Thank you for purchasing this Cellink dashcam battery made by Egen Inc.
This instruction manual contains information on how to operate your dashcam battery.
Before using the product, we recommend that you read through this manual to ensure correct usage.
To improve the performance of the product, the contents of this manual are subject to change without prior notice.
The CELLINK NEO80+S Battery is designed to power your dashcam in Parking Mode for extended periods of time without using your vehicle’s battery.
For user safety and to avoid property damage, read through this manual and follow these safety instructions to use the product correctly.
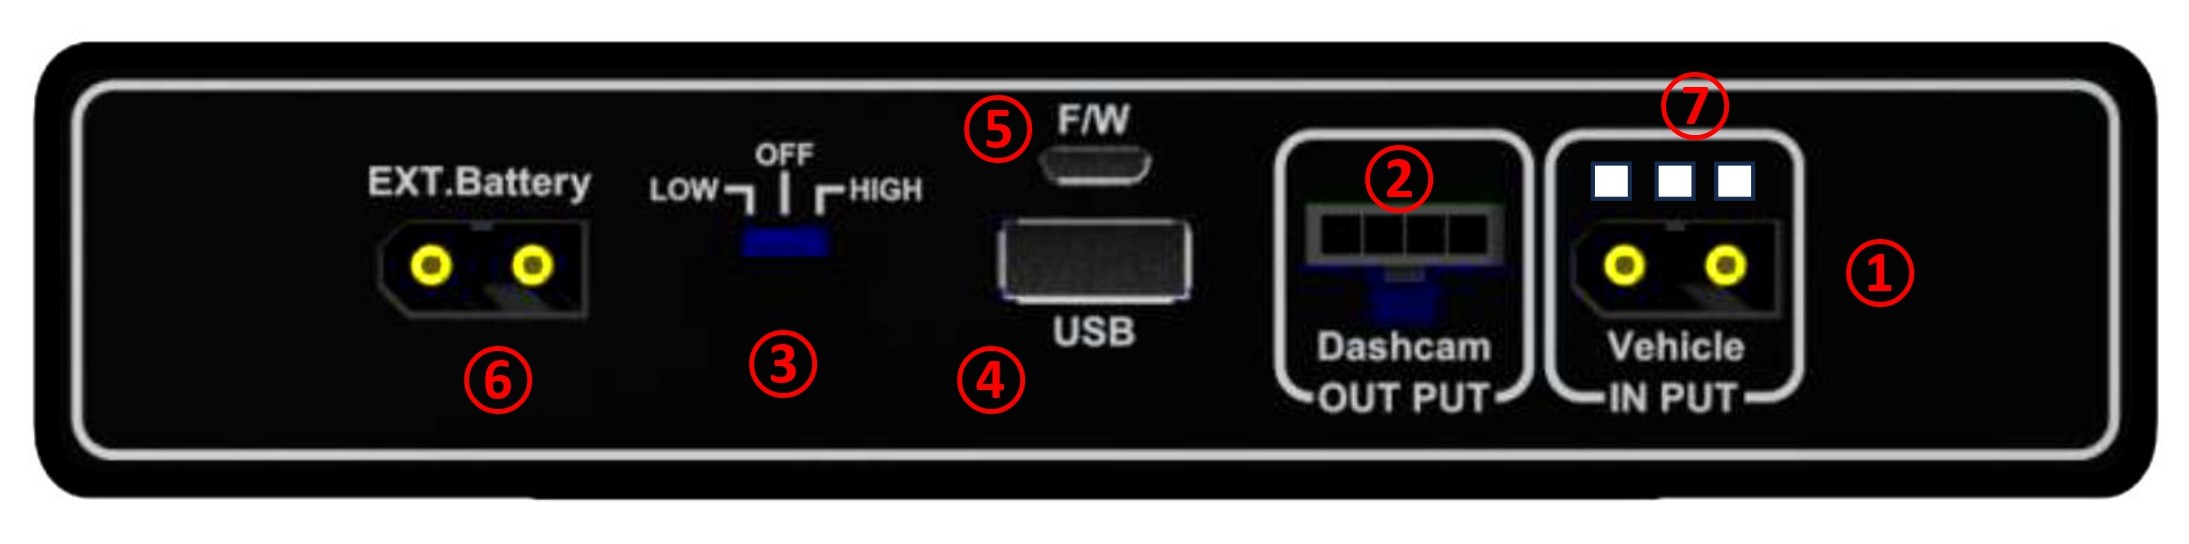
● 1. INPUT : The charging connector for connecting to the Cigar lighter socket and ACC Power contact in Fuse box.
● 2. OUTPUT : The discharging connector for connecting to the dashcam.
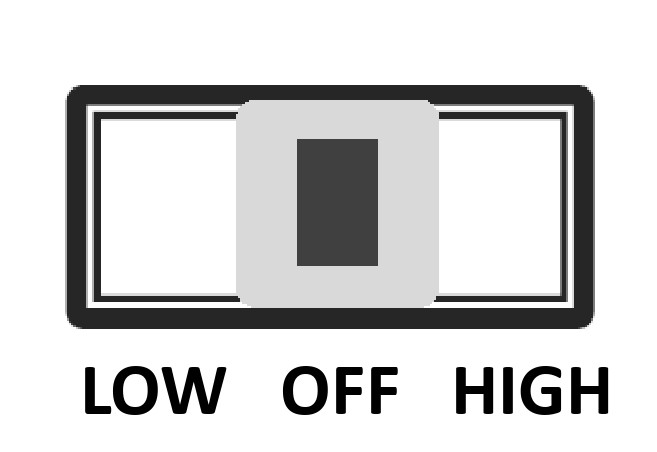
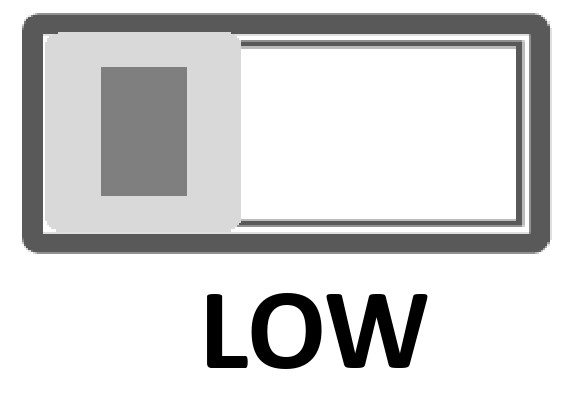
● 3. LOW/OFF/HiGH : The switch for adjusting the charge current.
▷LOW : System power on. Charging current is fixed at minimum or low charging mode. You cannot change the current setting using the app.
▷OFF : System power off.
▷HIGH : It makes be possible to charge by only Maximum charge current of the product and not possible to control the charge current with App
● 4. USB : The 5V output connector for charging a mobile product as a Smart phone.
● 5. F/W : The connector for firmware up-date only(Technician Use Only)
● 6. EXT.Battery : Connector for connecting to an extra battery such as CELLINK NEO EXT to add the capacity.
● 7. LED Display : Red - charging | Green - Fully charged | Blue - Bluetooth connected | When the switch is turned on, 3 LEDs are flashing for a while.
|
LED Display -R : Red -G : Green -B : Blue |
|
Powered on | R,G and B LEDs are turned on simultaneously and then turned off in the R,G and B order. |
|
|
Pre-charging (after powered on) Charging |
Red LED is on after several times flashed | |
|
|
Fully charged | Green LED is on | |
|
|
Bluetooth on | Blue LED is on after several times flashed. |
Bluetooth is built in, so the user can check the battery status in real time, including the time available and estimated charging time through the smartphone APP.
If the battery switch is set to LOW, the charging current is 5A and set to HIGH, the charging current is 7.5A.
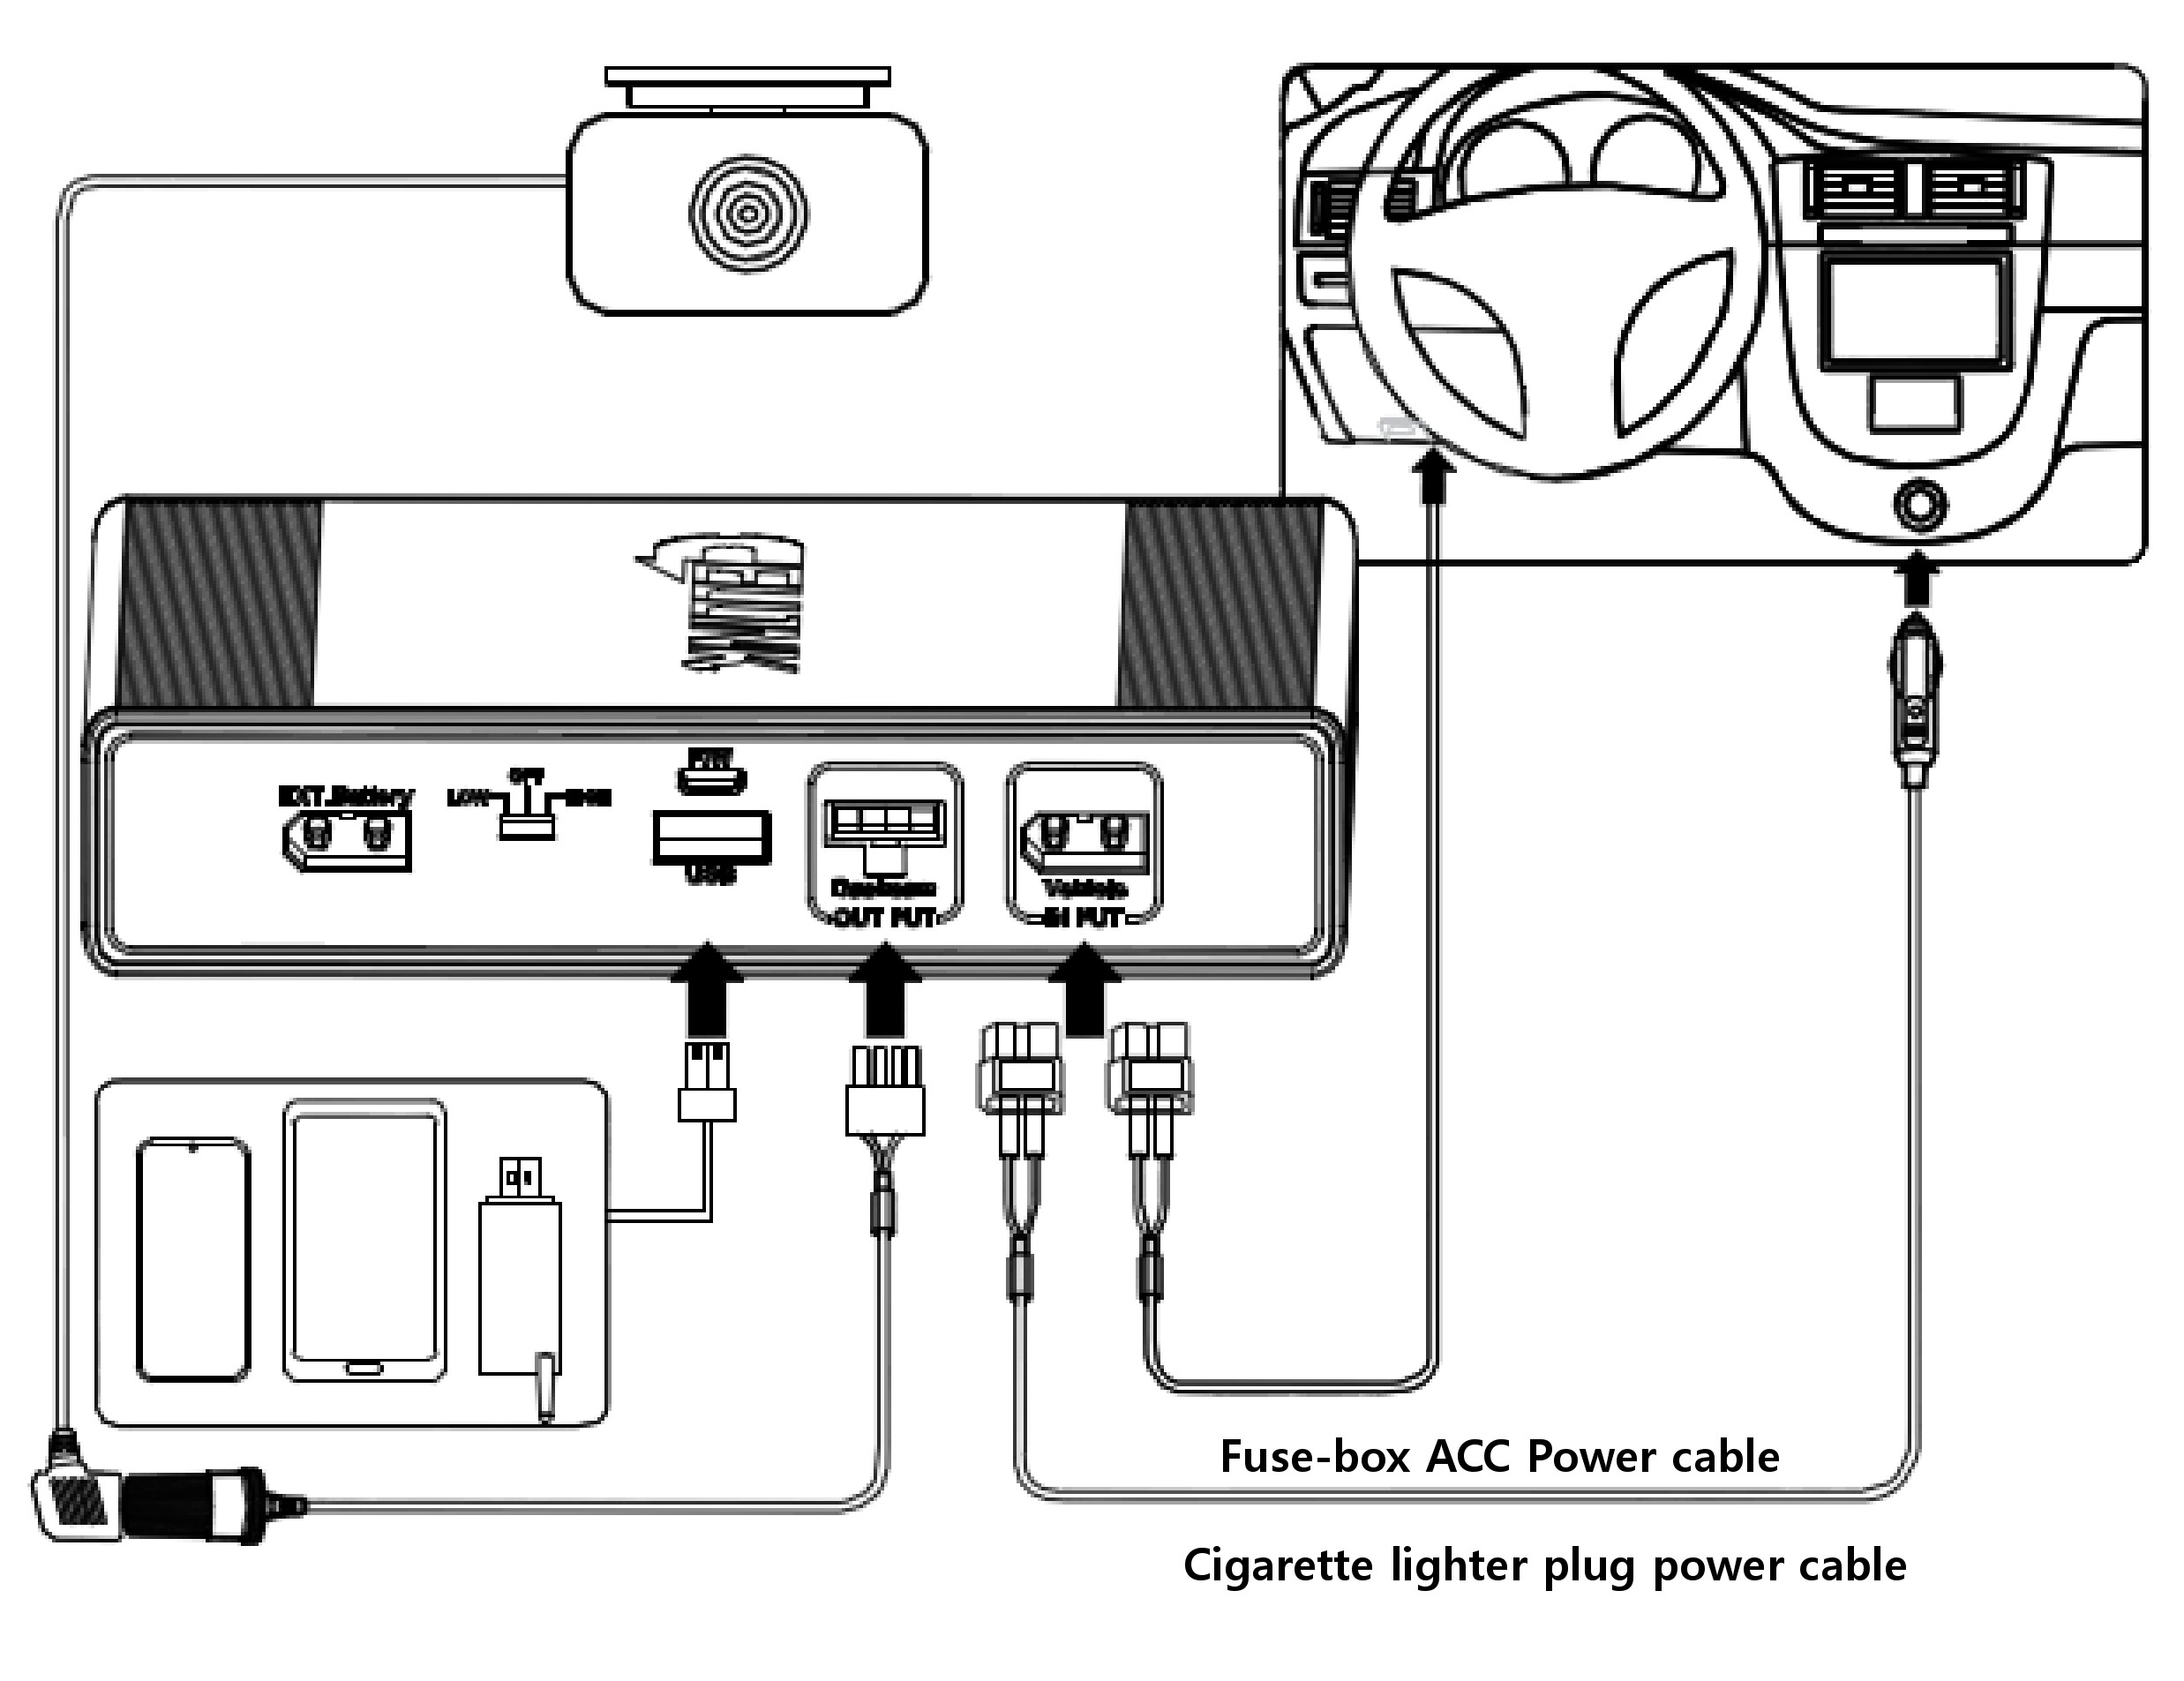
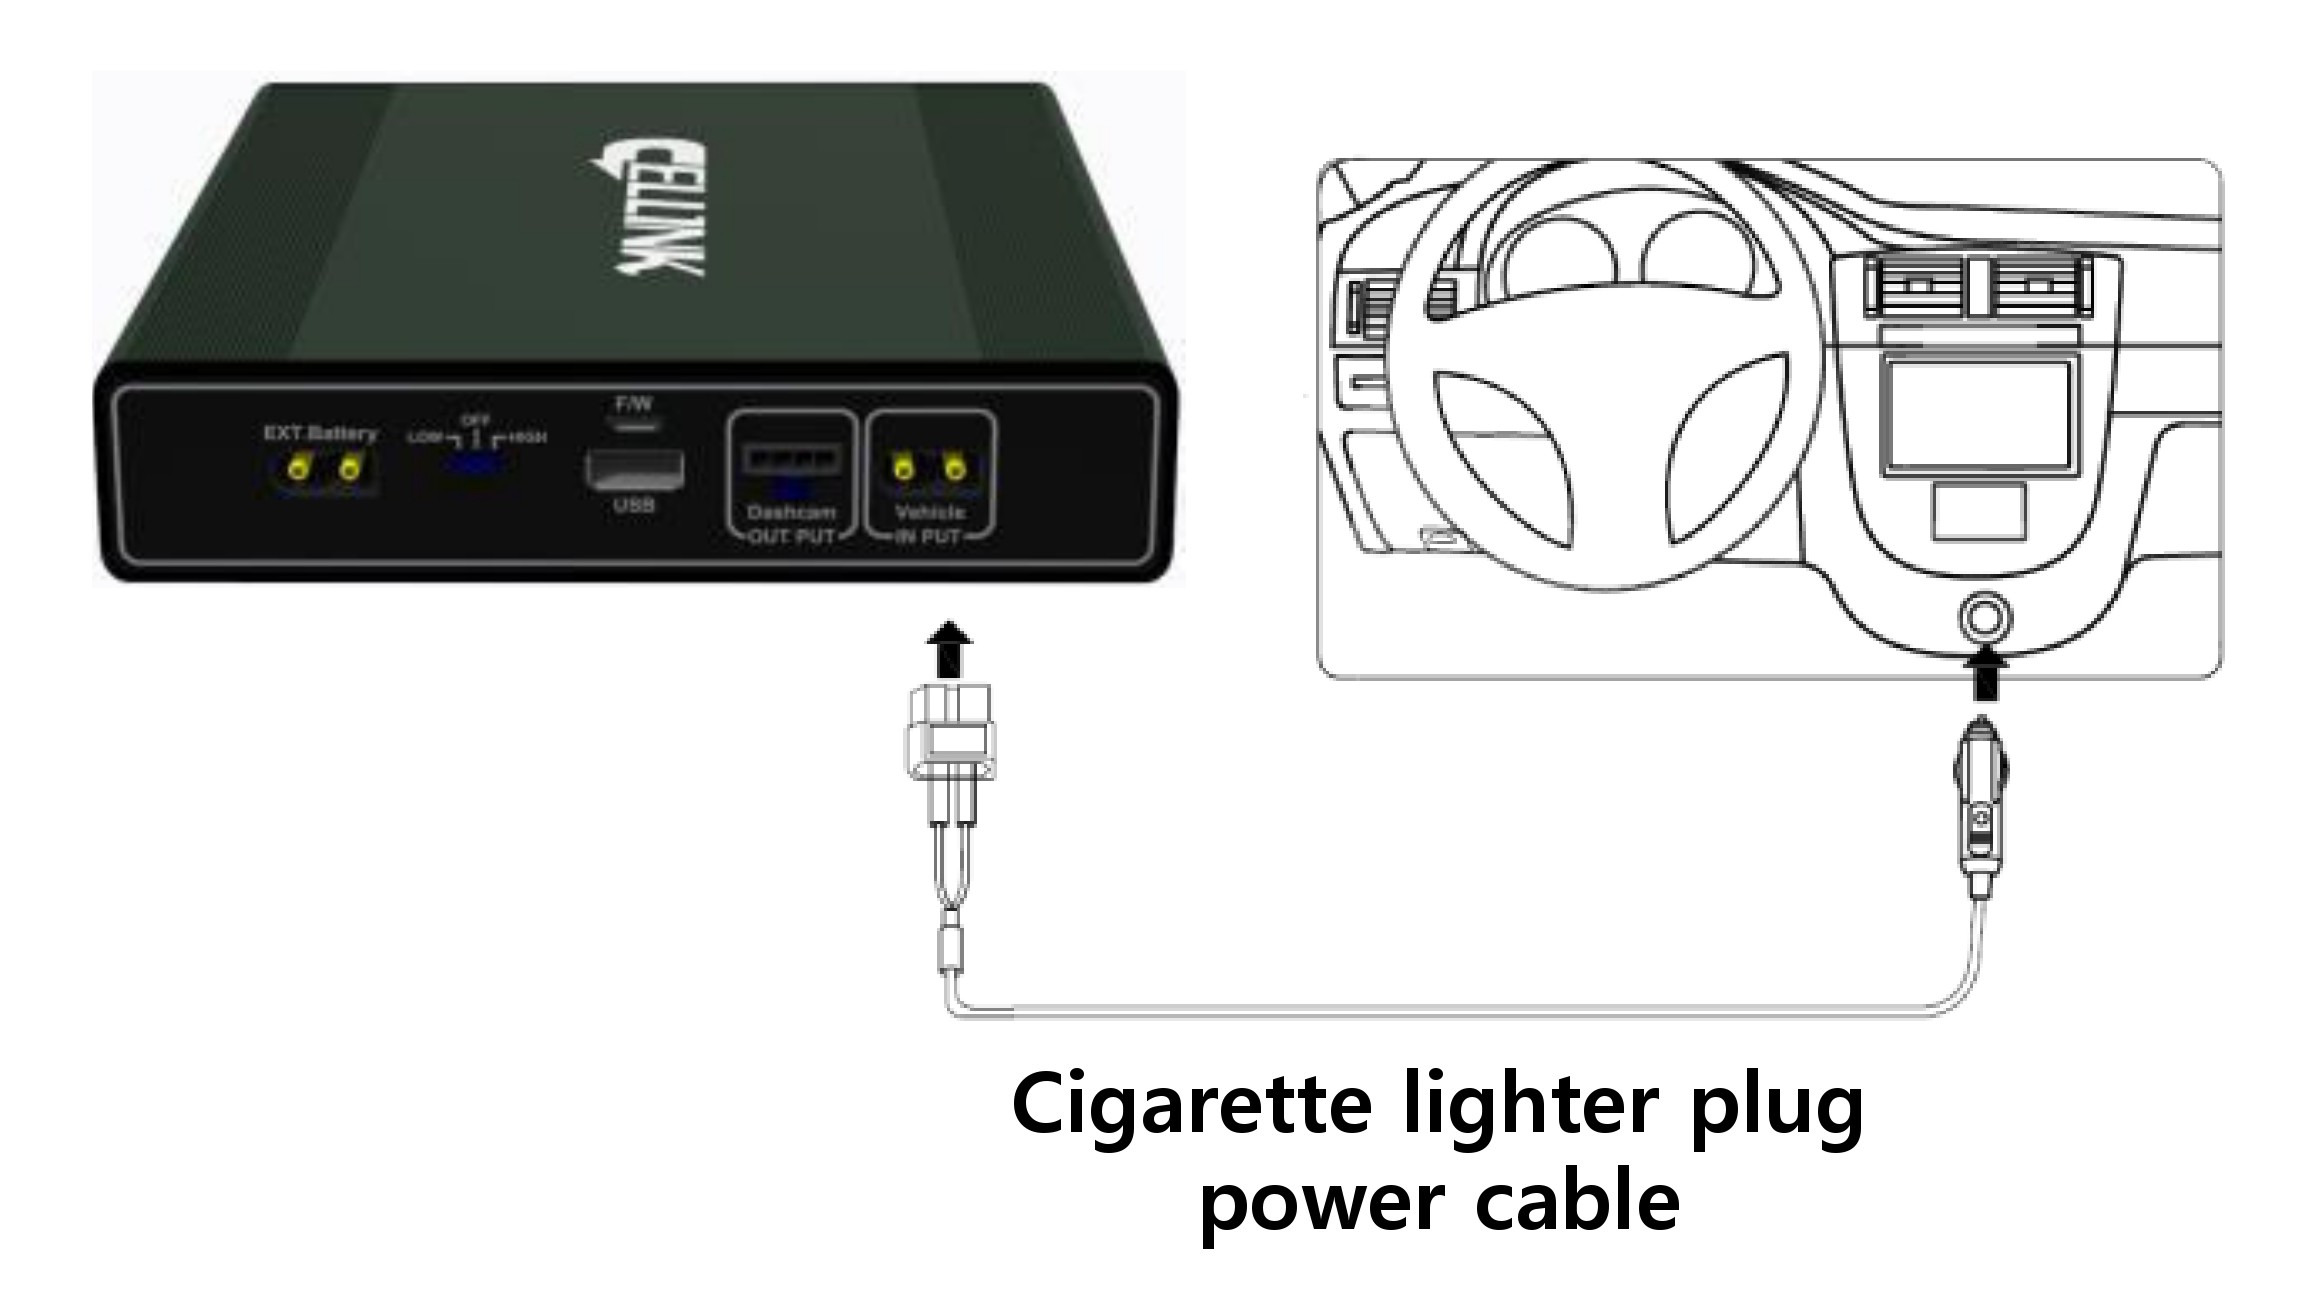
CELLINK NEO8+ S offers the 2 types charging methods such as the vehicle’s cigar-lighter plug and fuse-box ACC power connection.
The battery charging starts as soon as the vehicle’s engine starts. When the input power supplies
the output power directly and charge the battery at the same time.
For better battery safety, a constant current with constant. voltage charging circuit and a secondary protection circuit is built-in.
A micro controller (MCU) is built in to control the current, voltage and voltage balance of the battery, and the battery protection circuit module is built-in for secondary protection to prevent the over-charge, over-discharge and over-current.
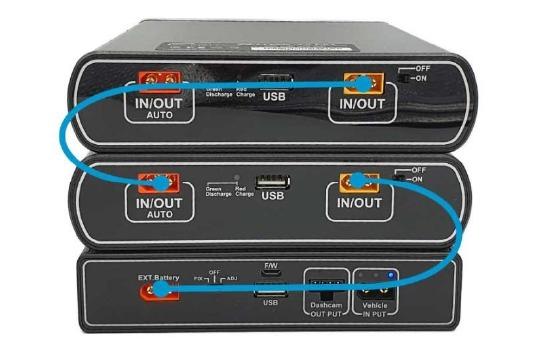
If you need more capacity, add the CELLINK NEO EXT battery to increase the capacity by connecting only the cables provided with the CELLINK NEO EXT.
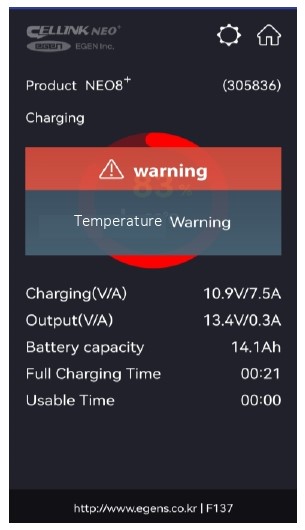
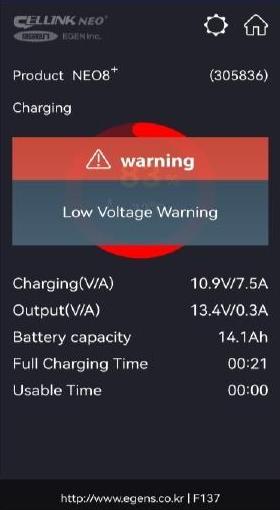
The APP will put up a warning screen when the internal temperature of the battery exceeds 70°C. The battery will automatically stop charging to prevent from problems such as overheating, and when the internal temperature of the battery drops to 60°C it will begins charging. Even if charging is stopped, the output remains normal.
The battery will be automatically cut off the current when the reverse voltage input or external short-circuit of the product’s connectors occur.
The cycle life is improved more three times than the general Li-ion battery because of The lithium- phosphate iron (LiFePO4) battery is used, and we guarantee at least 1,500 cycles.
Compact design makes possible to install in confined spaces such as below the vehicle seat.
| Input Power | ▷ When connected to the Cigar Lighter Socket | DC12~17V | Max. 6A | ||
| ▷ When connected to the Fuse Box ACC power | DC12~17V | Max. 13A | |||
| Output Power | ▷ Dashcam connector | DC 11.0V ~ 14.2V | Max 2A | ||
| ▷ USB connector | DC 5V | Max 2A | |||
| Charging Voltage & Current | LOW | ▷ When connected to Cigar Lighter Socket | DC 14.5V | Max 5A | |
| HIGH | ▷ When connected to Fuse Box ACC power | DC 14.5V | Max 7.5A | ||
|
Charging Time LOW - Min. Current HIGH - Max. Current |
LOW | ▷ 5A charging | Approximately 100 minutes | ||
| HIGH | ▷ 7.5A charging | Approximately 60 minutes | |||
| SWITCH STATUS | LEFT (LOW) | CENTRE (OFF) | RIGHT (HIGH) # | |
|
|
|
|
||
| # Select the charging current with only Min or Max | ||||
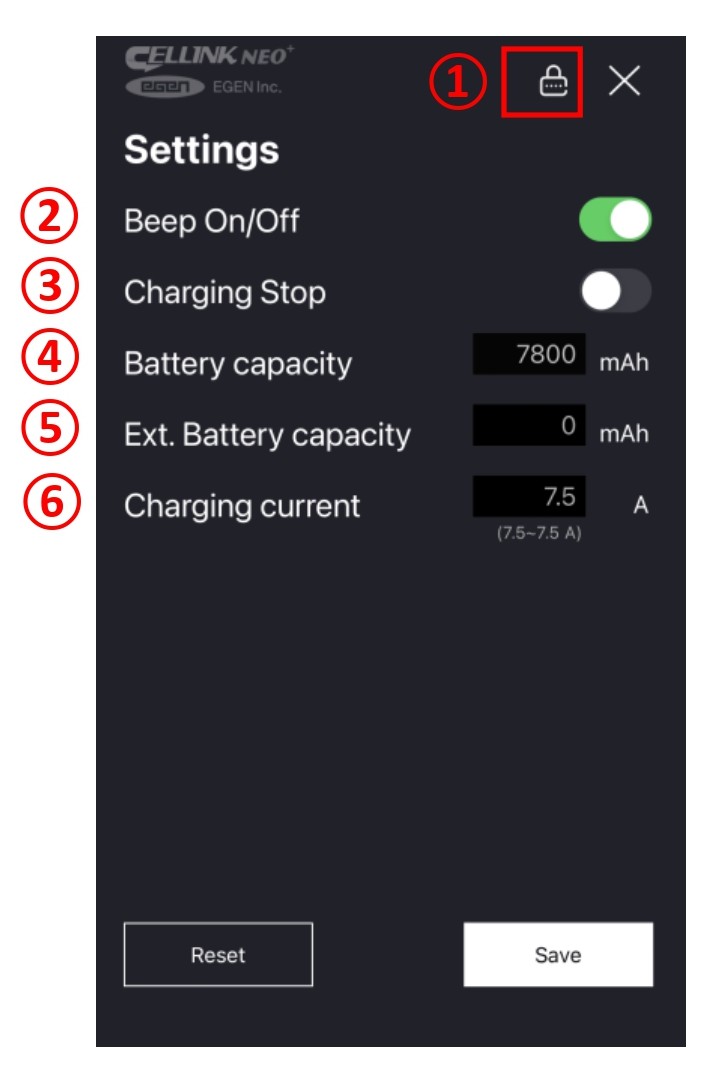
| Product Rating | 12.8V | 7,800mAh | 99.84Wh | |||
| Power Duration | About 33 hours* | |||
| *using 2-channel dashcam with average 3Wh power consumption | ||||
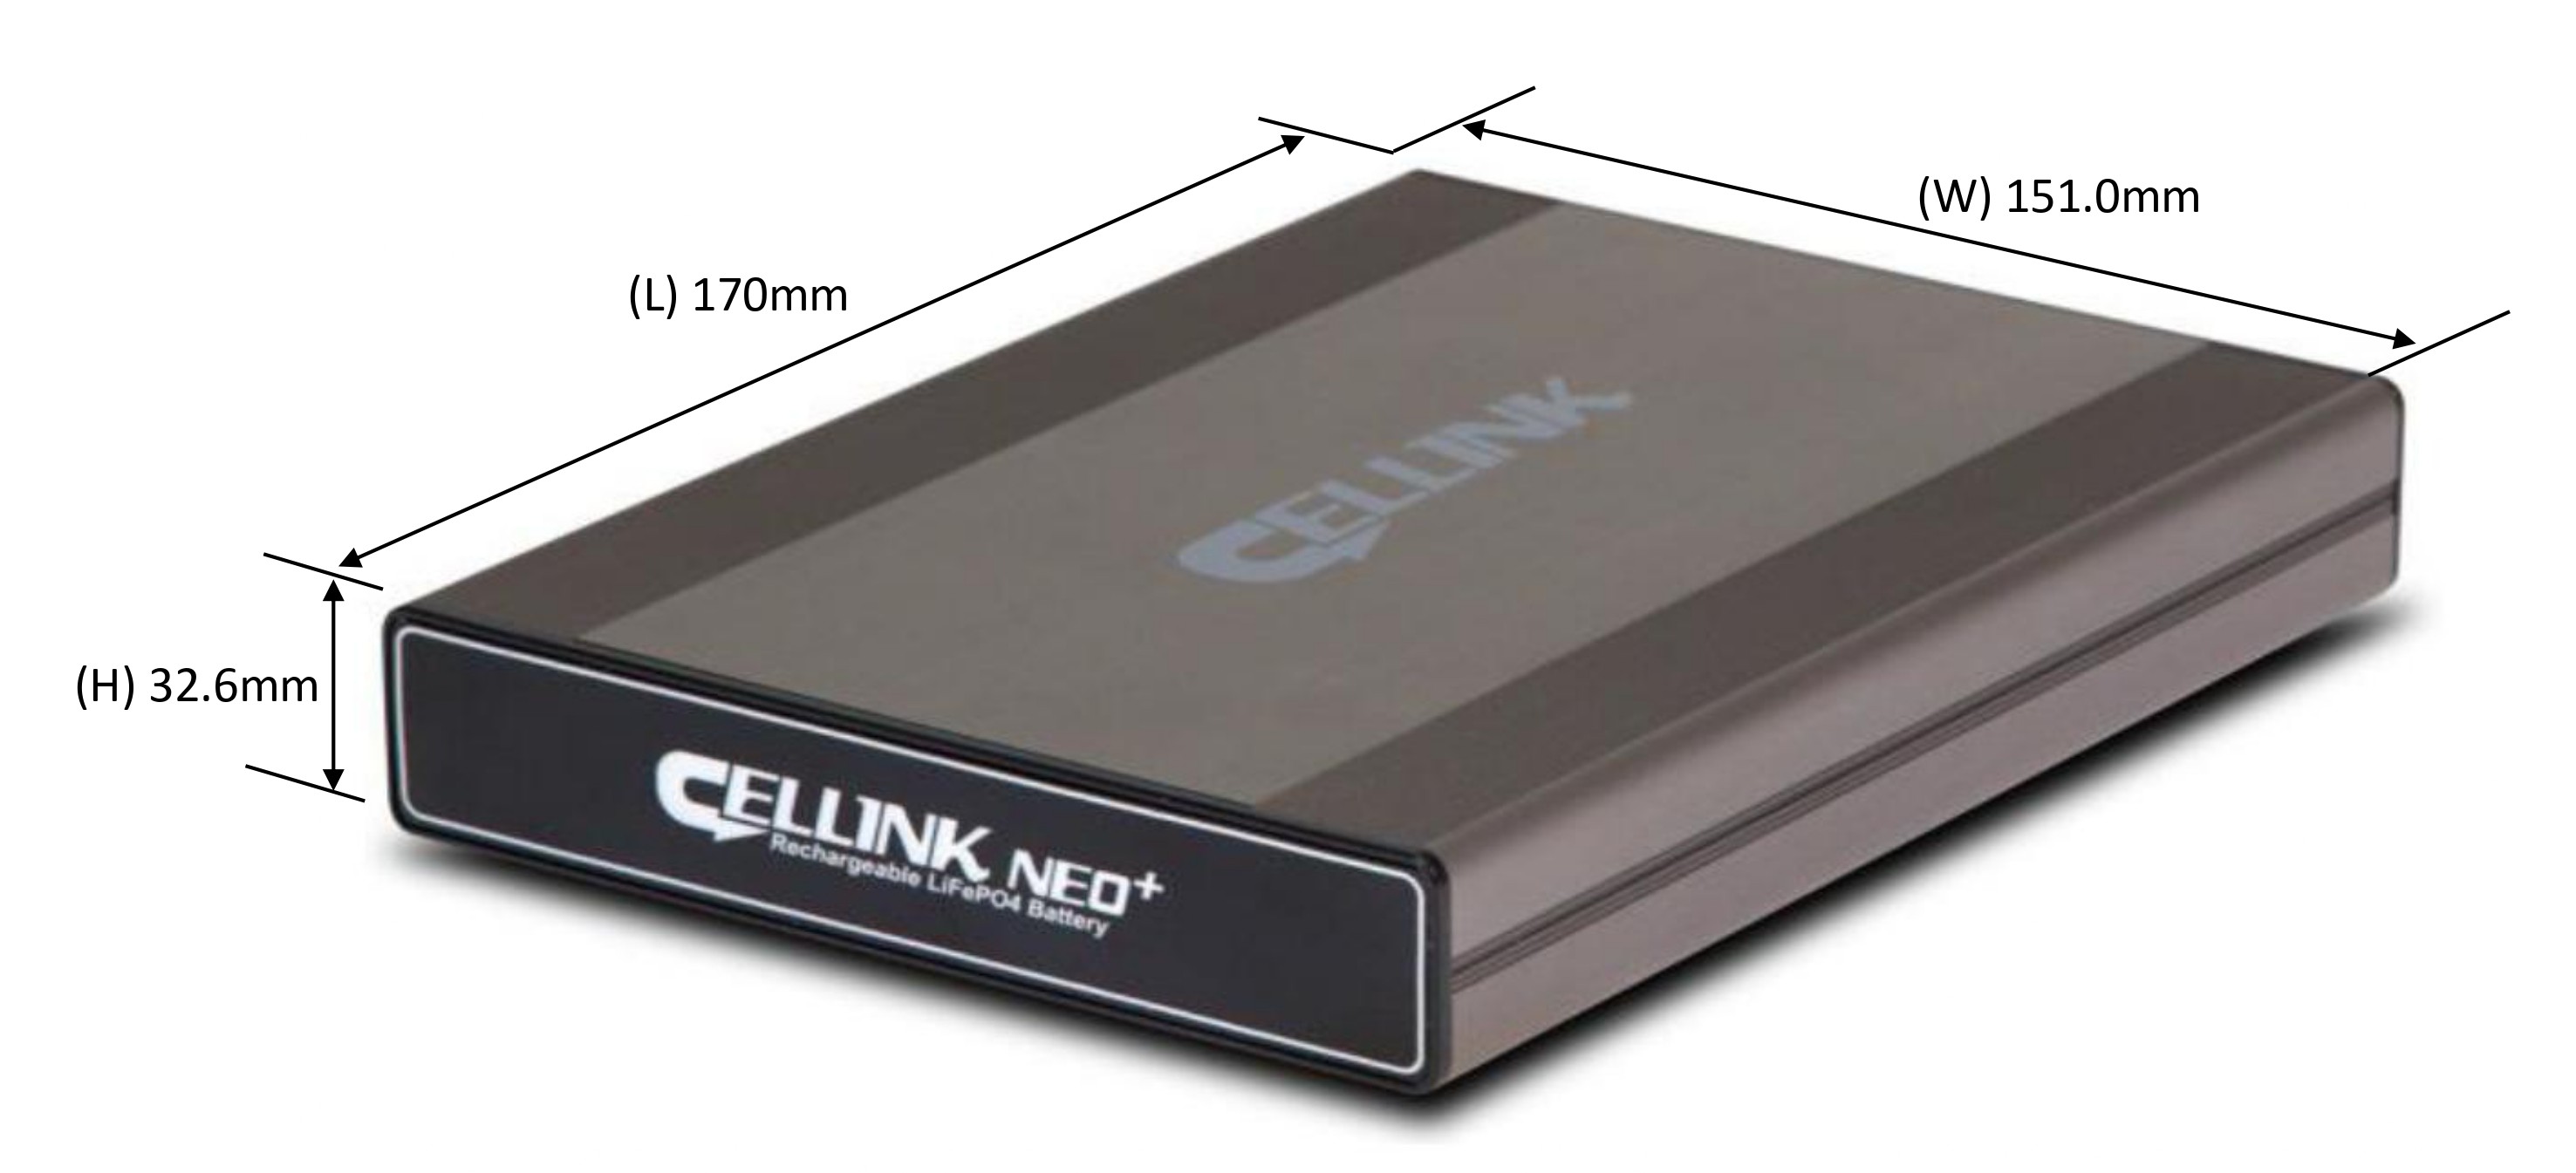
| Dimension | 151(W) x 170(L) x 32.6 (H) - Approx. 1.25kg | |||
| Battery Type | Lithium Iron Phosphate (LifePO4) | |||
※ Please set to the power-off before installation.
1. When connecting the product using the cigar lighter socket Input cable.

1. When connecting the product using the Fuse-box ACC Input cable.
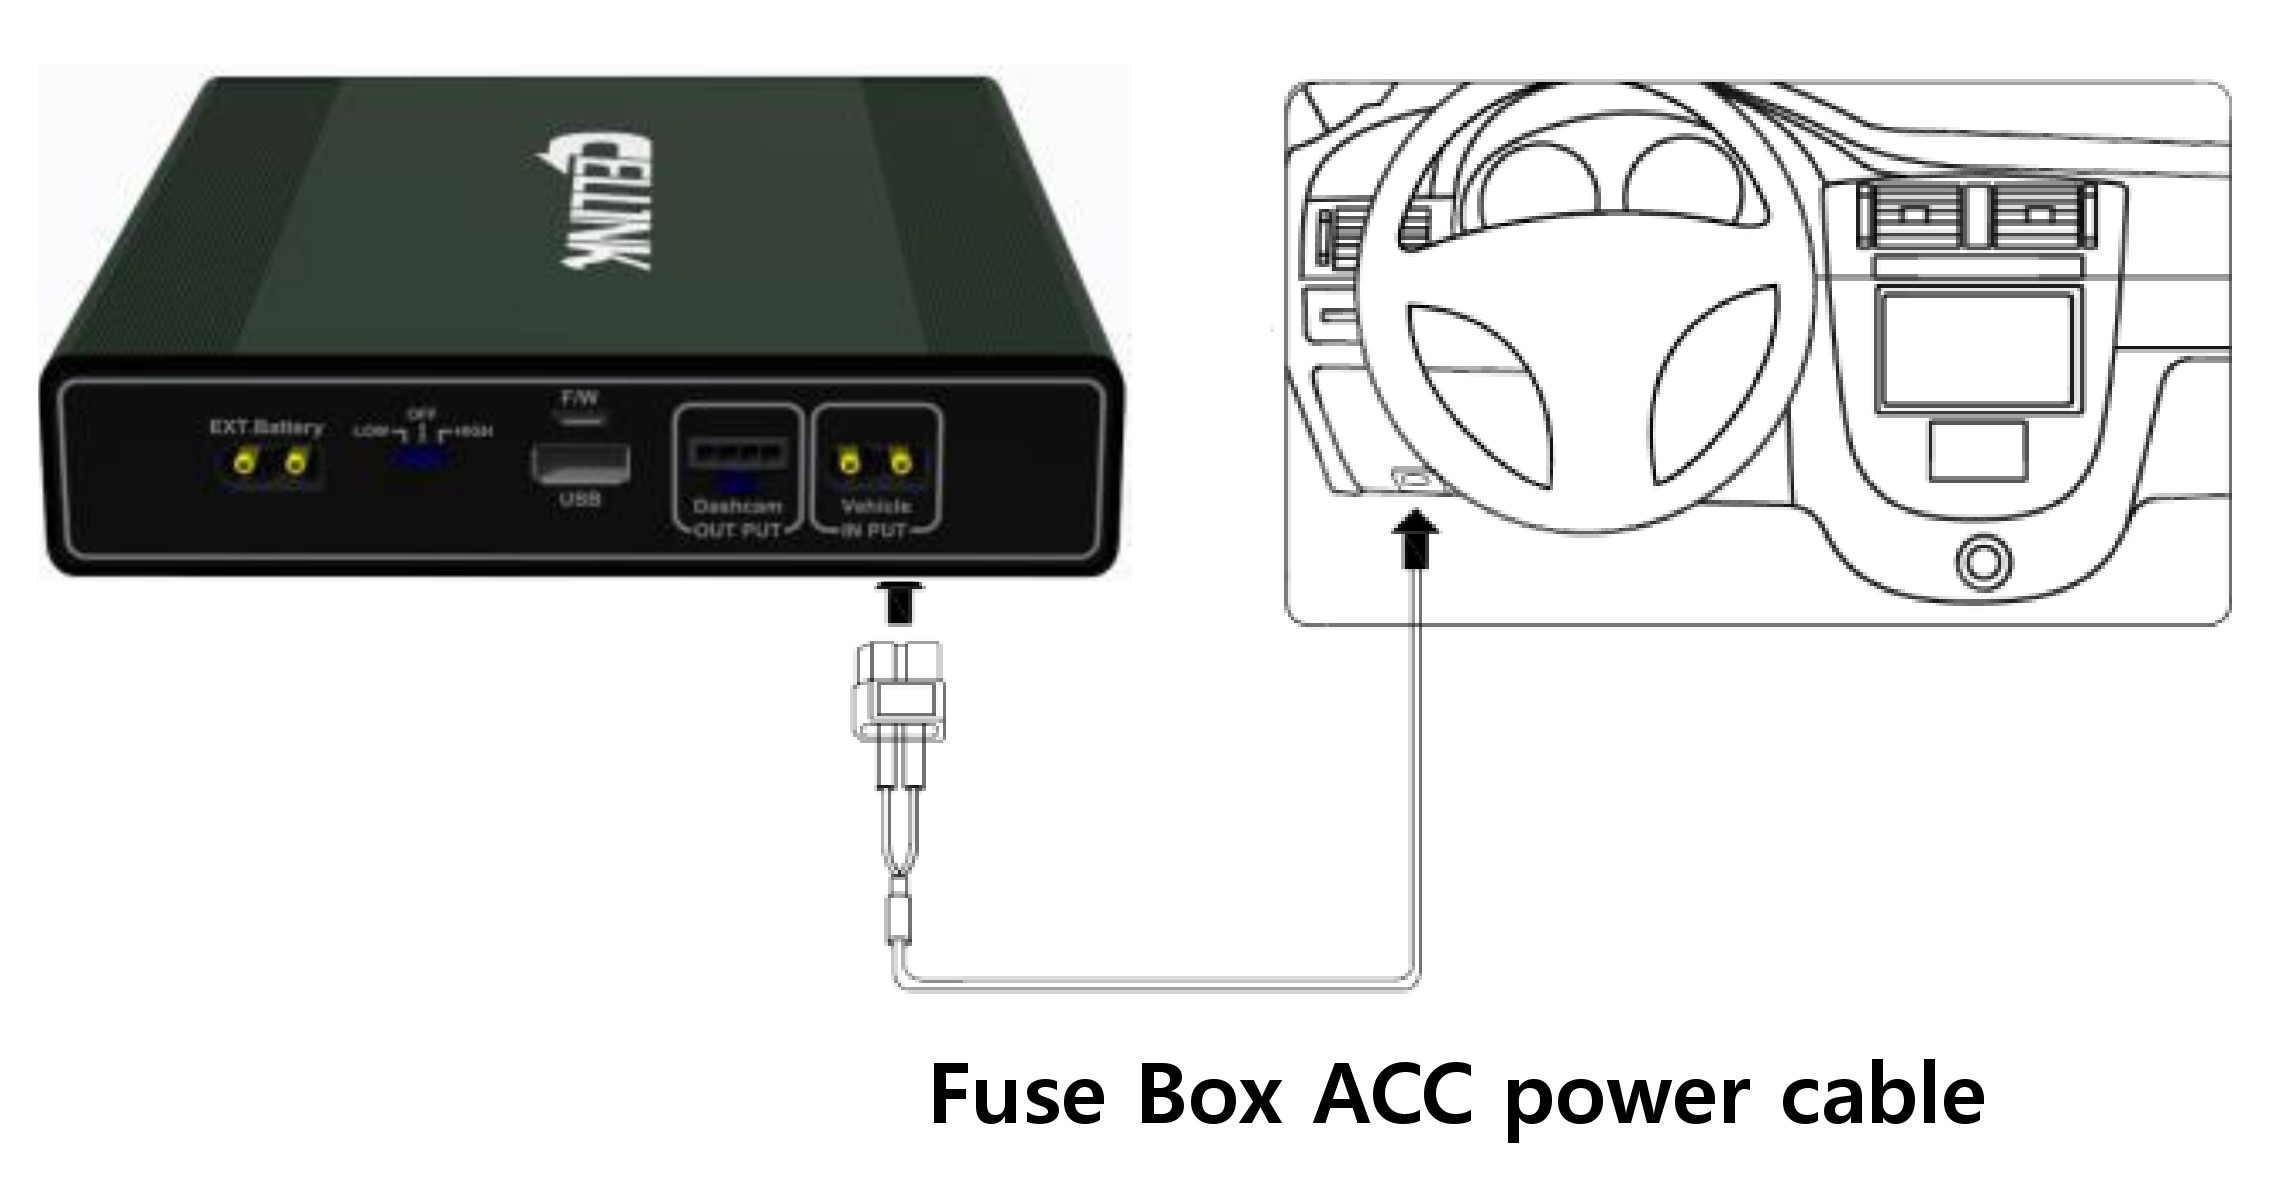
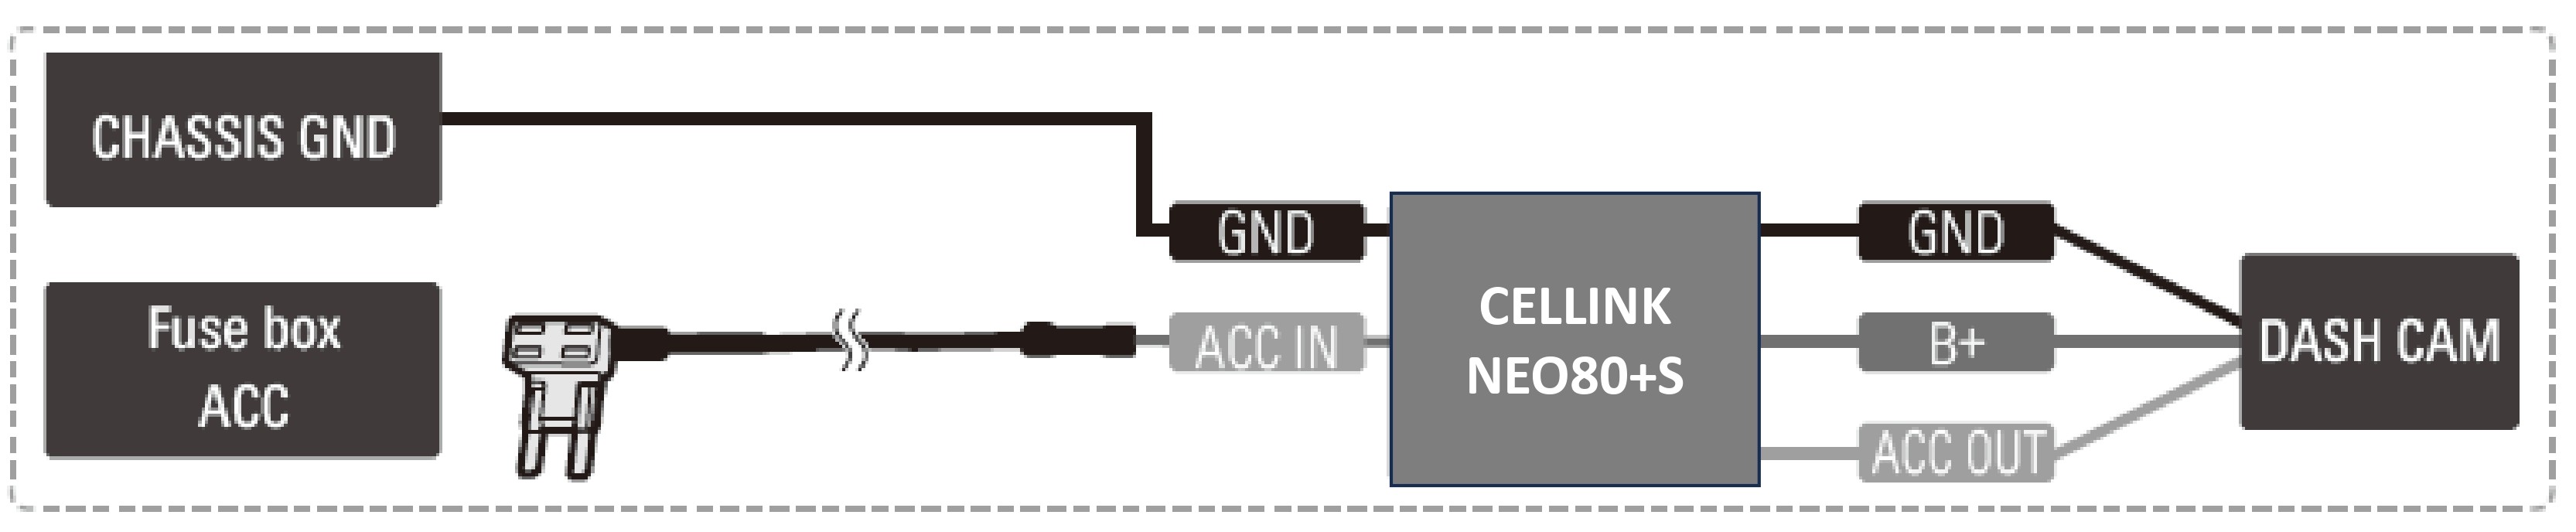
1) With the product’s power switch in the OFF position, connect:
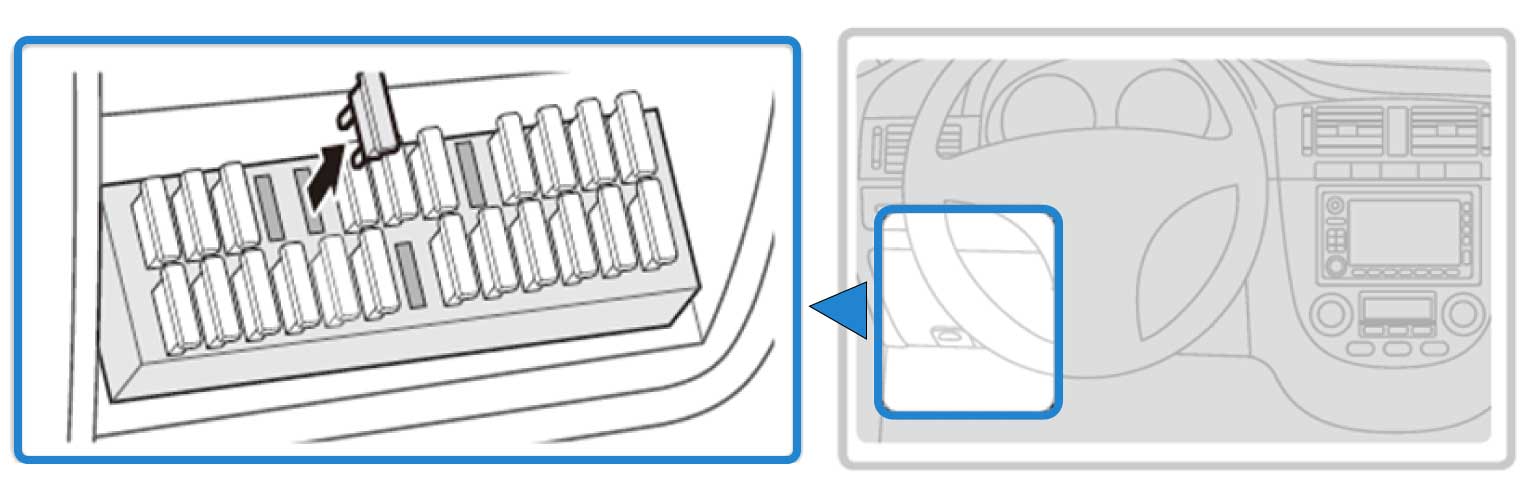
2) Open your vehicle’s fuse box, check the fuse type, and select the correct fuse tap to match.
The fuse box location in the vehicle may vary depending on the manufacturer and model of your vehicle. For more information, refer to your vehicle’s manual.
Inside the fuse box, there's two types of power available, permanent power (BATT) and ACC contact. Since our Cellink battery is charged only when the ACC is on, you must connect only to ACC contact. If you connect to BATT contact with permanent power, the car battery will be drained or cause some error on the dashboard.
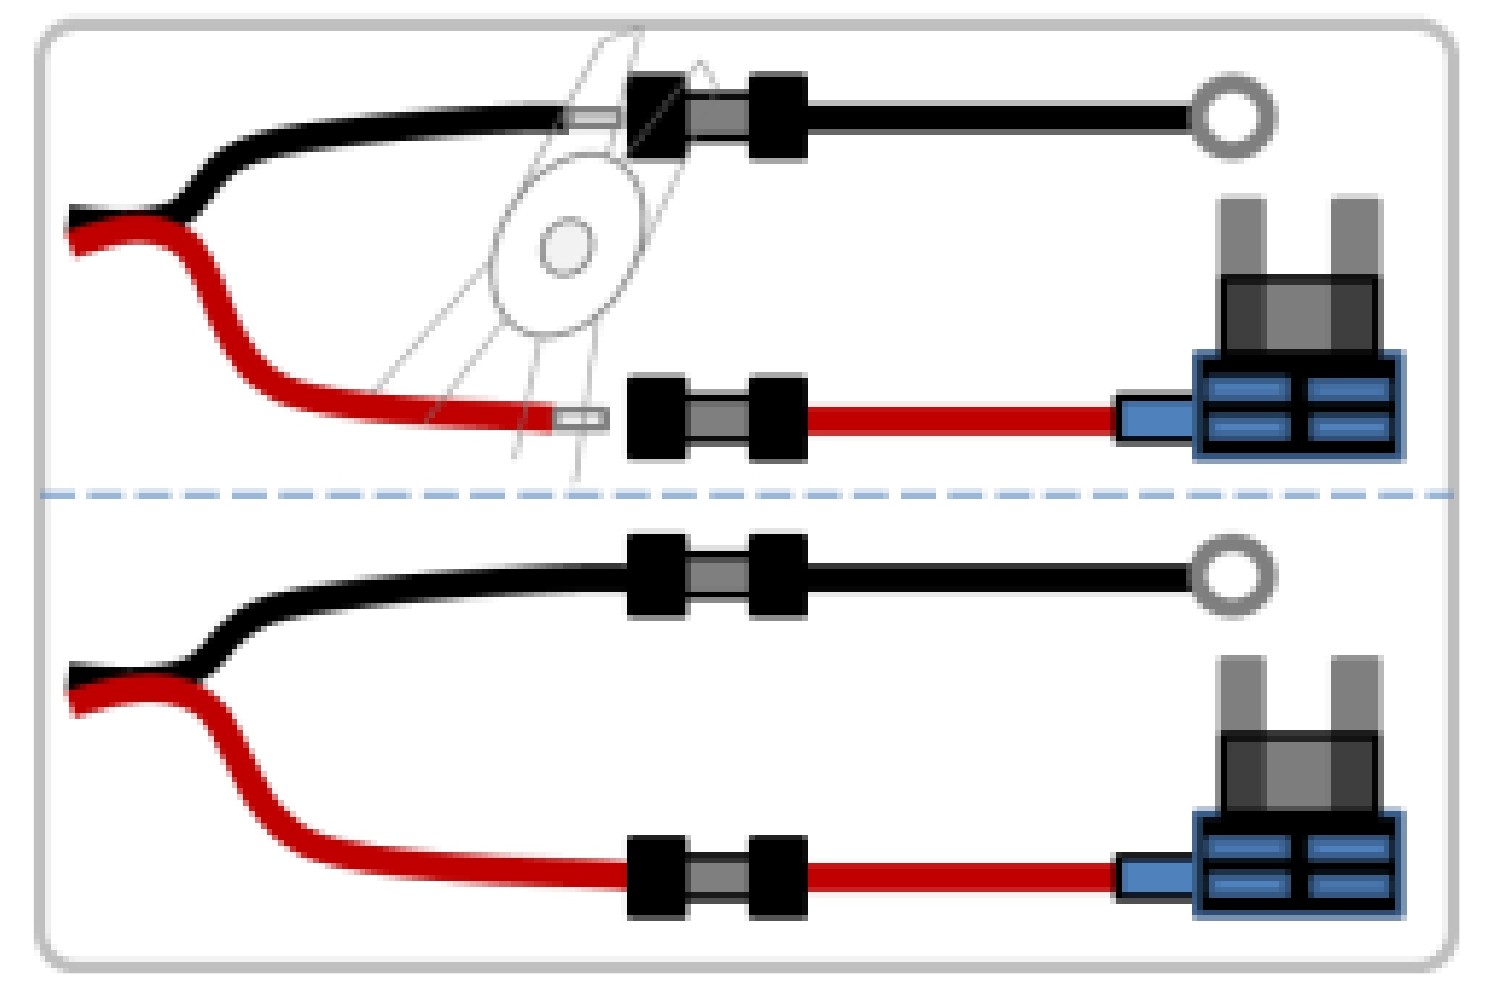
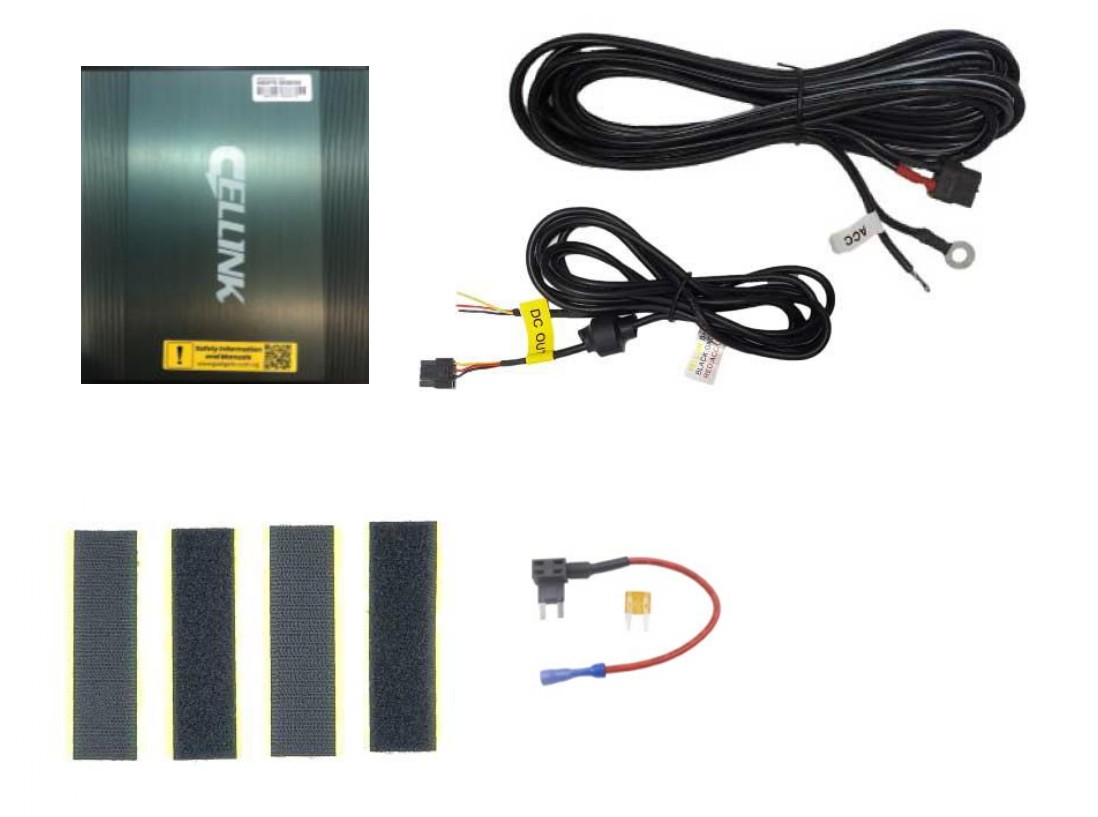
1) Insert the input cable into the sleeve at the end of the fuse holder cable, and then secure it by squeezing on the sleeve securely using appropriate tools, such as pliers.
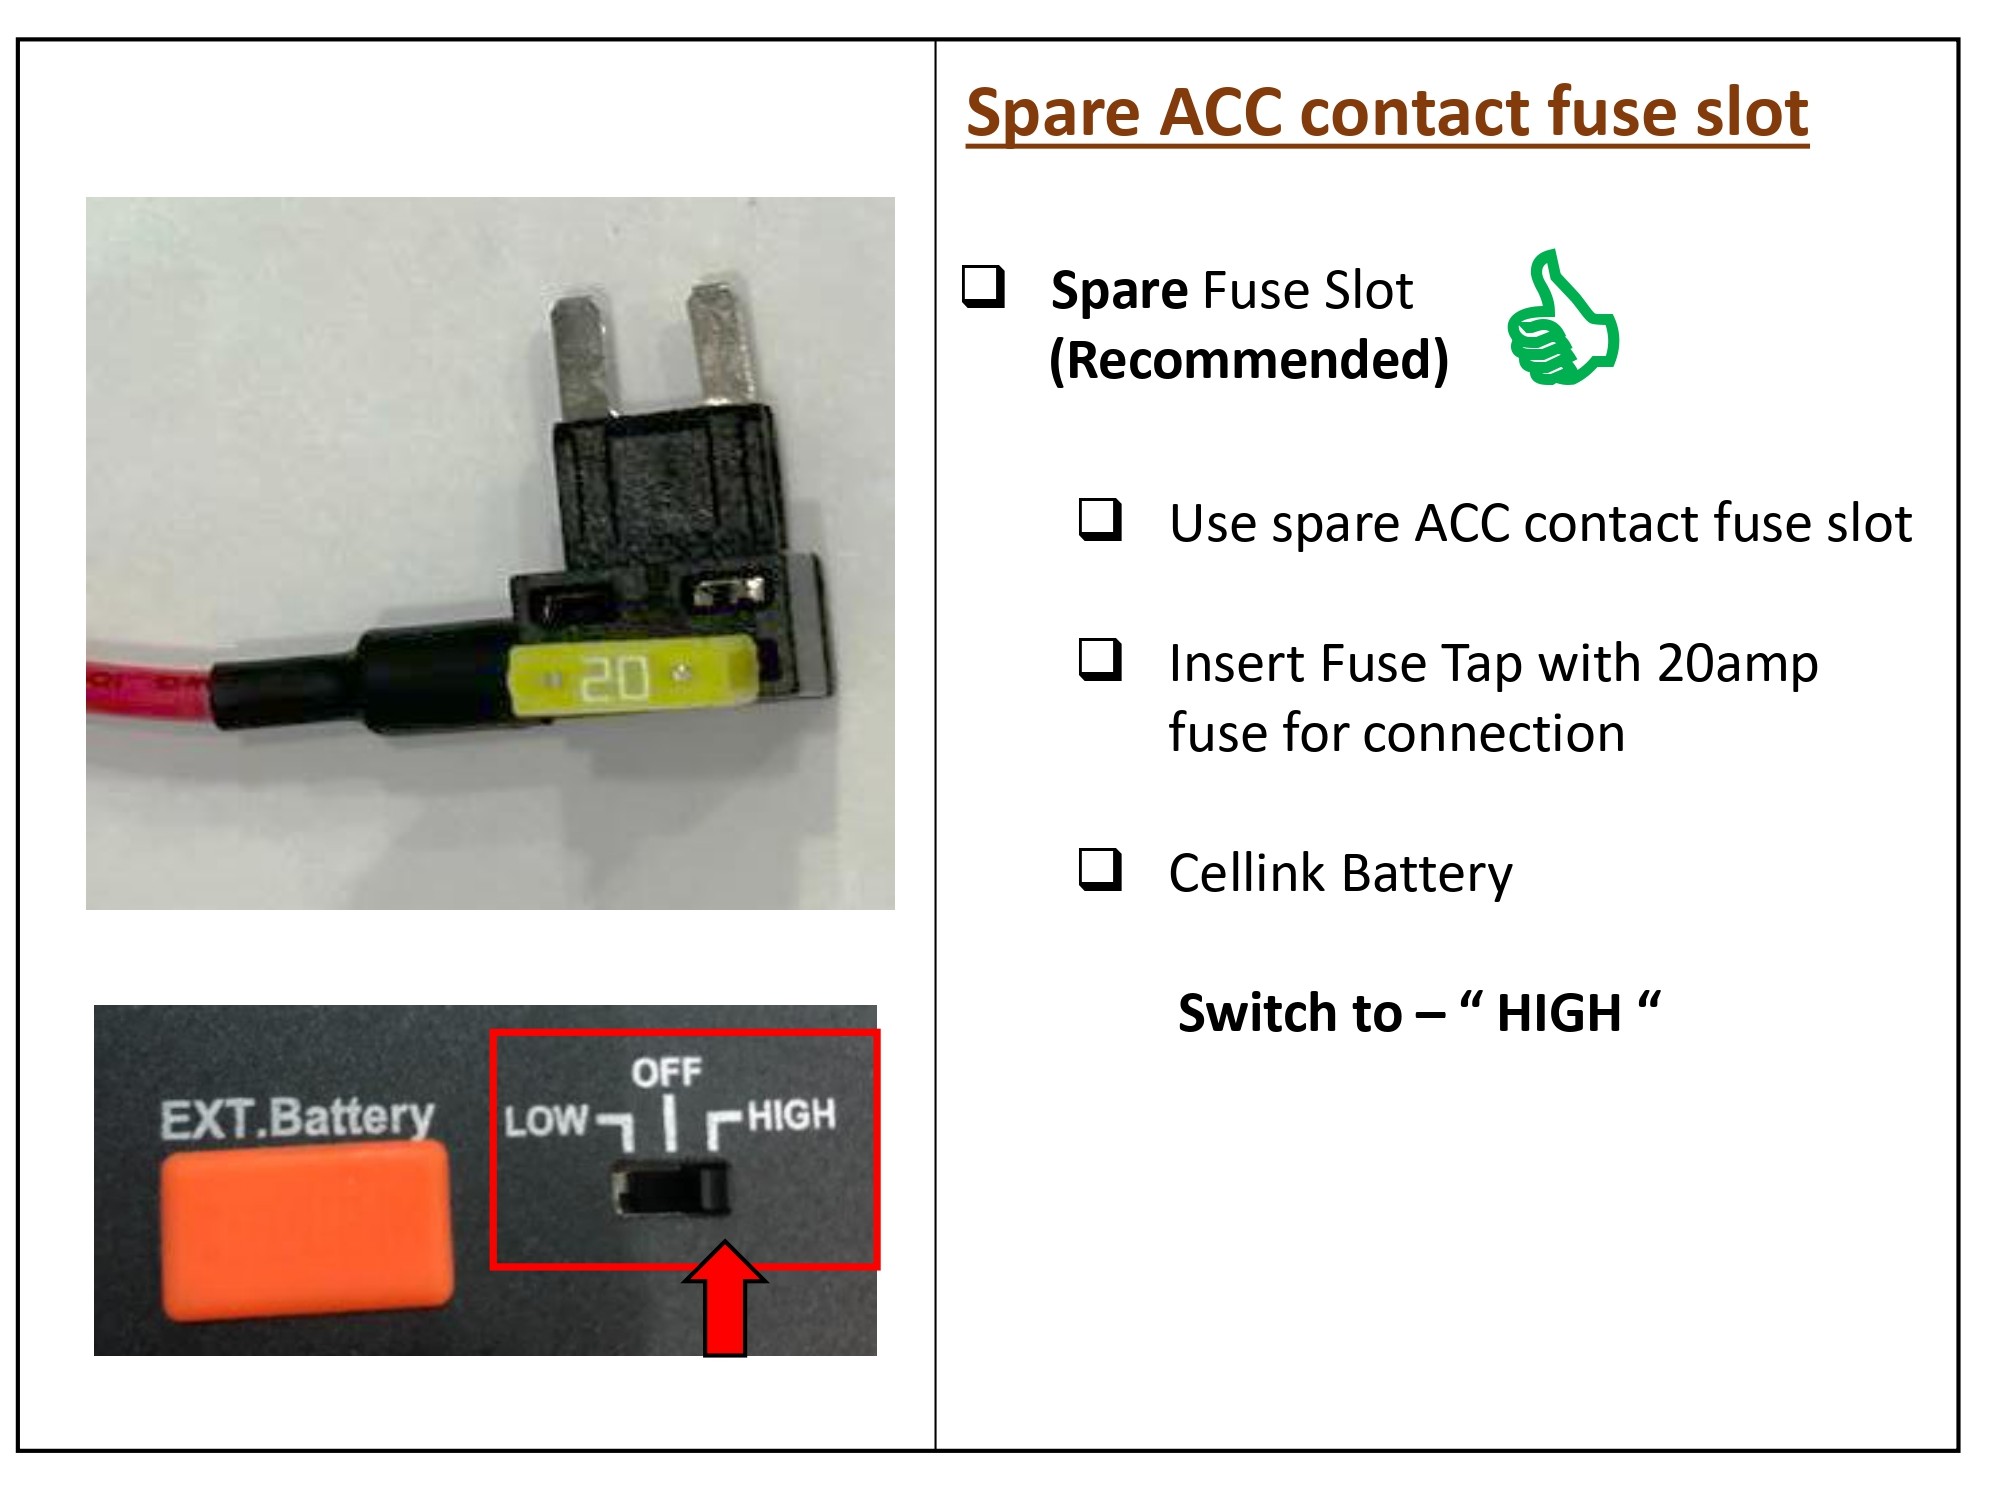
2) Preferably, look for spare ACC contact fuse socket in the fuse box and insert the fuse tap with the included 20A fuse.
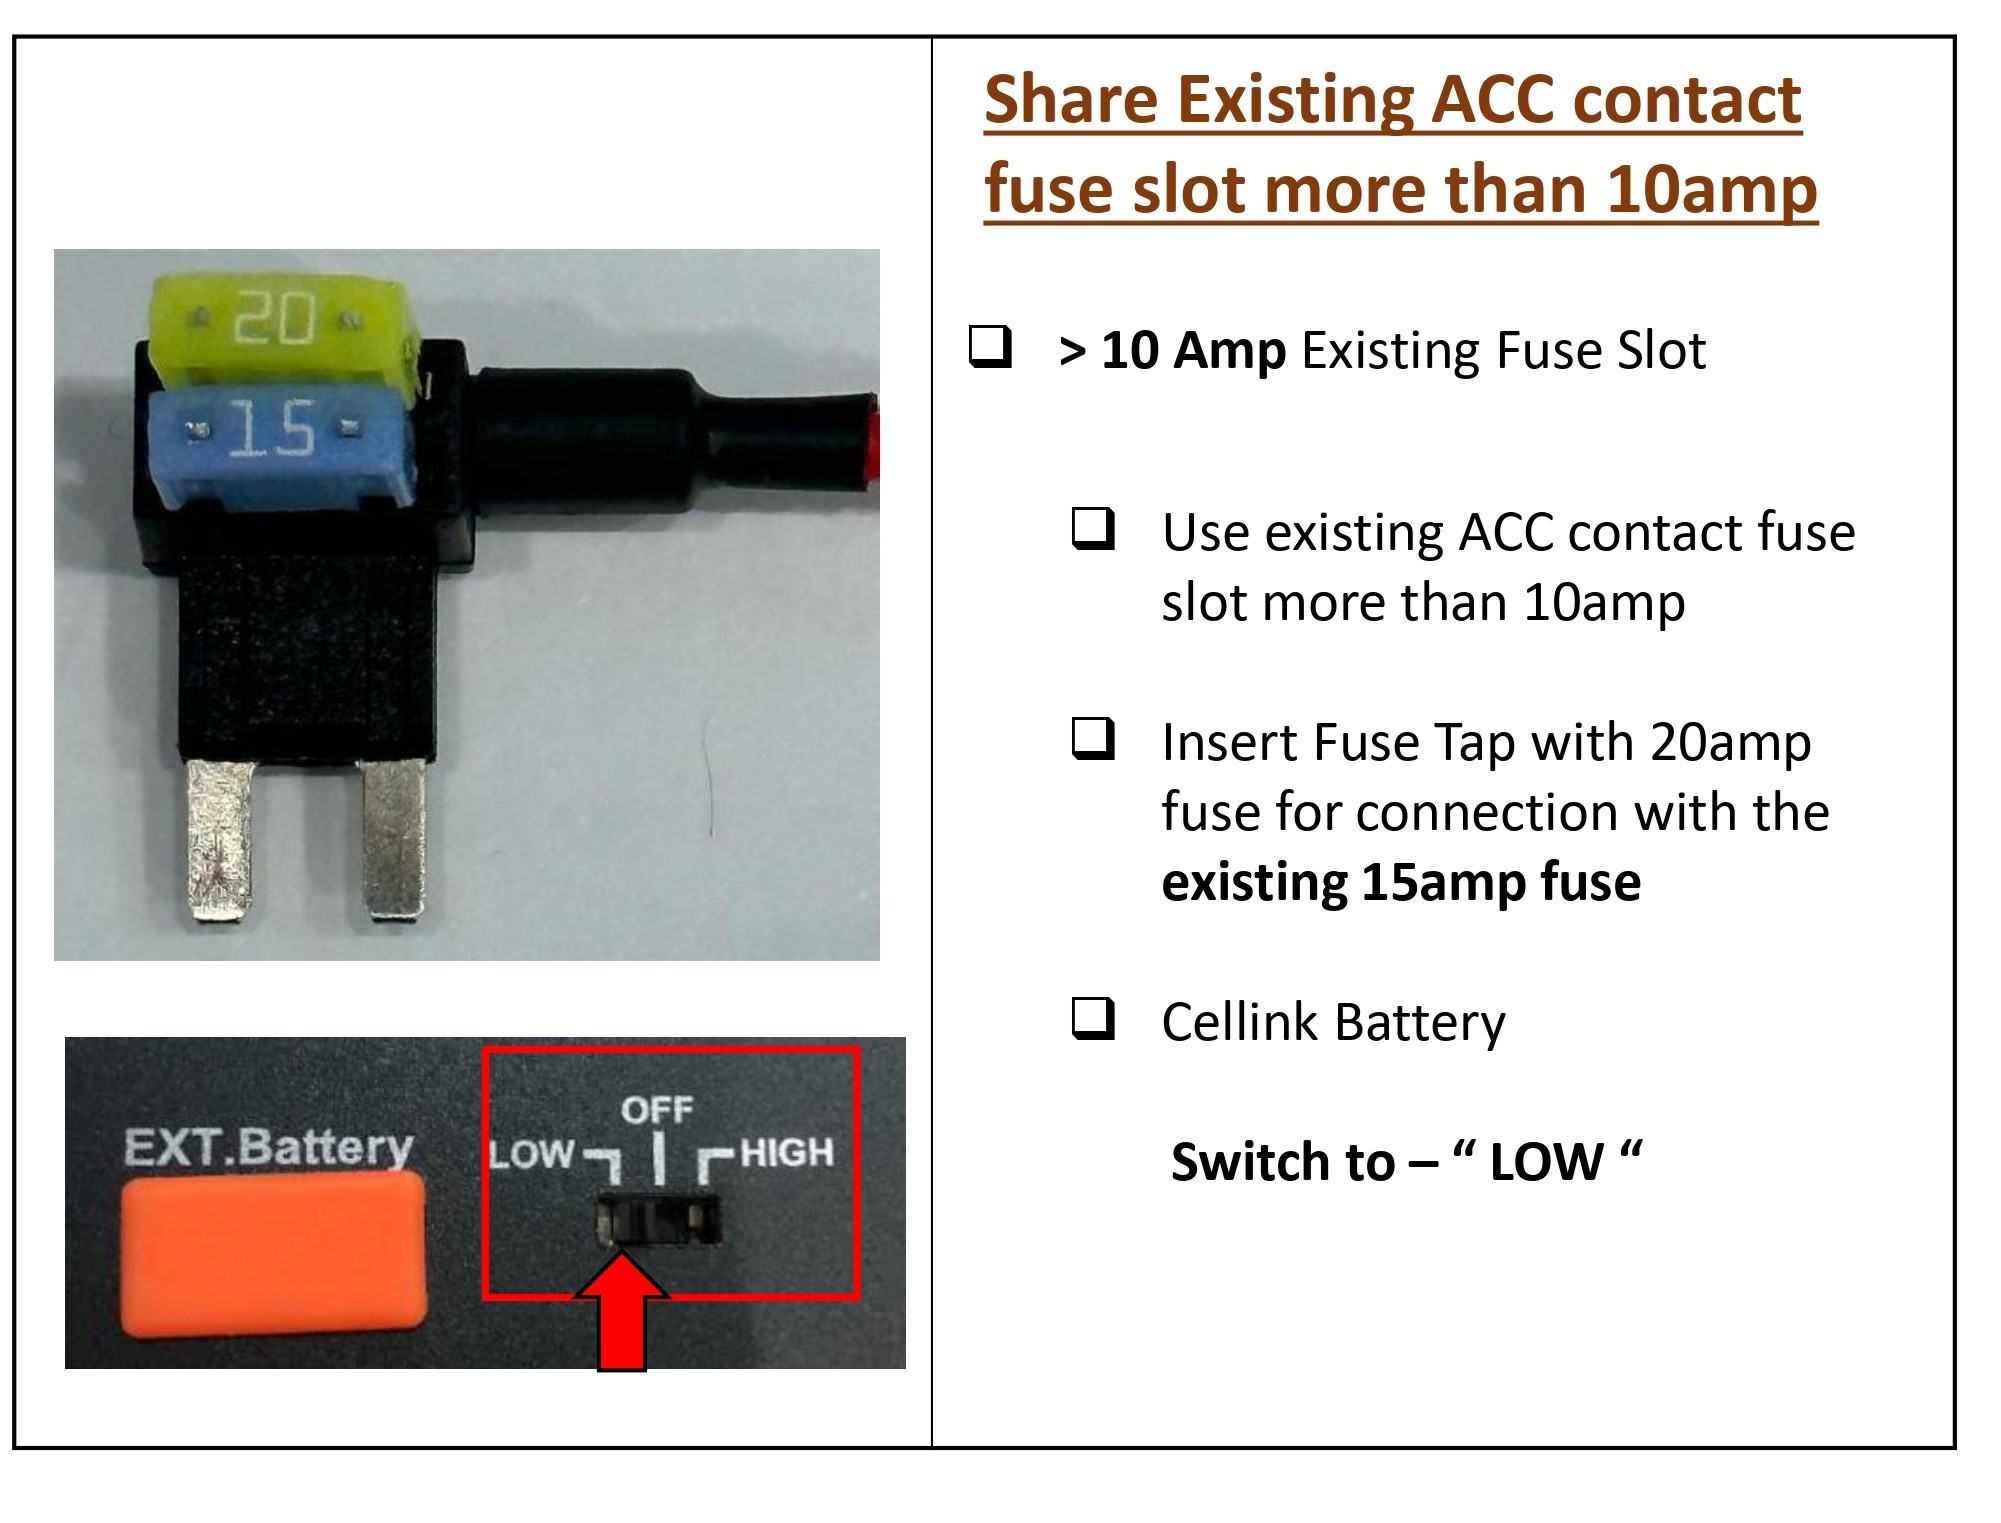
3) If you cannot find any spare ACC contact fuse socket, you can look for any existing fuse rated 10A or less with ACC contact. After removing the fuse from the socket, insert it to the fuse tap and plug the fuse tap cable back to the socket.
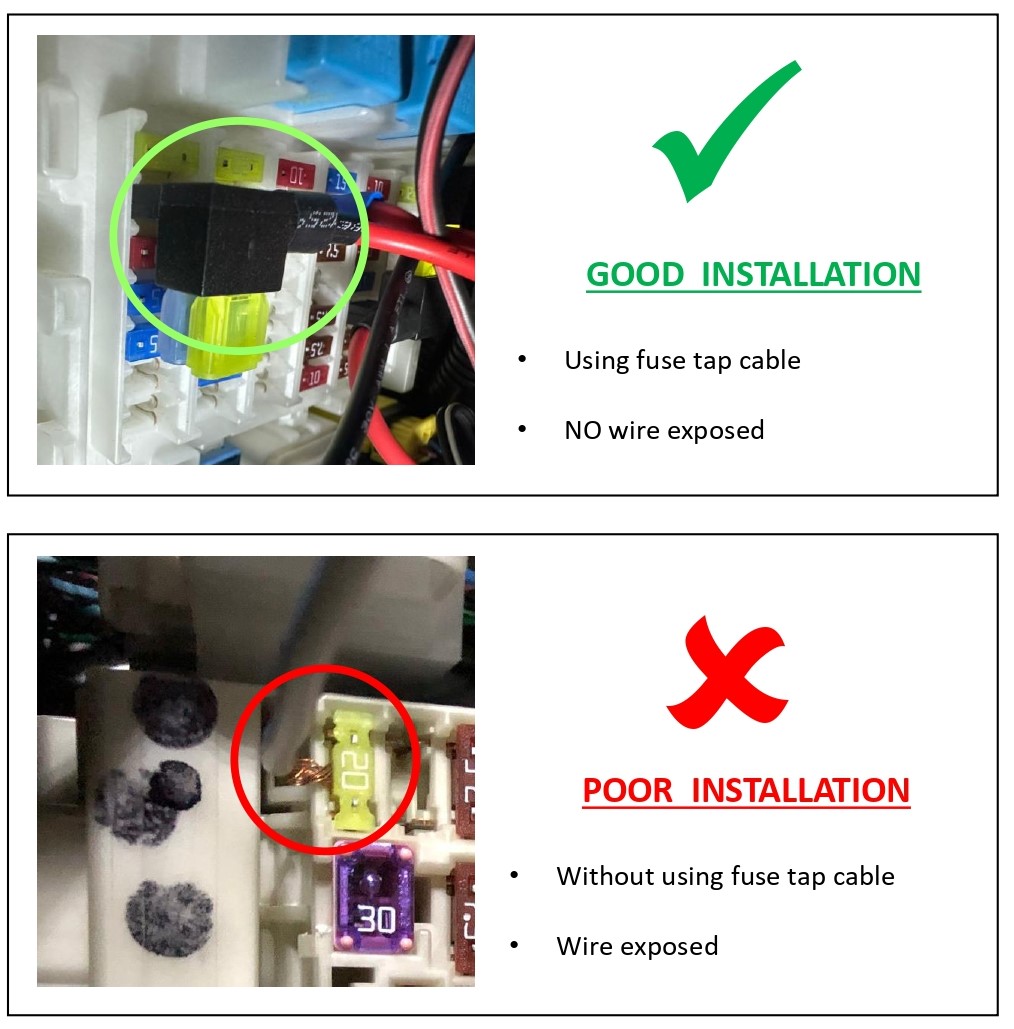
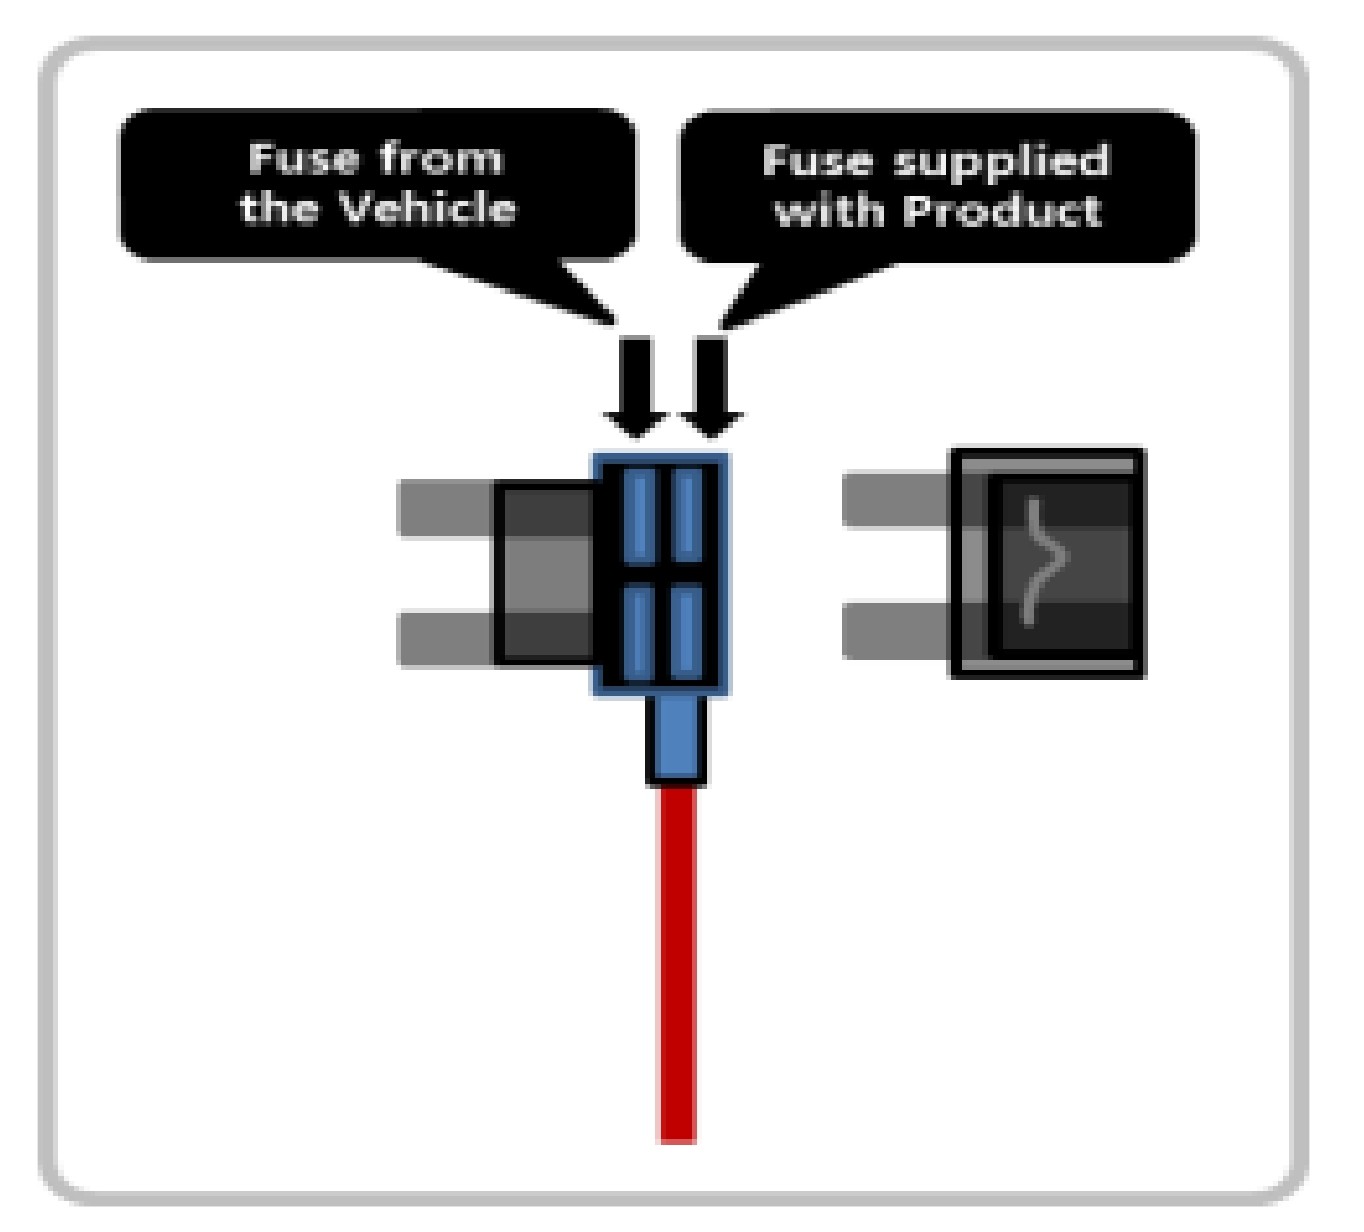
Insure that the fuse tap is plugged with the correct orientation with INPUT pin to the power source of the socket inside the fuse box.
Before connecting the GND-O-ring cable and the Fuse-Holder cable, be sure to cut the main cable to the required length and connect it. If the main cable is long and the remaining amount is tied up, It can cause the cable heating problem from the tied part.
Fuse supplied with the Cellink NEO is rated 20A, please do not change with other ratings.
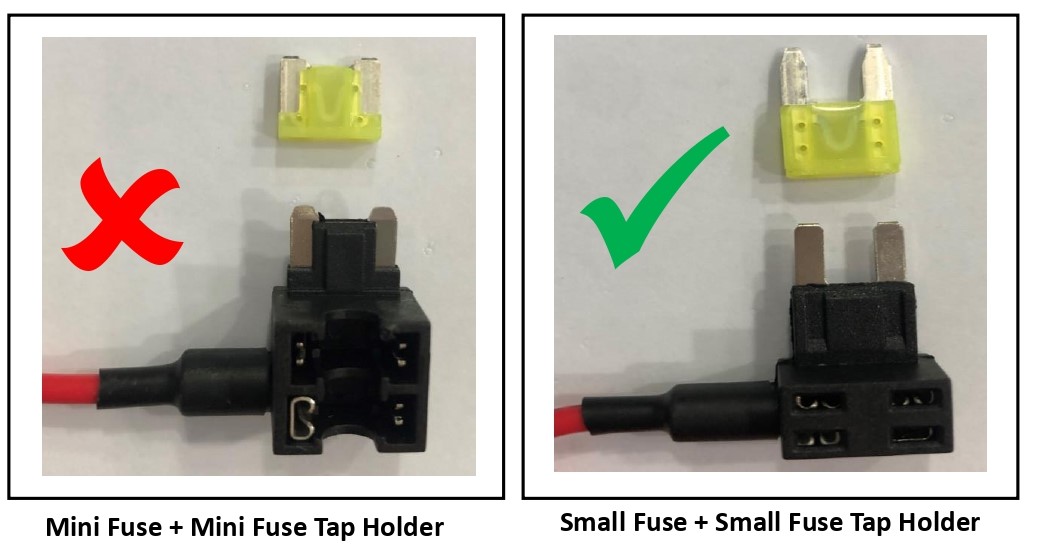
1. Do not use mini fuse and mini fuse tap holder.
If using the existing mini fuse in the vehicle change it to small fuse type

| CELLINK SWITCH POSITION | CHARGING AMPERE |
| LOW | Default: 5 ampere (Cannot adjust) |
| HIGH |
Default: 7.5 ampere (Cannot adjust) |
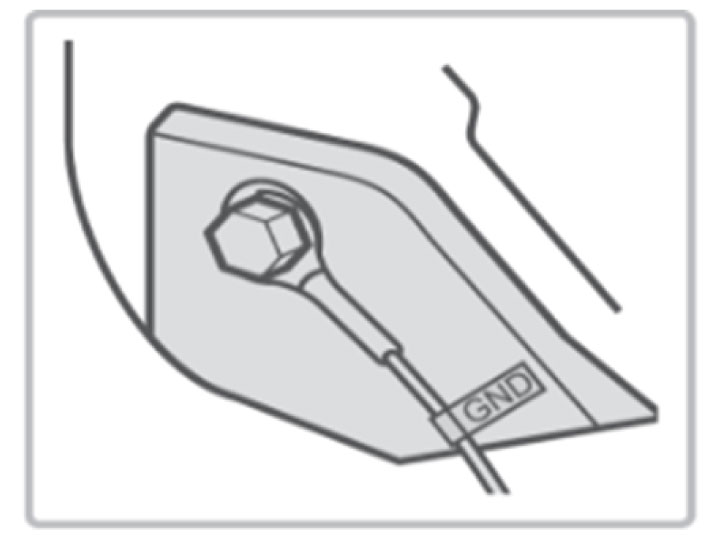
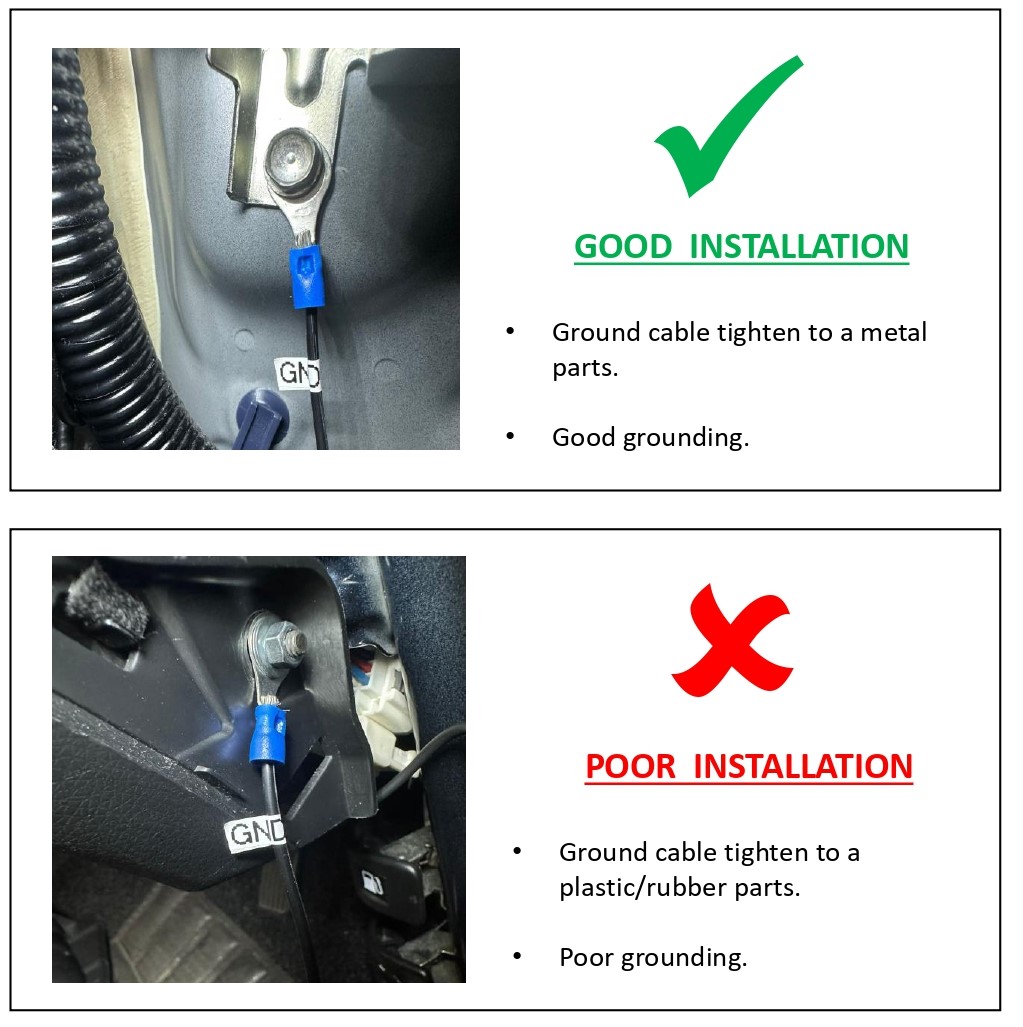
1) Find a bolt fixed on the vehicle’s and connect the ground (GND) cable to the bolt.
If the vehicle’s bolt is coated, remove the coating before connecting the ground (GND) cable. The power may not be supplied correctly due to the coating.
1) Make sure that the product is connected properly.
2) Fix the product using the provided Velcro tape on the car floor such as under the car seat.
3) Turn on the switch and check that the LEDs operate properly (Refer to the LED Display table).
![]()
1. Turn on the battery you purchased before running the downloaded app.
2. Set to the power switch position is "LOW" or "HIGH".
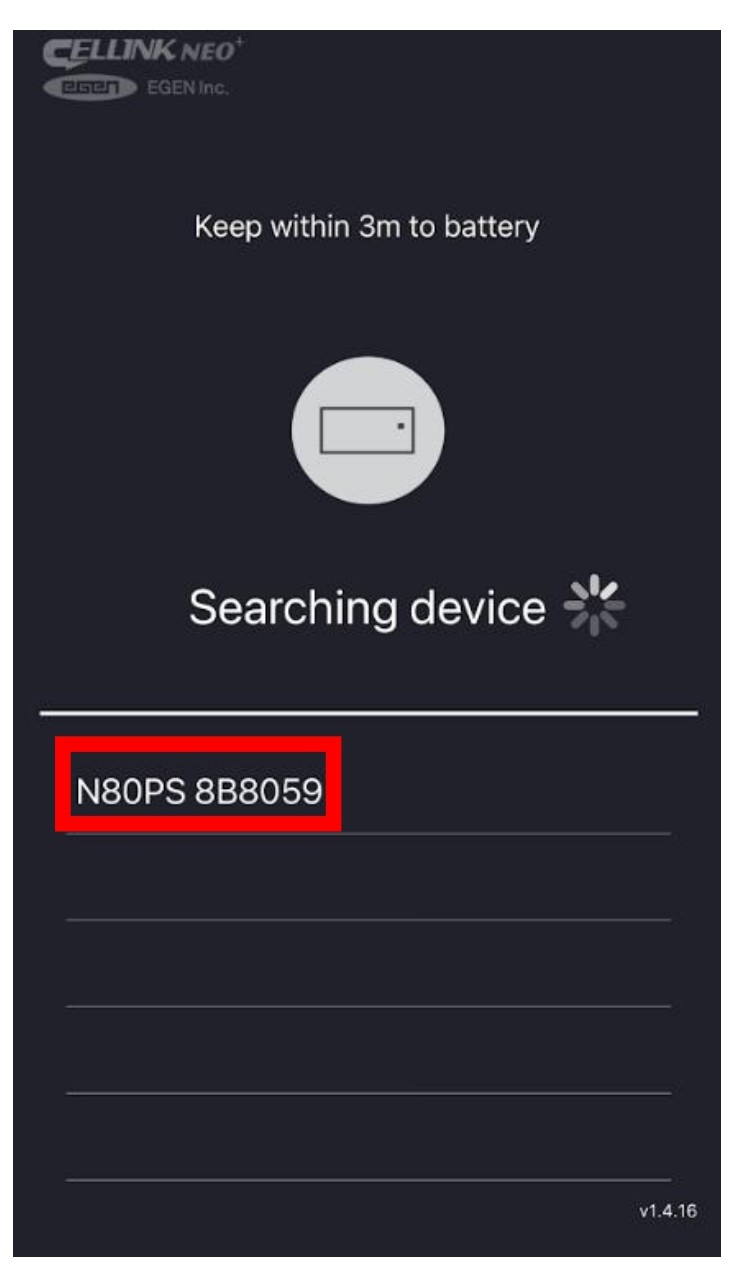
Check the code attached on the bottom of the purchased product and click the same code on the smartphone to complete the installation.
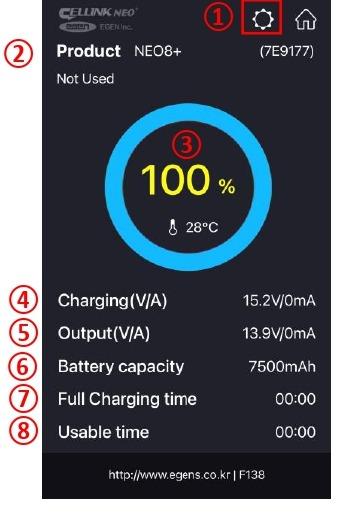
The App doesn’t always need to be turned on. However, if the battery’s internal temperature is
high or input voltage is low, you can receive an alarm message during the App is turned on.
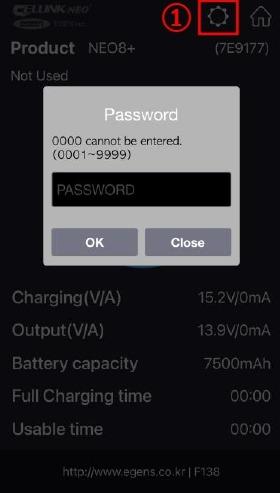
If you have forgotten your password, please contact our Customer Service Center.
If using Home Charger to charge the battery
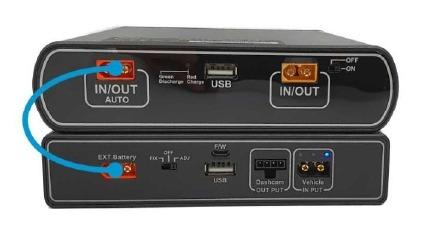
With the new NEO Extended 7+, it supports auto detection when connecting to the NEO 80+S. Battery capacity for NEO 80+S is 7,800mAh and NEO Extended 7+ is 6,800mAh.
Once you plug the link cable to the IN/OUT Auto port of NEO 80+S, the system will update the total capacity (7,800 + 6,800 = 14,600 mAh) automatically.
You can verify the capacity by using the smartphone app, Cellink NEO Plus which shows the total capacity of 14.6 Ah.
Article ID: 88
Created: March 27, 2026
Last Updated: March 30, 2026
Online URL: https://help.wowgadgets.com.sg/article/user-manual-cellink-neo-80+-s.html