User Guide Manual For S1-4K Infinite
Table of Contents
- 1. WARNING AND SAFETY INFORMATION
- 2. PACKAGE CONTENTS
- 3. PRODUCT OVERVIEW
- 4. PRODUCT SPECIFICATIONS
- 5. DEVICE INSTALLATION
- 6. INITIAL SETTINGS
- 7. DISPLAY & SETTINGS
- 7.1 Live View
- 7.2 Settings Overview
- 7.2.1 Setting - Camera
- 7.2.1.1 Setting - Camera - Resolution & Framerate
- 7.2.1.2 Setting - Camera - Bitrate
- 7.2.1.3 Setting - Camera - Frequency
- 7.2.1.4 Setting - Camera - Audio Recording
- 7.2.1.5 Setting - Camera - Video Enhancing
- 7.2.1.6 Setting - Camera - Time-Lapse at Driving
- 7.2.1.7 Setting - Camera - Event Sensitivity
- 7.2.1.8 Setting - Camera - Rotate & Mirror View
- 7.2.1.9 Setting - Camera - Event Video Protection
- 7.2.1.10 Setting - Camera - Camera Usage
- 7.2.1.11 Setting - Camera - Privacy Mode
- 7.2.2 Setting - Parking Recording Settings
- 7.2.2.1 Setting - Parking Recording - Auto Parking Recording
- 7.2.2.2 Setting - Parking Recording - Vehicle Battery Protection
- 7.2.2.3 Setting - Parking Recording - Parking Mode Delay
- 7.2.2.4 Setting - Parking Recording - Video Enhancing
- 7.2.2.5 Setting - Parking Recording - Recording Type
- 7.2.2.6 Setting - Parking Recording - Auto REC Off Zone
- 7.2.2.5 Setting - Reference Driving Recording Details
- 7.2.2.6 Setting - Reference Location of Saved File
- 7.2.3 Setting - System Settings
- 7.2.3.1 Setting - System - Speaker Volume
- 7.2.3.2 Setting - System - Alert
- 7.2.3.3 Setting - System - Date & Time
- 7.2.3.4 Setting - System - Memory Allocation
- 7.2.3.5 Setting - System - LCD Off
- 7.2.3.6 Setting - System - Speed Unit
- 7.2.3.7 Setting - System - Stamp
- 7.2.3.8 Setting - System - Wi-Fi
- 7.2.3.9 Setting - System - System Information
- 7.2.3.10 Setting - System - SD Card Format
- 7.2.3.11 Setting - System - Initialization
- 7.2.3.12 Setting - System - App Download
- 7.2.3.13 Setting - System - Password
- 7.2.3.14 Setting - System - Language
- 7.2.4 Setting - Playback On Dashcam
- 7.2.1 Setting - Camera
- 8. CUSTOMER SERVICE
1. WARNING AND SAFETY INFORMATION
1.1 Warning For Safety Usage
- User According of Guidelines: Please follow the instructions in this manual carefully to ensure safe and proper use of device.
- Legal Compliance: Consult local traffic laws and regulations to ensure the proper and lawful use of the dashcam device in your region.
- Installation of Safety: Install the device in a location that does not obstruct the driver’s view or interfere with vehicle controls. Ensure the product is installed correctly. Improper installation may cause the product to fall due to vibration or may result in physical injury.
- Pre-Use Check: Inspect the device for any visible damage or malfunction before each use to ensure safe operation. Please ensure that the power cable is properly connected to the device.
- Prohibited During Driving: Do not operate this device while driving to avoid distraction.
- Water and Moisture Exposure: Do not expose the product to rain, moisture, or water under any circumstances, as it may result in the risk of electric shock or fire.
- Heat Exposure: Using the product beyond optimal temperature range may result in reduced performance or malfunction.
- Power Cable Safety: Do not handle the power cable with wet hands, and avoid placing connectors near heat sources to prevent damage or injury.
- Charging Safety: Use only the genuine power adapter from VUEROID for charging. Using unauthorized chargers may result in damage to the device or pose a safety risk.
1.2 Maintenance And Performance Guidelines
- Damaging Goods: In cases when the product is damaged or power is disconnected due to an accident or vehicle vibration, recording may be unavailable.
- Firmware and Software Updates: Ensure your device’s firmware is up to date for optimal performance and safety. Only use official software and updates from authorized sources.
- Performance Variation: Device performance may vary depending on the recording environment. It is recommended to regularly check the quality of recordings.
- Micro SD Card Replacement: Since the Micro SD Card is an expendable item, please replace it after extended use. Continuous use of the Micro SD Card may lead to recording issues. Regularly check the recording capacity of the Micro SD Card, and replace it when necessary. VUEROID is not responsible for any issues arising from the use of non-genuine Micro SD Cards.
- Data Backup: Regularly back up recorded video data to avoid loss.
1.3 Usage Limitations
- This device is designed to capture and store video recordings of the surroundings and inside of the vehicle. Certain features may not function as expected due to driving conditions or the vehicle’s surroundings, and performance differences may occur between products due to firmware updates intended to enhance reliability and quality.
- Recording functionality may be affected by the condition of the Micro SD Card.
- While this device is capable of capturing video for vehicle accidents, it does not guarantee the recording of all incidents
- Low-impact collisions may fall outside the sensitivity range of the impact sensor, resulting in the absence of event footage.
- Even though the product is built to endure severe vehicle collisions, recordings may not be available if the device sustains damage in the event of an accident.
- To maintain high video quality, ensure that the camera lens and windshield are clean. Dirt, debris, or substances on these surfaces can negatively impact the clarity of recorded footage.
- This product is intended solely for use within the interior of a vehicle and should not be operated outside this environment.
1.4 Warranty Information
- Please contact Vueroid Customer Service (cs@vueroid.com) if you are experiencing issues on Vueroid dashcam.
- Please check the detailed warranty information on our website. (http://www.vueroid.com/support/warranty-policy/)
2. PACKAGE CONTENTS
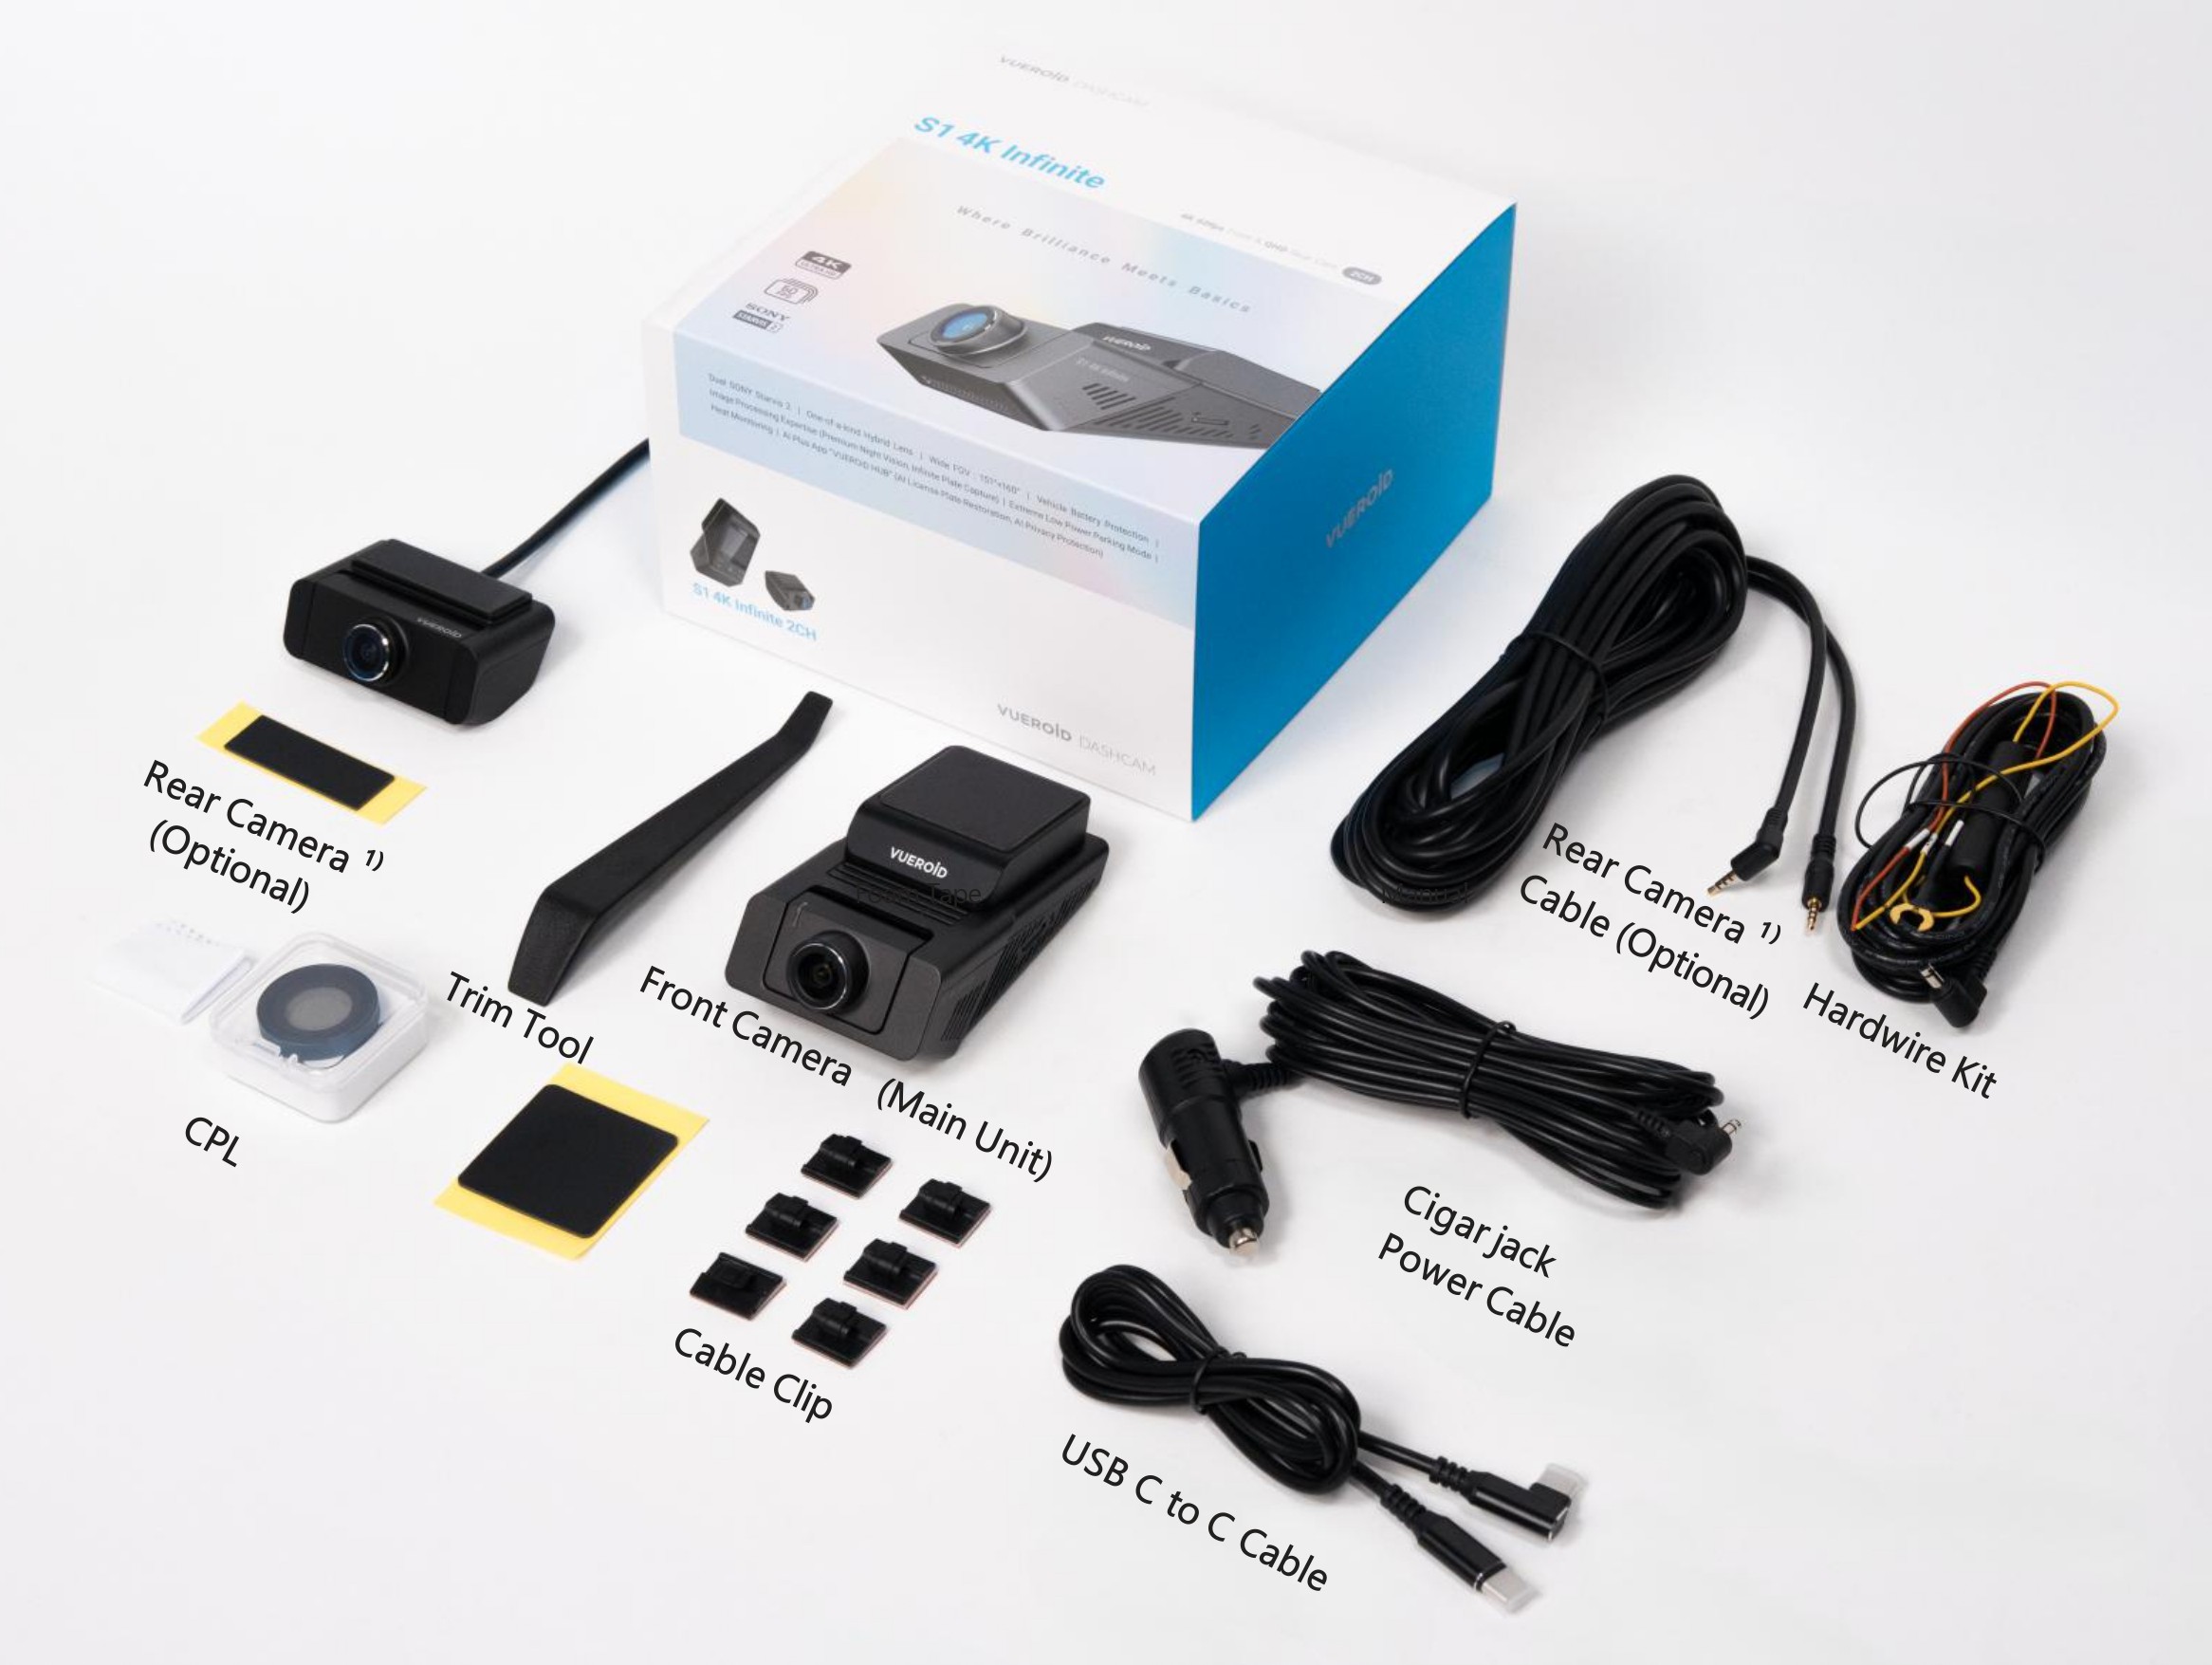
1. Rear camera is included in 2CH
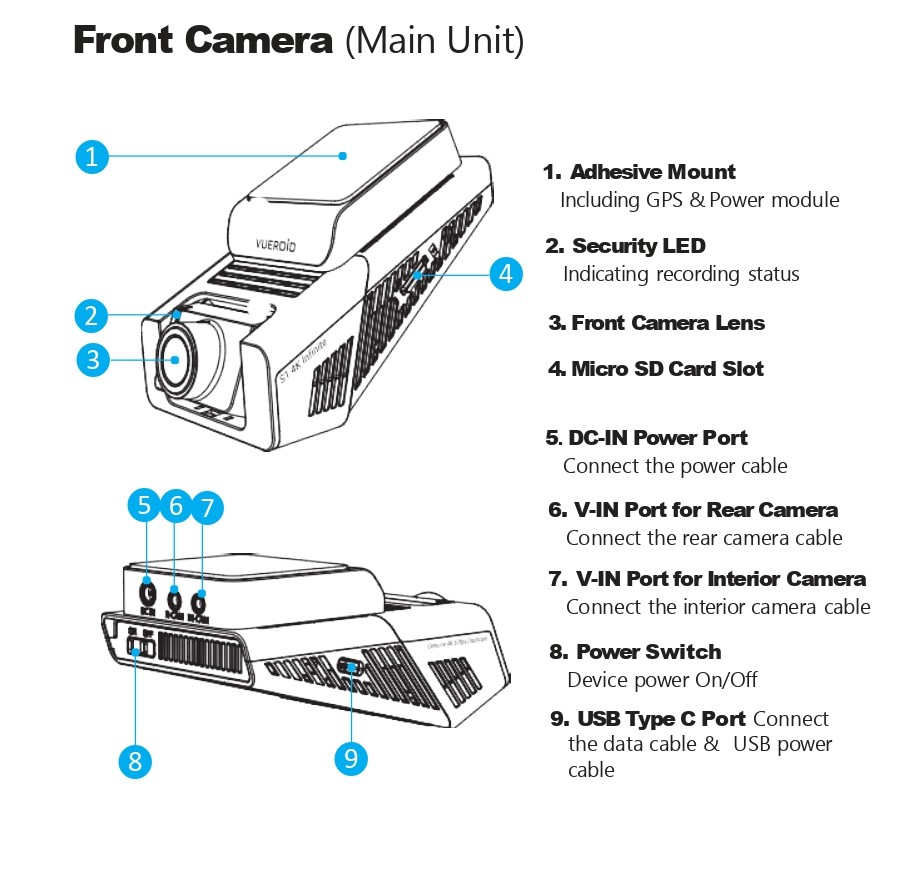
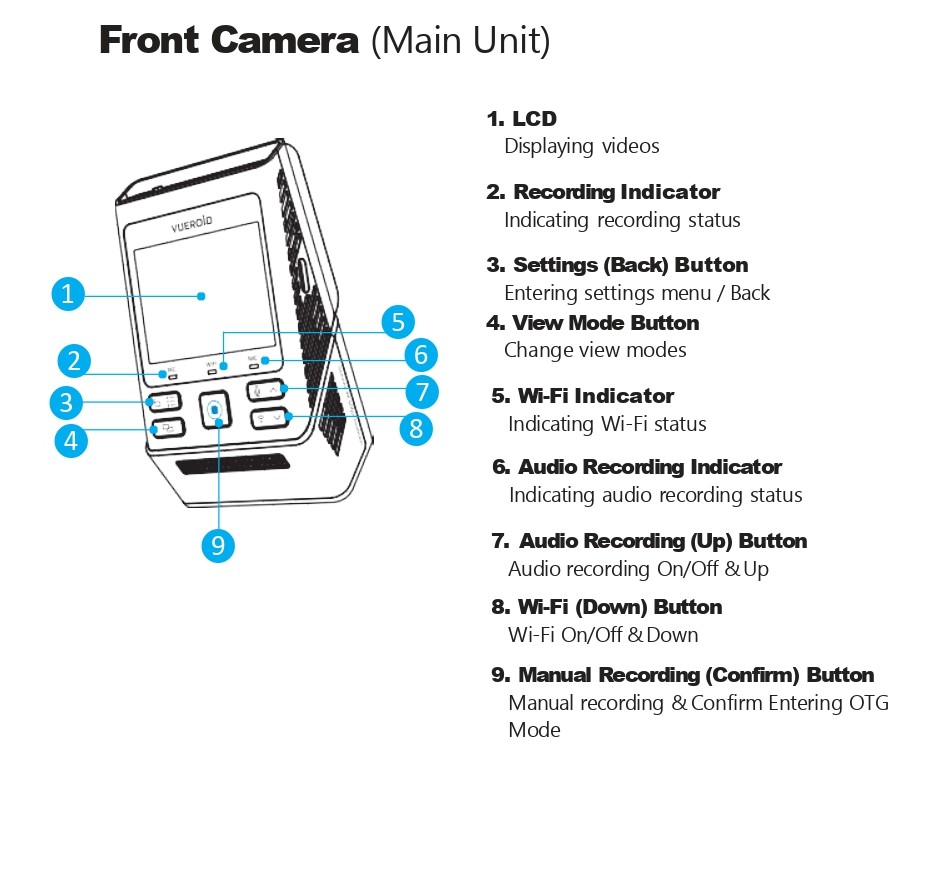
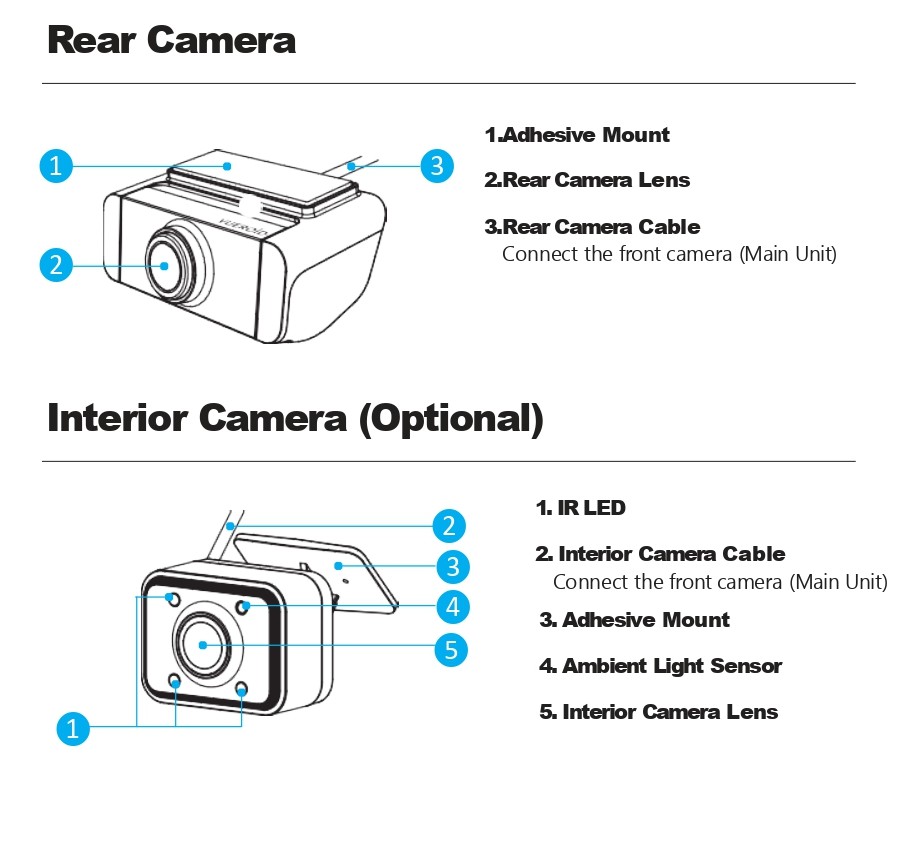
3. PRODUCT OVERVIEW
3.1 Device Overview
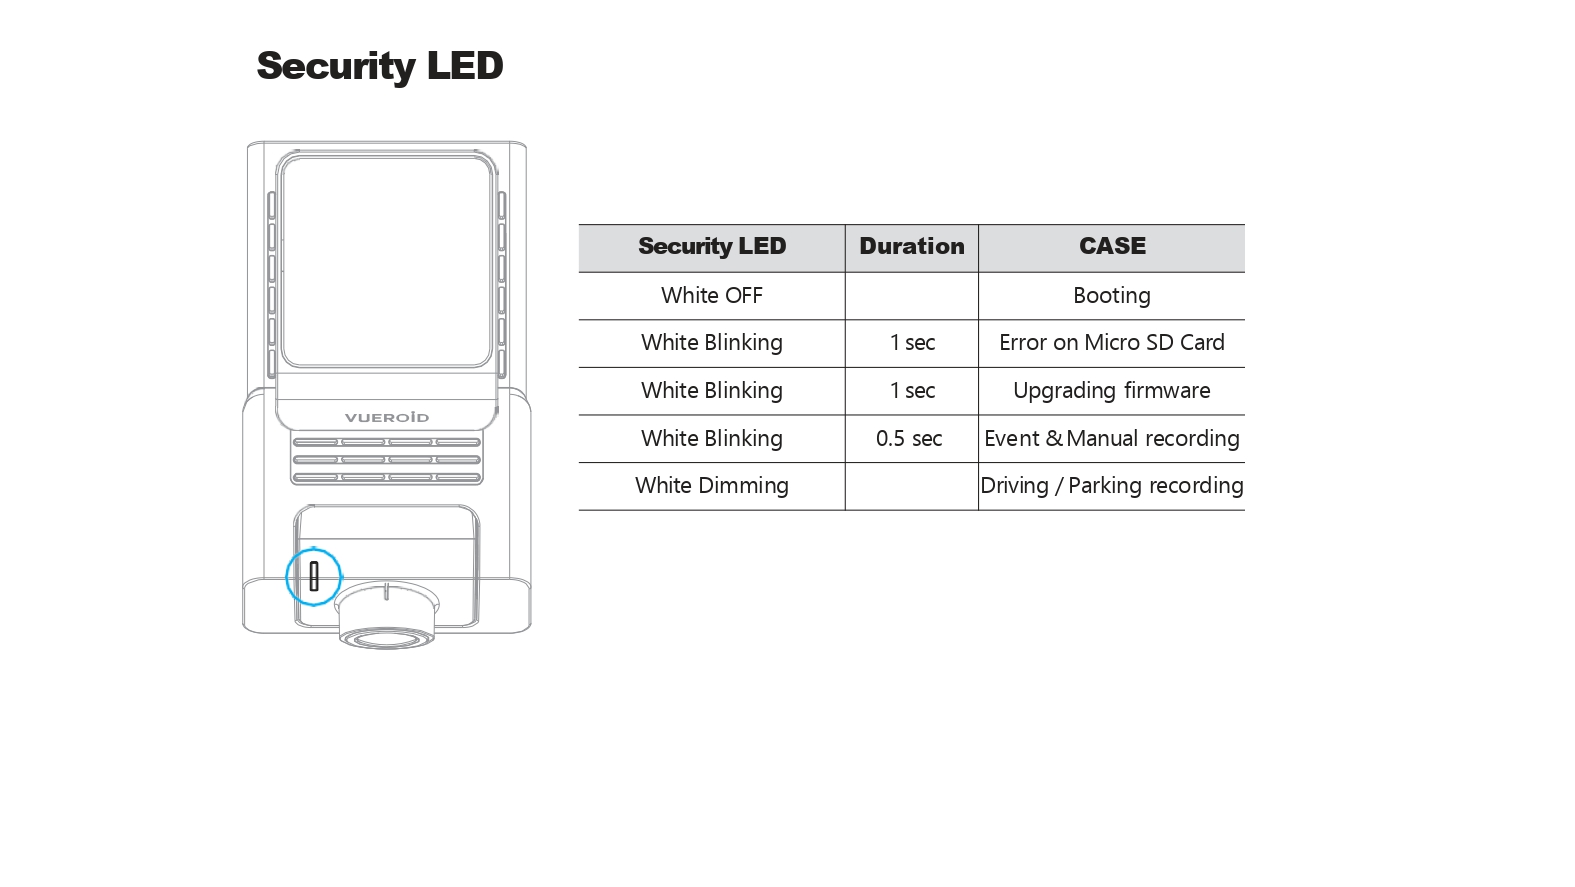
3.2 LED Indicator

4. PRODUCT SPECIFICATIONS
| ITEM | DESCRIPTION | |
| Channel | 2 Channel - Front and Rear | |
| Camera Sensor |
Front: SONY STARVIS 2 (IMX678) | |
| Rear : SONY STARVIS 2 (IMX675) | ||
| Resolutions |
Front Camera: UHD (3,840 x 2,160) @ 30fps (Max. 60fps) | |
| Rear Camera: QHD (2560 x 1440) @ 30fps |
||
| View Angle |
Front: 151º | |
| Rear : 160º | ||
| Memory Card | Micro SD Card (32GB/64GB/128GB/256GB/512GB) | |
| Wi-Fi | Built-In | |
| GPS | Built-in | |
| LCD | 2.3 inch | |
| Speaker | Built-in | |
| Microphone | Built-in | |
| Data Transfer | SD Card, Vueroid HUB App, PC Viewer & USB Mode | |
| AI Functionalities | AI License Plate Restoration & Privacy Protection via HUB App or PC Viewer | |
| Parking Mode | Extreme Low Power Mode, Impact&Motion, Impact&Timelapse, Auto REC Off Zone mode, Durashift Parking Mode (Hardwire Cable is included) |
|
| Power Input | 12V, 5V(USB-C) | |
| Safety Features | Battery Protection Mode (Battery Cut-Off Voltage & Time) | |
| Operating Temperature | -20℃ ~ 65℃ (-4℉ ~ 149℉) | |
| Storage Temperature | -20℃ ~ 70℃ (-4℉ ~ 158℉) | |
5. DEVICE INSTALLATION
5.1 Insert / Remove the Micro SD Card
- A Micro SD Card is required for normal device operation and must be purchased separately.
- For optimal device performance and recording quality, we recommend using a genuine VUEROID Micro SD Card.
- For issues arising from not using an official VUEROID Micro SD Card, VUEROID does not provide warranty coverage.
- Since the Micro SD Card is an expendable, please replace it after extended use. Continuous use of the Micro SD Card may lead to recording issues.
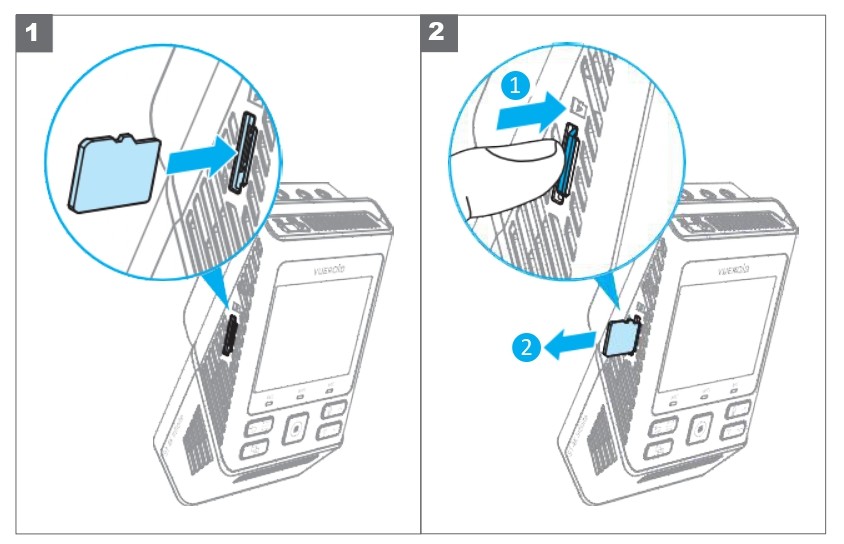
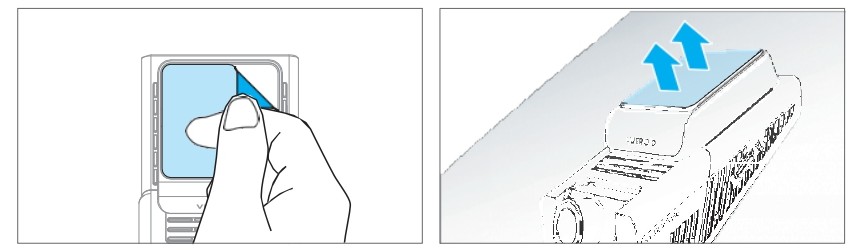
Please insert or remove the Micro SD Card like below.
- To insert the SD card, align it with the slot and slide it until you hear a “click”.
- In case of removing Micro SD Card, ensure the camera is turned off and push the Micro SD Card inserted in device with your fingernail.
5.2 Installing the Main Unit.
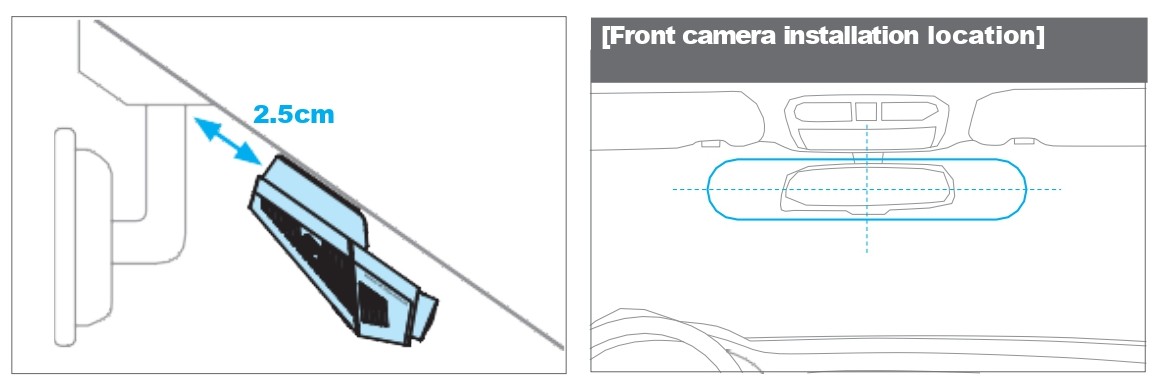
- Please ensure that the main unit is properly connected to the adhesive mount.
- Determining the installation location, ensure it is at least 2.5cm away from the top of the vehicle to allow proper connection with the rear camera and interior camera.
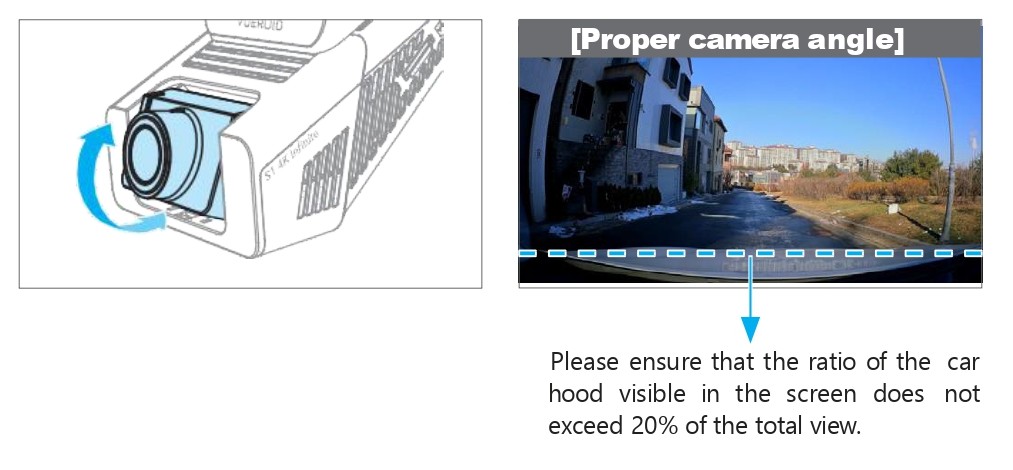
- When installing the main unit, please refer to the pictures below to adjust the camera angle.
- Clean the attachment location using a dry cloth.
- Remove the film from the sticker on the adhesive mount, then firmly attach it to the selected location. Be cautious when changing the installation location, as the sticker has strong adhesive for stability during operation.
- Remove the lens film attached in front of the camera lens.
- Please select an installation location that does not obstruct the lens’s view.
- After installation, ensure it is level horizontally.
- Leave enough space and keep wires from overlapping to prevent interference with other devices such as navigation systems.
5.3 Installing CPL Filter
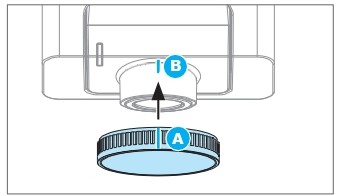
- Align the ‘A’ line on the included CPL filter with the ‘B’ line on the dashcam lens during installation. If the recorded footage is affected by glare or reflections, adjust the CPL filter by rotating it left or right until the image becomes clearer.
5.4 Connect the Main Unit to the Power Source
5.4.1 Connecting with Cigar Jack Power Cable
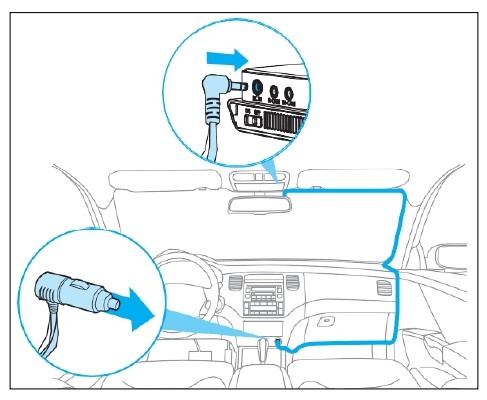
- Connect the power cable to the DC-IN power port of main unit while the main unit is turned off and then connect cigar jack adapter to the power socket of the vehicle.
- Please use the included trim tool to carefully route the power cable along the vehicle’s trim.
- After turning on the main unit, please adjust the main unit’s angle while viewing the device’s LCD screen.
5.4.2 Connecting with Hardwire Kit.
VUEROID recommends to visit a professional installer to connect hardwire cable.
- Ensure the vehicle is turned off before connecting the hardwire kit.
- Locate the vehicle’s fuse box. Refer to the vehicle’s manual if necessary.
- Identify the constant power terminal and ACC terminal in the fuse box, then carefully remove the two fuses from each terminal.
- Use an electrical tester to check the input and output slots for the target fuse.
- Connect the BAT (Yellow) wire to the output prong of the constant power fuse and the ACC (Red) wire to the output prong of the ACC fuse.
- Reinsert the fuses into their original slots, ensuring the wires are securely connected to the output prong of each terminal.
- Find a bolt on a metal part of the vehicle’s body and securely attach the ground wire (GND (Black)) to it.
- Use the included trim tool to carefully route the power cable from the fuse box to the main unit’s installation point, neatly tucking it along the vehicle’s trim.
- Connect the power cable to the DC-IN port on the main unit while ensuring the main unit is turned off.
- Turn on the vehicle and the main unit to verify proper operation. Adjust the camera angle while checking the LCD screen.
- When using the cigar power socket, parking recording mode cannot be activated.
- Always use the genuine VUEROID power cable.
- Check the cable and connections carefully during installation to prevent issues.
- Ensure the power cable does not interfere with any vehicle controls.
5.5 Connect the Rear Camera & Interior Camera to Main Unit.
5.5.1 Installing Rear Camera.
- Avoid installing the rear camera where it may interfere with the rear window curtain or on the rear window’s defroster lines.
- Before installation, clean the selected area with a dry cloth, as done for the main unit.
- Remove the adhesive sticker from the main unit and film from lens, and firmly attach the camera to the chosen location.
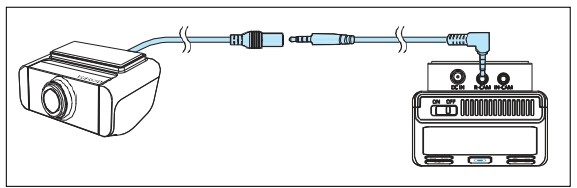
-
Turn off the main unit power and securely connect the cable to the R-CAM port on the main unit, as well as to the rear camera. (Refer to the image above for connector shapes to avoid confusion.)
-
Route the cable along the vehicle’s trim to the rear camera’s installation location.
-
Turn on the main unit and verify that the rear camera video is displayed correctly.
When connecting a rear or interior camera for the first time, a popup will appear: “Camera configuration has changed. Do you want to switch to the 2CH/3CH system? This will format the system.”
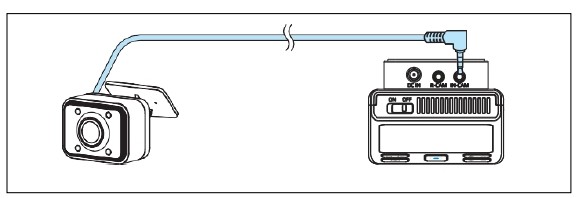
5.5.2 Installing Interior Camera.
Select a position that clearly captures the vehicle interior. To avoid obstructing the driver’s view, we recommend installing the camera between the top of the front windshield and the rearview mirror. If this position is not feasible, consider placing it near the sides of the rearview mirror. Before installation, clean the mounting area with a dry cloth.
-
Turn off the main unit power and securely connect the cable to the IN-CAM port on the main unit.
-
Route the cable along the vehicle’s trim to the installation location of the interior camera.
-
Turn on the main unit and verify that the interior camera video is recording properly
If more camera channels(CH) are selected for recording than current setting, SD card formatting will be required. If you missed the popup, you can configure the recording settings for each camera in Camera > Camera Usage.
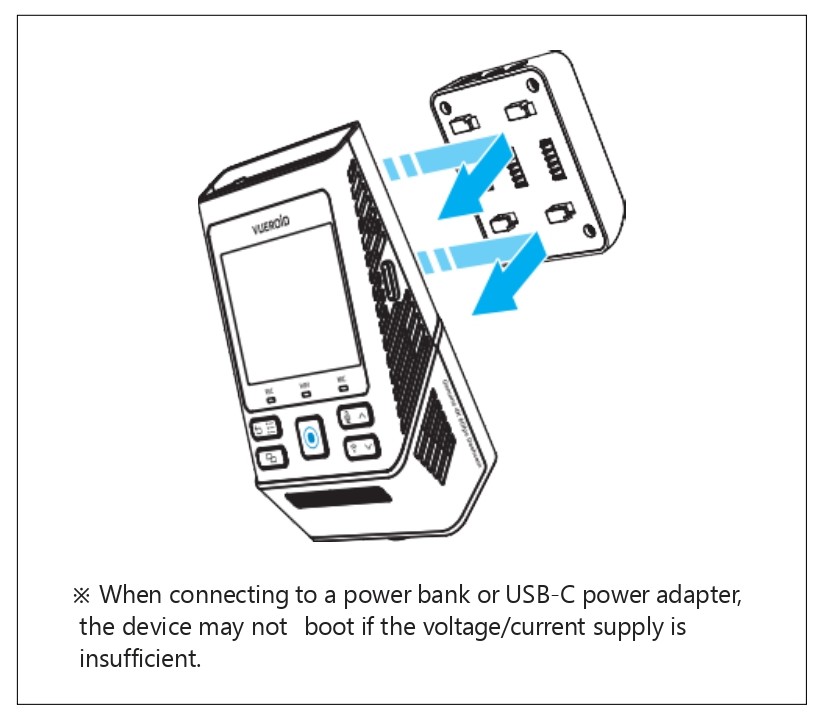
5.6 Detachment & Reassembly to the Adhesive Mount
-
To use the device without removing the mount from the windshield, you can detach the main unit from the adhesive mount after turning off the device, as shown in the picture. After detaching, you can power it through the USB C port for use.
-
To reassemble it again, slide the device into the mount until a “click” sound is heard.
-
After connecting the device properly, turn on the power and check if the main unit is recording
6. INITIAL SETTINGS

When you turn on the device for the first time or after initialization from the setting menu, you will need to configure the following settings. If you do not wish to set them now, you can skip, and the default values will be automatically applied.
Please connect all the cameras you intend to use such as rear or interior cameras to the main unit before starting the setup. This ensures that settings related to the rear or interior cameras can be properly configured.
6.1 Language
- Choose your preferred display language.
Default: English
6.2 Date & Time
Date
- The date will be automatically set based on built-in GPS of the device.
- At date setting menu, you can choose how the date is displayed. (YYYY/MM/DD or MM/DD/YYYY or DD/MM/YYYY)
- This setting will be automatically applied to the live view on device and the data stamp in saved videos.
Time
- When you select a region of your time zone, it will be automatically applied to the live view on device and the data stamp in saved videos.
6.3 Frequency
- To minimize flicker in the video, select proper hz. There may be different hz from country to country.
6.4 Rear & Interior Camera Usage
- If a rear camera and interior camera are connected to the main unit, you can choose whether to enable and record from the rear and interior cameras.
6.5 Resolution & Framerate
- Set the resolution & framerate for the recording.
Front ( + Rear Camera )
| Driving Recording | Parking Recording |
| 4K 60FPS ( + QHD 30FPS) | 4K 30FPS ( + QHD 30FPS) |
| 4K 30FPS ( + QHD 30FPS) | 4K 30FPS ( + QHD 30FPS) |
| QHD 60FPS ( + QHD 30FPS) | QHD 30FPS ( + QHD 30FPS) |
| QHD 30FPS ( + QHD 30FPS) | QHD 30FPS ( + QHD 30FPS) |
※ To save memory capacity, the frame rate is adjusted to 30FPS when the vehicle is parked.
Front + Rear + Interior Camera
| Driving Recording | Parking Recording |
| 4K 60FPS + QHD 15FPS + FHD 15FPS | 4K 30FPS + QHD 15FPS (+ FHD 15FPS) |
| 4K 60FPS + QHD 30FPS + FHD 30FPS | 4K 30FPS + QHD 15FPS (+ FHD 30FPS) |
| QHD 60FPS + QHD 30FPS + FHD 30FPS | QHD 30FPS + QHD 30FPS (+ FHD 30FPS) |
| QHD 30FPS + QHD 30FPS + FHD 30FPS | QHD 30FPS + QHD 30FPS (+ FHD 30FPS) |
※ If the “Interior Camera Recording“ in parking recording settings is disabled, the interior camera will not record while the vehicle is in parking mode.
※ To save memory capacity, the frame rate is adjusted to 30p when the vehicle is parked.
6.6 Bitrate
- The bitrate setting adjusts the amount of data recorded per second. Higher bitrates improve video quality but also increase file size, which may reduce recording time on the Micro SD Card and its life span. Lower bitrates allow for longer recording times but may slightly reduce video quality.
6.7 Memory Allocation
- You can set the Micro SD Card memory allocation according to your recording priorities—like driving, parking, events, or driving only.
6.8 Interior Camera Recording in Parking Mode (Optional)
- This is a menu to set whether the interior camera records during parking mode. If “Off” is selected, videos from the interior camera will not be recorded in parking mode.
7. DISPLAY & SETTINGS
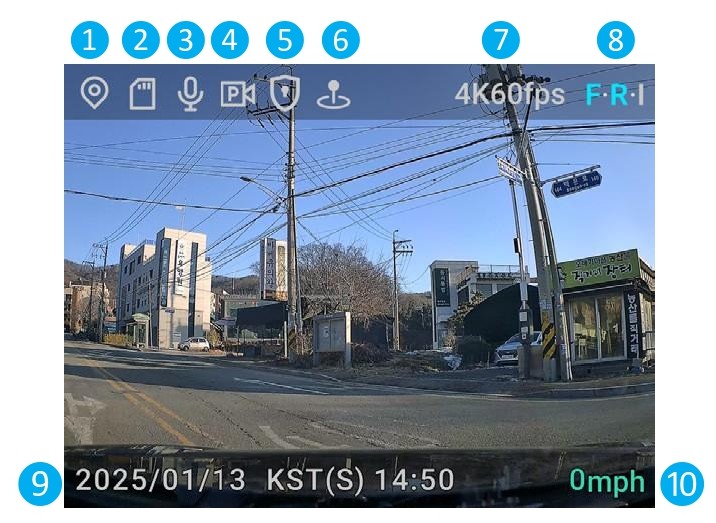
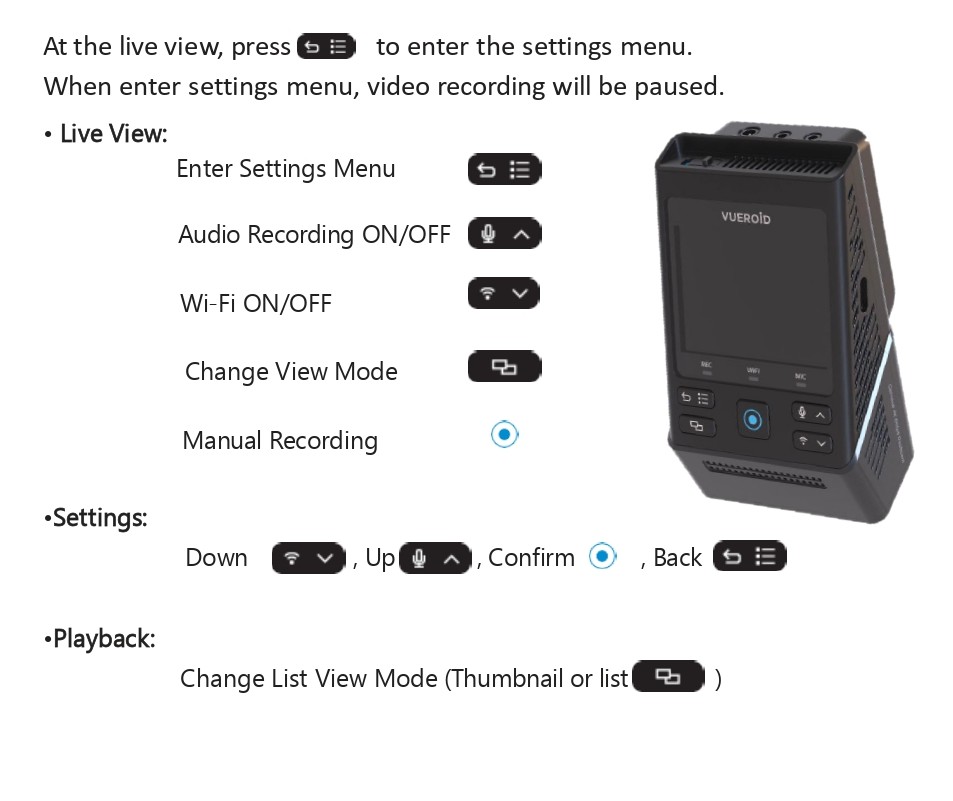
7.1 Live View
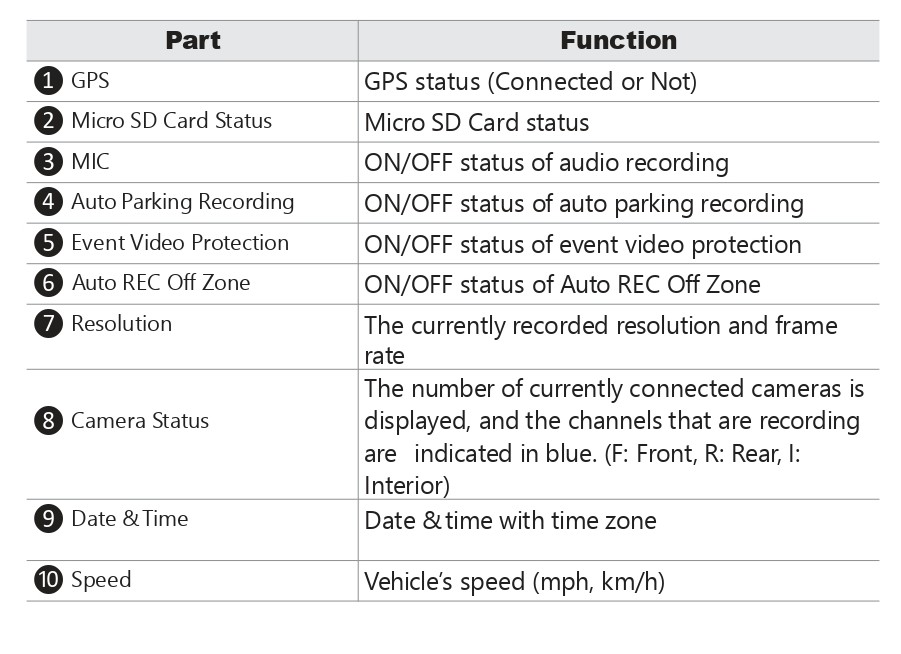
Live View displays the current recording & setting status of the device in real time along with status LED.
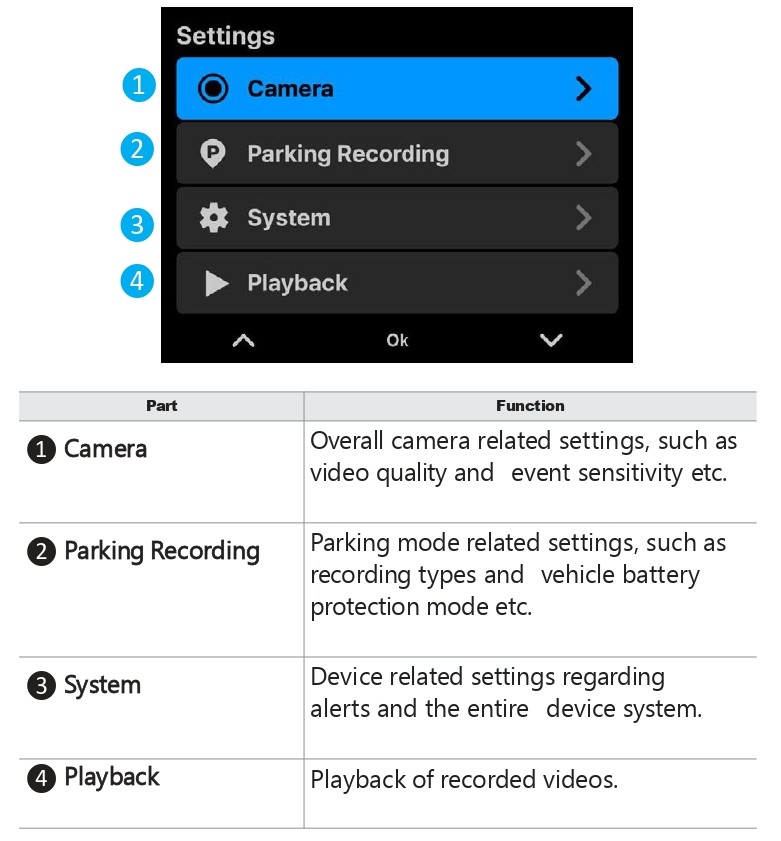
7.2 Settings Overview
7.2.1 Setting - Camera
7.2.1.1 Setting - Camera - Resolution & Framerate
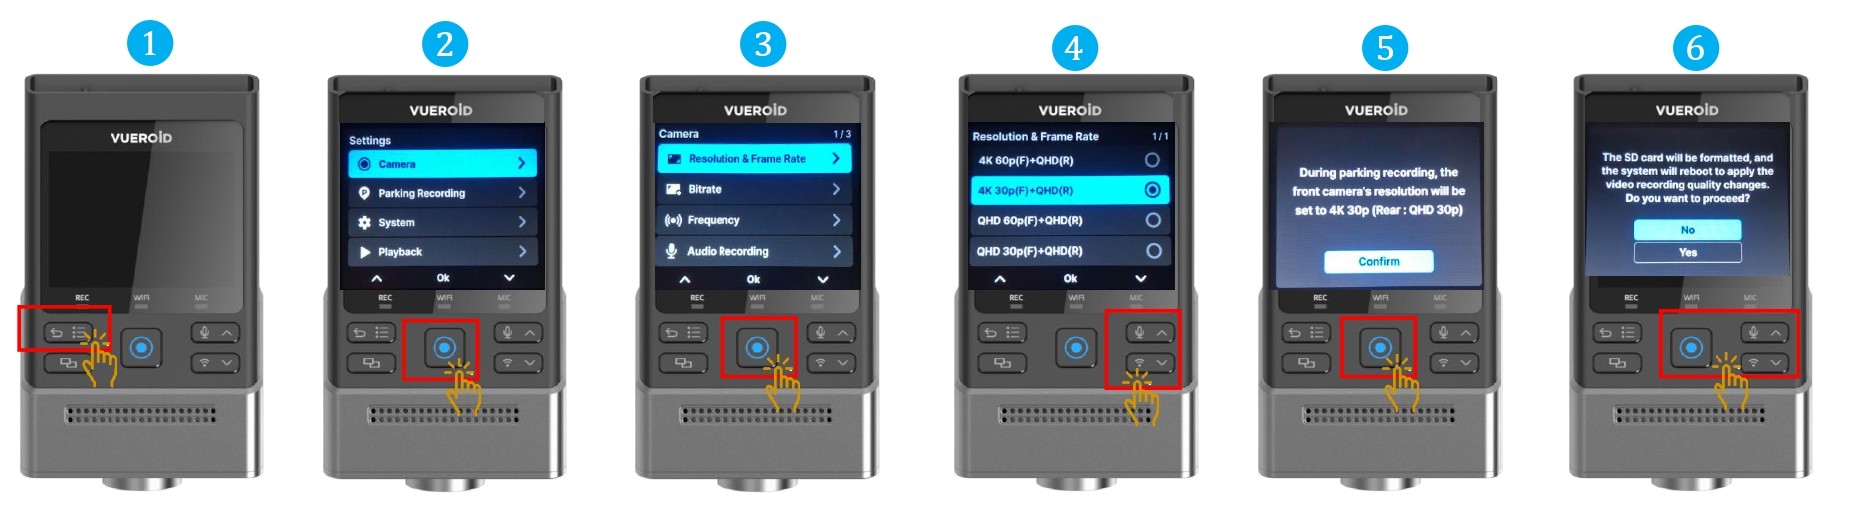
- Press Settings/Back button to turn on the display and press one more time to go to the setting.
- Press Manual Record button / Enter button to select "Camera"
- Choose "Resolution & Frame Rate" and press Manual Record button / Enter button.
- Choose the resolution type your preference by clicking Up/Down button.
- Press Manual Record button / Enter button to confirm the selection.
If you change the Resolution & Framerate or Bitrate, the Micro SD Card will be formatted, and the device will automatically reboot afterward. Therefore, it is recommended to save a copy of your videos on an Micro SD Card before changing the resolution and bitrate.
7.2.1.2 Setting - Camera - Bitrate
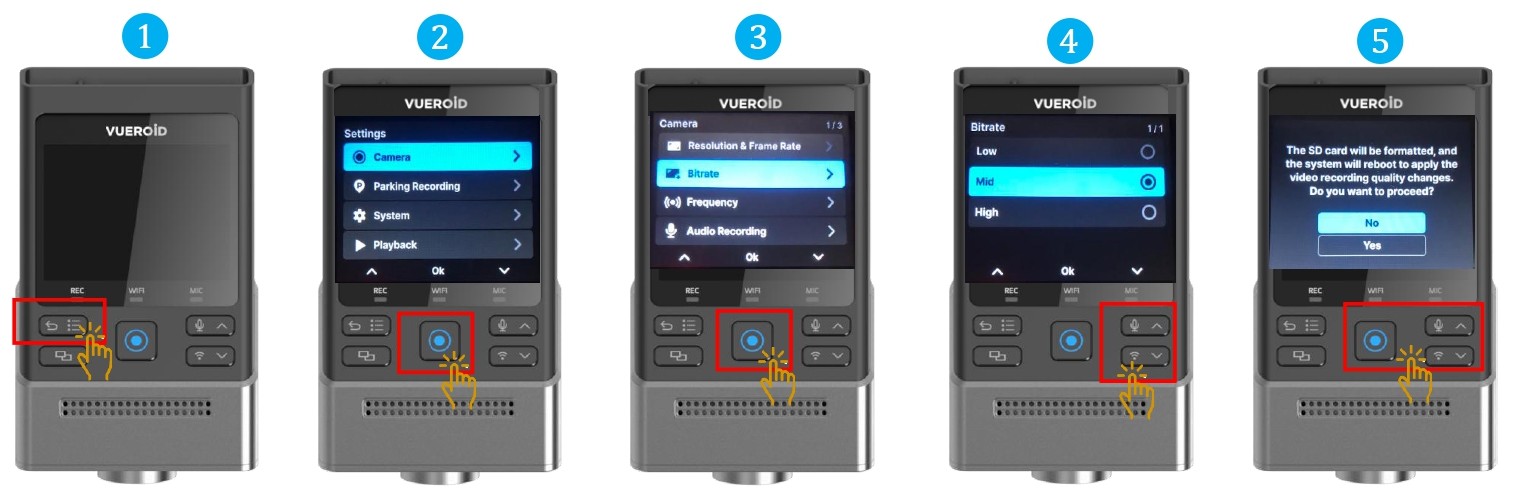
- Press Settings/Back button to turn on the display and press one more time to go to the setting.
- Press Manual Record button / Enter button to select "Camera"
- Choose "Bitrate" and press Manual Record button / Enter button.
- Choose the bitrate " High", "Mid" or "Low" type your preference by clicking Up/Down button.
- Press Manual Record button / Enter button to confirm the selection.
- The bitrate setting adjusts the amount of data recorded per second. Higher bitrates improve video quality but also increase file size, which may reduce recording time on the Micro SD Card and its life span. Lower bitrates allow for longer recording times but may slightly reduce video quality.
If you change Bitrate settings, the Micro SD Card will be formatted, and the device will automatically reboot afterward. Therefore, it is recommended to save a copy of your videos on an Micro SD Card before changing the resolution and bitrate.
7.2.1.3 Setting - Camera - Frequency
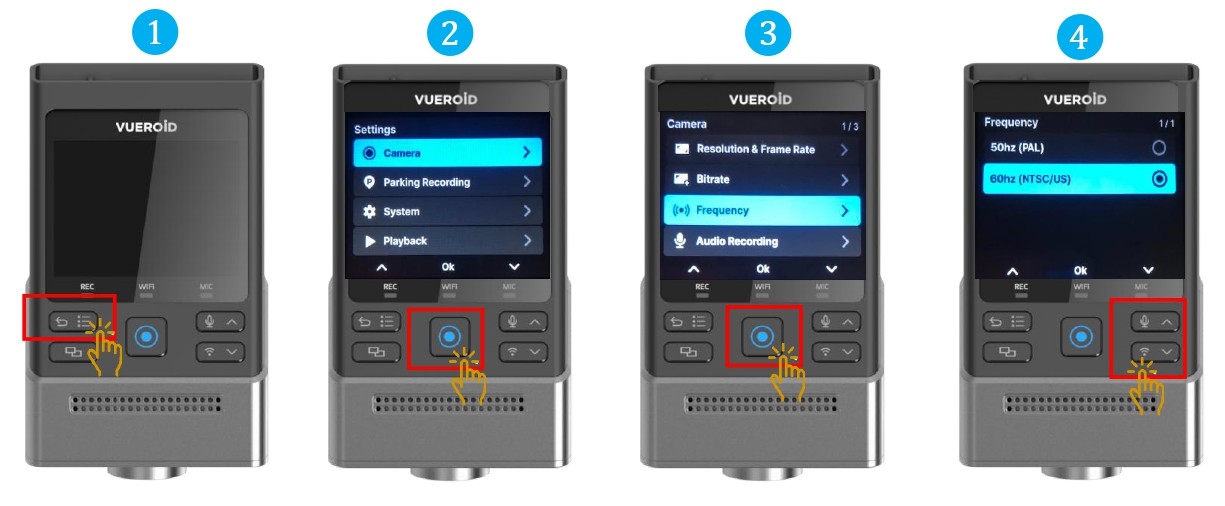
- Press Settings/Back button to turn on the display and press one more time to go to the setting.
- Press Manual Record button / Enter button to select "Camera"
- Choose "Frequency" and press Manual Record button / Enter button.
- Choose the frequency " 50Hz" or "60Hz".
- Press Manual Record button / Enter button to confirm the selection.
- To minimize flicker in the video, select proper hz. There may be different hz from country to country.
7.2.1.4 Setting - Camera - Audio Recording
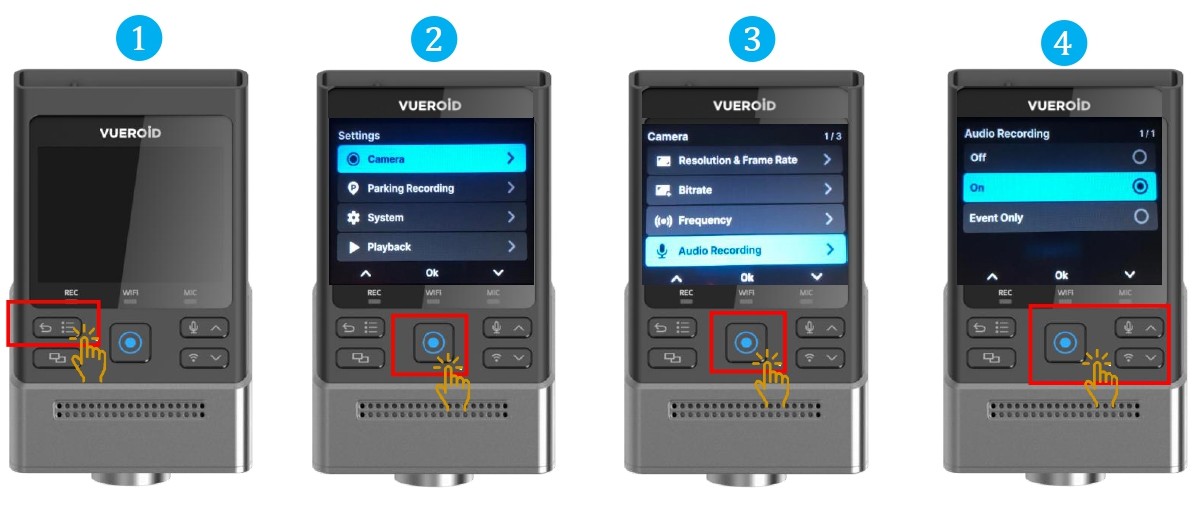
- Press Settings/Back button to turn on the display and press one more time to go to the setting.
- Press Manual Record button / Enter button to select "Camera"
- Choose "Audio Recording" and press Manual Record button / Enter button.
- Choose either
OFF - Voice Recording Off
ON - Voice Recording On
Event Only - In the event of an accident, the recording will capture all the sounds at that moment only. - Press Manual Record button / Enter button to confirm the selection.
7.2.1.5 Setting - Camera - Video Enhancing

- Press Settings/Back button to turn on the display and press one more time to go to the setting.
- Press Manual Record button / Enter button to select "Camera"
- Choose "Video Enhancing" and press Manual Record button / Enter button.
- Choose either
Normal - Normal video recording.
HDR + IPC - Infinite Plate Capture is based on HDR, displaying images by focusing on license plates so that license plates can be easily identified.
Under "Operation Mode", timer can be set accordingly or to be set continuously.
HDR - The HDR(High Dynamic Range) is for expressing a richer contrast between light and dark areas in photos or videos.
Under "Operation Mode", timer can be set accordingly or to be set continuously.
InformationHDR (High Dynamic Range) and IPC (Infinite Plate Capture) are not supported at 4K 60FPS and QHD 60FPS
7.2.1.6 Setting - Camera - Time-Lapse at Driving
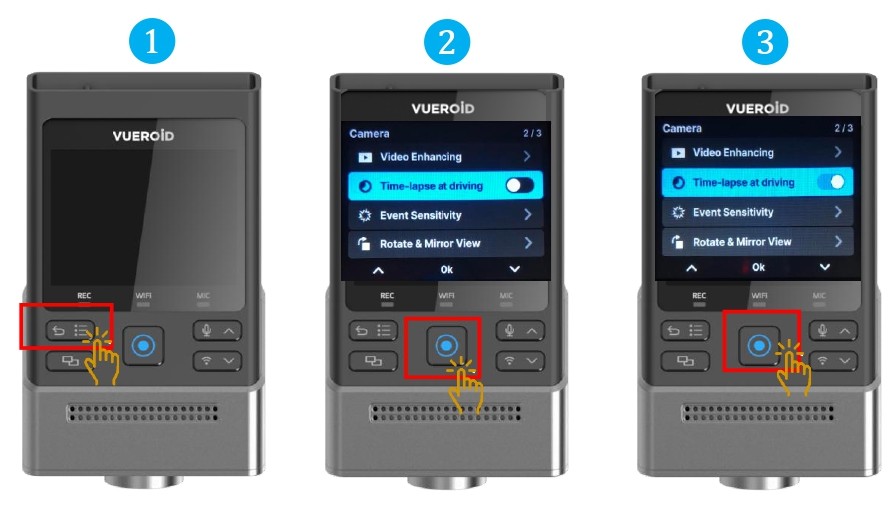
- Press Settings/Back button to turn on the display and press one more time to go to the setting.
- Press Manual Record button / Enter button to select "Camera"
- Choose "Time-Lapse at Driving" and press Manual Record button / Enter button.
- Press Manual Record button / Enter button to toggle to turn "On" or "Off".
- Time-lapse recording mode is recording at 1 fps instead of 30 fps (or more). Event recording files captured during time-lapse mode, including impact events and manual recordings, are saved at their originally set framerate.
7.2.1.7 Setting - Camera - Event Sensitivity
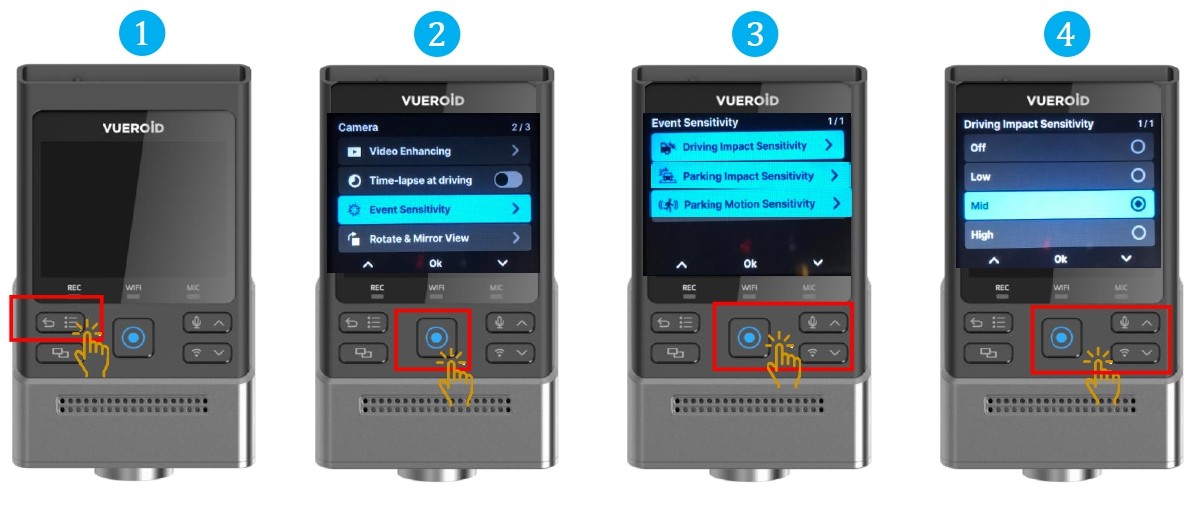
- Press Settings/Back button to turn on the display and press one more time to go to the setting.
- Press Manual Record button / Enter button to select "Camera"
- Choose "Event Sensitivity" and press Manual Record button / Enter button.
- Choose either the following to set the sensor sensitivity
Driving Impact Sensitivity - "Off" . "Low", "Mid" or "High"
Parking Impact Sensitivity - "Off" . "Low", "Mid" or "High"
Parking Motion Sensitivity - "Off" . "Low", "Mid" or "High" - For driving, impact sensitivity based on the g-sensor can be set from low to high. For parking, motion and impact sensitivity can be configured separately. If motion sensitivity is turned off, only impacts will trigger recordings during parking.
7.2.1.8 Setting - Camera - Rotate & Mirror View
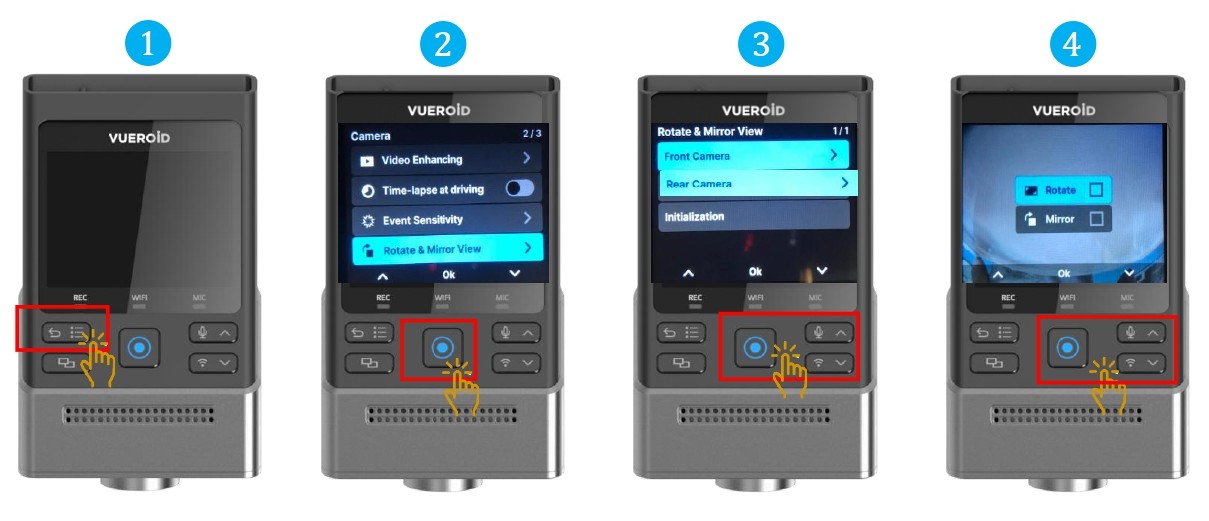
- Press Settings/Back button to turn on the display and press one more time to go to the setting.
- Press Manual Record button / Enter button to select "Camera"
- Choose "Rotate & Mirror View" and press Manual Record button / Enter button.
- Choose either the following to manually rotate or flip the video.
Front Camera - "Rotate" , "Mirror"
Rear Camera - "Rotate" , "Mirror" - Initialization will reset the viewing settings, and both “Rotate” and “Mirror” will be set to Off.
7.2.1.9 Setting - Camera - Event Video Protection
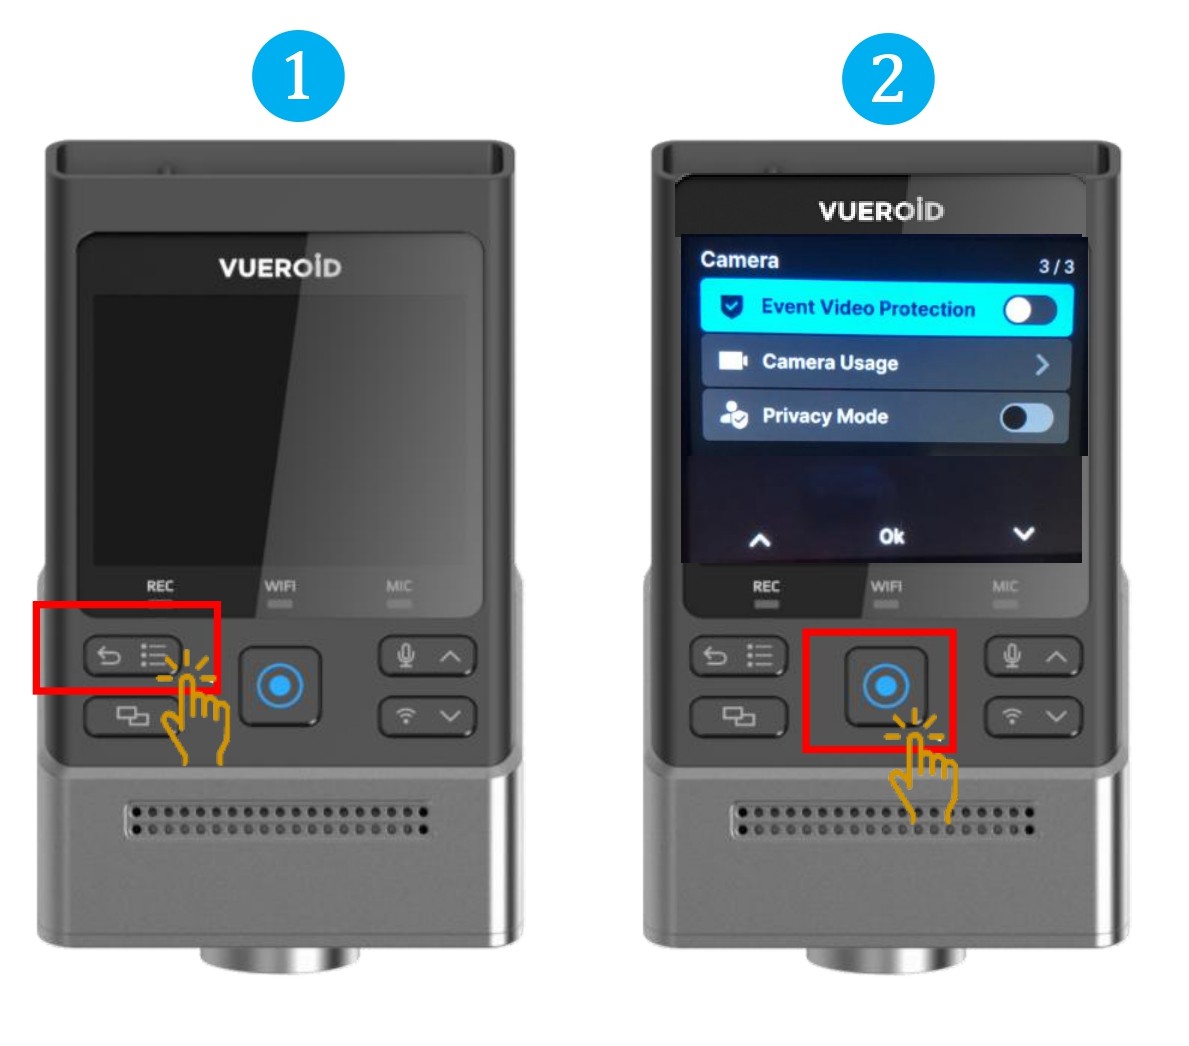
- Press Settings/Back button to turn on the display and press one more time to go to the setting.
- Press Manual Record button / Enter button to select "Camera"
- Choose "Event Video Protection " and press Manual Record button / Enter button.
- Press Manual Record button / Enter button to toggle to turn "On" or "Off".
- If an impact is detected by the G-sensor, it will be saved as an event recording. These files will not be overwritten when event video protection is enabled.
If the event recording folder is full, event recording will stop. In this case, a device pop-up and voice guidance will prompt the user to delete files.
To ensure stable recording, we recommend backing up event folder files regularly.
7.2.1.10 Setting - Camera - Camera Usage
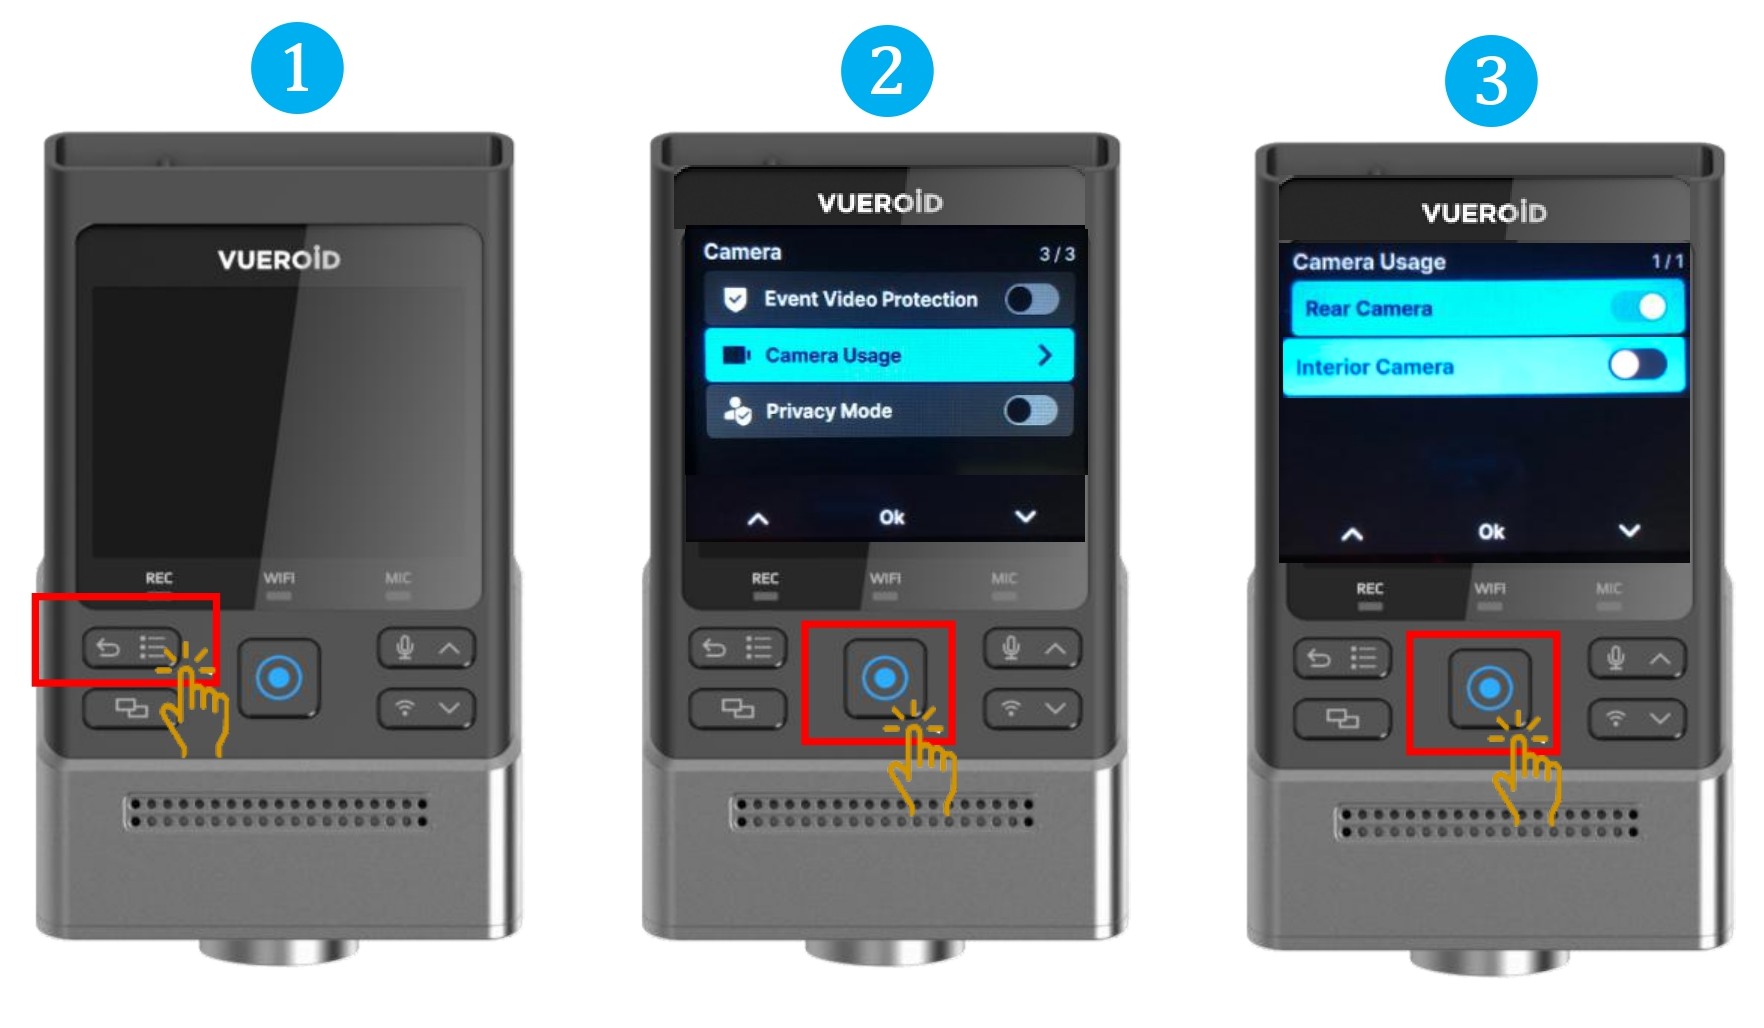
- Press Settings/Back button to turn on the display and press one more time to go to the setting.
- Press Manual Record button / Enter button to select "Camera"
- Choose "Camera Usage " and press Manual Record button / Enter button.
- Press Manual Record button / Enter button to toggle to turn "On" or "Off" for Rear Camera or Interior Camera.
- You can manually select the camera(s) you wish to record from.
Since front camera recording starts automatically when the main unit is powered on, you can only select whether to record from the rear and/or interior cameras.
7.2.1.11 Setting - Camera - Privacy Mode
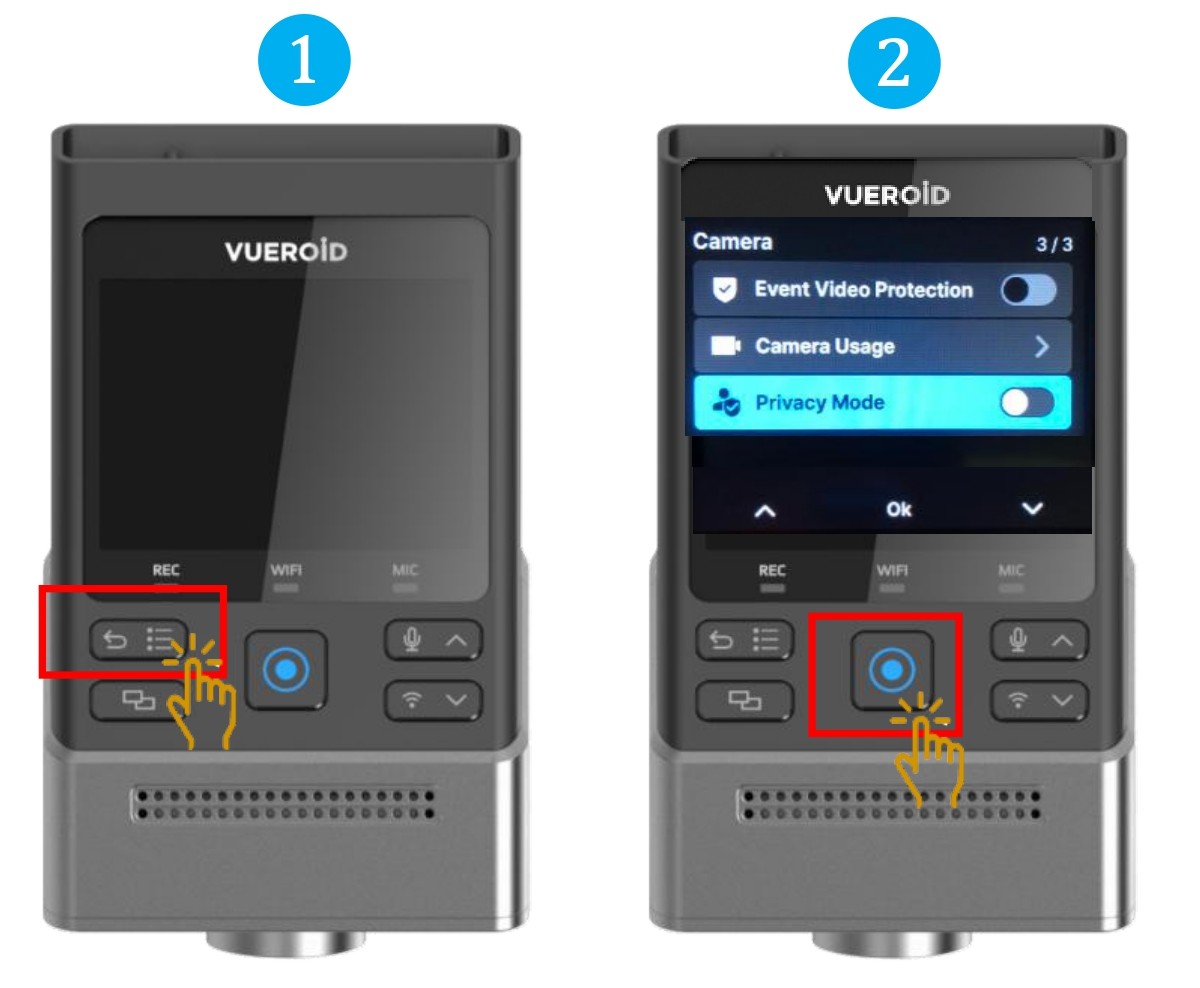
- Press Settings/Back button to turn on the display and press one more time to go to the setting.
- Press Manual Record button / Enter button to select "Camera"
- Choose "Privacy Mode " and press Manual Record button / Enter button.
- Press Manual Record button / Enter button to toggle to turn "On" or "Off".
- This feature deactivates audio recording and the interior camera.
Pressing and holding the View button on the device performs the same function.
7.2.2 Setting - Parking Recording Settings
7.2.2.1 Setting - Parking Recording - Auto Parking Recording
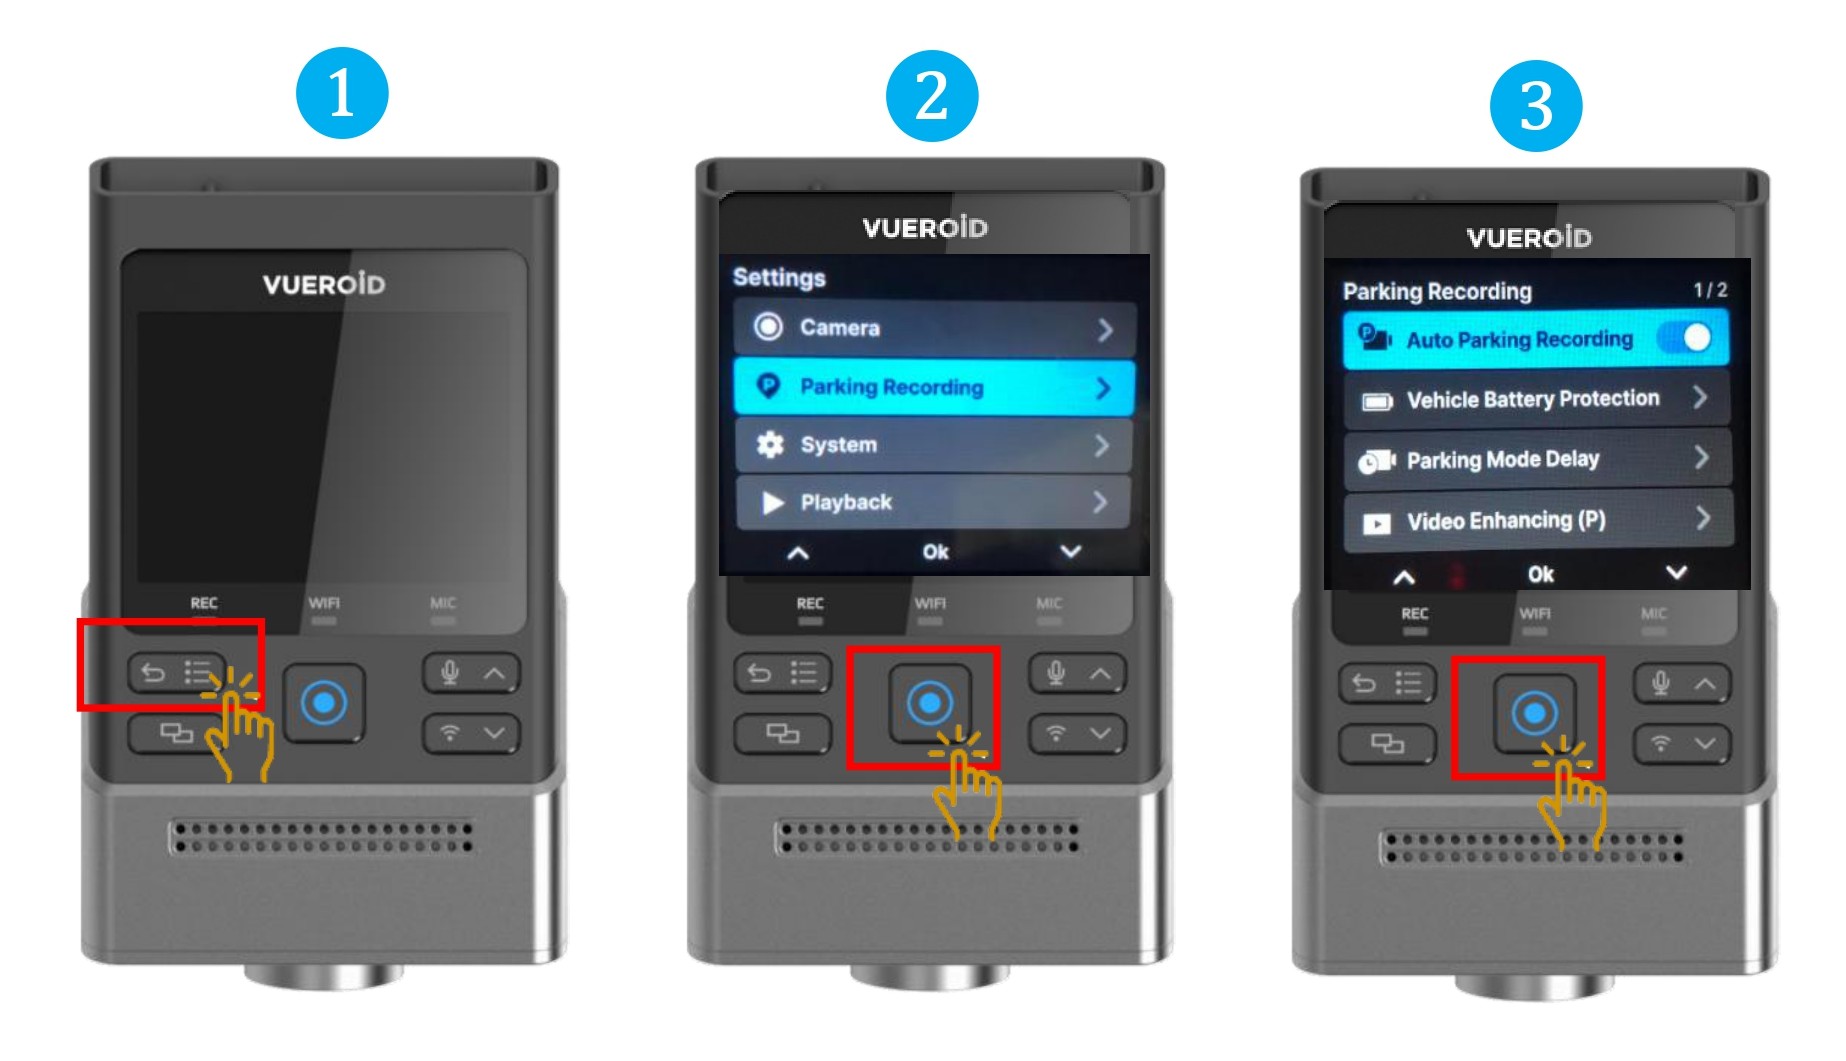
- Press Settings/Back button to turn on the display and press one more time to go to the setting.
- Press Manual Record button / Enter button to select "Parking Recording"
- Choose "Auto Parking Recording " and press Manual Record button / Enter button to turn "On" or "Off"
- Choose whether or not to automatically switch to parking mode. (Selecting “Off” will fully power down the device and disable recording while the vehicle is parked). In Live View, you can also turn the feature On/Off by pressing and holding the device’s Confirm button.
7.2.2.2 Setting - Parking Recording - Vehicle Battery Protection
7.2.2.2.1 Setting - Parking Recording - Vehicle Battery Protection - Power Off Voltage
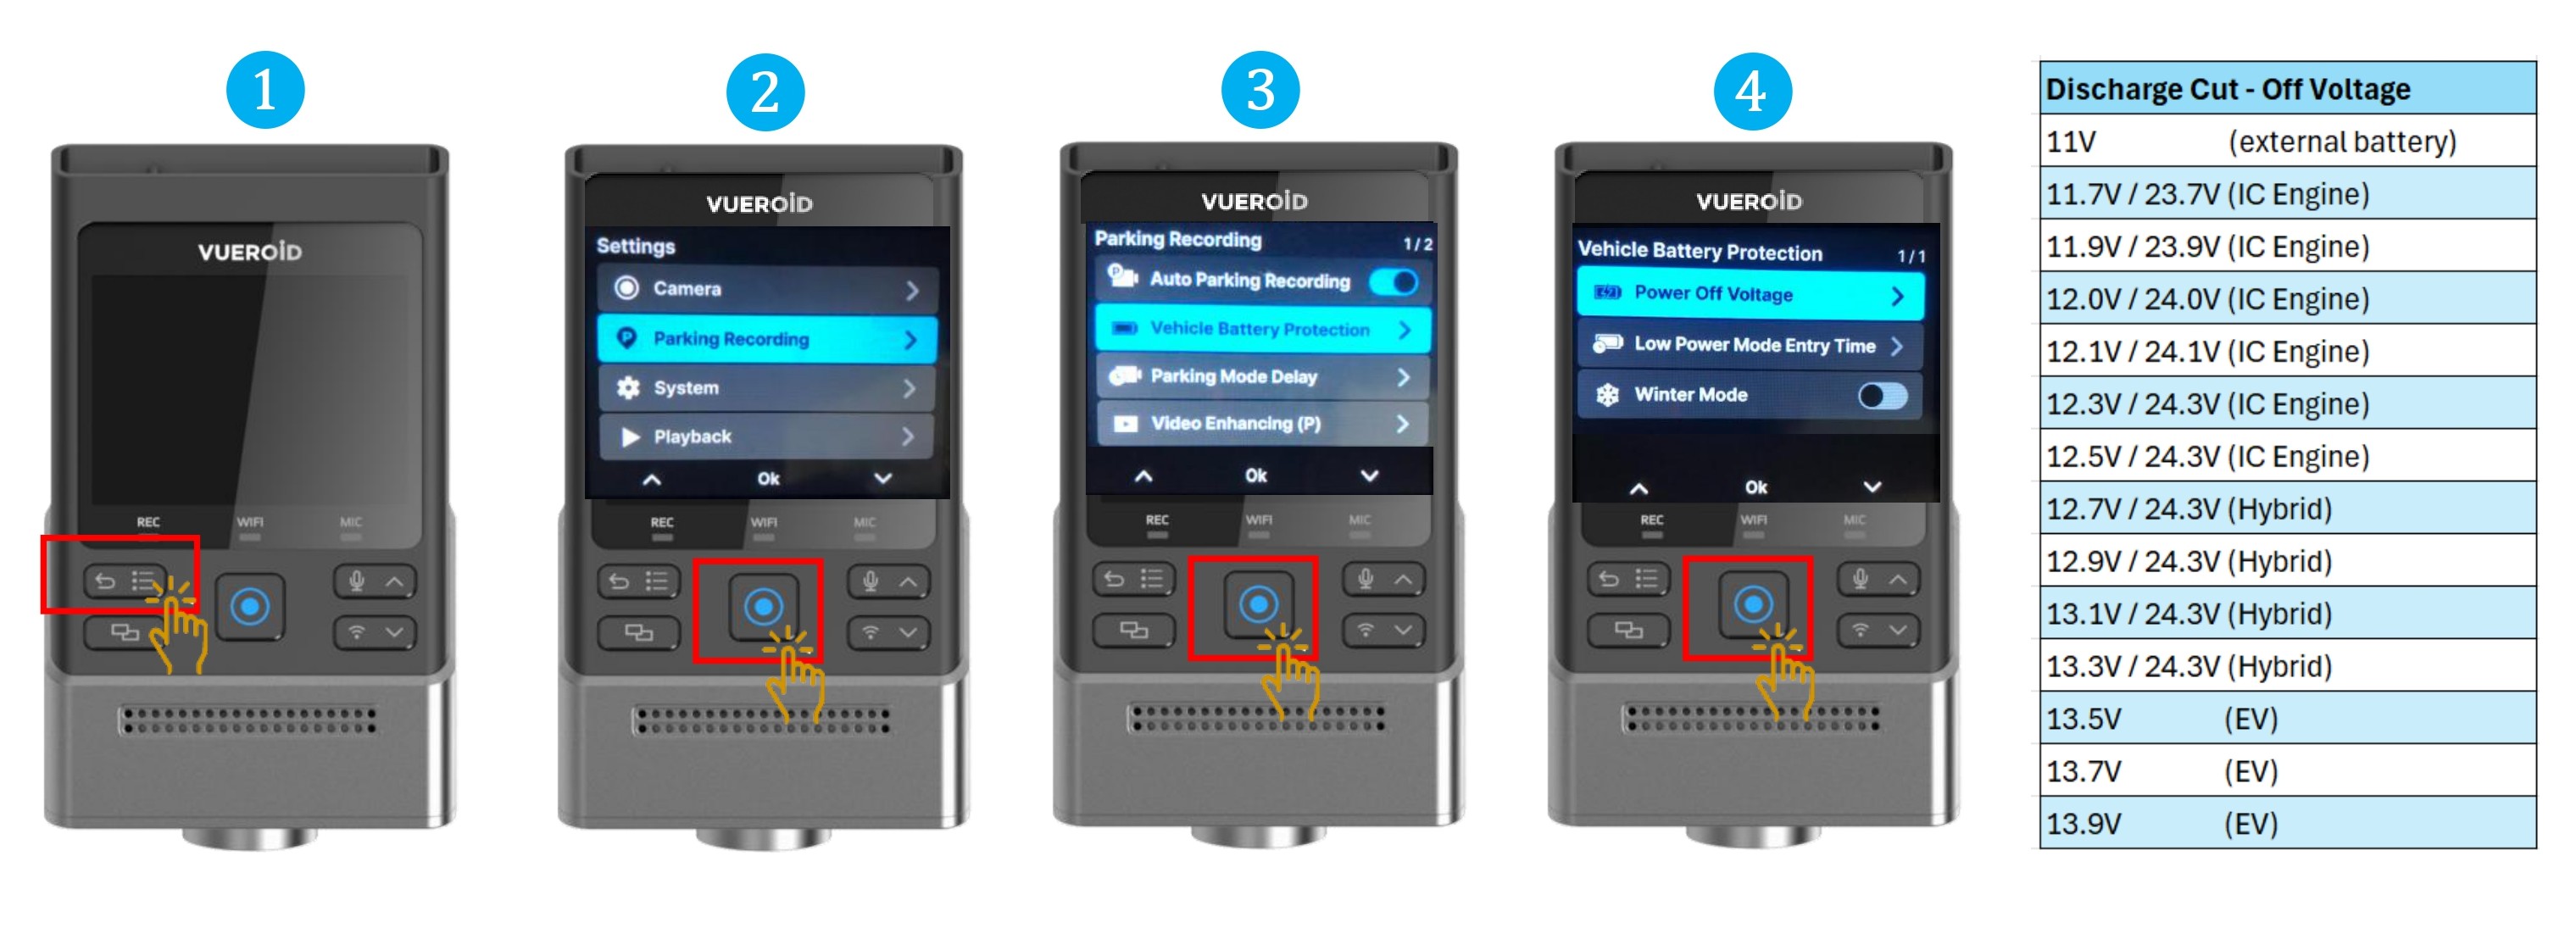
After entering the parking mode, Vehicle Battery Protection can prevent discharge of the vehicle battery.
- Press Settings/Back button to turn on the display and press one more time to go to the setting.
- Press Manual Record button / Enter button to select "Parking Recording"
- Choose "Vehicle Battery Protection " and press Manual Record / Enter button.
- Choose " Discharge Cut-Off Voltage and press Manual Record / Enter button.
- Select the pre-set voltage cut off settings.
- If the vehicle's battery voltage drops below a predetermined level, the device will stop parking recording and remain turned off until the vehicle is started again.
- Vehicle types (IC Engine, Hybrid, EV) are provided for reference only.
7.2.2.2.2 Setting - Parking Recording - Vehicle Battery Protection - Low Power Mode Entry Time
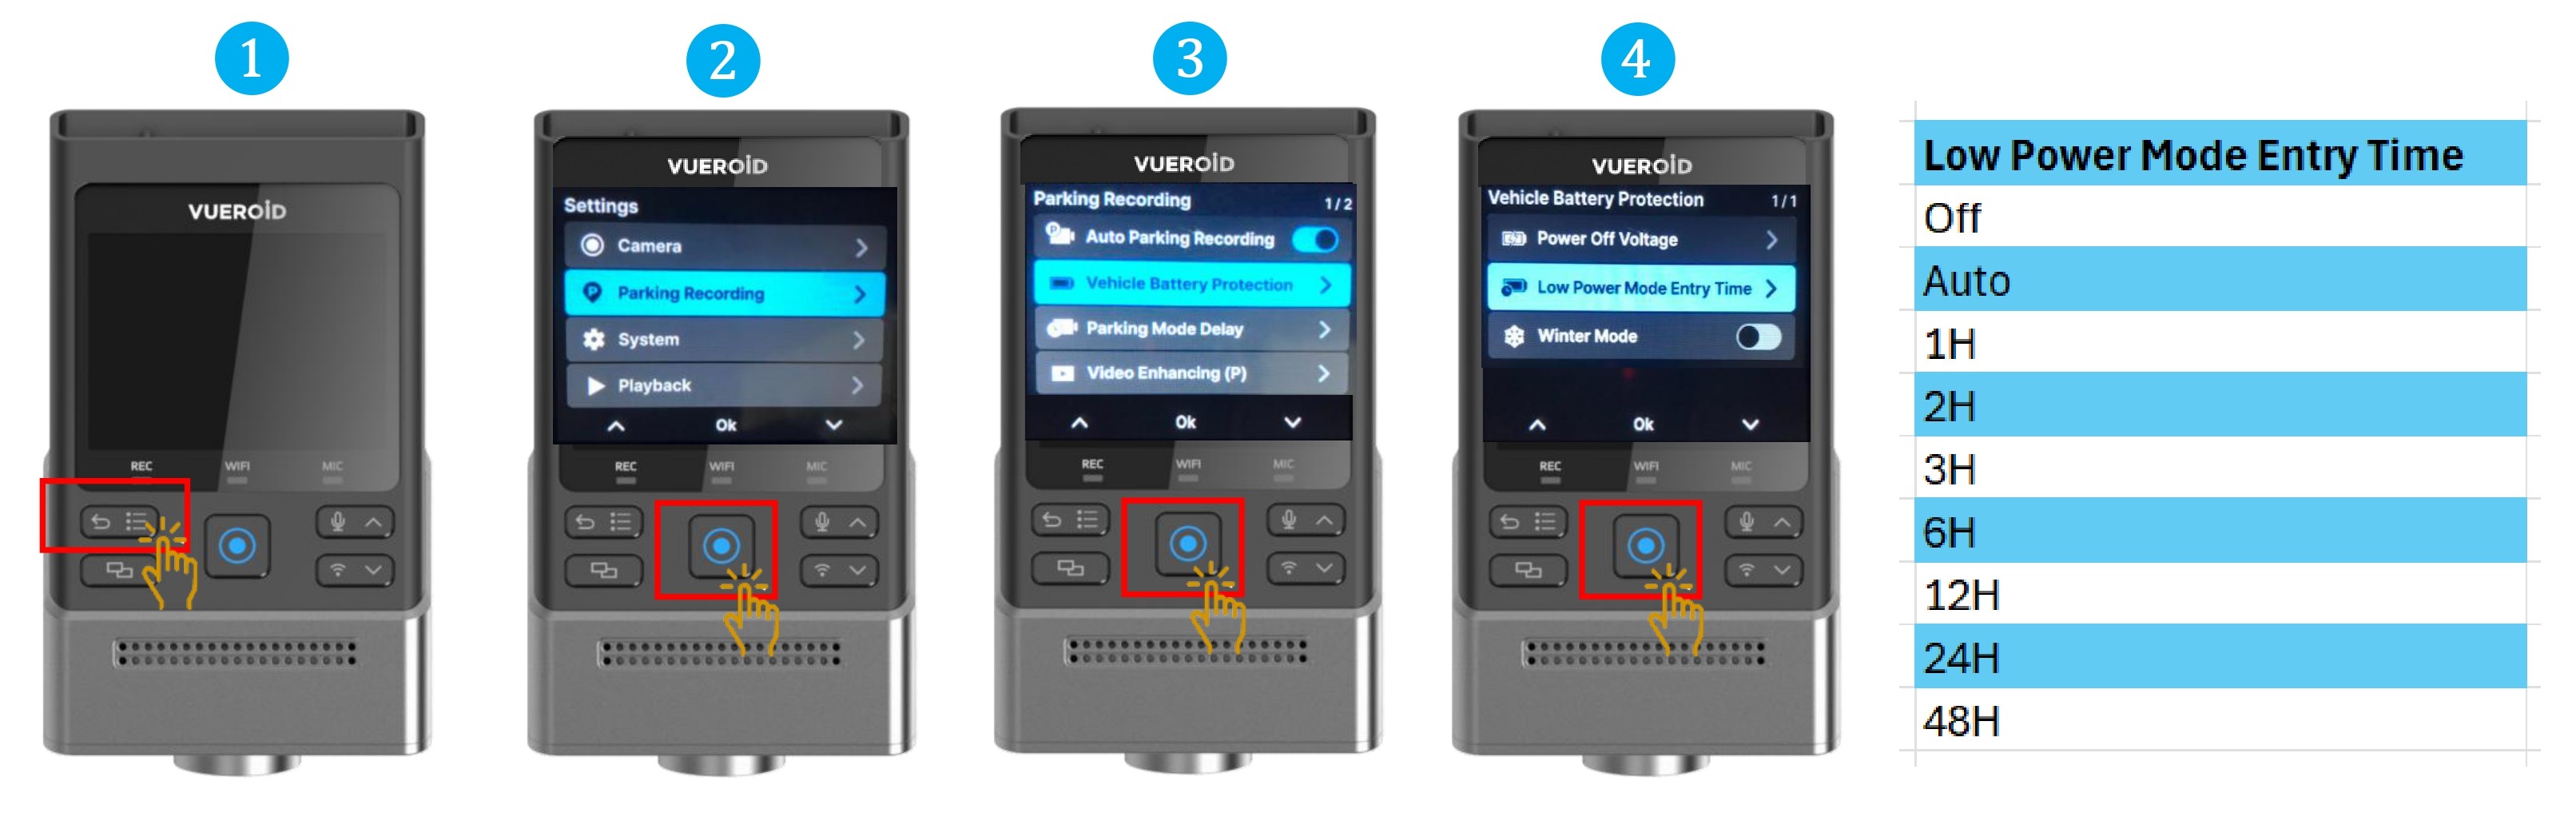
- Press Settings/Back button to turn on the display and press one more time to go to the setting.
- Press Manual Record button / Enter button to select "Parking Recording"
- Choose "Vehicle Battery Protection " and press Manual Record / Enter button.
- Choose " Low Power Mode Entry Time" and press Manual Record / Enter button.
- Select the pre-set Low Power Mode Entry settings.
- After a set time, the device will enter Low Power Mode during parking mode.
7.2.2.2.3 Setting - Parking Recording - Vehicle Battery Protection - Winter Mode
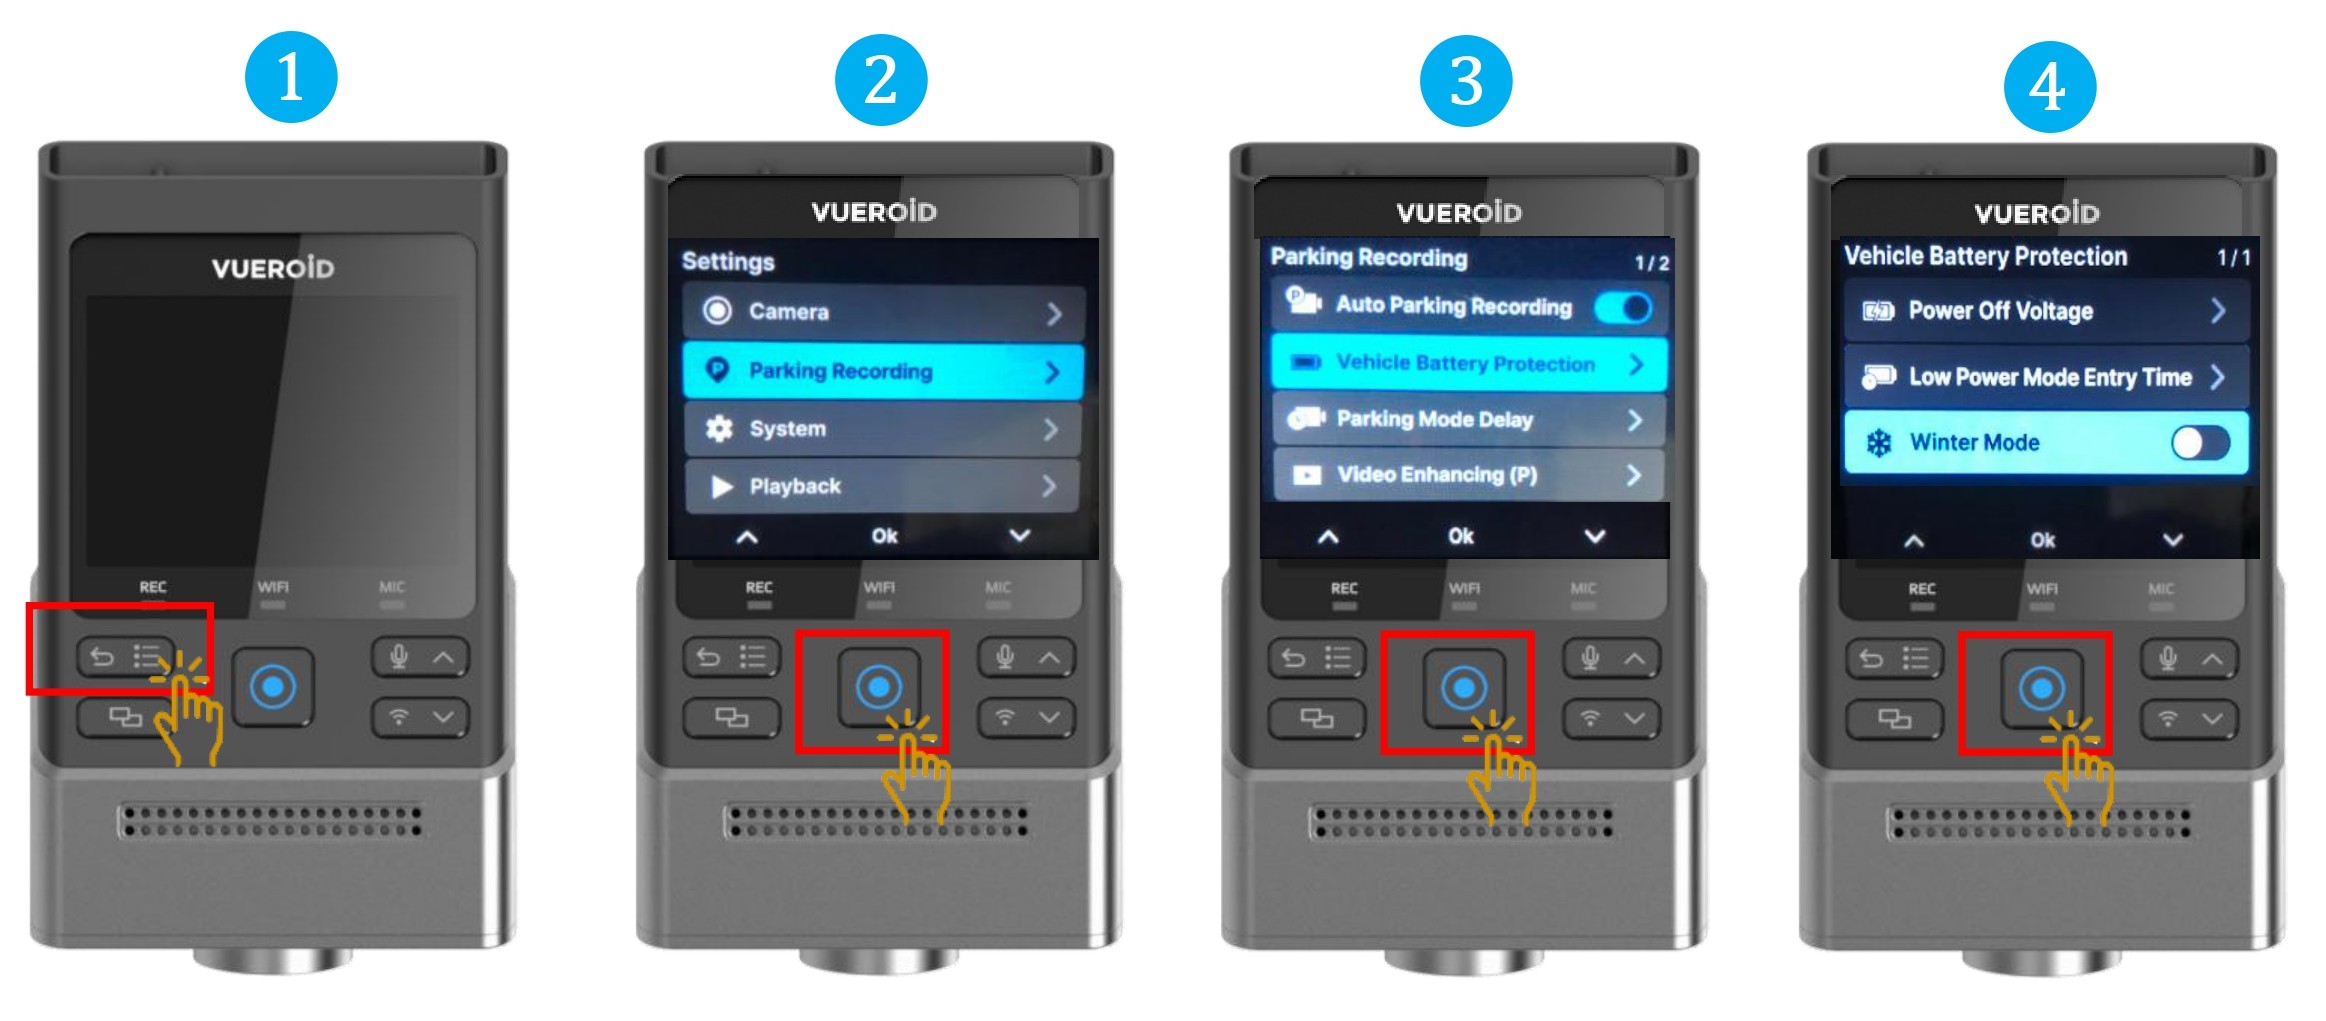
- Press Settings/Back button to turn on the display and press one more time to go to the setting.
- Press Manual Record button / Enter button to select "Parking Recording"
- Choose "Vehicle Battery Protection " and press Manual Record / Enter button.
- Choose " Winter Mode" and press Manual Record / Enter button to turn "On" or "Off".
- Winter mode(From 1st of November to 31st of March) is a strong discharge prevent mode for winter. The Cut-off Voltage will be automatically raised by 0.2V from the set voltage.
- This mode is not applicable to Singapore region and is set to OFF by default.
7.2.2.3 Setting - Parking Recording - Parking Mode Delay
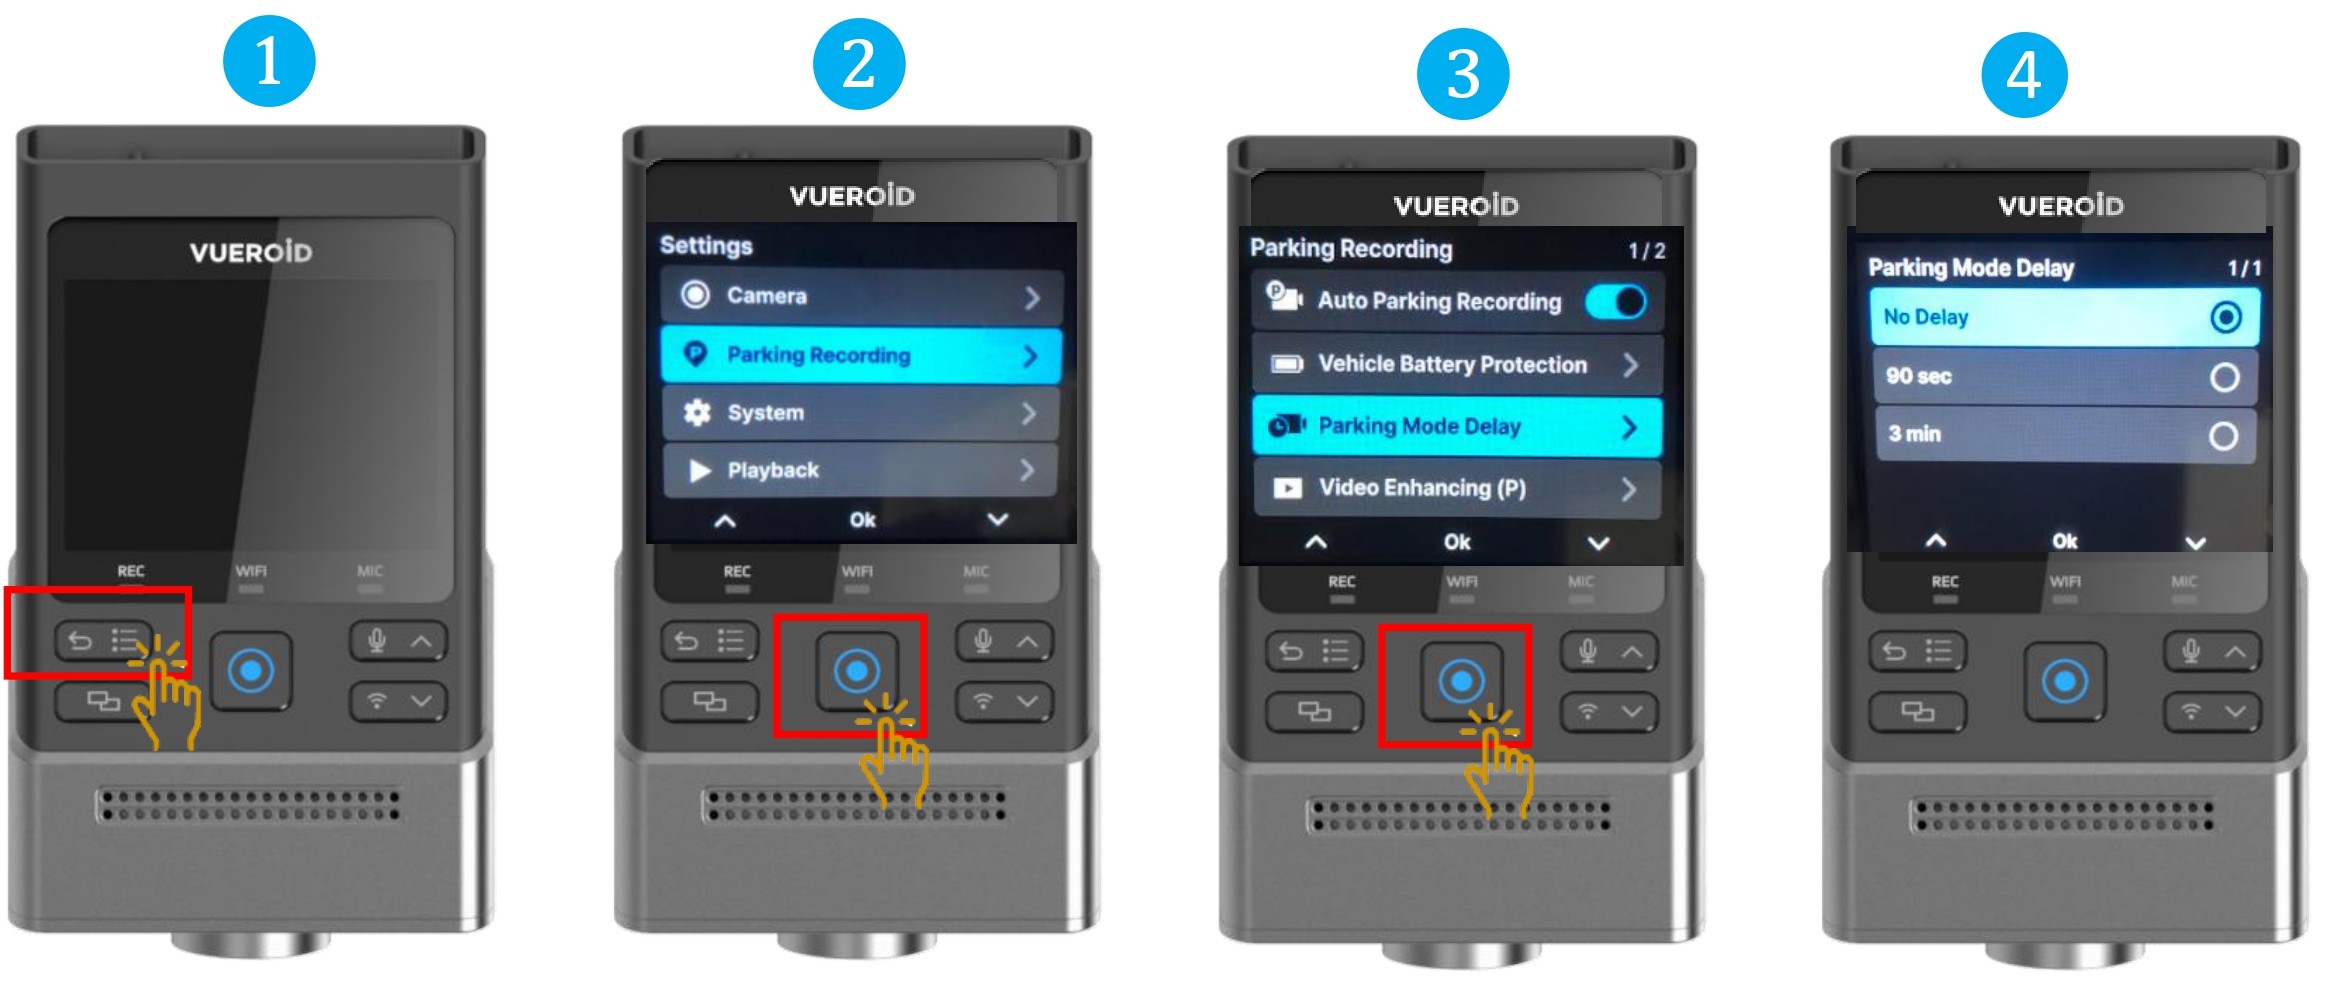
- Press Settings/Back button to turn on the display and press one more time to go to the setting.
- Press Manual Record button / Enter button to select "Parking Recording"
- Choose "Parking Mode Delay " and press Manual Record / Enter button.
- Select the pre-set delay time settings.
- Delay entering into parking mode for a set amount of time after the vehicle is turned off.
7.2.2.4 Setting - Parking Recording - Video Enhancing
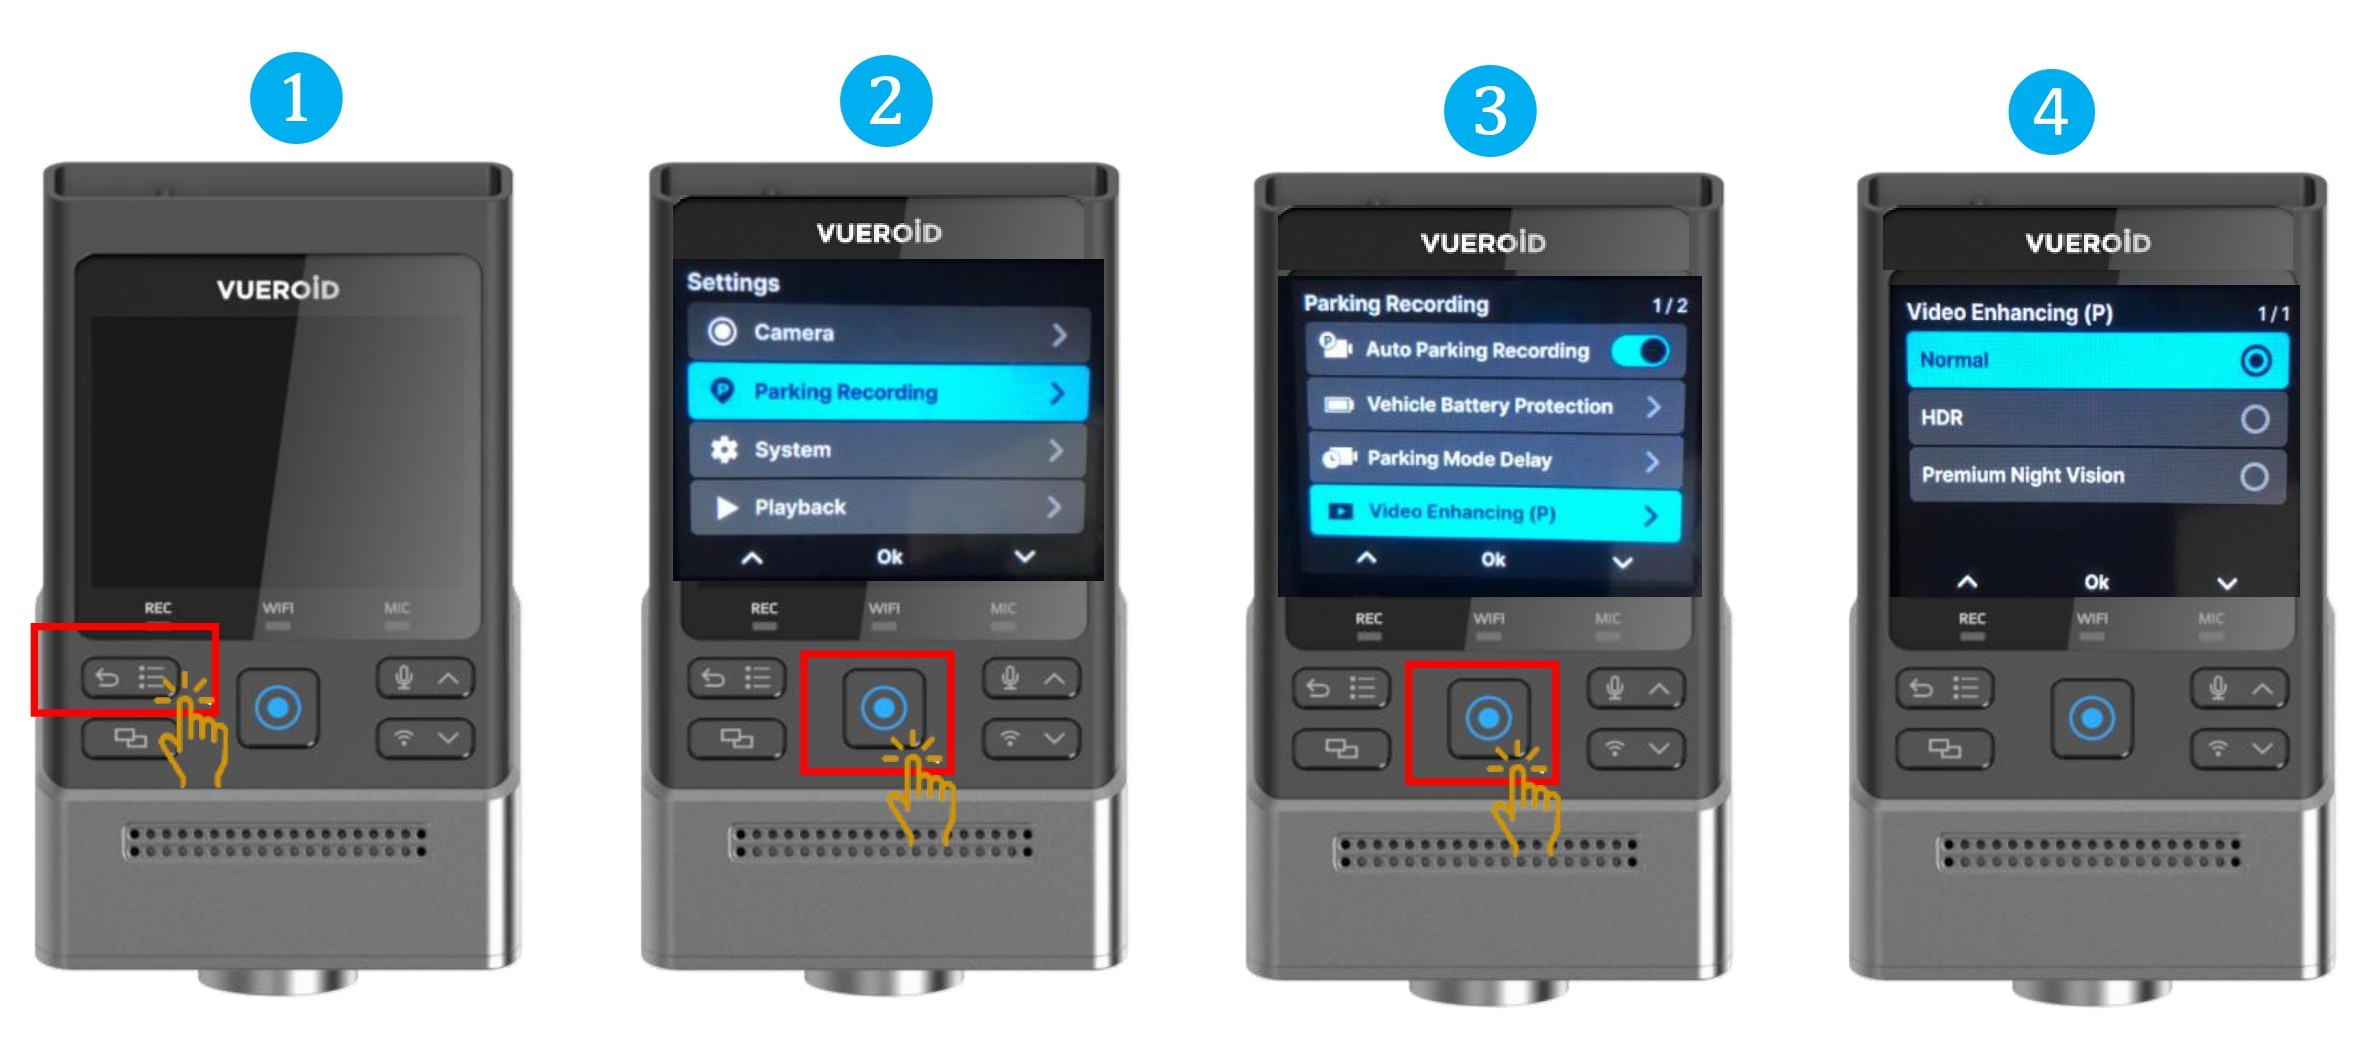
- Press Settings/Back button to turn on the display and press one more time to go to the setting.
- Press Manual Record button / Enter button to select "Parking Recording"
- Choose "Video Enhancing " and press Manual Record / Enter button.
- Select the video enhancing mode.
- You can select Video Enhancing mode for video quality during the parking mode.
※ The HDR(High Dynamic Range) is for expressing a richer contrast between light and dark areas in photos or videos.
※ Premium Night Vision is specialized in nighttime, for extremely dark environments.
※ Parking recording does not apply HDR Timer.
HDR / Premium Night Vision is not supported at 4K 60FPS and QHD 60FPS
7.2.2.5 Setting - Parking Recording - Recording Type
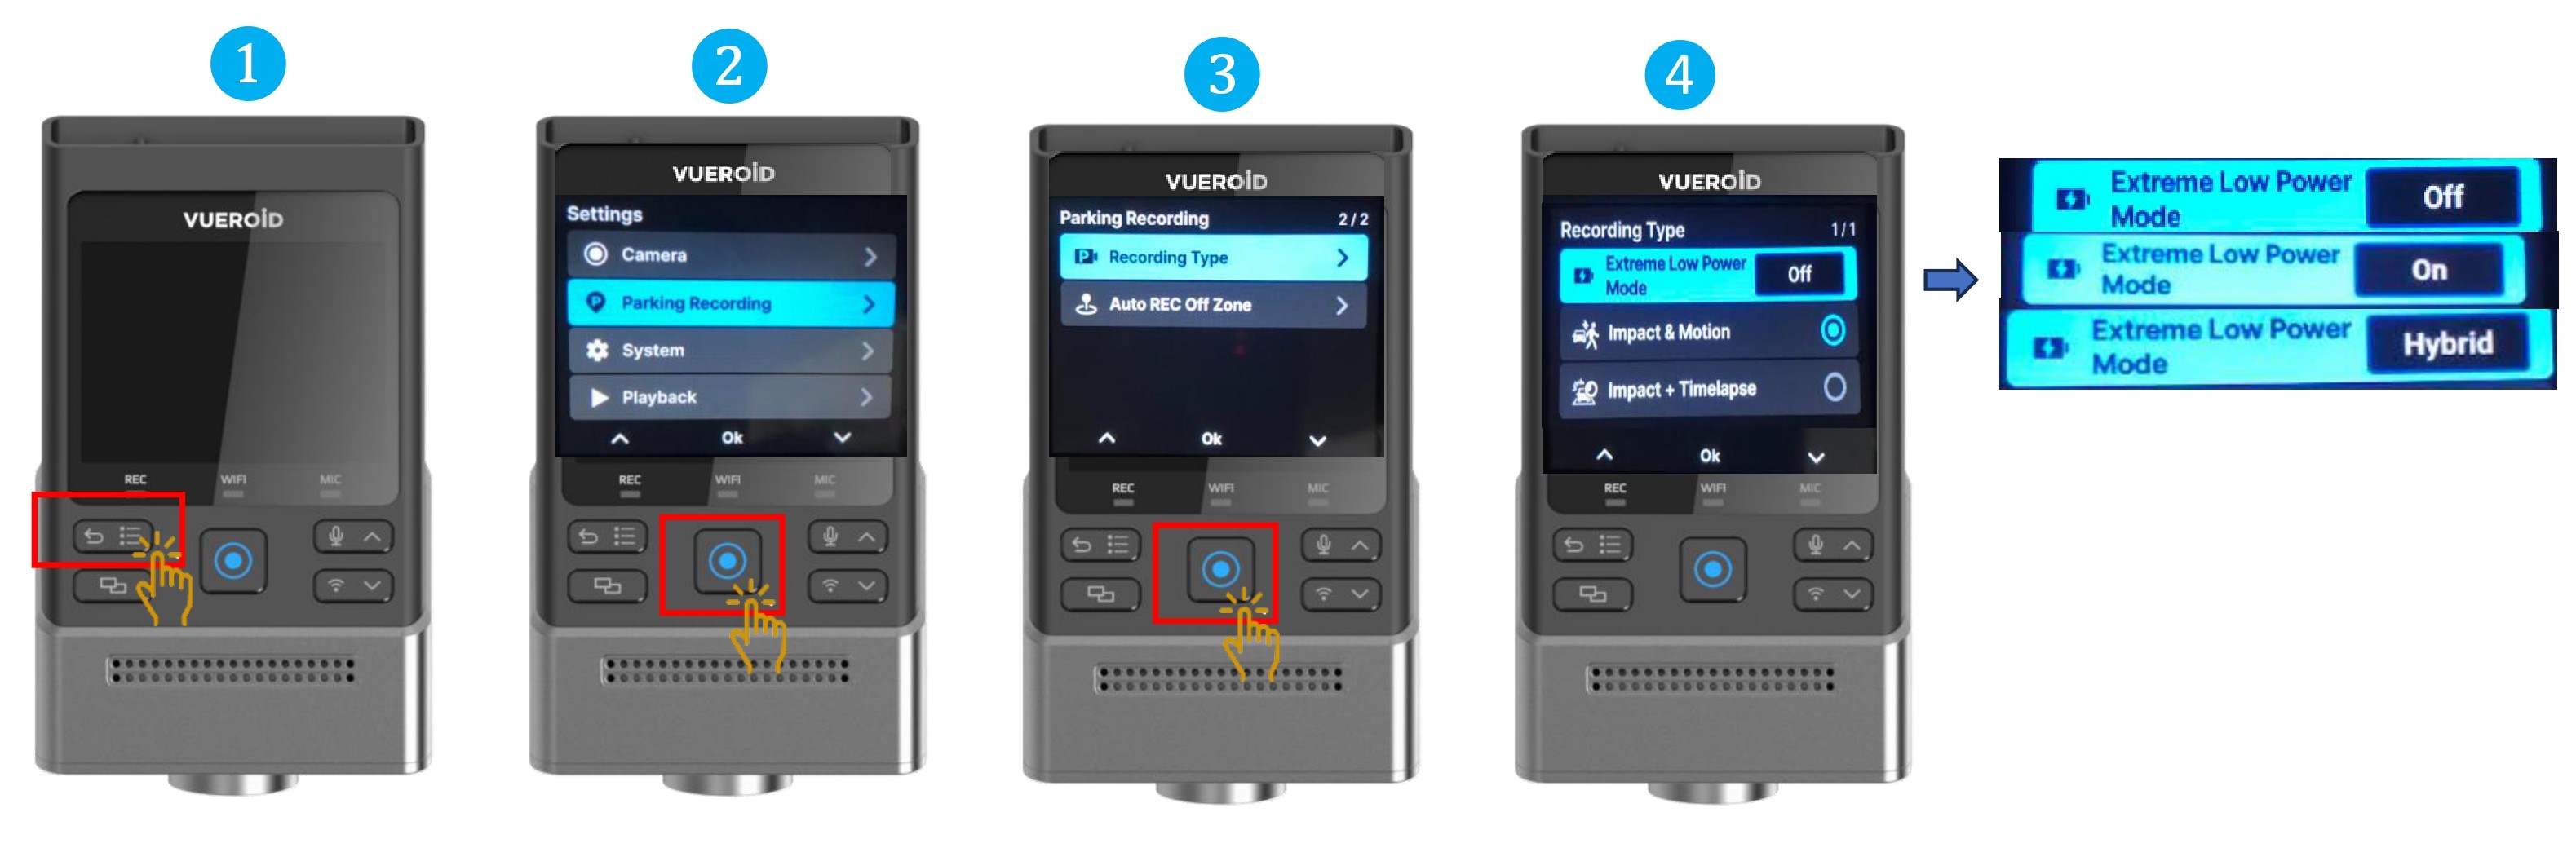
- Press Settings/Back button to turn on the display and press one more time to go to the setting.
- Press Manual Record button / Enter button to select "Parking Recording"
- Choose "Recording Type " and press Manual Record / Enter button.
- Select the recording type mode.
- Extreme Low Power Mode: Off - Normal parking recording will be recorded upon the selection of Impact + Motion or Impact + Timelapse.
- Extreme Low Power Mode: On - Dashcam will enter Low Power Mode where the dashcam will not record until there is an impact detected.
- Extreme Low Power Mode: Hybrid - Dashcam will enter Low Power Mode once it reached the low voltage cut off setting.
Pre- Set Low Voltage Cut Off 12V Extreme Low Power Mode (ELPM) Low Power Mode Entry Time OFF AUTO 1 - 48Hr ON ELPM will "On" once enter parking mode. ELPM will "On" once enter parking mode. ELPM will "On" once enter parking mode. OFF No ELPM ELPM will "On" once detected 12V and continuous in this ELPM mode. Not suitable for tap on vehicle engine power Enter ELPM after the set time (If Power Off Voltage is detected before the set time, the device turns off) HYBRID Enter ELPM when12.2V Power Off Voltage is detected during parking recording. Turn off when 12V Power Off Voltage is detected during ELPM parking recording. Enter ELPM when12.2V Power Off Voltage is detected during parking recording. Turn off when 12V Power Off Voltage is detected during ELPM parking recording. Enter ELPM after the set time. If 12.2V Power Off Voltage is detected before the set time, the device enters ELPM. During ELPM parking recording, the device turns off when 12V Power Off Voltage is detected.
7.2.2.6 Setting - Parking Recording - Auto REC Off Zone
You can designate areas where parking recording is not preferred to save the vehicle’s battery. (e.g., home, workplace, etc.).
If the vehicle enters one of these designated areas and the engine is turned off, parking recording will not start automatically, even if the auto parking recording is enabled.
Up to three zones can be set, with a radius of 30, 50, or 100 yards(m) based on the current GPS location.
Settings are based on GPS coordinates, and you must enter the settings menu at the desired location to register or modify the zone.
Dashcam GPS location must be detected to do this setting.
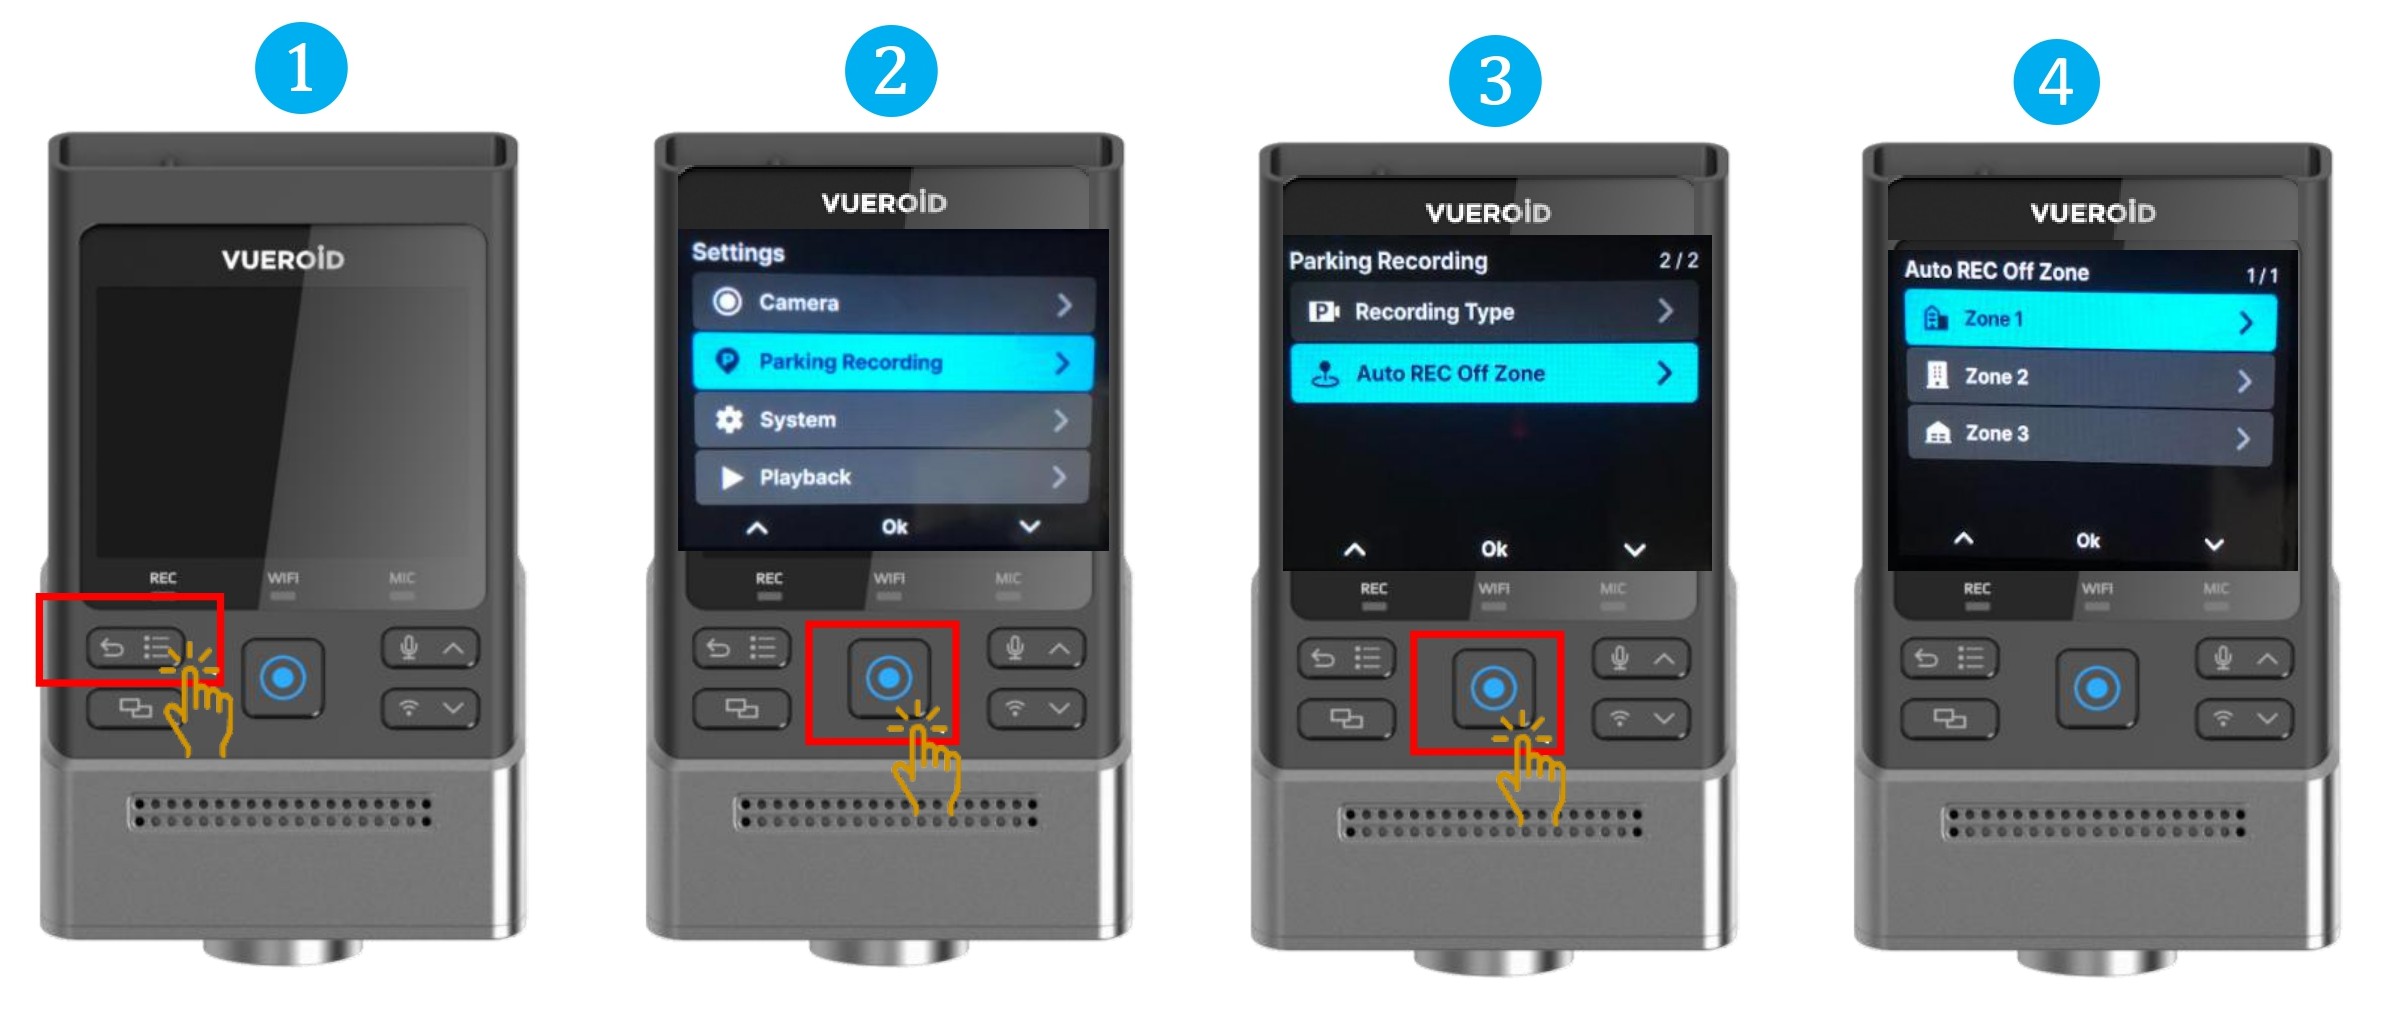
- Press Settings/Back button to turn on the display and press one more time to go to the setting.
- Press Manual Record button / Enter button to select "Parking Recording"
- Choose "Auto REC Off Zone" and press Manual Record / Enter button.
- Select the "Zone" and press Manual Record / Enter button.
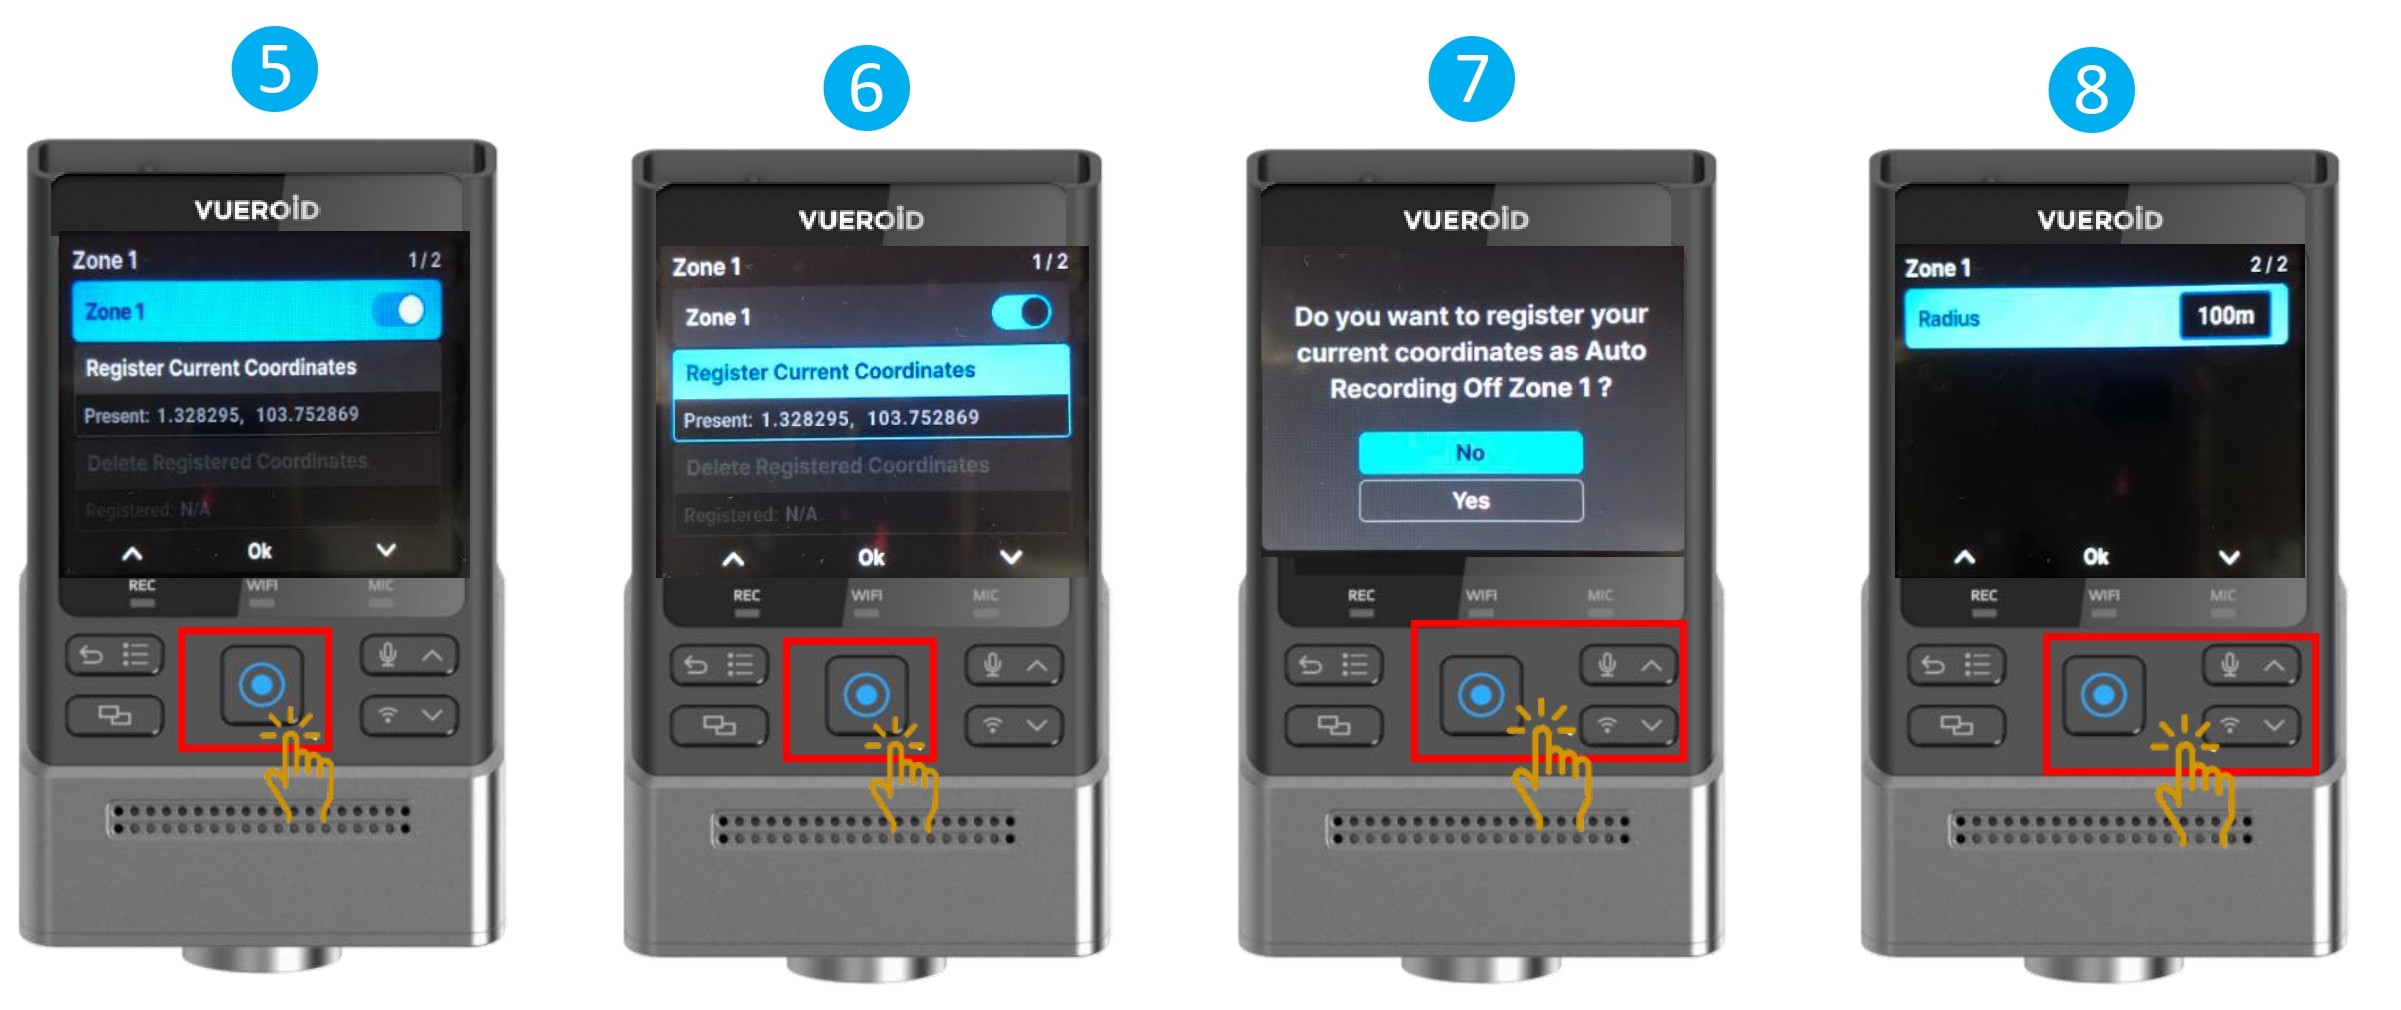
- Click on "Zone 1" and press Manual Record / Enter button to turn "On" or "Off".
- Once turned On, choose "Register Current Coordinates" press Manual Record / Enter button.
- Select Yes, to confirm.
- Click on the Down button to choose the radius setting of 30, 50, or 100 m
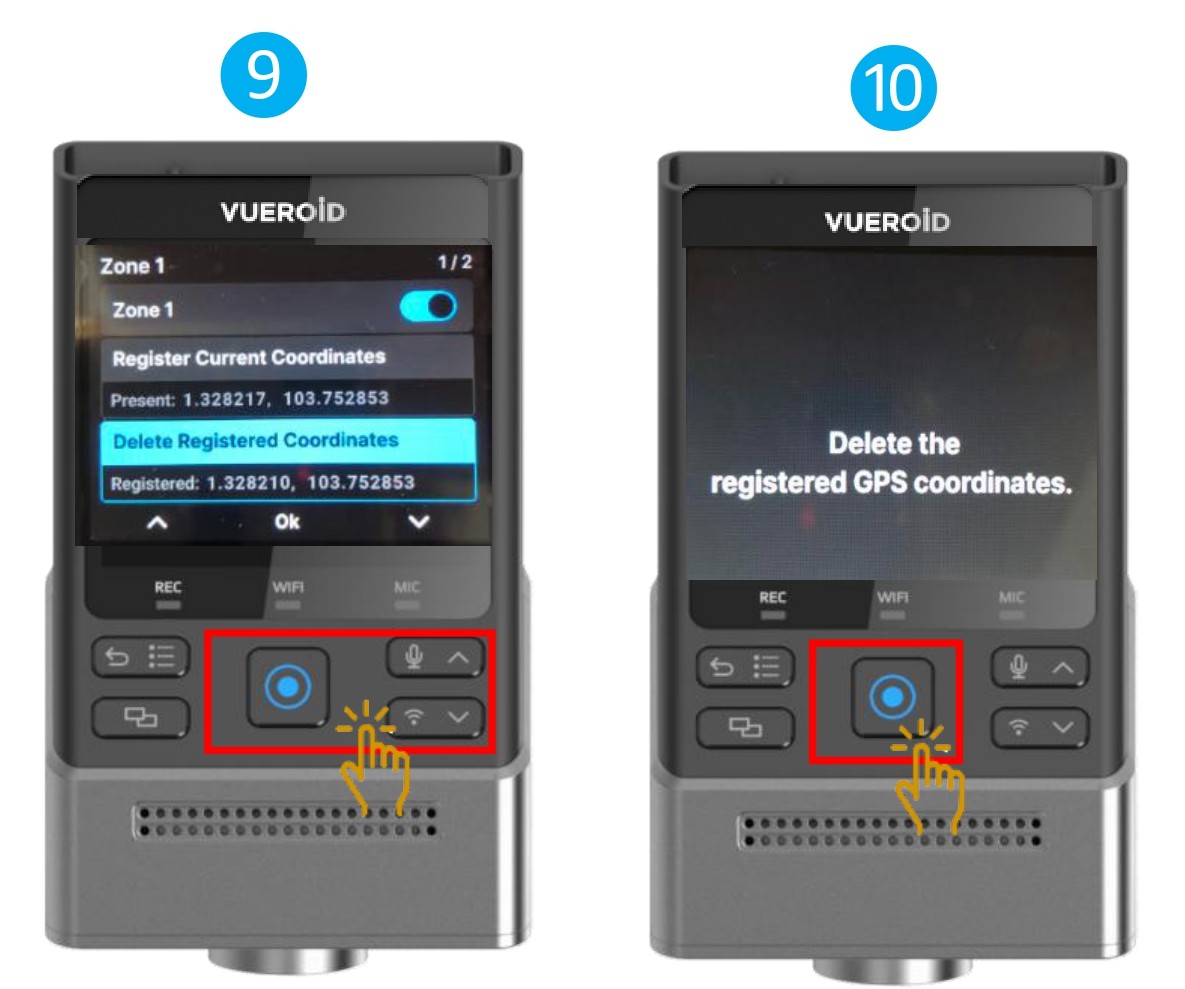
- To delete, choose the "Delete Registered Coordinates" press Manual Record / Enter button.
- A message will appeared to confirm the registered coordinates has been deleted.
7.2.2.5 Setting - Reference Driving Recording Details
| Option | Detail |
| Driving Recording | Recording videos during the driving and saved in folder every 1 minute unit. |
| Time-Lapse at Driving | Recording at 1 fps per second instead of 30 fps (or 60fps). 5 minutes of video per recording file. |
| Impact (Event) Recording | When an impact is detected while driving, capturing 10 seconds before and 20 seconds after the impact. When impact recording is activated, a buzzer sound is played. ※ The buzzer On/Off option can be changed in Settings > System > Alert > Event Alert Tone. |
| Manual Recording | Manual recording can be started by pressing the Manual/Enter button on the device. It will record 10 seconds before the button is pressed and 20 seconds after. |
7.2.2.6 Setting - Reference Location of Saved File
| File Type | SD Card Folder |
| Driving Recording | INF Folder |
| Impact Recording while Driving | EVENT Folder |
| Impact Recording while Parking | PEVENT Folder |
| Motion / Time Lapse Recording | PARK Folder. |
| Manual Recording | USER Folder |
| Screenshot image | Bookmark Folder |
7.2.3 Setting - System Settings
7.2.3.1 Setting - System - Speaker Volume
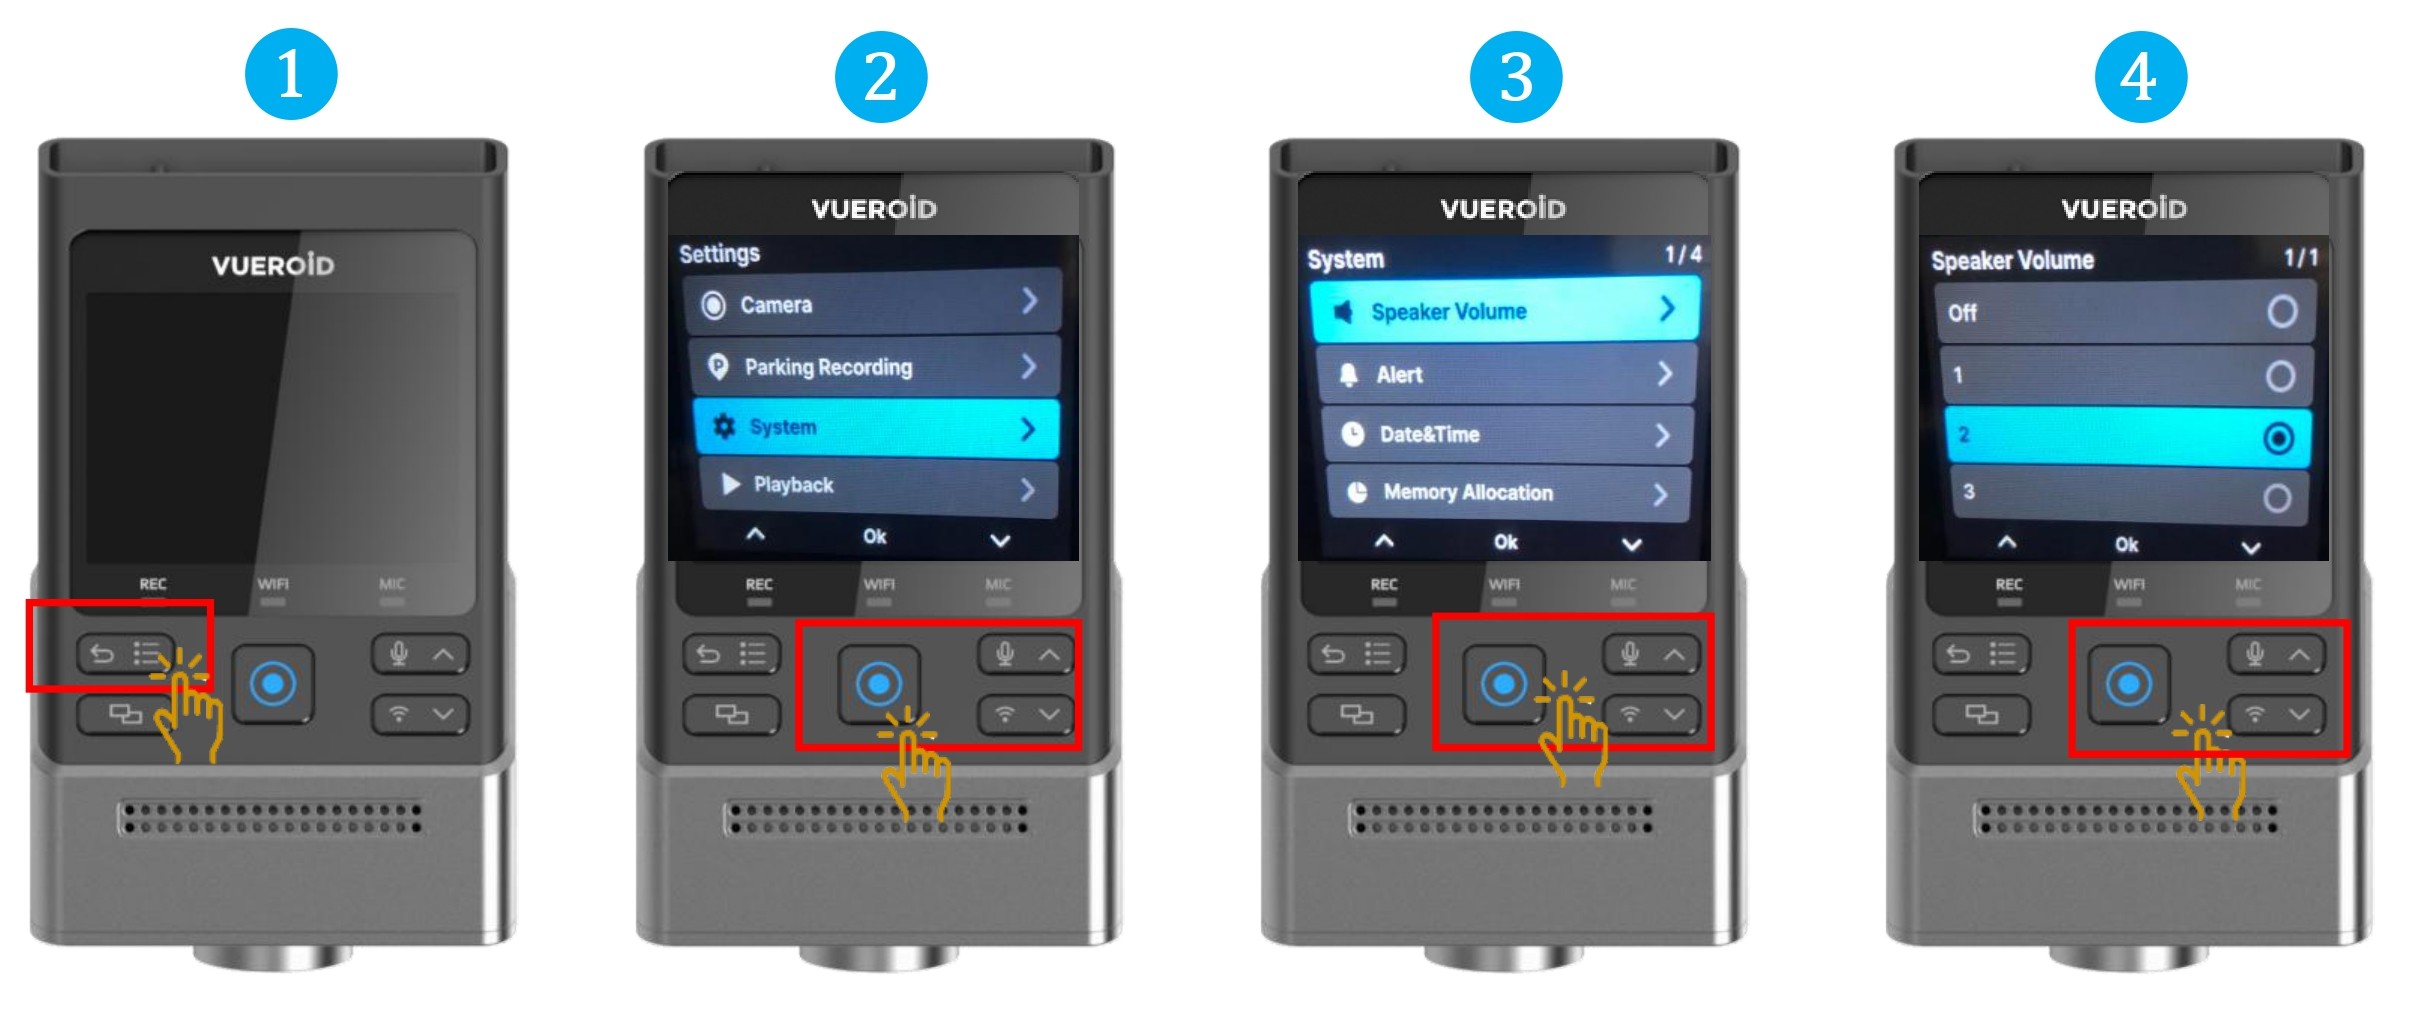
- Press Settings/Back button to turn on the display and press one more time to go to the setting.
- Press Manual Record button / Enter button to select "System".
- Choose "Speaker Volume" and press Manual Record / Enter button.
- Select the loudness volume and press Manual Record / Enter button.
7.2.3.2 Setting - System - Alert
7.2.3.2.1 Setting - System - Alert - Voice Alert
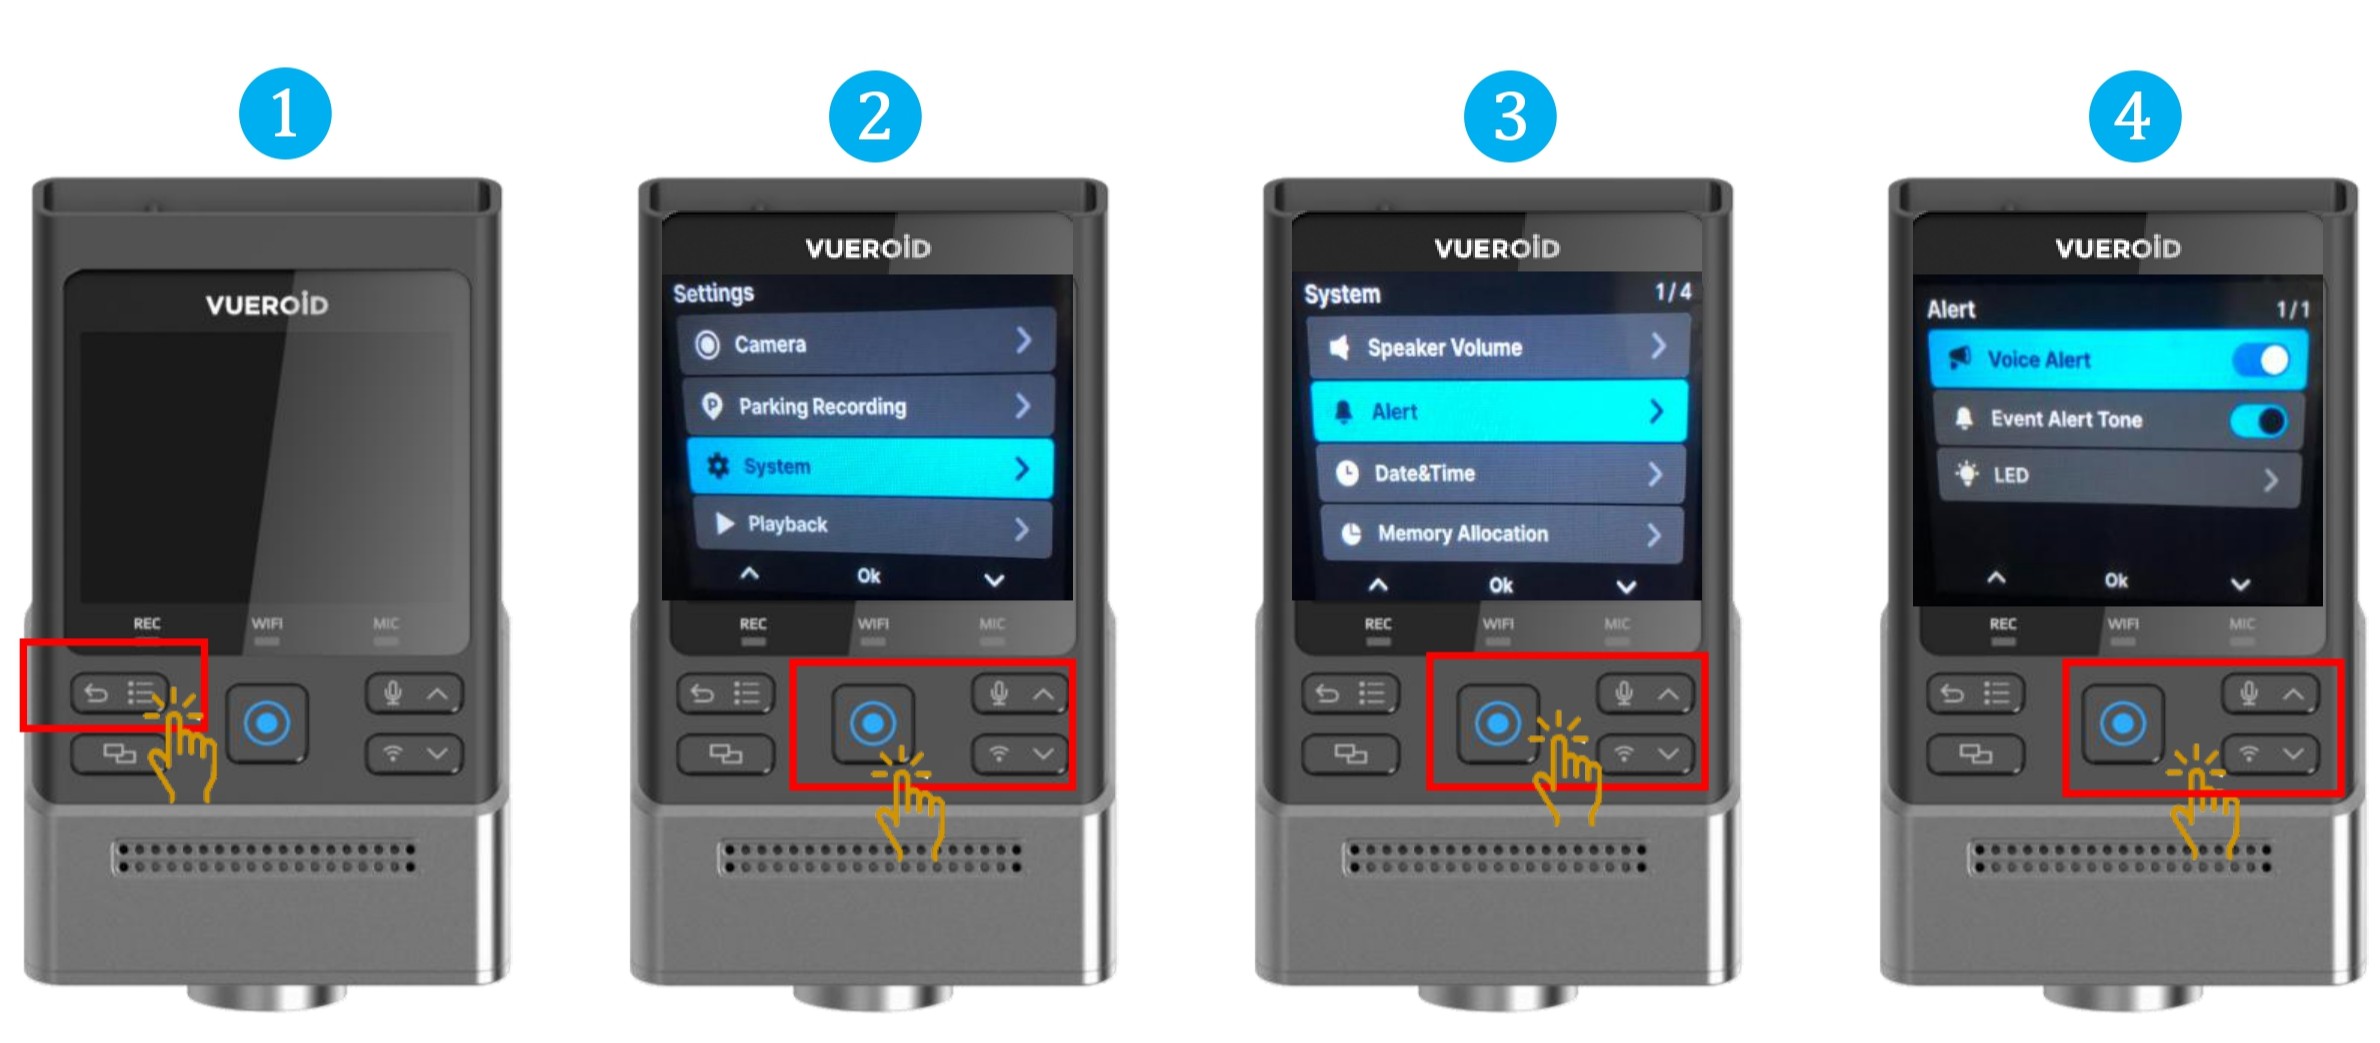
- Press Settings/Back button to turn on the display and press one more time to go to the setting.
- Press Manual Record button / Enter button to select "System".
- Choose "Alert" and press Manual Record / Enter button.
- Choose "Voice Alert" and press Manual Record / Enter button to turn On/Off.
7.2.3.2.2 Setting - System - Alert - Event Alert Tone
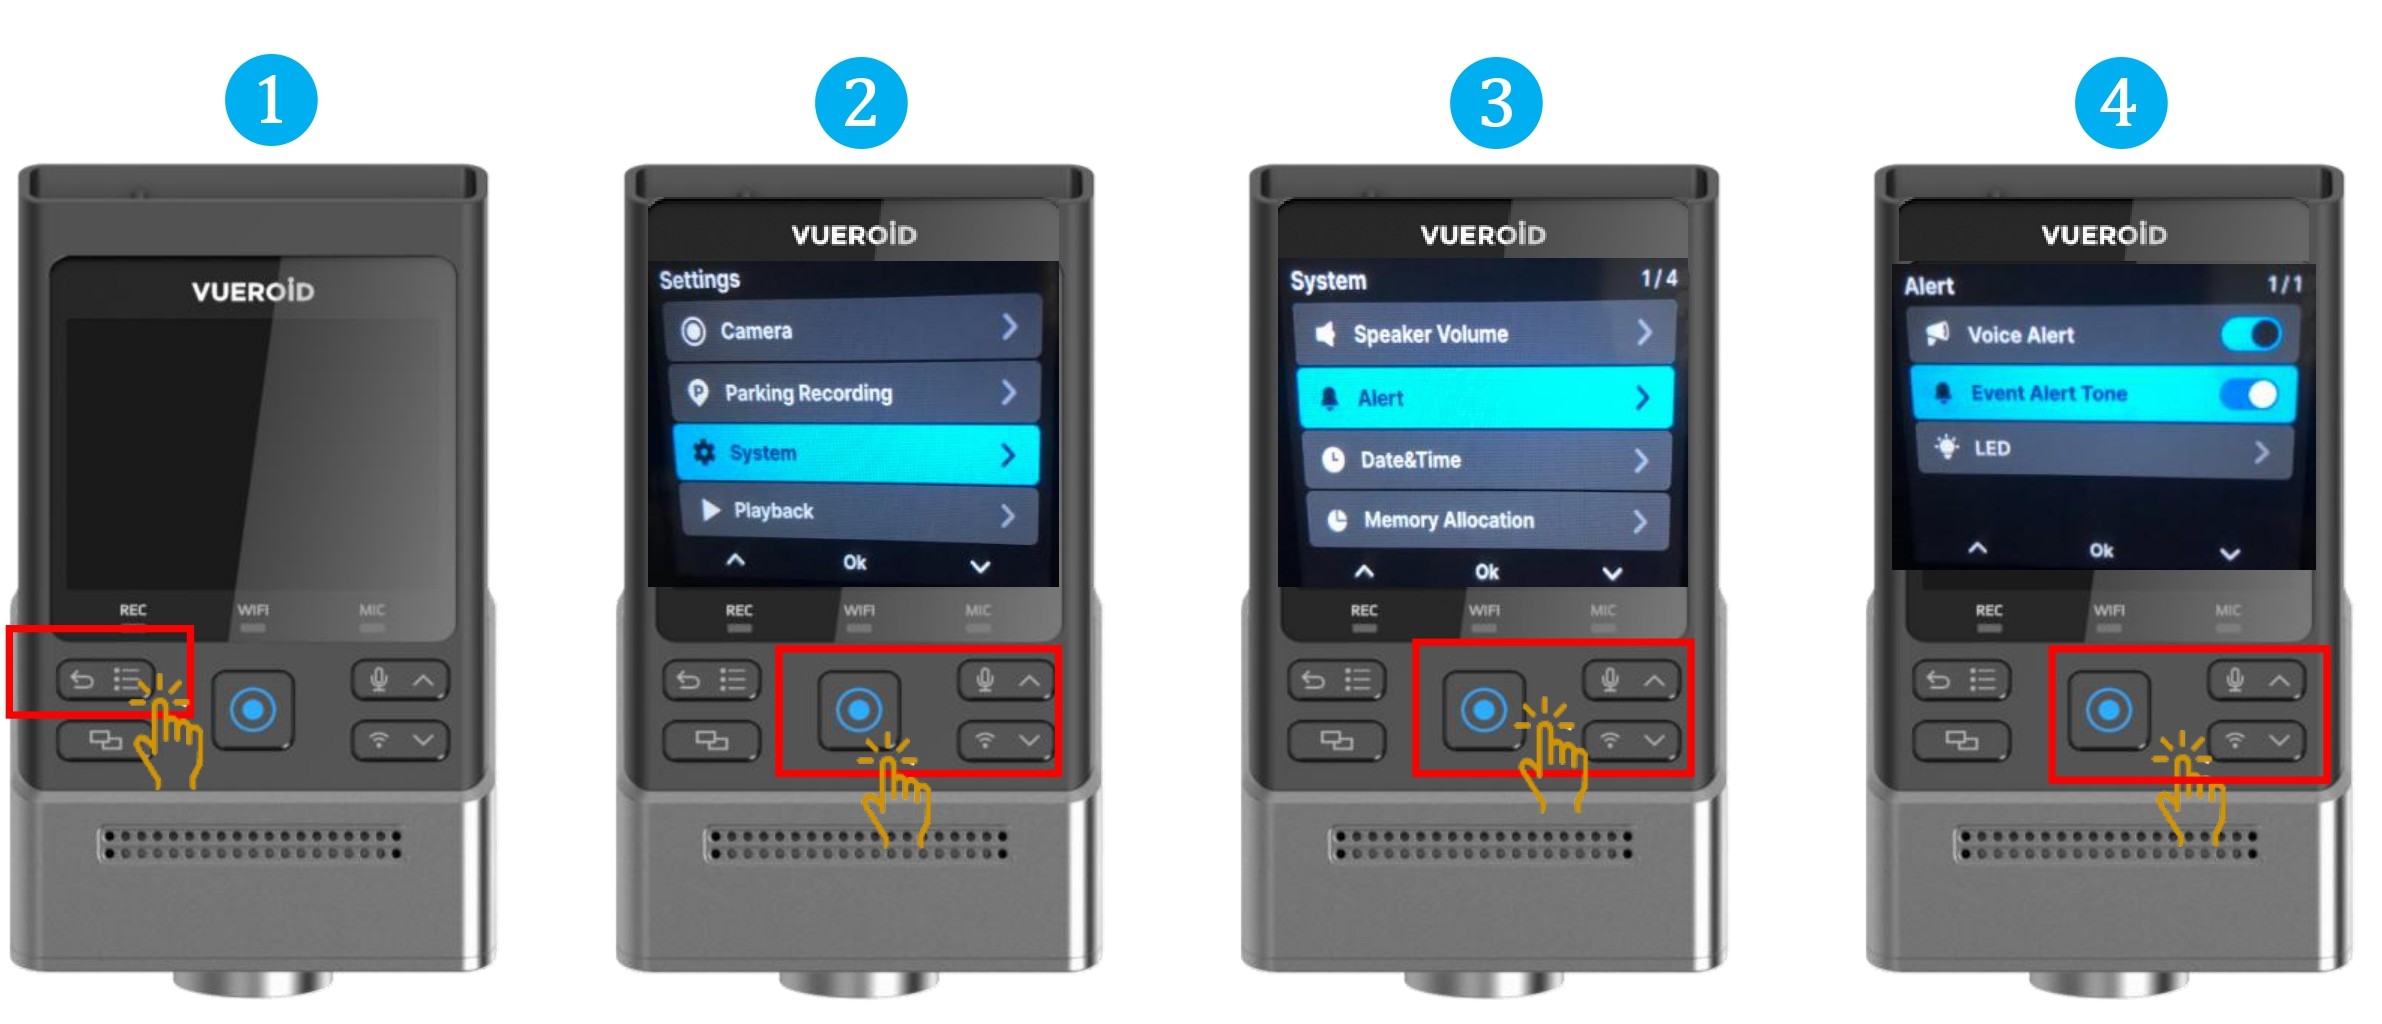
- Press Settings/Back button to turn on the display and press one more time to go to the setting.
- Press Manual Record button / Enter button to select "System".
- Choose "Alert" and press Manual Record / Enter button.
- Choose "Event Alert Tone" and press Manual Record / Enter button to turn On/Off.
- Turn on/off the buzzer sound, that is played when impact is detected.
7.2.3.2.3 Setting - System - Alert - LED
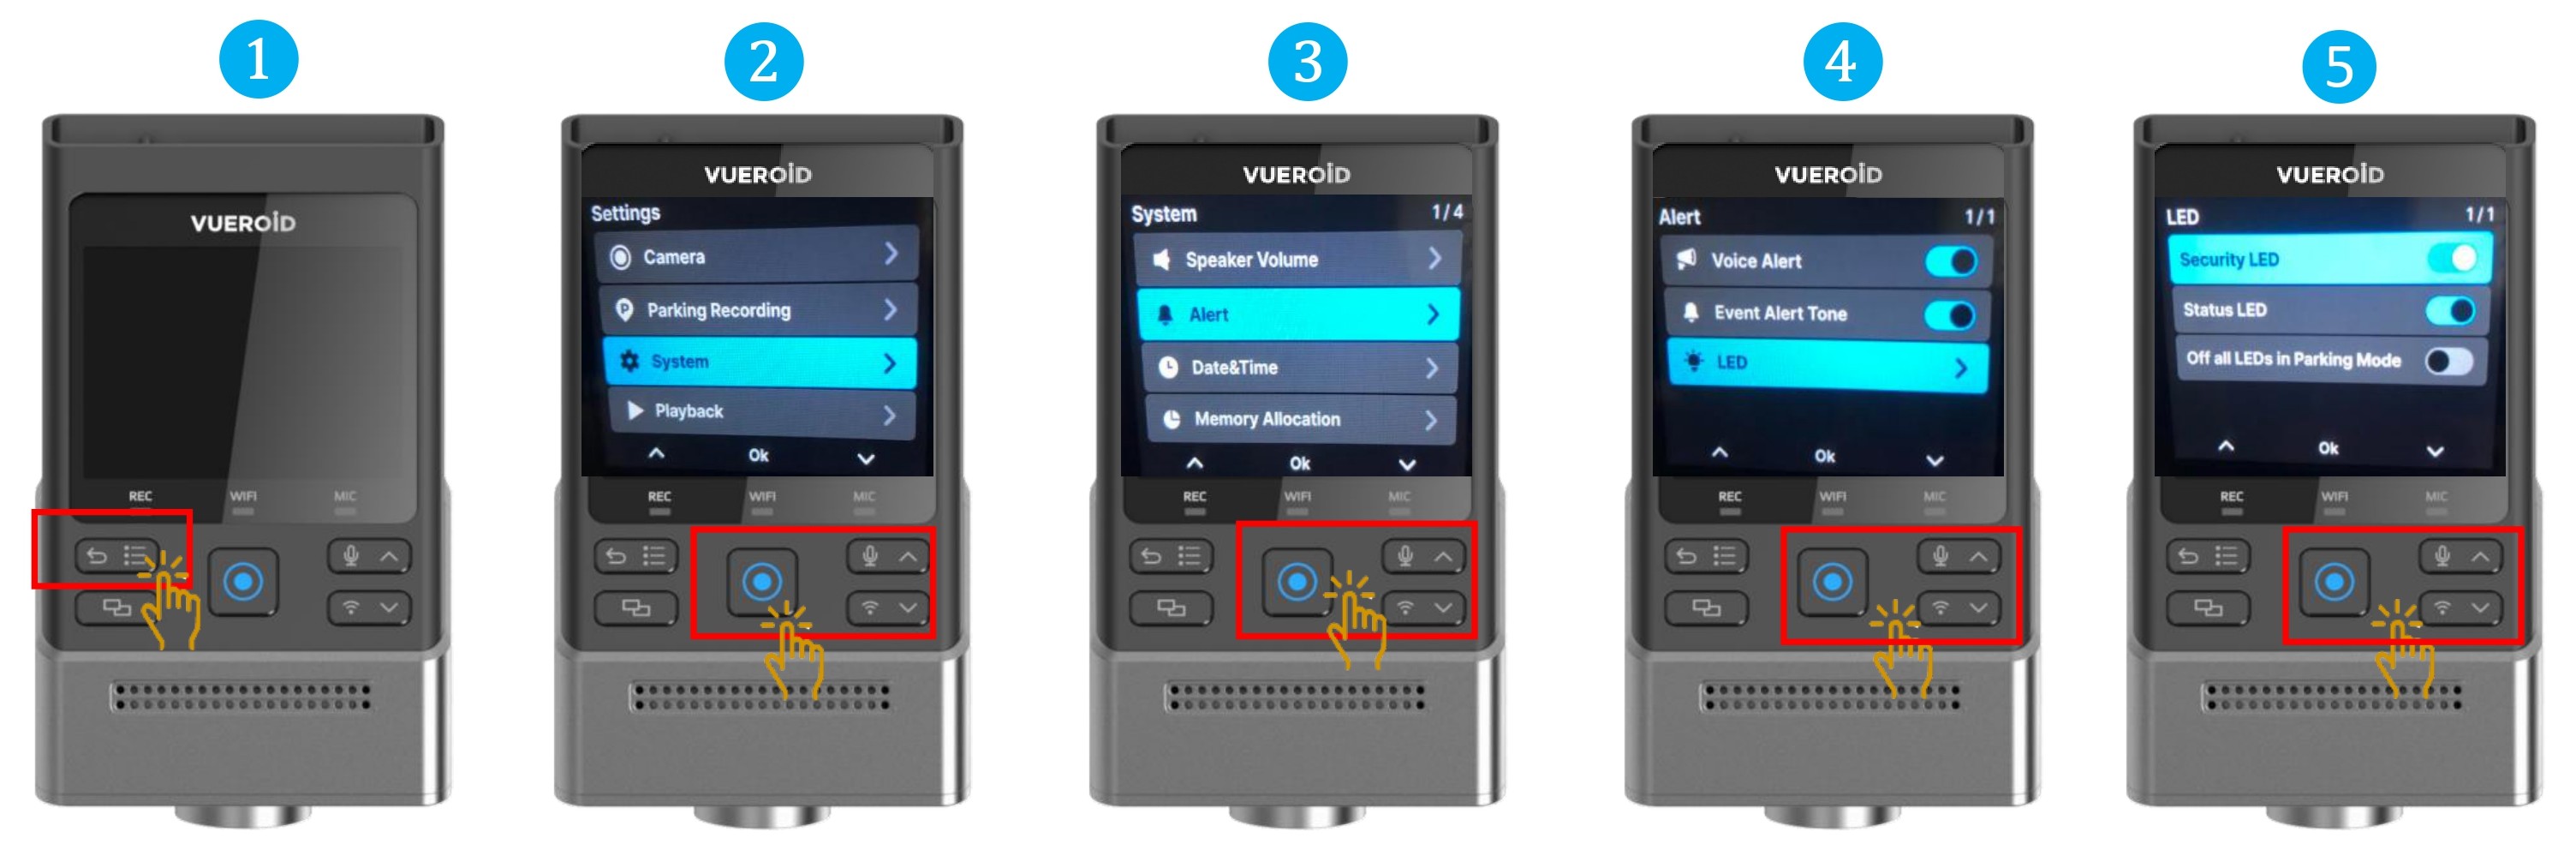
- Press Settings/Back button to turn on the display and press one more time to go to the setting.
- Press Manual Record button / Enter button to select "System".
- Choose "LED" and press Manual Record / Enter button.
- Choose
※"Security LED" and press Manual Record / Enter button to turn On/Off.
※"Status LED" and press Manual Record / Enter button to turn On/Off.
※"Off All LEDs in Parking Mode" and press Manual Record / Enter button to turn On/Off.
7.2.3.3 Setting - System - Date & Time
7.2.3.3.1 Setting - System - Date & Time - Date
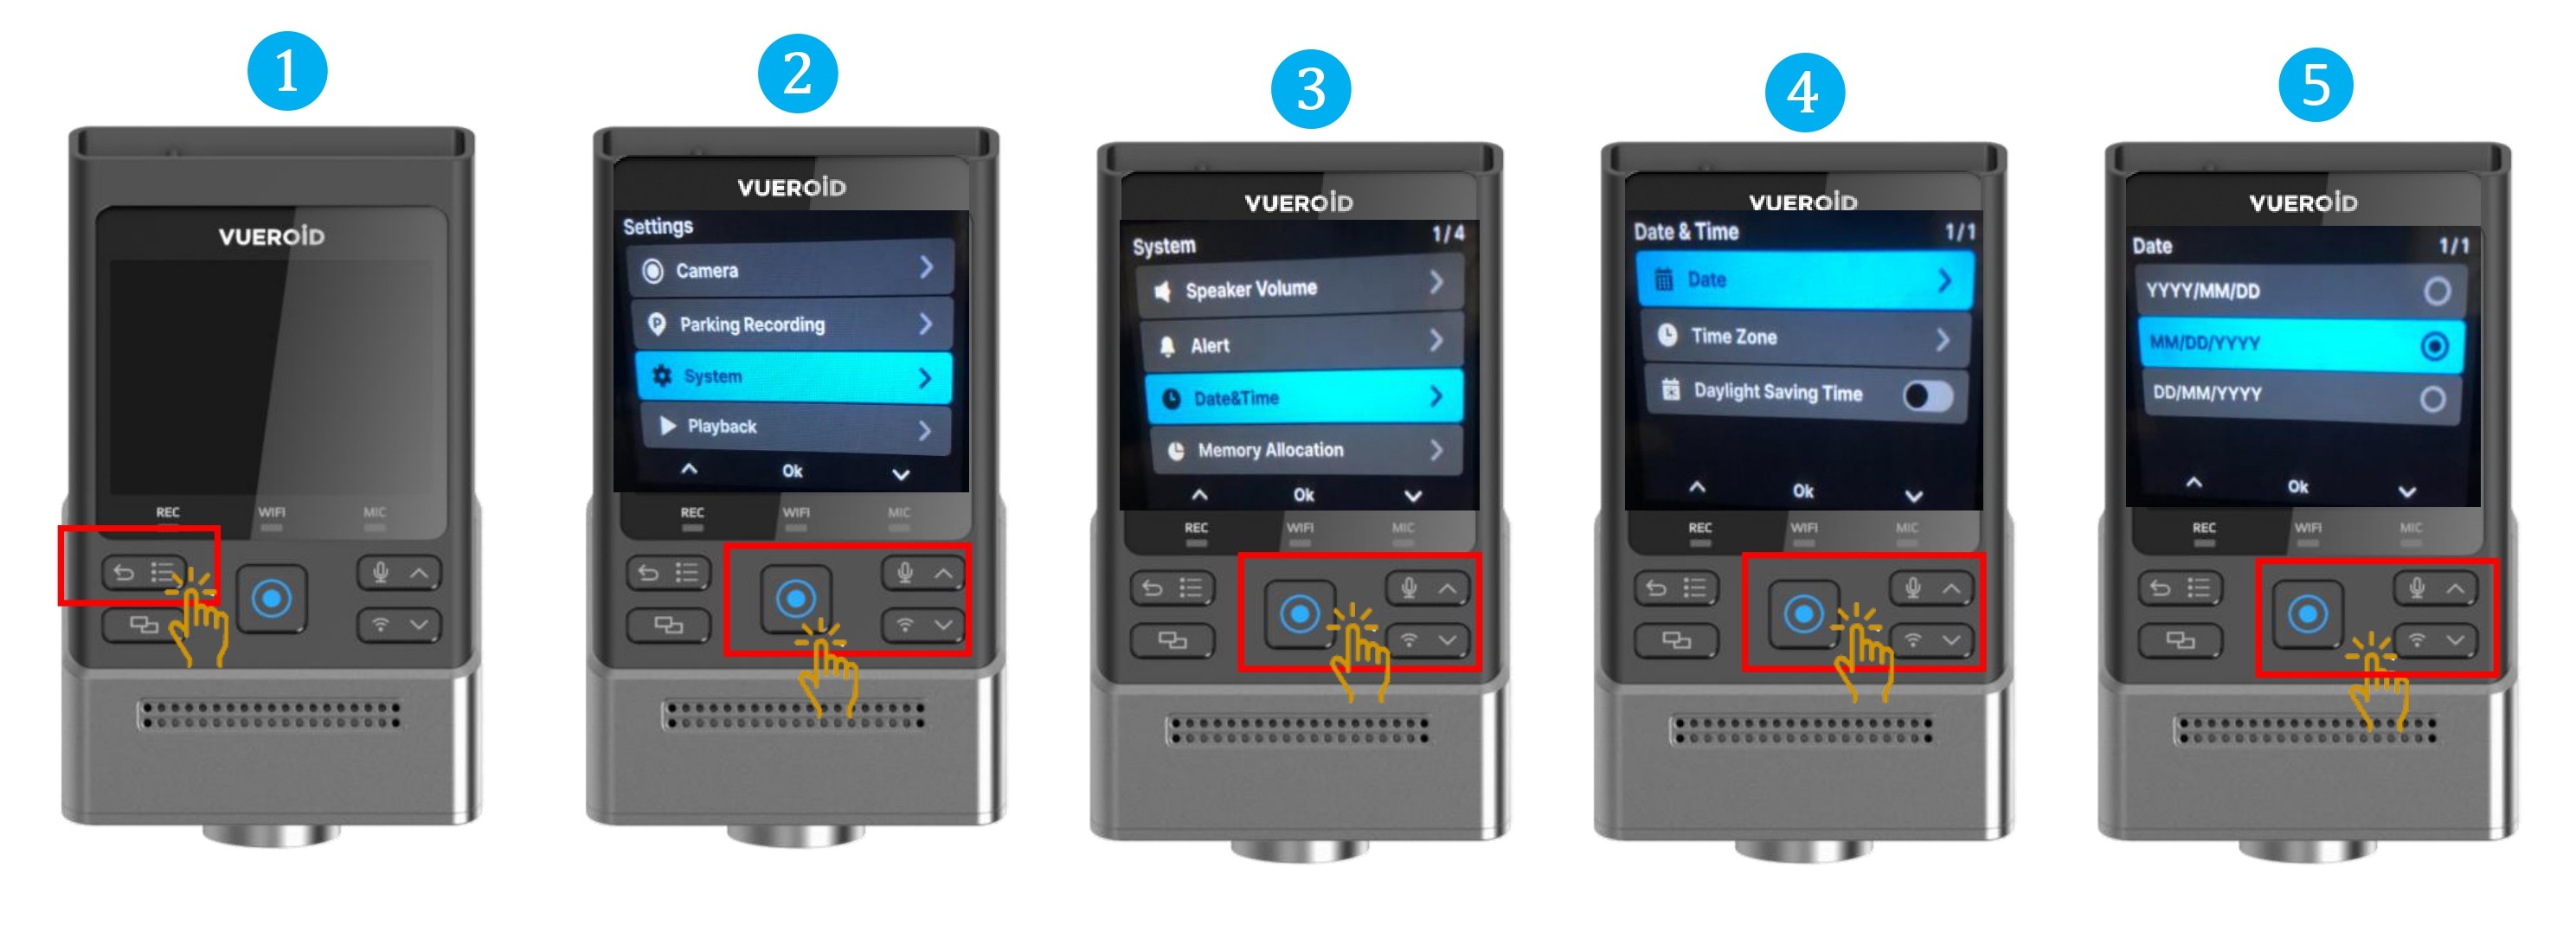
- Press Settings/Back button to turn on the display and press one more time to go to the setting.
- Press Manual Record button / Enter button to select "System".
- Choose "Date & Time" and press Manual Record / Enter button.
- Choose "Date" and press Manual Record / Enter button.
- Select the Date format type.
7.2.3.3.2 Setting - System - Date & Time - Time Zone
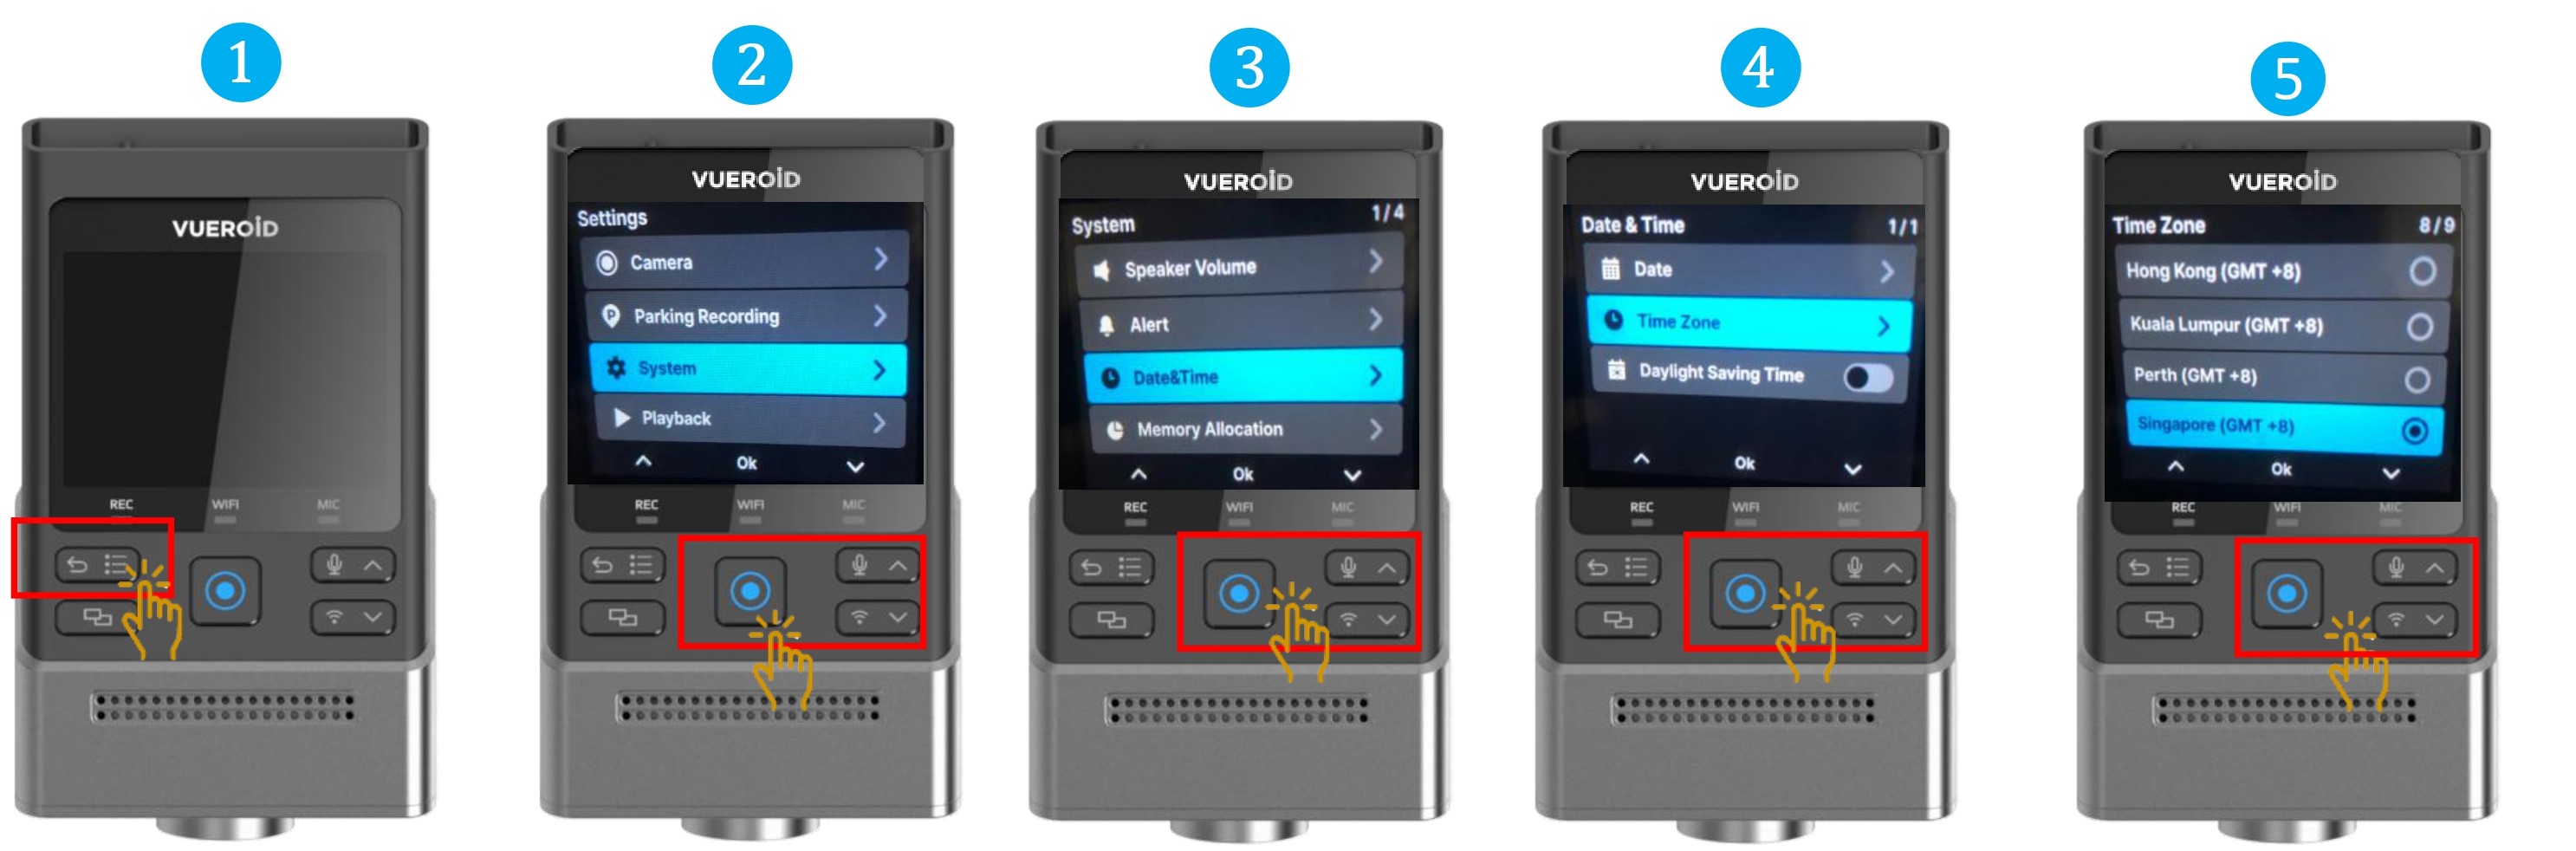
- Press Settings/Back button to turn on the display and press one more time to go to the setting.
- Press Manual Record button / Enter button to select "System".
- Choose "Date & Time" and press Manual Record / Enter button.
- Choose "Time Zone" and press Manual Record / Enter button.
- Select Singapore (GMT +8).
7.2.3.3.3 Setting - System - Date & Time - Daylight Saving Time
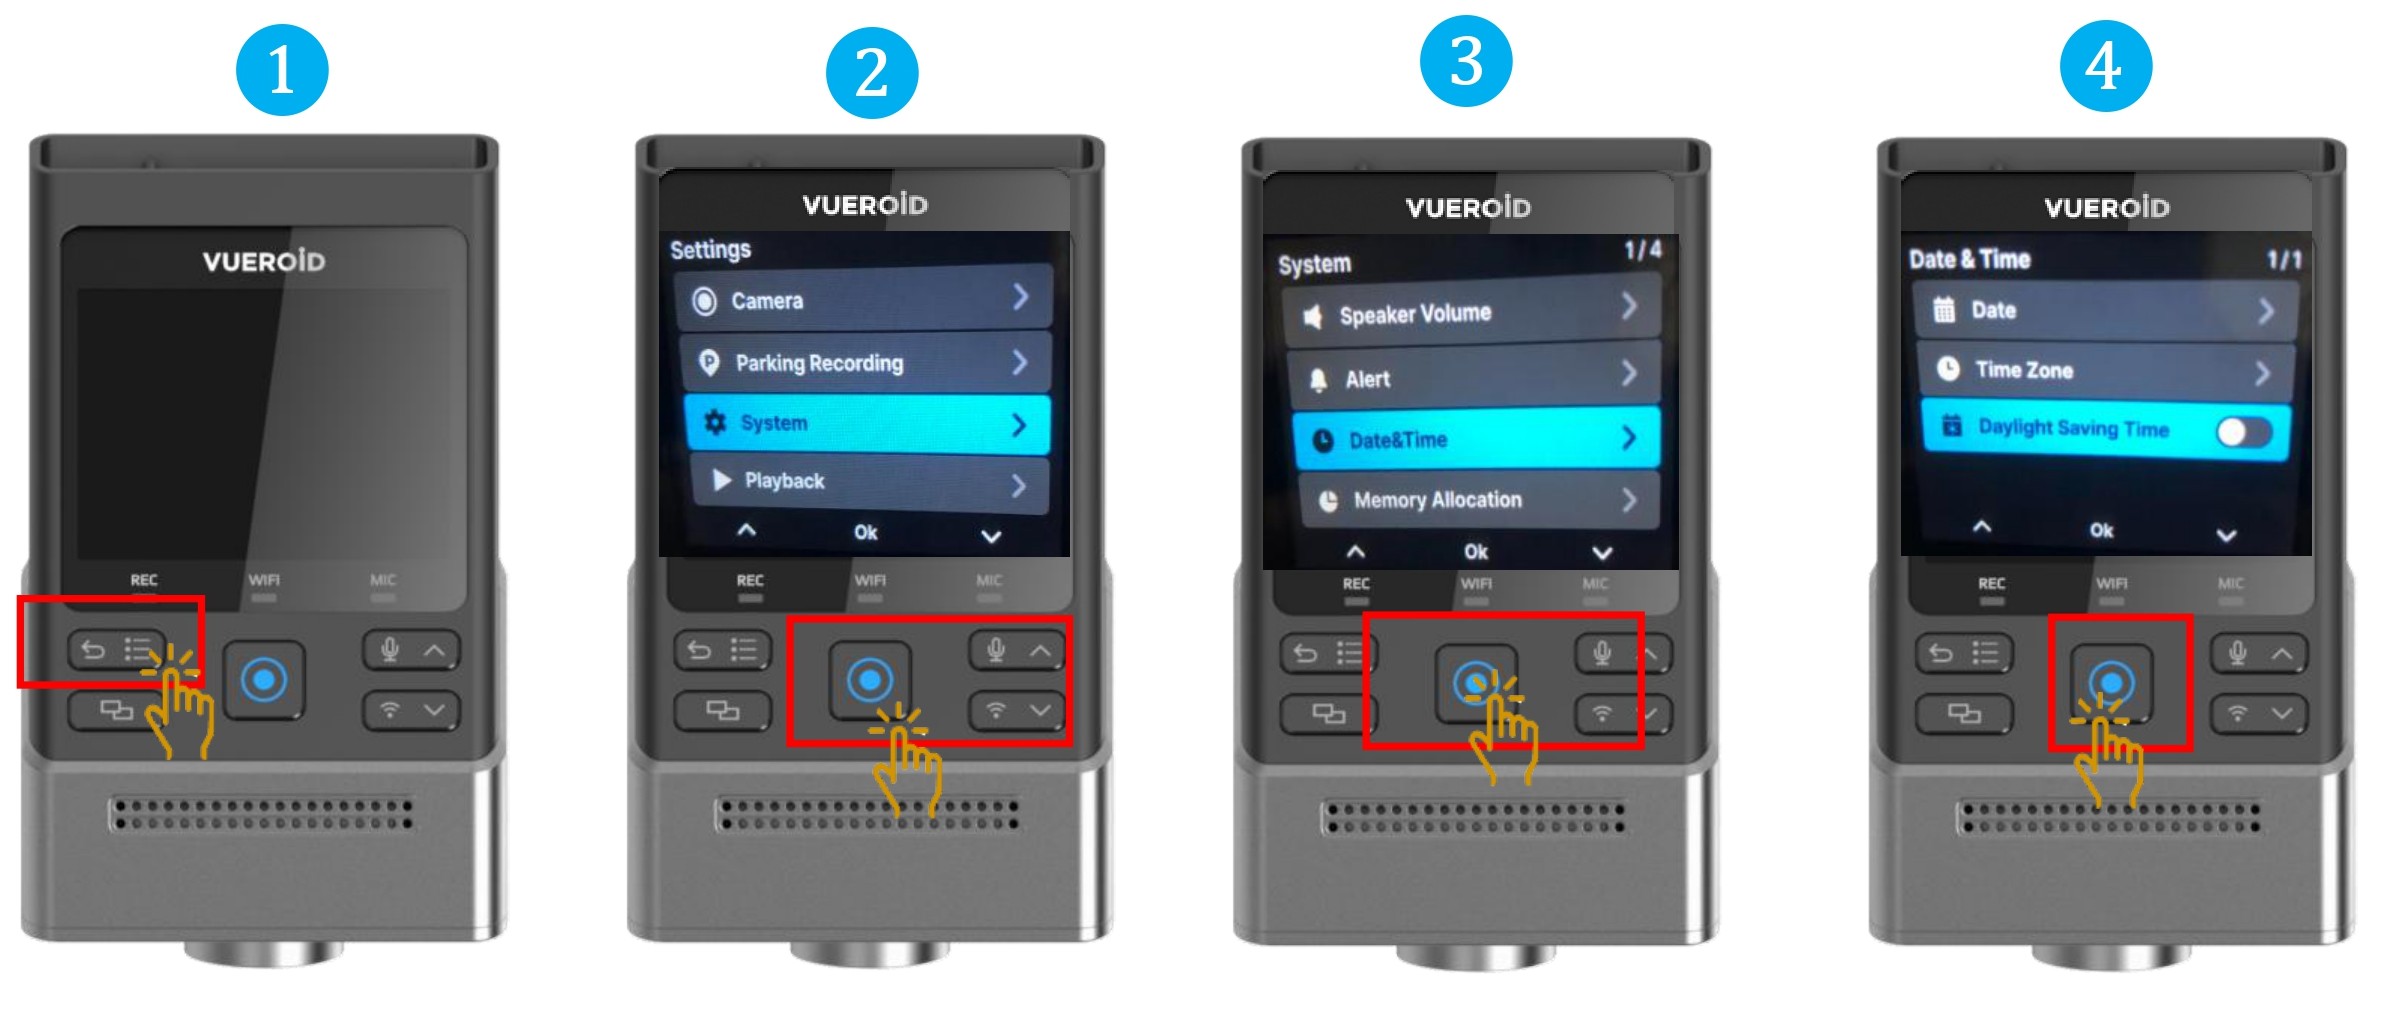
- Press Settings/Back button to turn on the display and press one more time to go to the setting.
- Press Manual Record button / Enter button to select "System".
- Choose "Date & Time" and press Manual Record / Enter button.
- Choose "Daylight Saving Time" and press Manual Record / Enter button to turn On/Off.
- Daylight Saving Time option, the time will be set +1 hour based on current time zone. When Daylight Saving Time ended, You must manually disable the Daylight Saving Time option.
- This option is not applicable to Singapore region thus it is turn off by default.
7.2.3.4 Setting - System - Memory Allocation
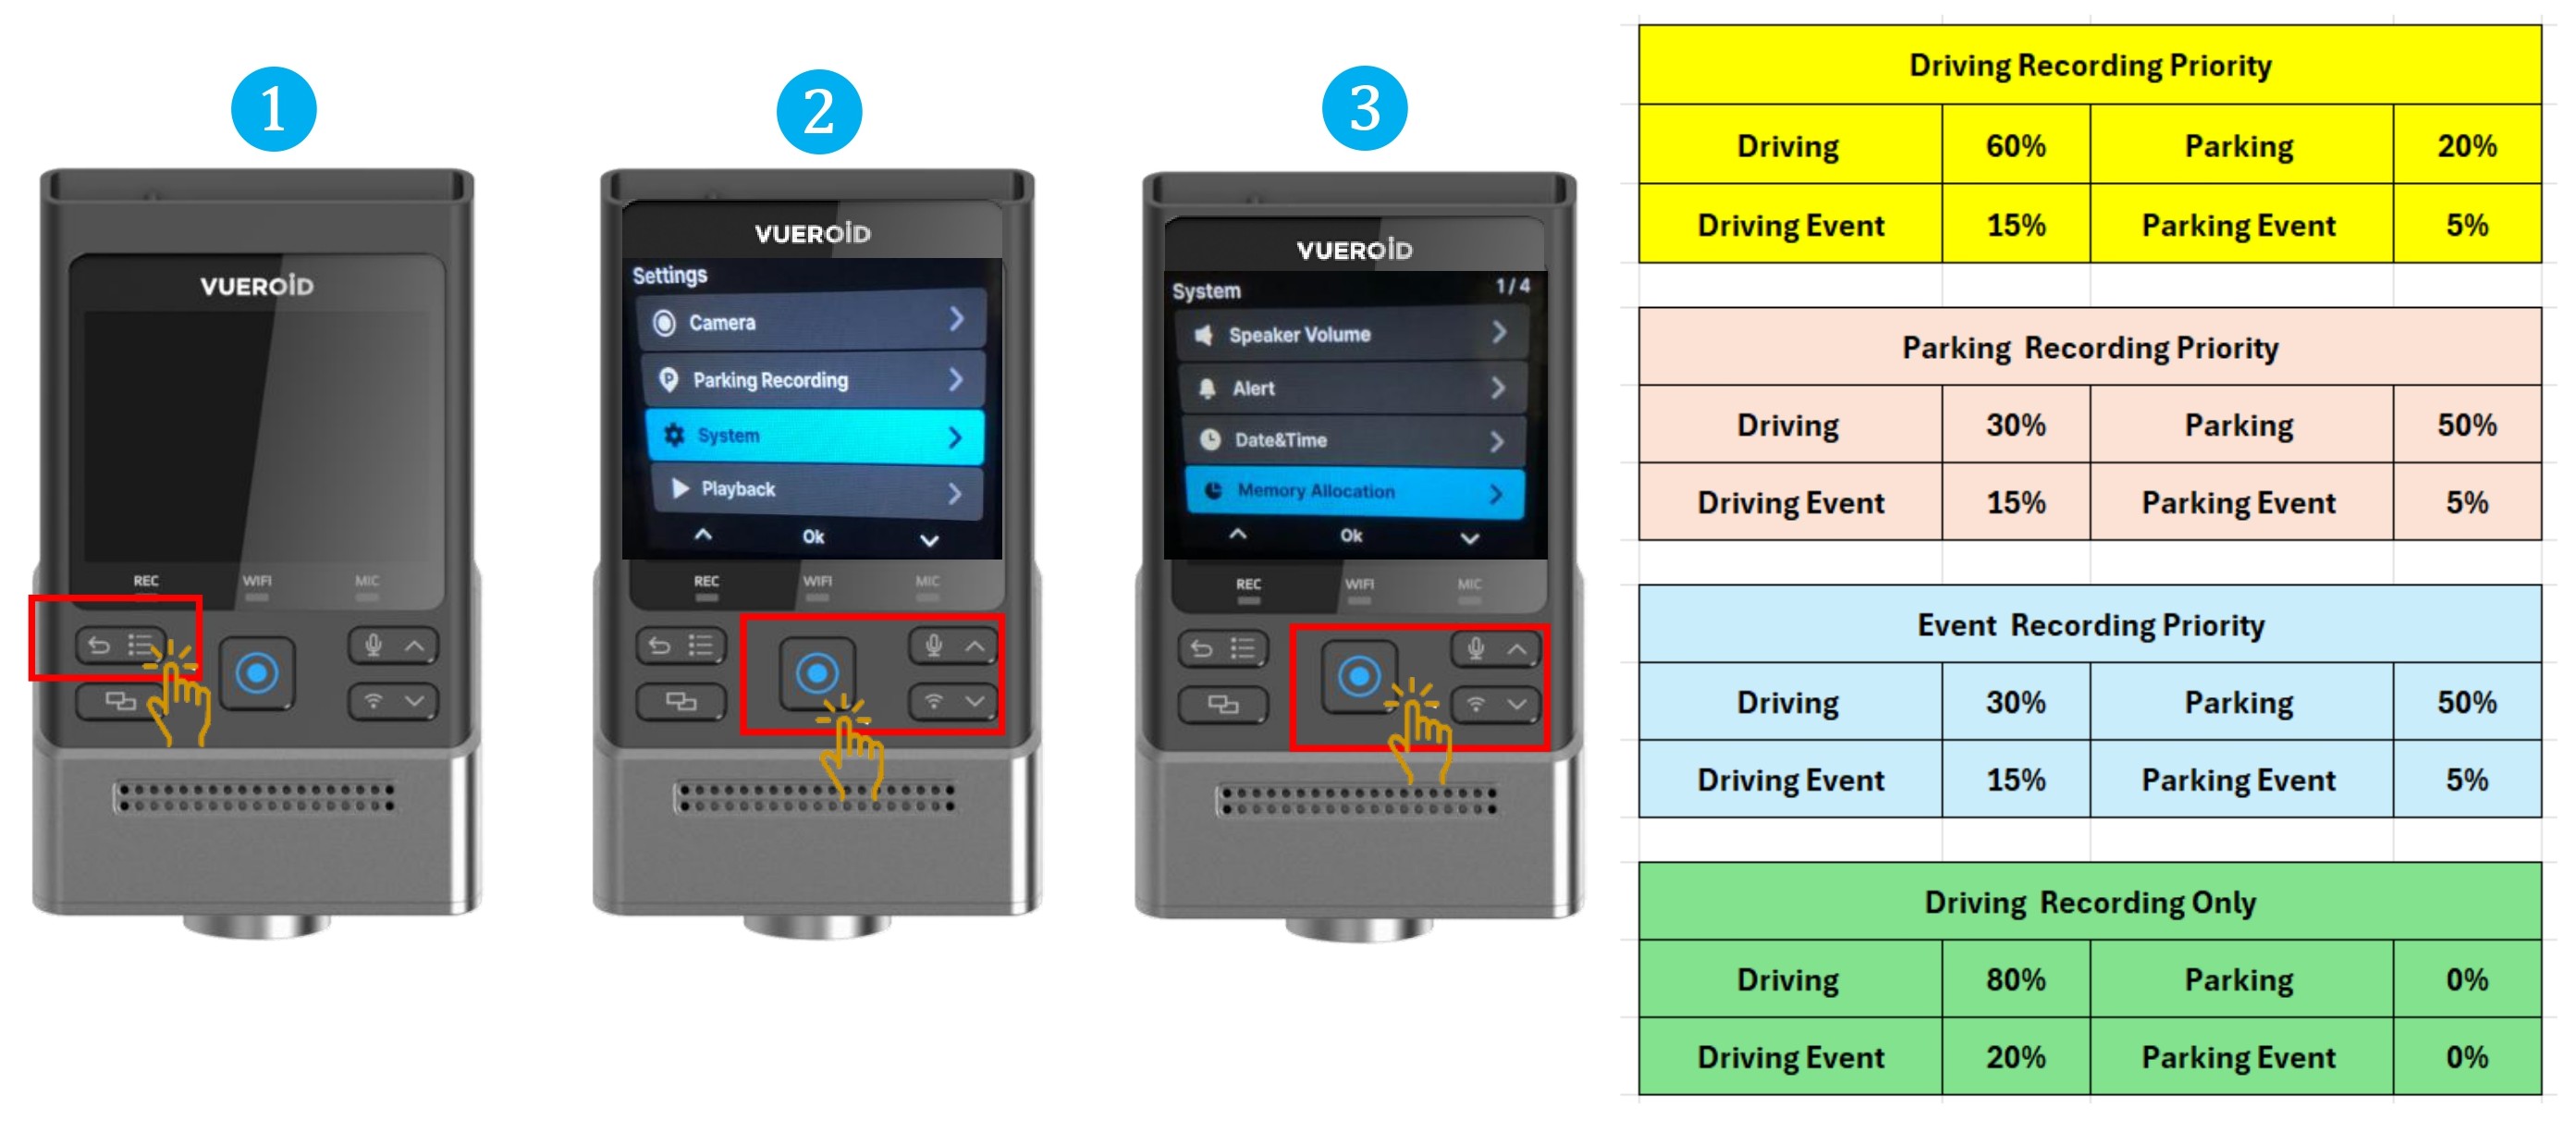
- Press Settings/Back button to turn on the display and press one more time to go to the setting.
- Press Manual Record button / Enter button to select "System".
- Choose "Memory Allocation" and press Manual Record / Enter button.
- The capacity of each folder on the Micro SD Card will be adjusted for saving recorded videos in driving/parking/events or driving only.
Before changing this Memory Allocation setting, please make sure important videos have been downloaded. Once this setting is changed, the SD card will be formatted and erase all the recorded videos inside.
7.2.3.5 Setting - System - LCD Off
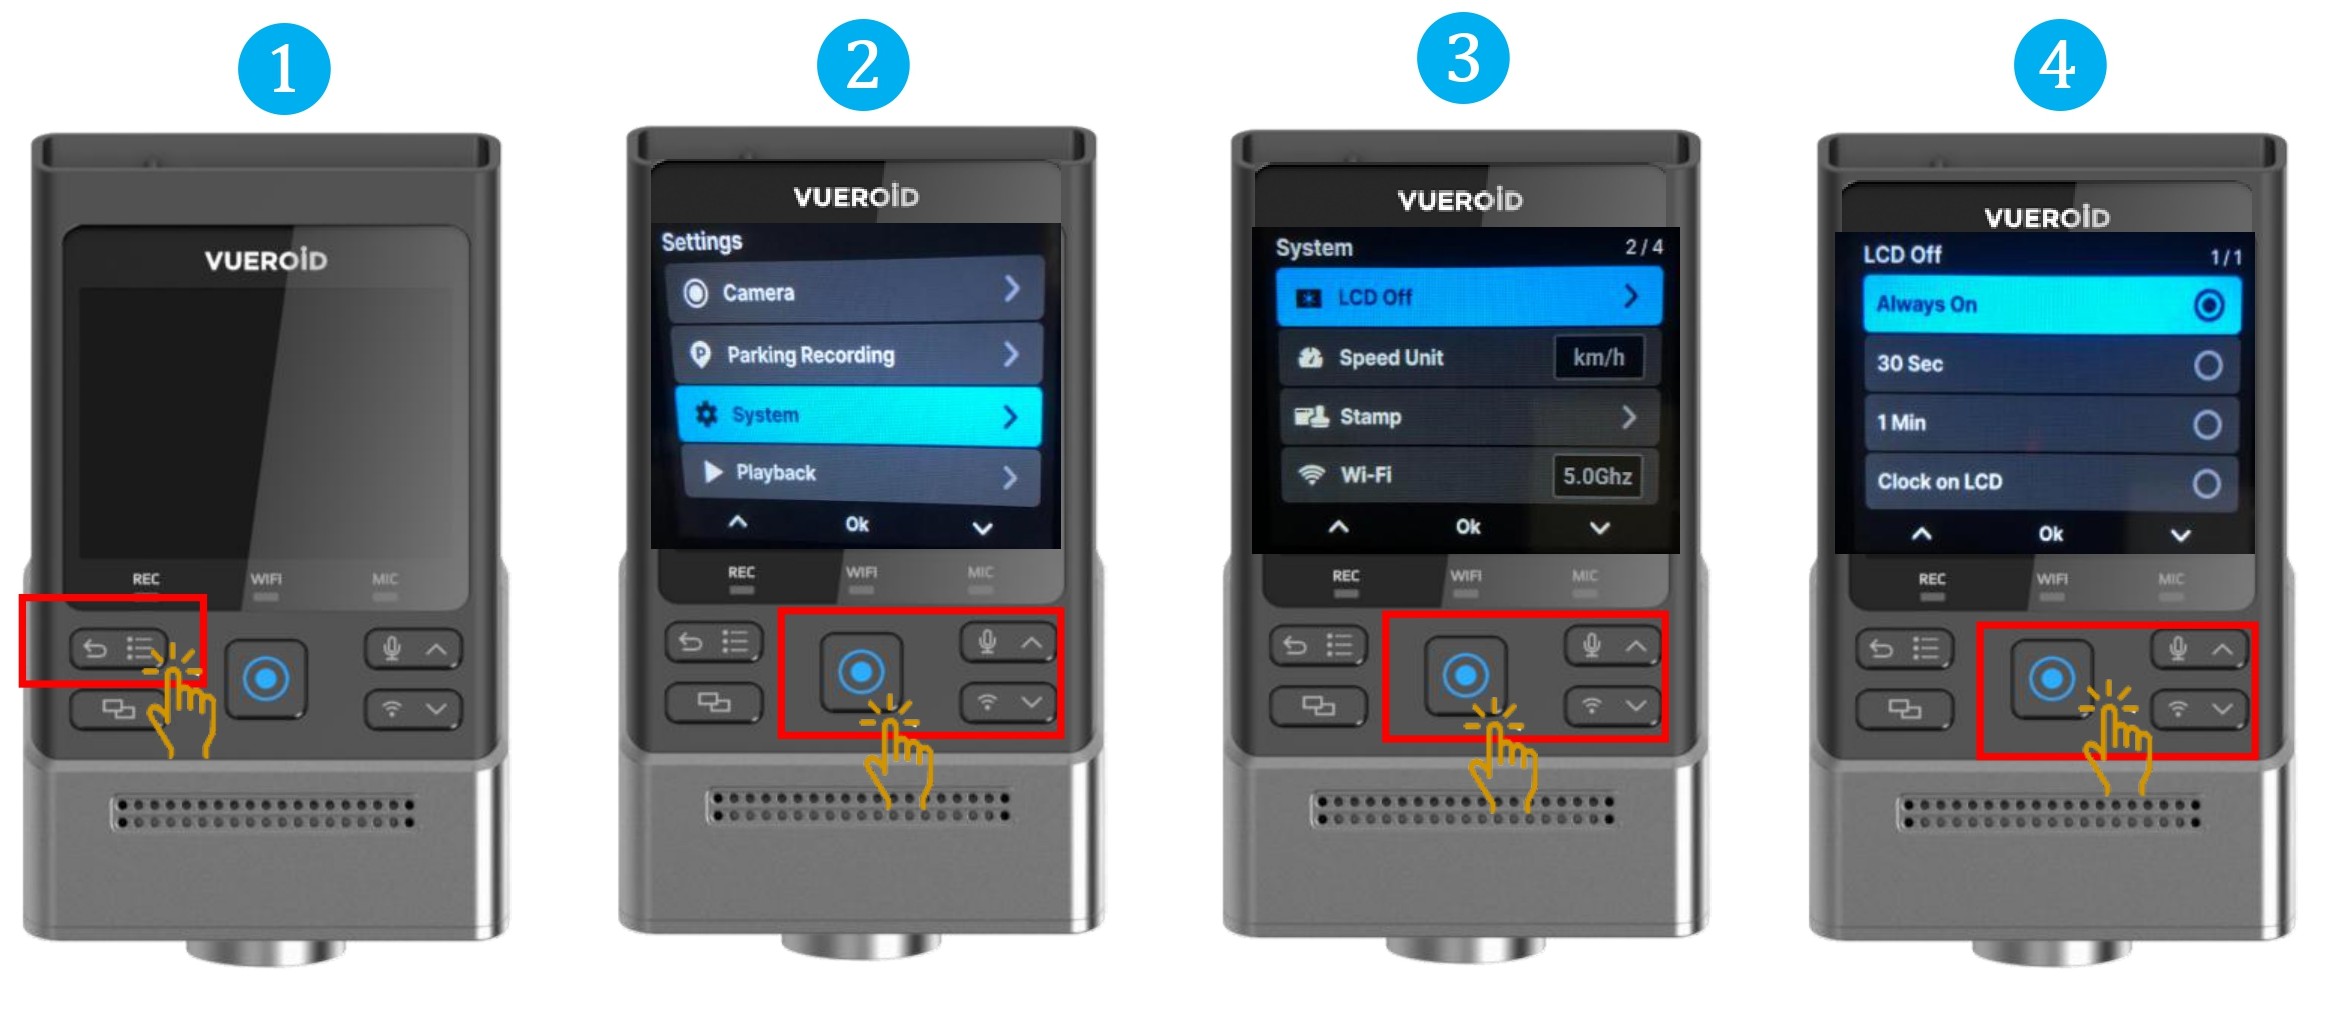
- Press Settings/Back button to turn on the display and press one more time to go to the setting.
- Press Manual Record button / Enter button to select "System".
- Choose "LCD Off" and press Manual Record / Enter button.
- Choose the device’s auto LCD Off time or screen saving mode.
※ Even when ‘Always On’ and ‘Clock on LCD’ settings are enabled, the LCD may automatically turn off if the external temperature is too high.
7.2.3.6 Setting - System - Speed Unit
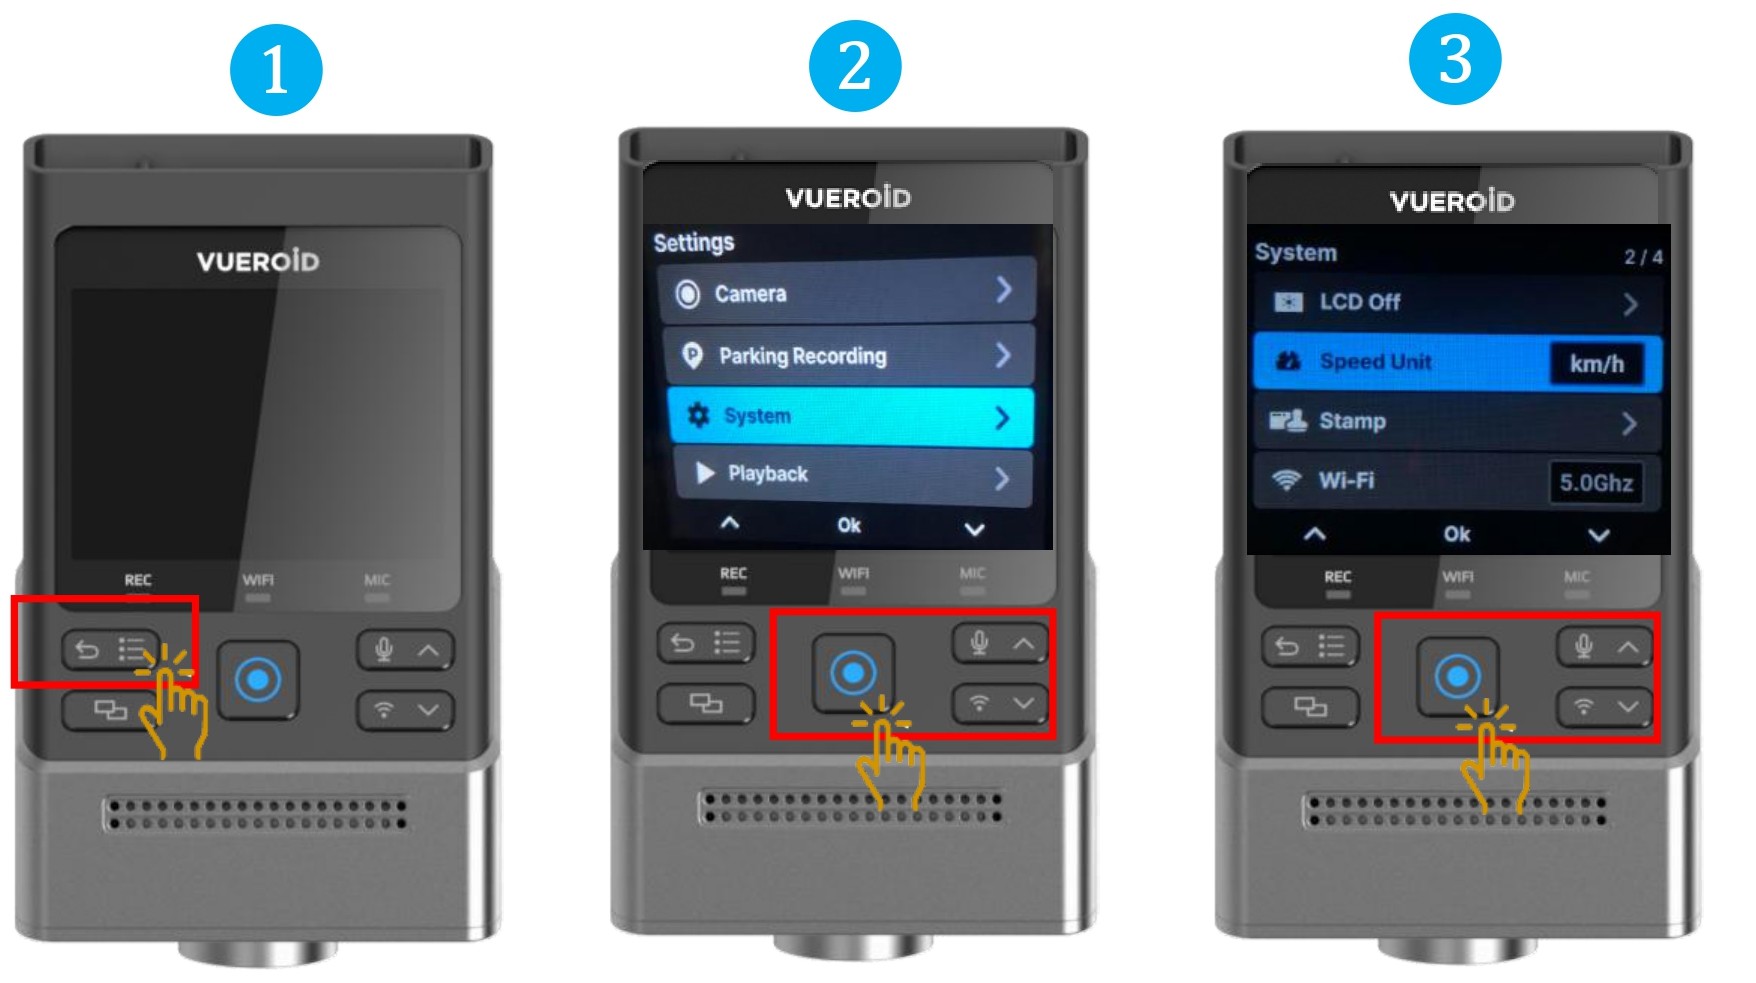
- Press Settings/Back button to turn on the display and press one more time to go to the setting.
- Press Manual Record button / Enter button to select "System".
- Choose "Speed Unit" and press Manual Record / Enter button to choose km/h or mph unit
7.2.3.7 Setting - System - Stamp
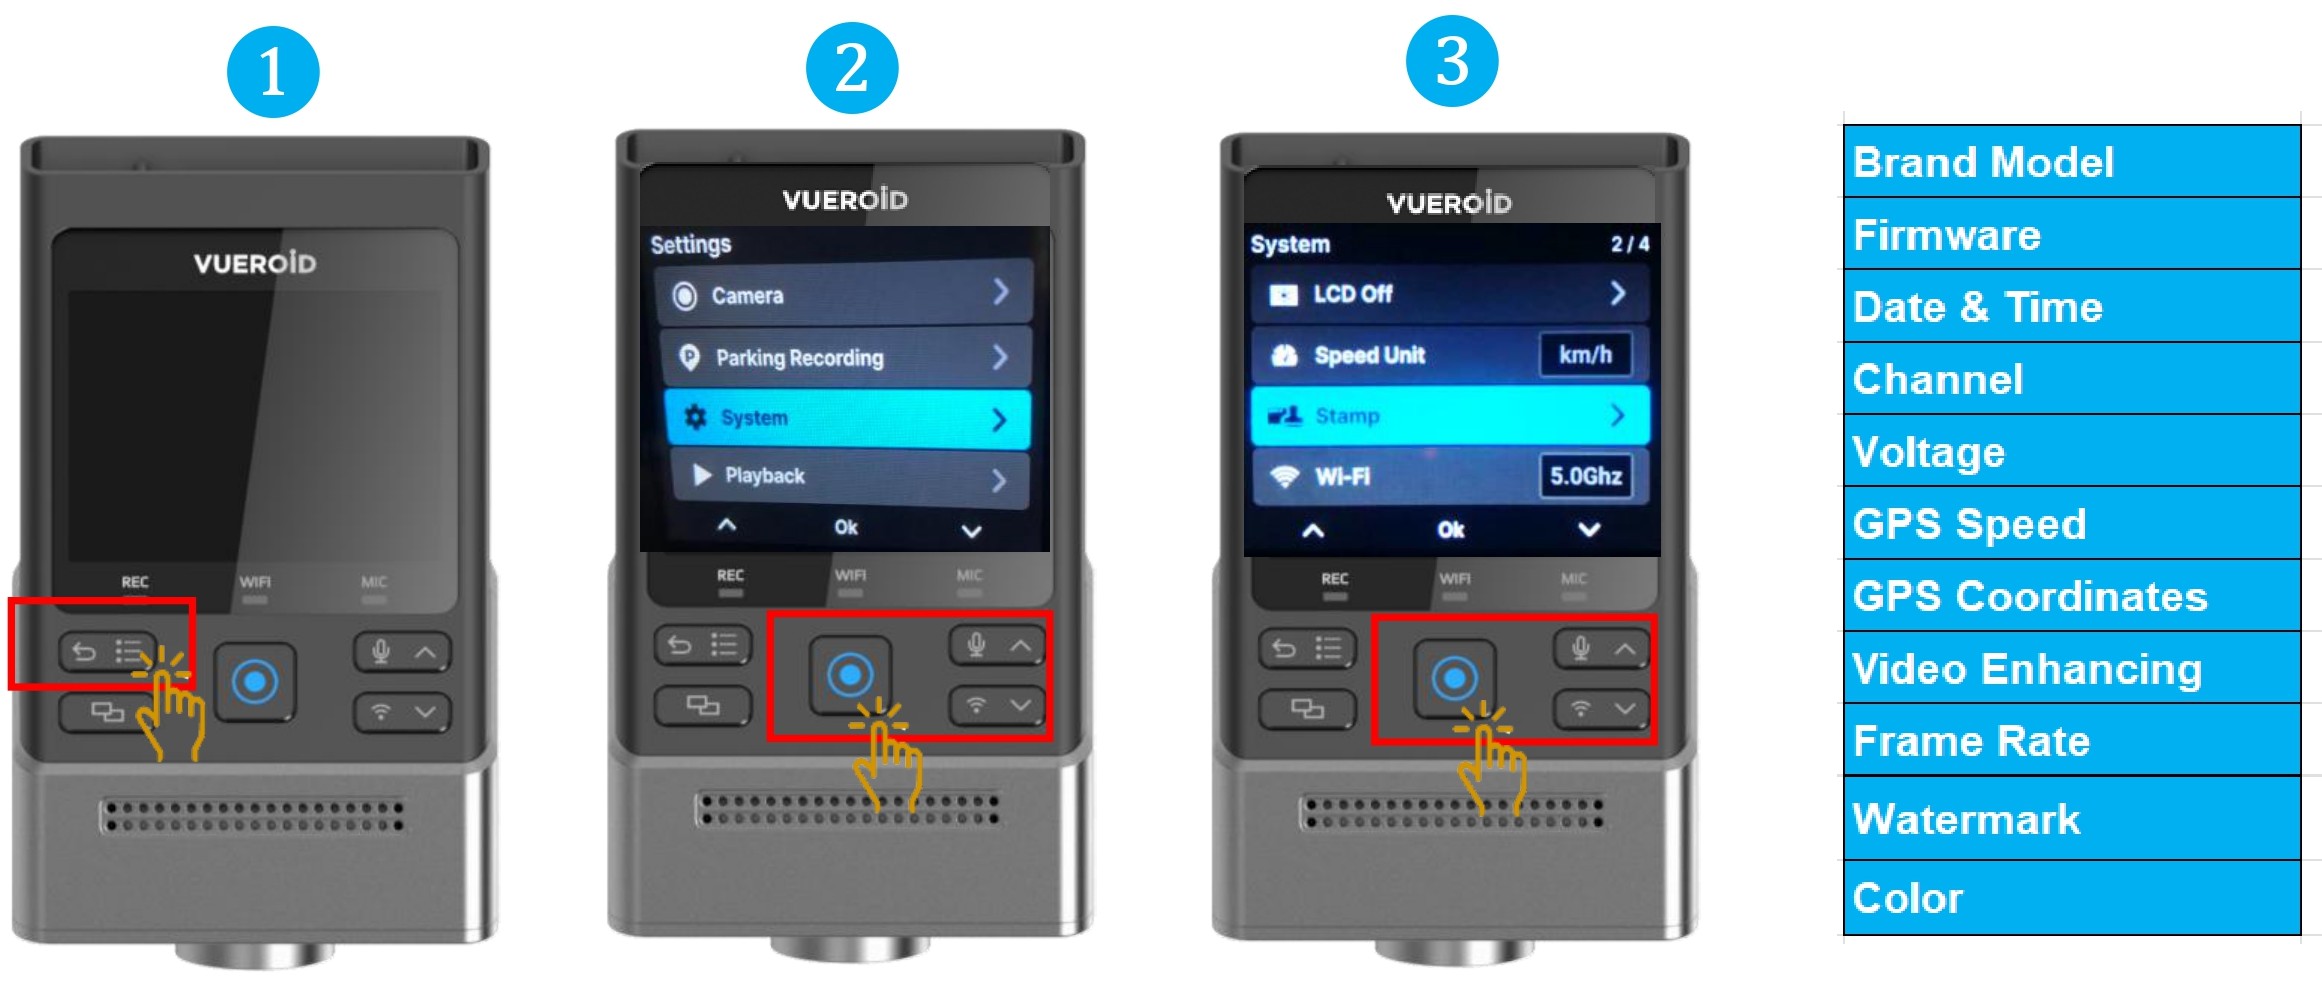
- Press Settings/Back button to turn on the display and press one more time to go to the setting.
- Press Manual Record button / Enter button to select "System".
- Choose "Stamp" and press Manual Record / Enter button.
- Choose the following and press Manual Record / Enter button to turn ON/OFF.
Once turn off, the playback recorded videos will not show the following information
※Brand Model
※Firmware
※Date & Time
※Channel
※Voltage
※GPS Speed
※GPS Coordinates
※Video Enhancing
※Frame rate
※Watermark. The video saved via VUEROID Dashcam will display VUEROID logo in the upper left corner.
※Color. Text color : White, Yellow, Light Blue, Magenta
7.2.3.8 Setting - System - Wi-Fi
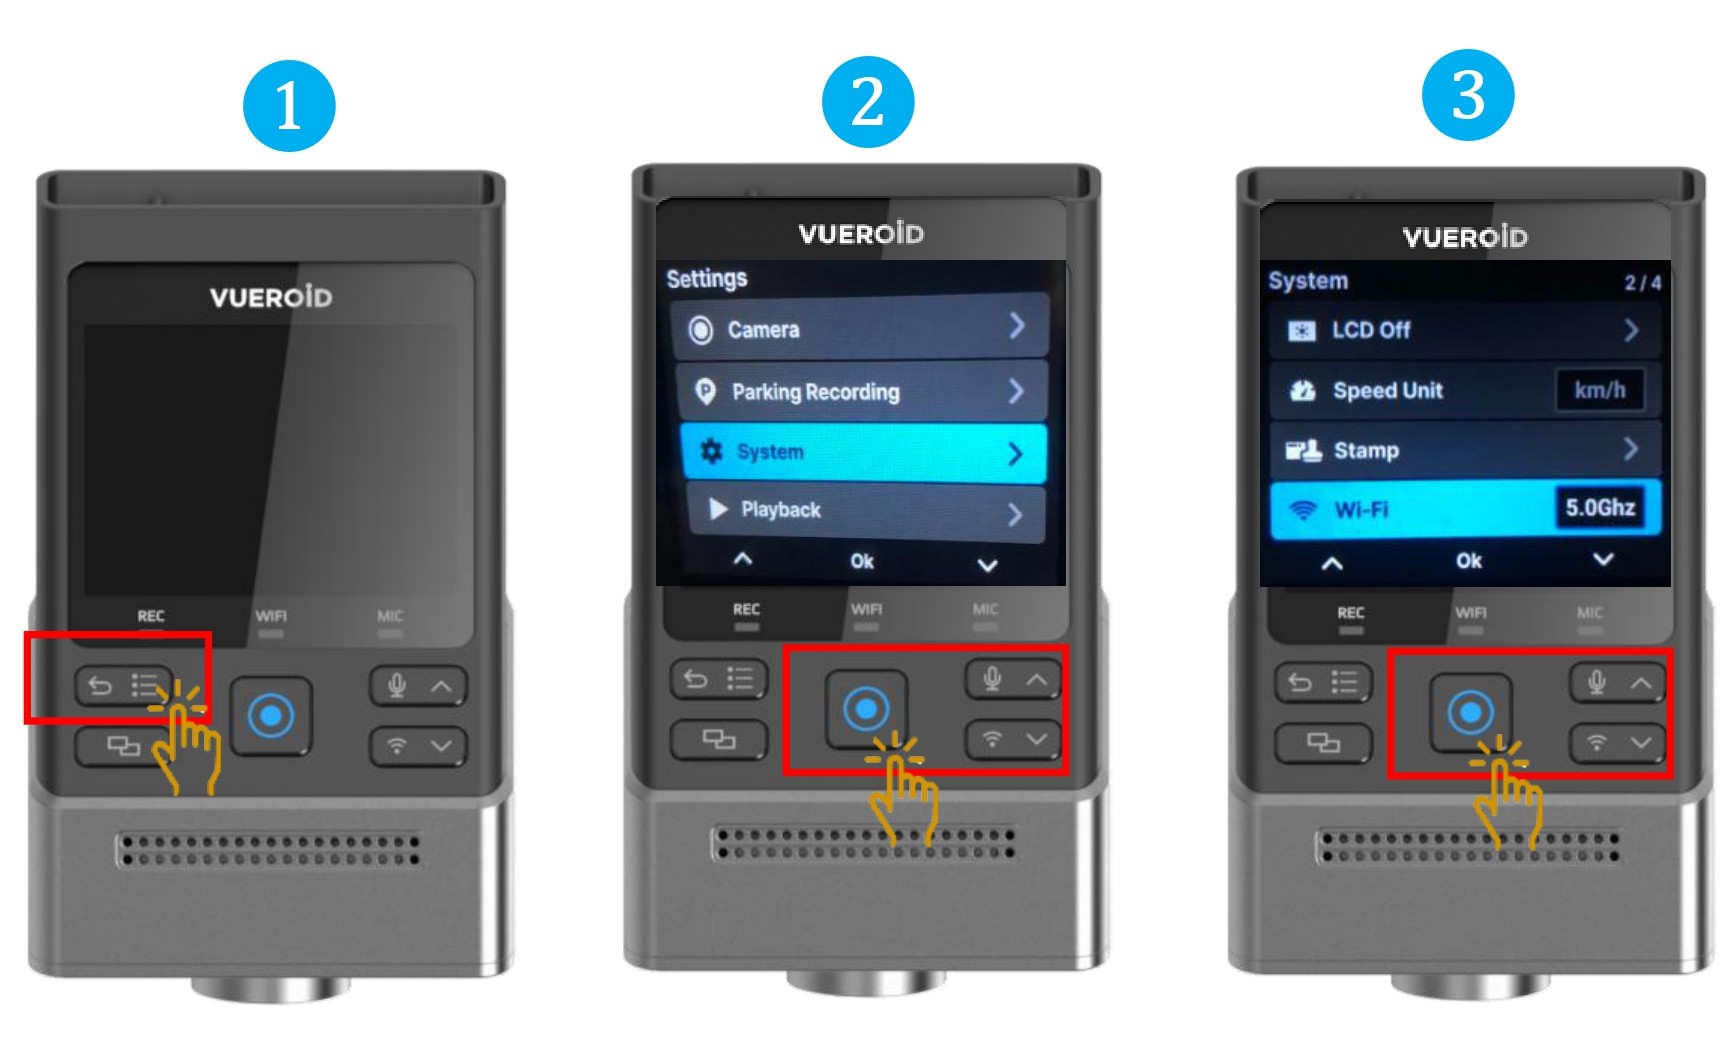
- Press Settings/Back button to turn on the display and press one more time to go to the setting.
- Press Manual Record button / Enter button to select "System".
- Choose "Wi-Fi" and press Manual Record / Enter button to choose the bandwidth 2.5Ghz or 5Ghz depends on your mobile phone.
7.2.3.9 Setting - System - System Information
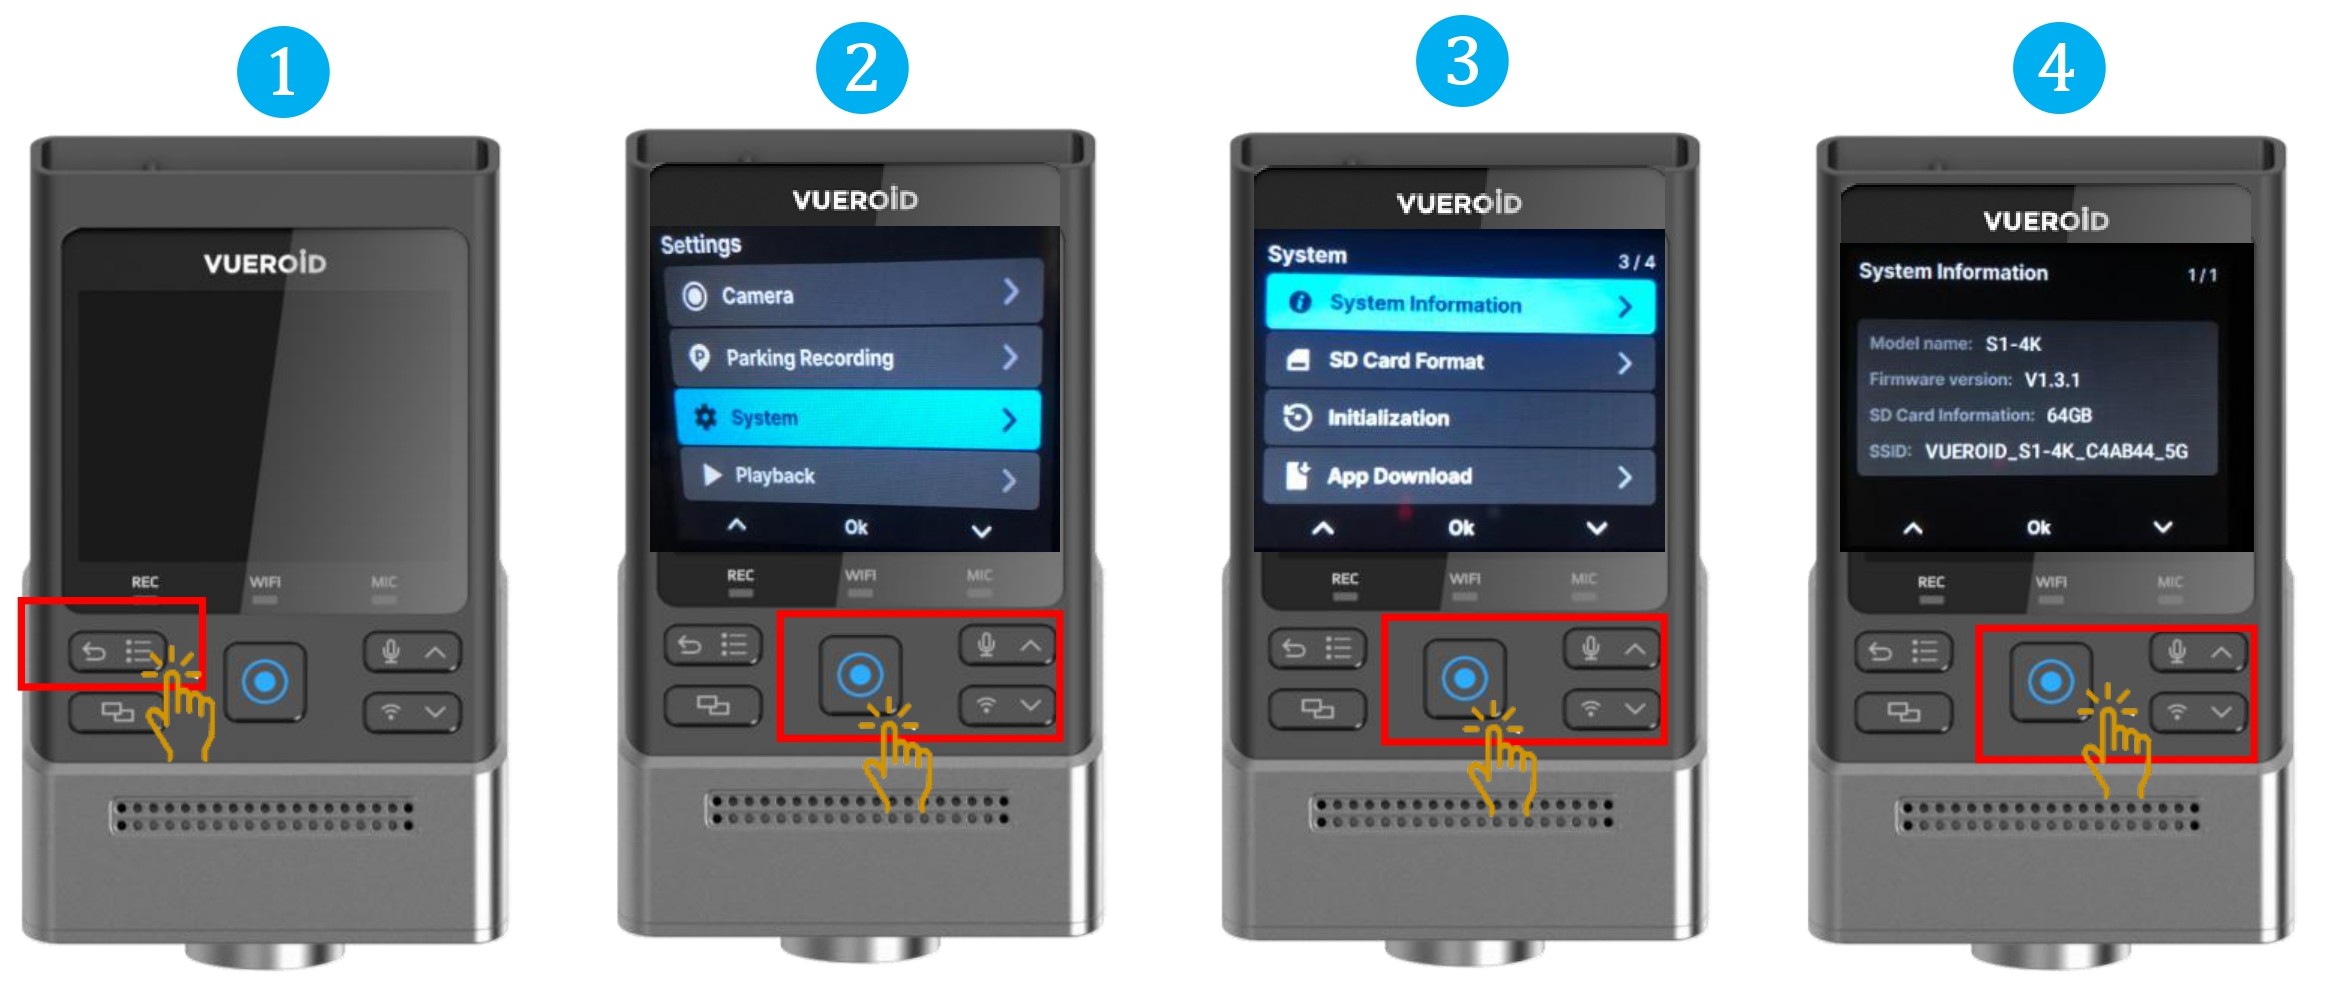
- Press Settings/Back button to turn on the display and press one more time to go to the setting.
- Press Manual Record button / Enter button to select "System".
- Choose "System Information" and press Manual Record / Enter button.
- Showing device’s model name, firmware version, Micro SD Card and SSID.
7.2.3.10 Setting - System - SD Card Format
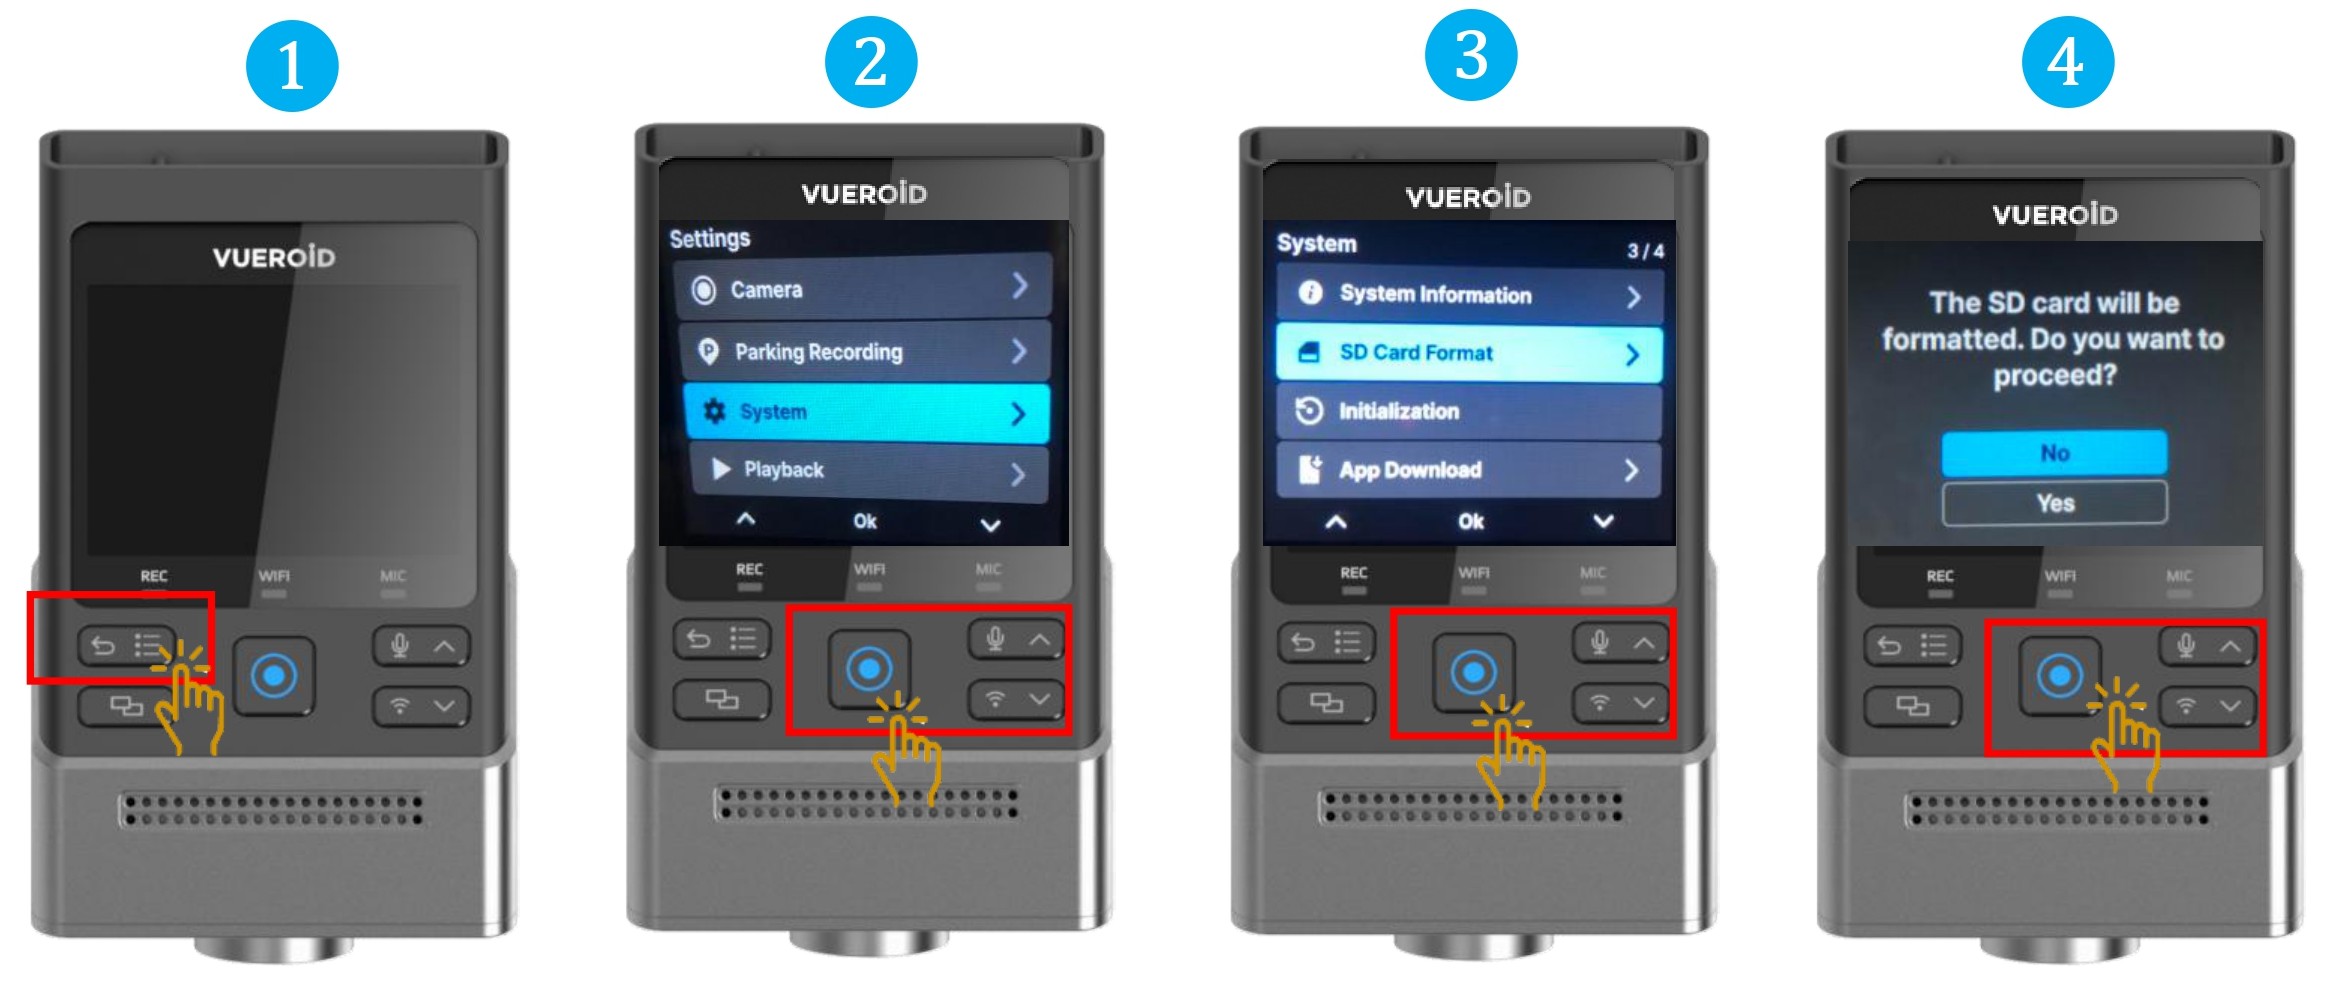
- Press Settings/Back button to turn on the display and press one more time to go to the setting.
- Press Manual Record button / Enter button to select "System".
- Choose "SD Card Format" and press Manual Record / Enter button.
- Choose "Yes", to format the SD card. All videos will be erased after formatting.
7.2.3.11 Setting - System - Initialization
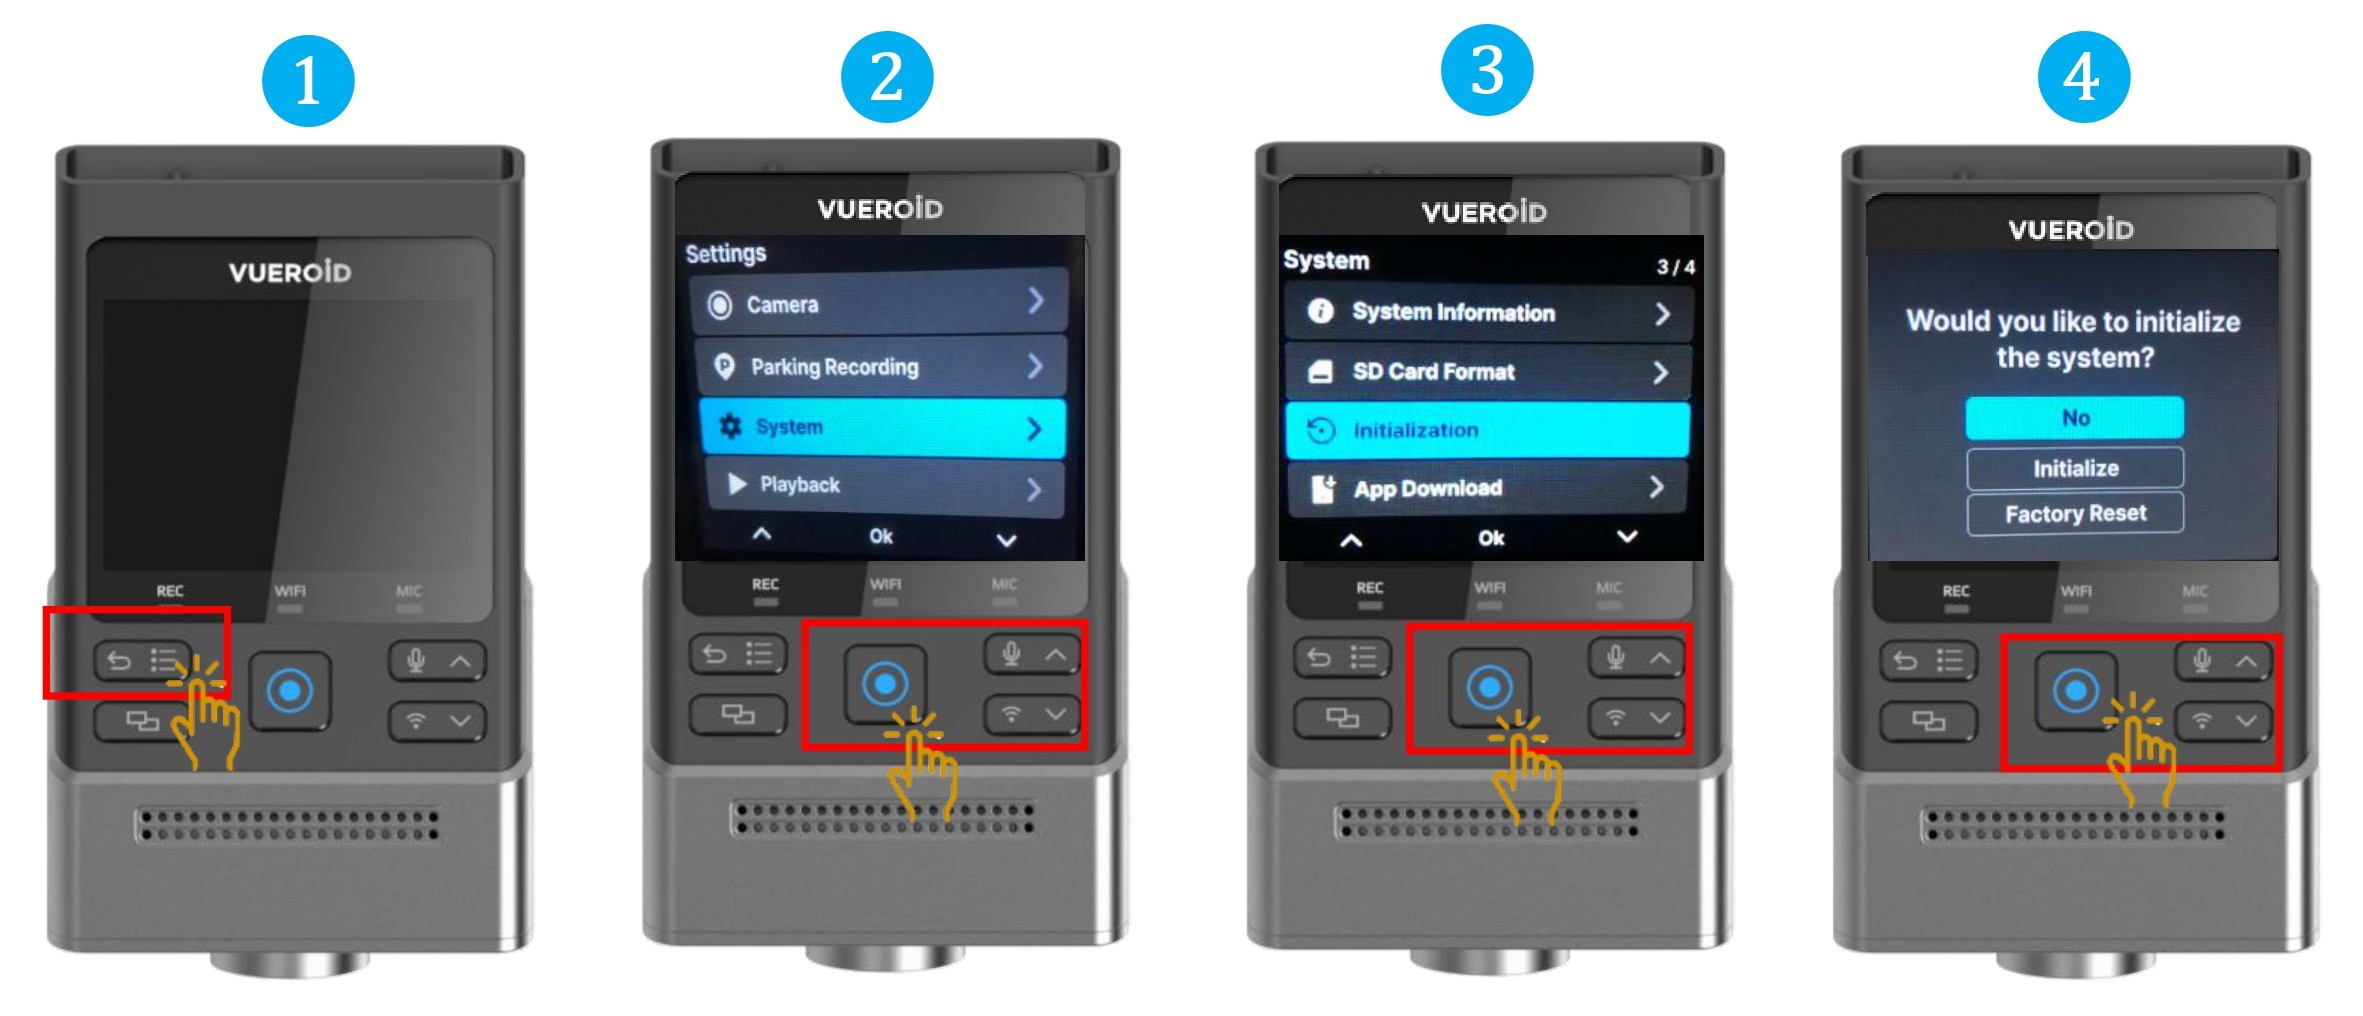
- Press Settings/Back button to turn on the display and press one more time to go to the setting.
- Press Manual Record button / Enter button to select "System".
- Choose "Initialization" and press Manual Record / Enter button.
- Choose the following option.
※Initialize - Restores settings to their default values only. Depending on the current settings, the SD card
may be formatted. (Regional settings, such as date and time zone, may not be reset.). All videos will be erased.
※Factory reset - Factory Reset: Formats the SD card and resets all data and settings to factory defaults. The firmware
version remains unchanged. All videos will be erased.
7.2.3.12 Setting - System - App Download
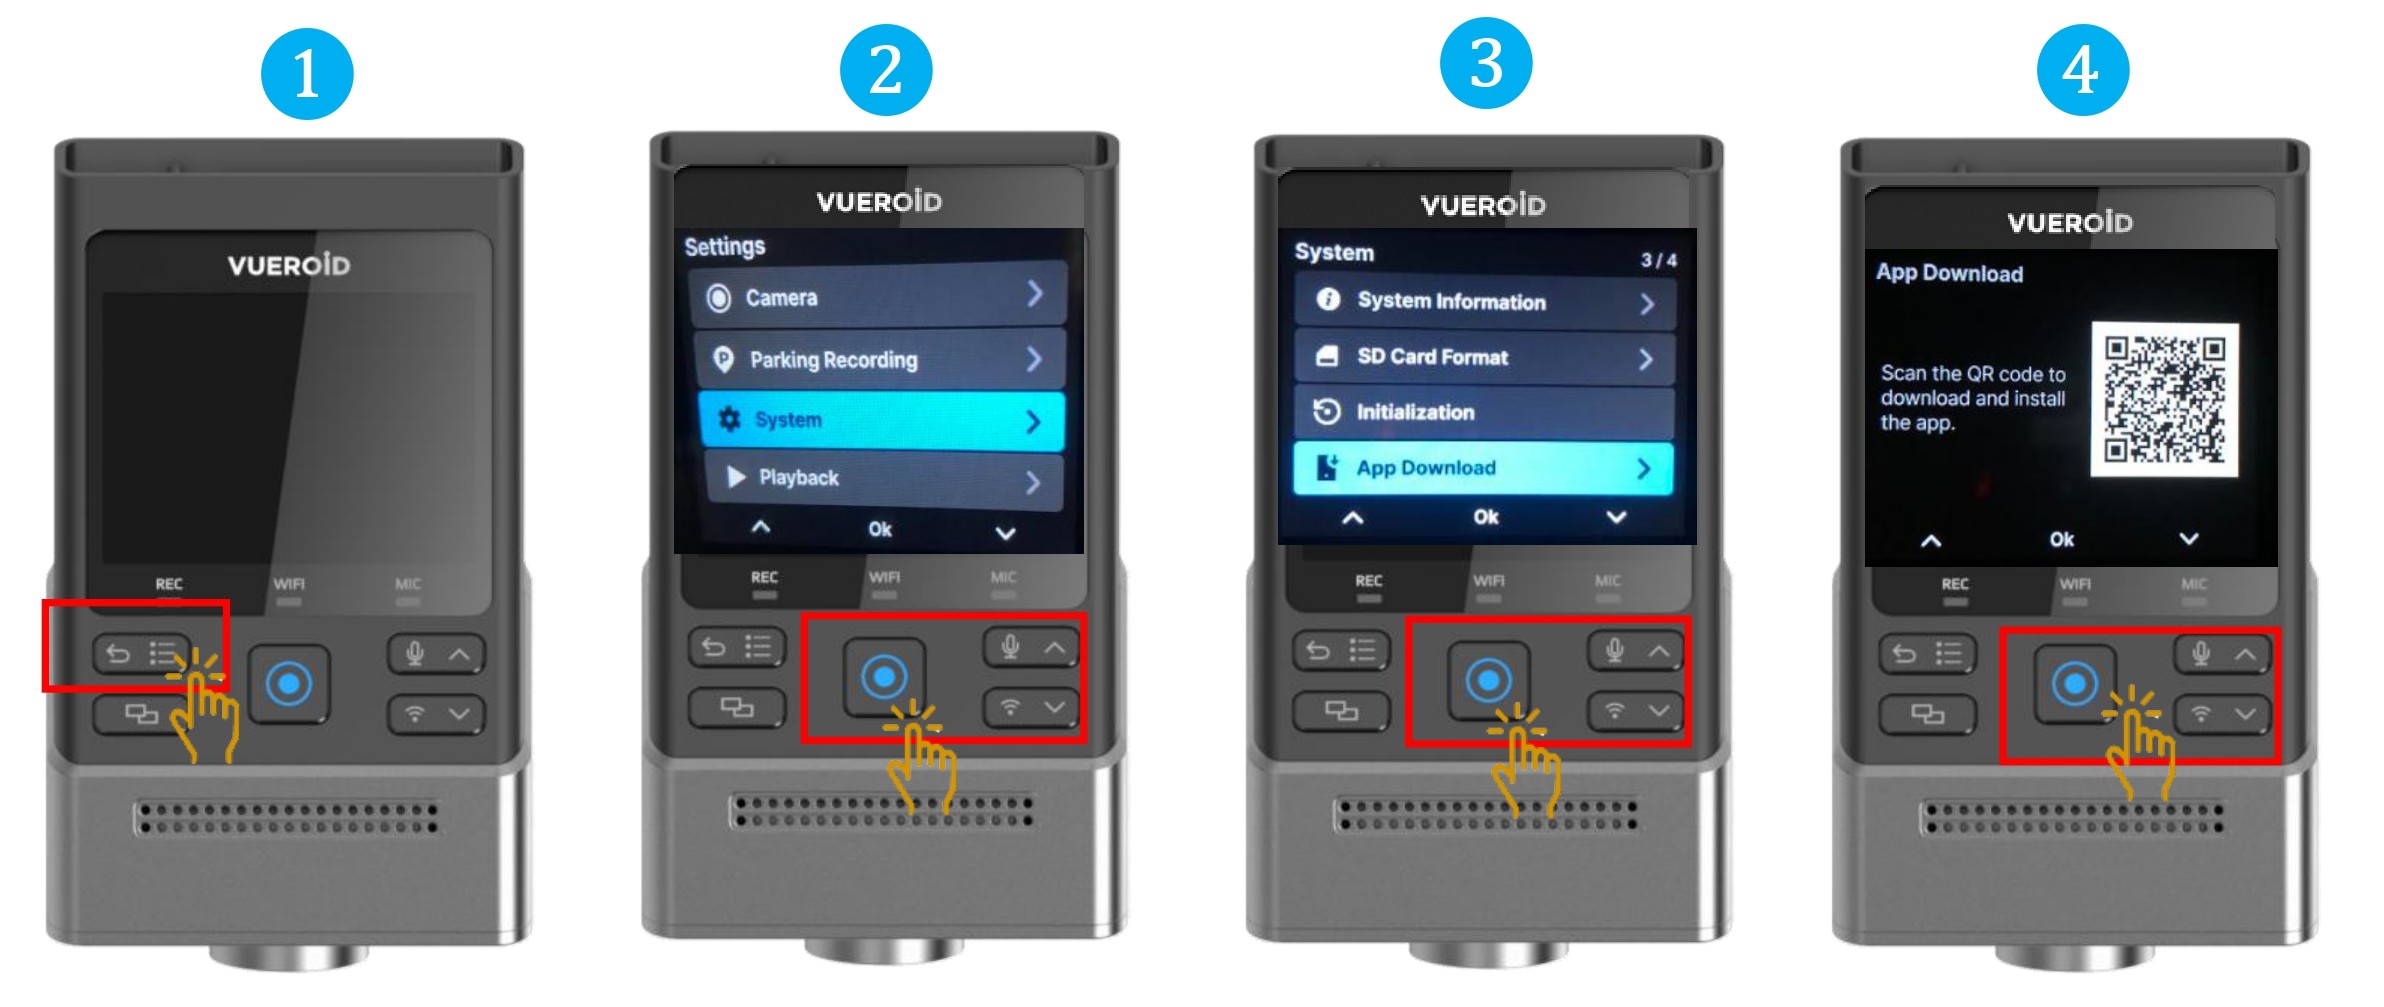
- Press Settings/Back button to turn on the display and press one more time to go to the setting.
- Press Manual Record button / Enter button to select "System".
- Choose "App Download" and press Manual Record / Enter button.
- Showing QR code that links to the download page of the VUEROID HUB App for mobile application connection.
7.2.3.13 Setting - System - Password
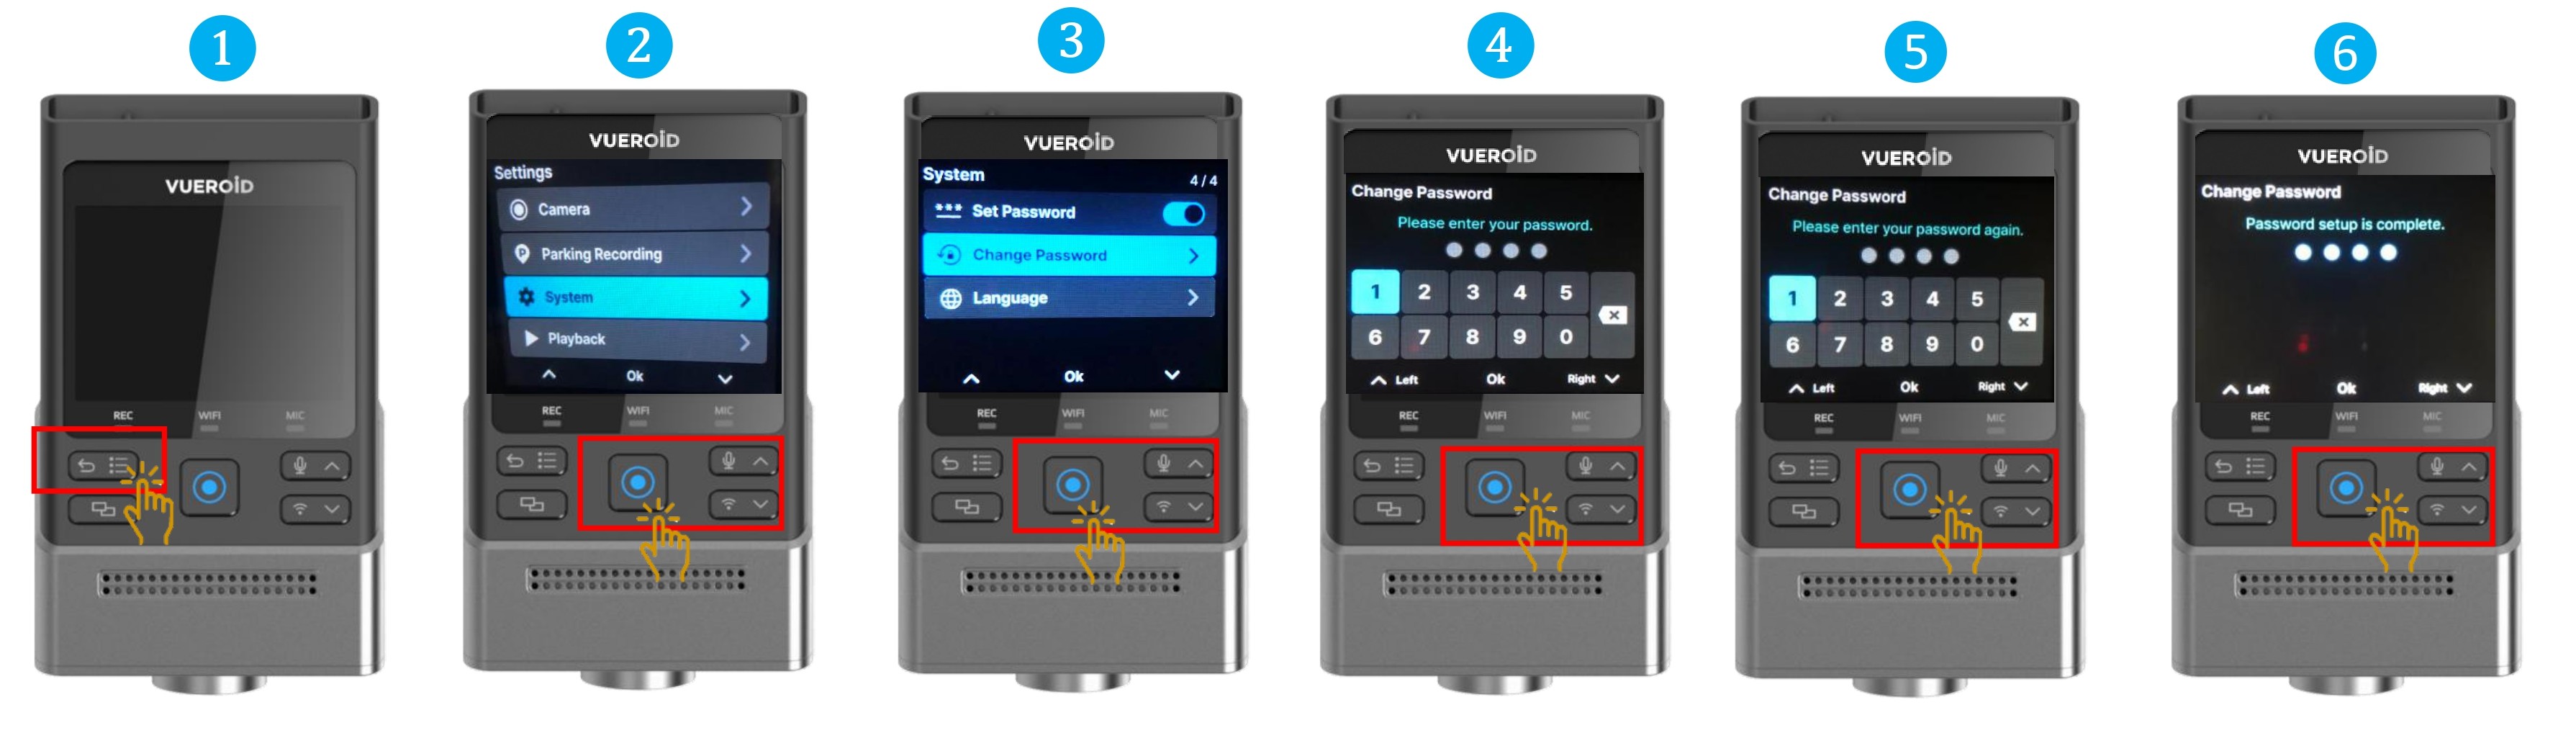
7.2.3.13.1 Setting - System - Set Password
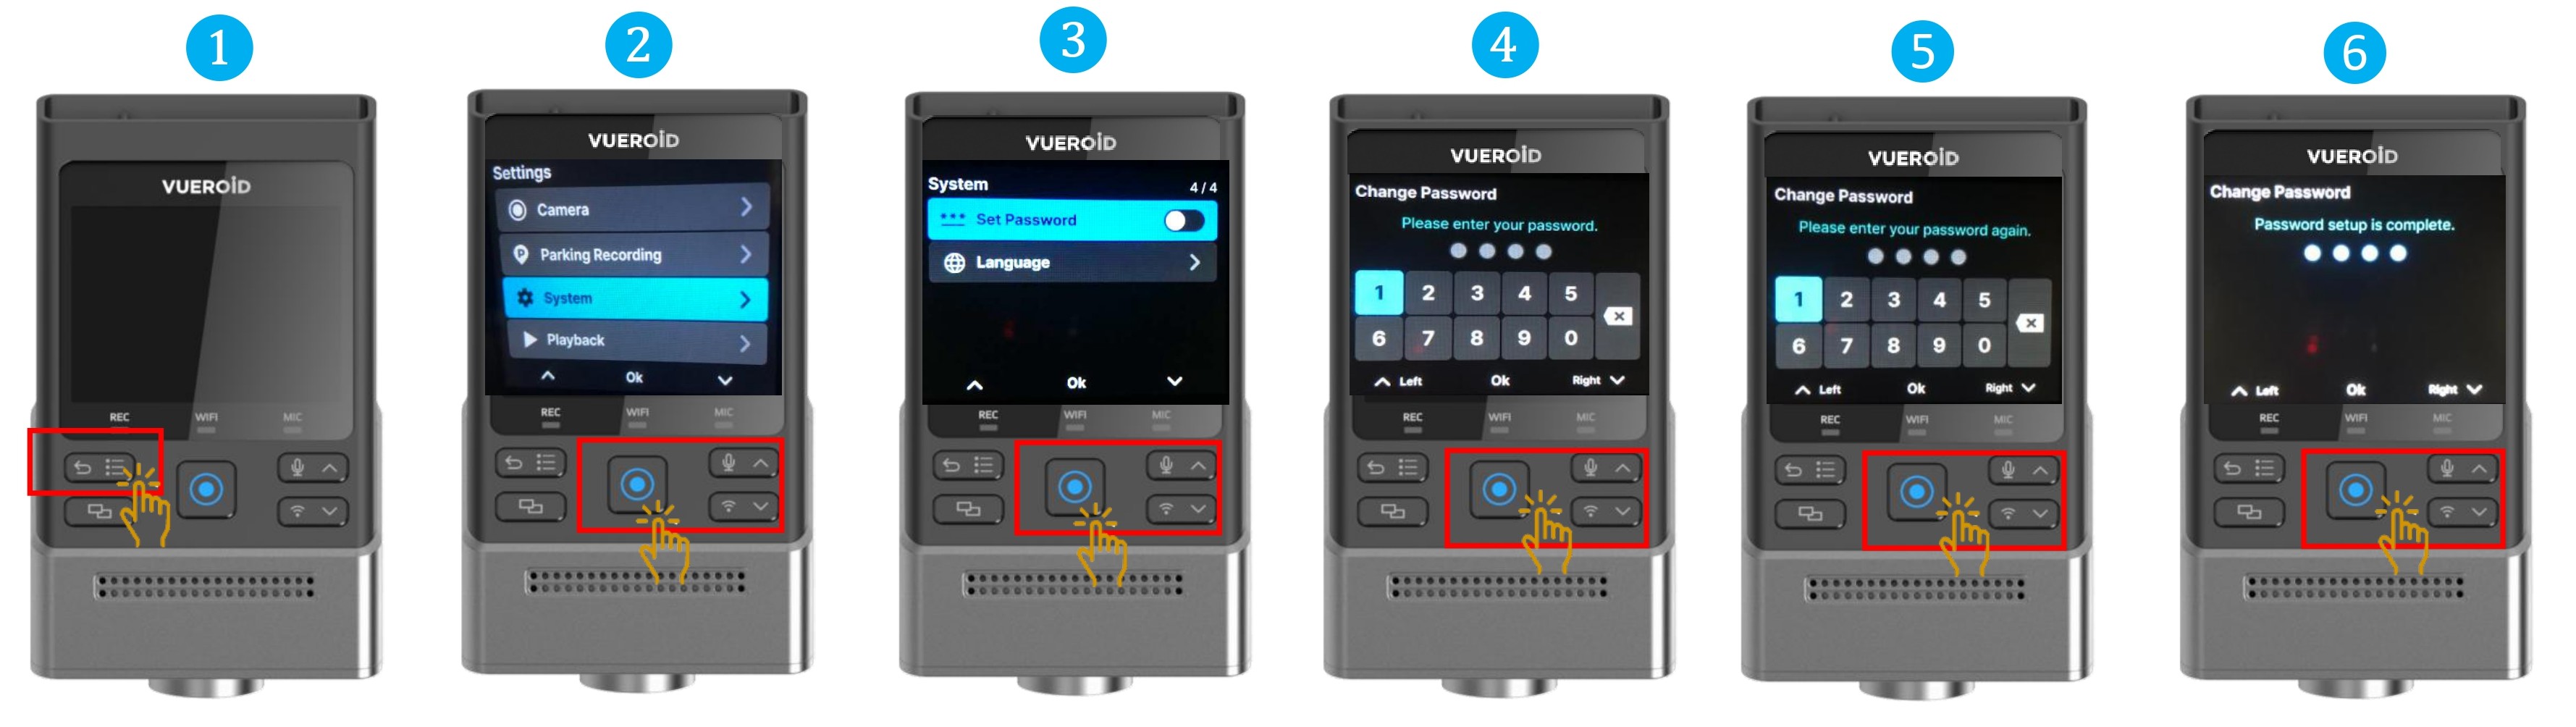
- Press Settings/Back button to turn on the display and press one more time to go to the setting.
- Press Manual Record button / Enter button to select "System".
- Choose "Set Password" and press Manual Record / Enter button.
- Input 4 numerical for the password setting then press Manual Record / Enter button.
- Re-input the 4 numerical password for verification and press Manual Record / Enter button.
- Password setup is complete.
※ Your password is also applied to the VUEROID HUB App.
7.2.3.13.2 Setting - System - Change Password
- Press Settings/Back button to turn on the display and press one more time to go to the setting.
- Press Manual Record button / Enter button to select "System".
- Choose "Change Password" and press Manual Record / Enter button.
- Input NEW 4 numerical for the password setting then press Manual Record / Enter button.
- Re-input the NEW 4 numerical password for verification and press Manual Record / Enter button.
- Password setup is complete.
7.2.3.14 Setting - System - Language
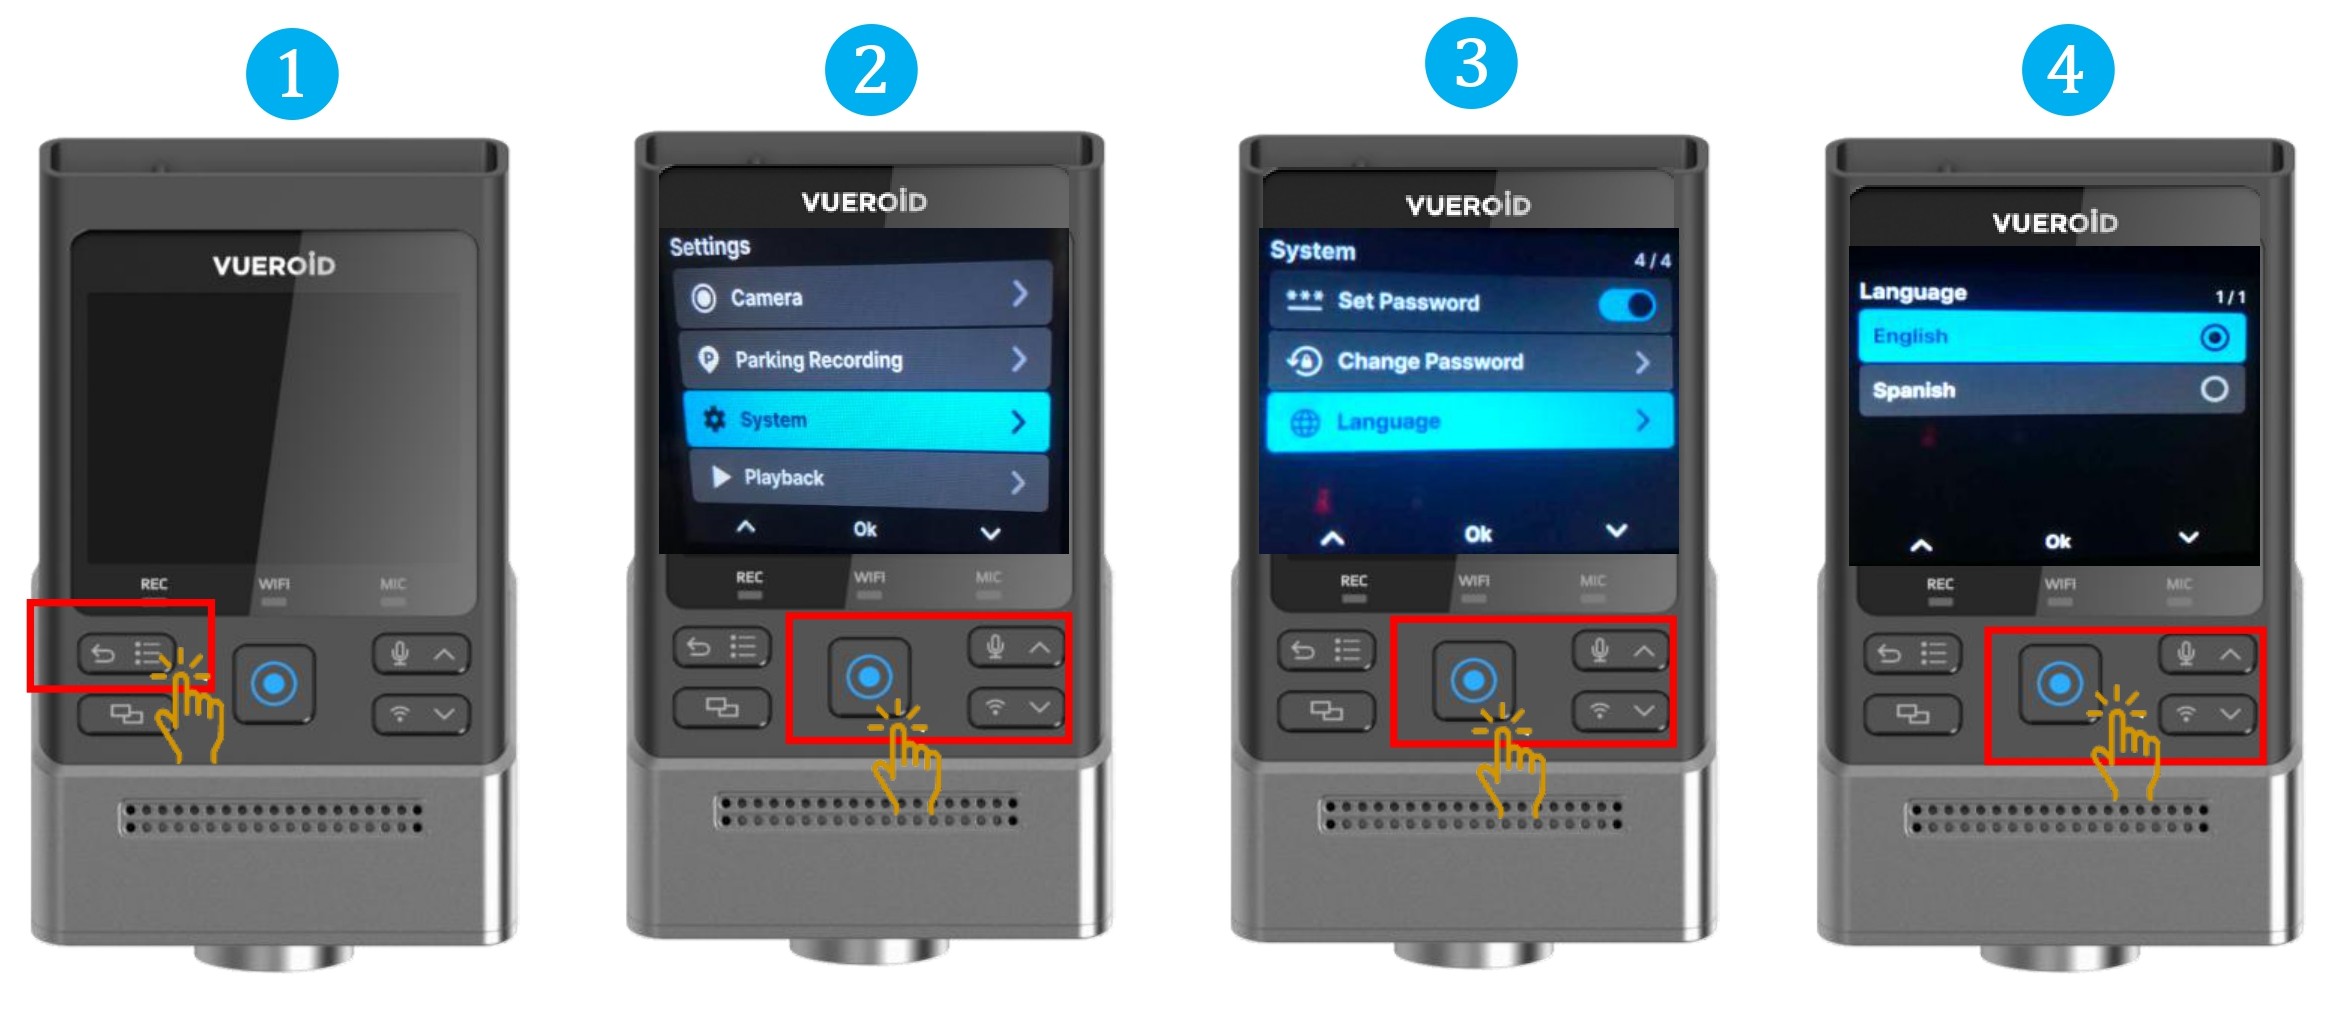
- Press Settings/Back button to turn on the display and press one more time to go to the setting.
- Press Manual Record button / Enter button to select "System".
- Choose "Language" and press Manual Record / Enter button.
- Choose the language preferences then press Manual Record / Enter button.
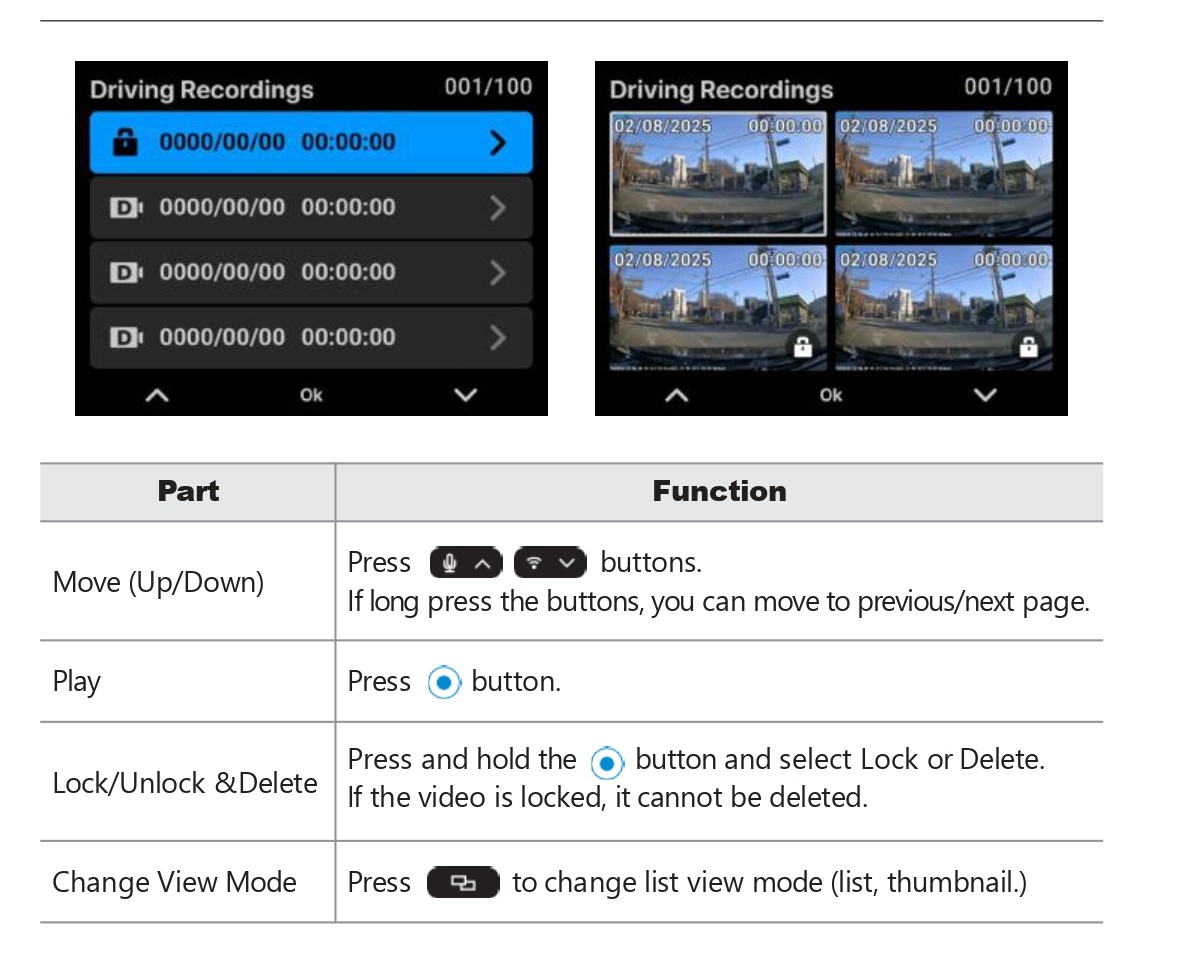
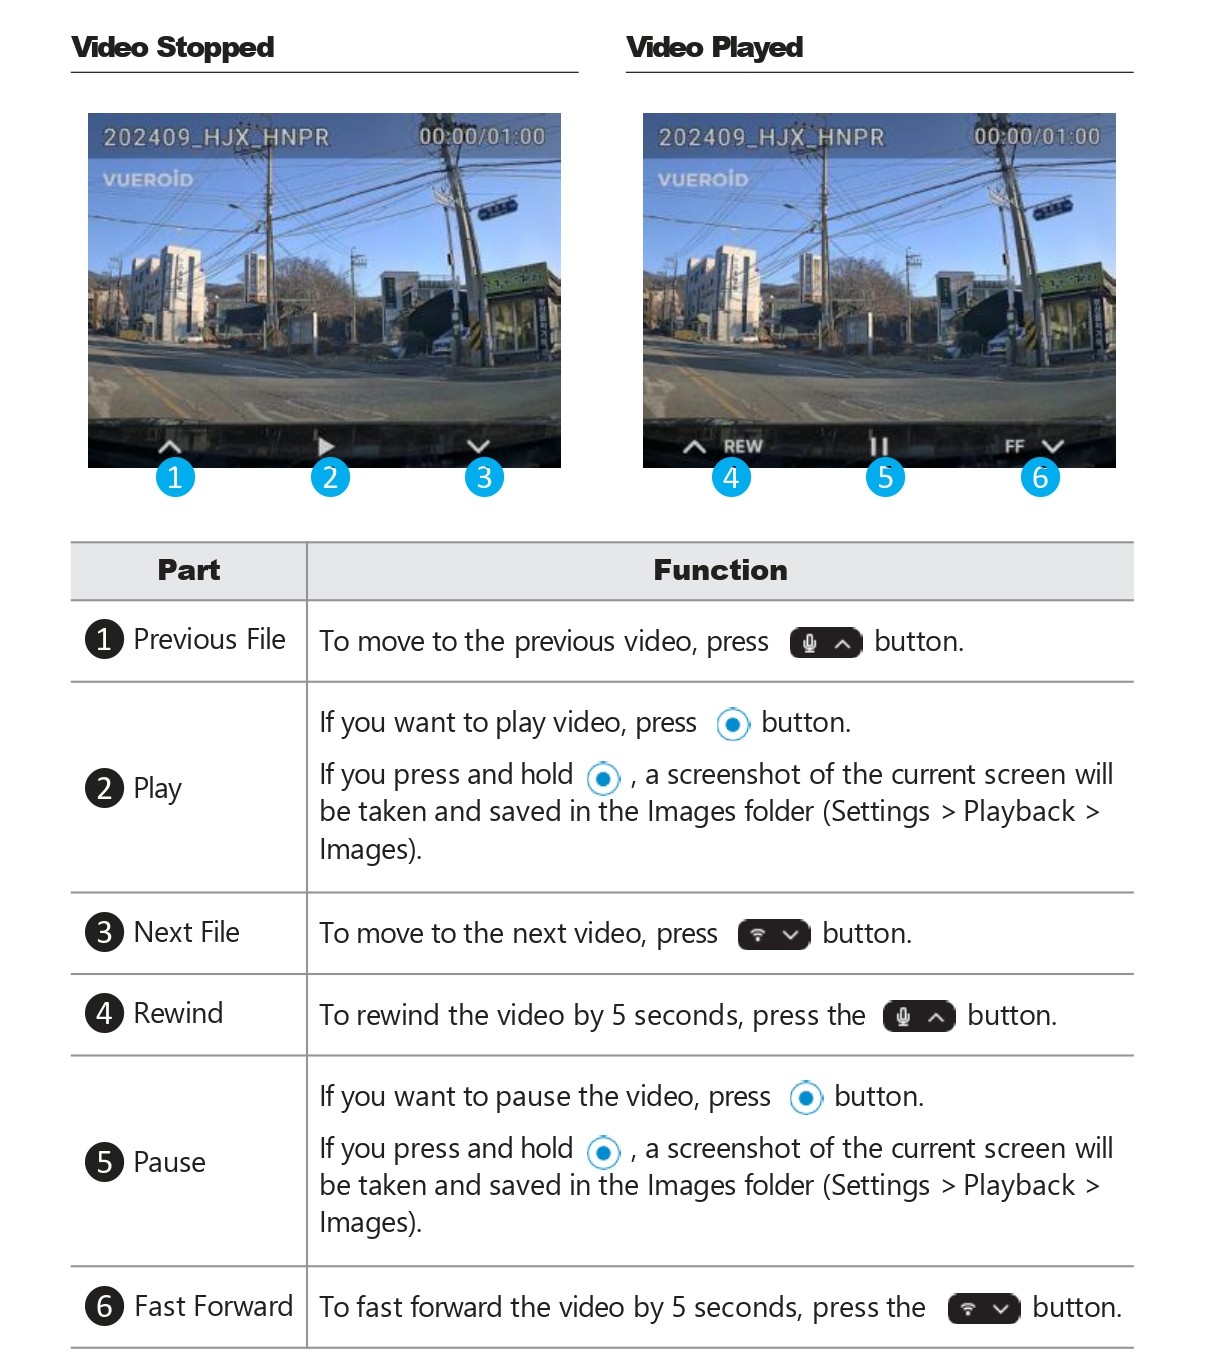
7.2.4 Setting - Playback On Dashcam
The saved videos can be found at the following path.
Settings > Playback > Videos > Driving Recording, Parking Recording, Event Recording, Parking Event Recording or Manual Recording.

- Press Settings/Back button to turn on the display and press one more time to go to the setting.
- Press Manual Record button / Enter button to select "Playback".
8. CUSTOMER SERVICE
Local Service Centre:
WOW! Gadgets Pte Ltd
8 Boon Lay Way, 04-02 Tradehub 21
Singapore 609964
Tel: (65) 61009691