Using Vueroid D10-F2W Touch Screen Application Manual
VUEROID D10-F2W ON SCREEN APPLICATION APPS
Table of Contents
- VUEROID D10-F2W ON SCREEN APPLICATION APPS
- 1.0 MAIN SCREEN
- 2.0 STATUS BAR
- 3.0 MENU
- 4.0 MENU SCREEN
- 4.1 Audio Recording
- 4.2 Volume Control
- 4.3 Play List
- 4.4 Setting
- 4.4.1 Recording
- 4.4.2 Parking Mode
- 4.4.3 Event Sensitivity
- 4.4.4 Advanced Driver Assistance System (ADAS)
- 4.4.4.1 Lane Departure Warning System
- 4.4.4.2 Lane Departure Sensitivity
- 4.4.4.3 Front Car Departure Warning
- 4.4.4.4 Front Car Collision Notification
- 4.4.4.5 Guide (Safety Camera Alert)Safety Camera Alert features are only applicable when purchase Optional Add-On GPS receiver.
- 4.4.4.6 Baseline Position Adjustment
- 4.4.5 MEMORY
- 4.4.6 SYSTEM
1.0 MAIN SCREEN
- Once D10-F2W dashcam is powered on, the main screen will appear as shown.

2.0 STATUS BAR

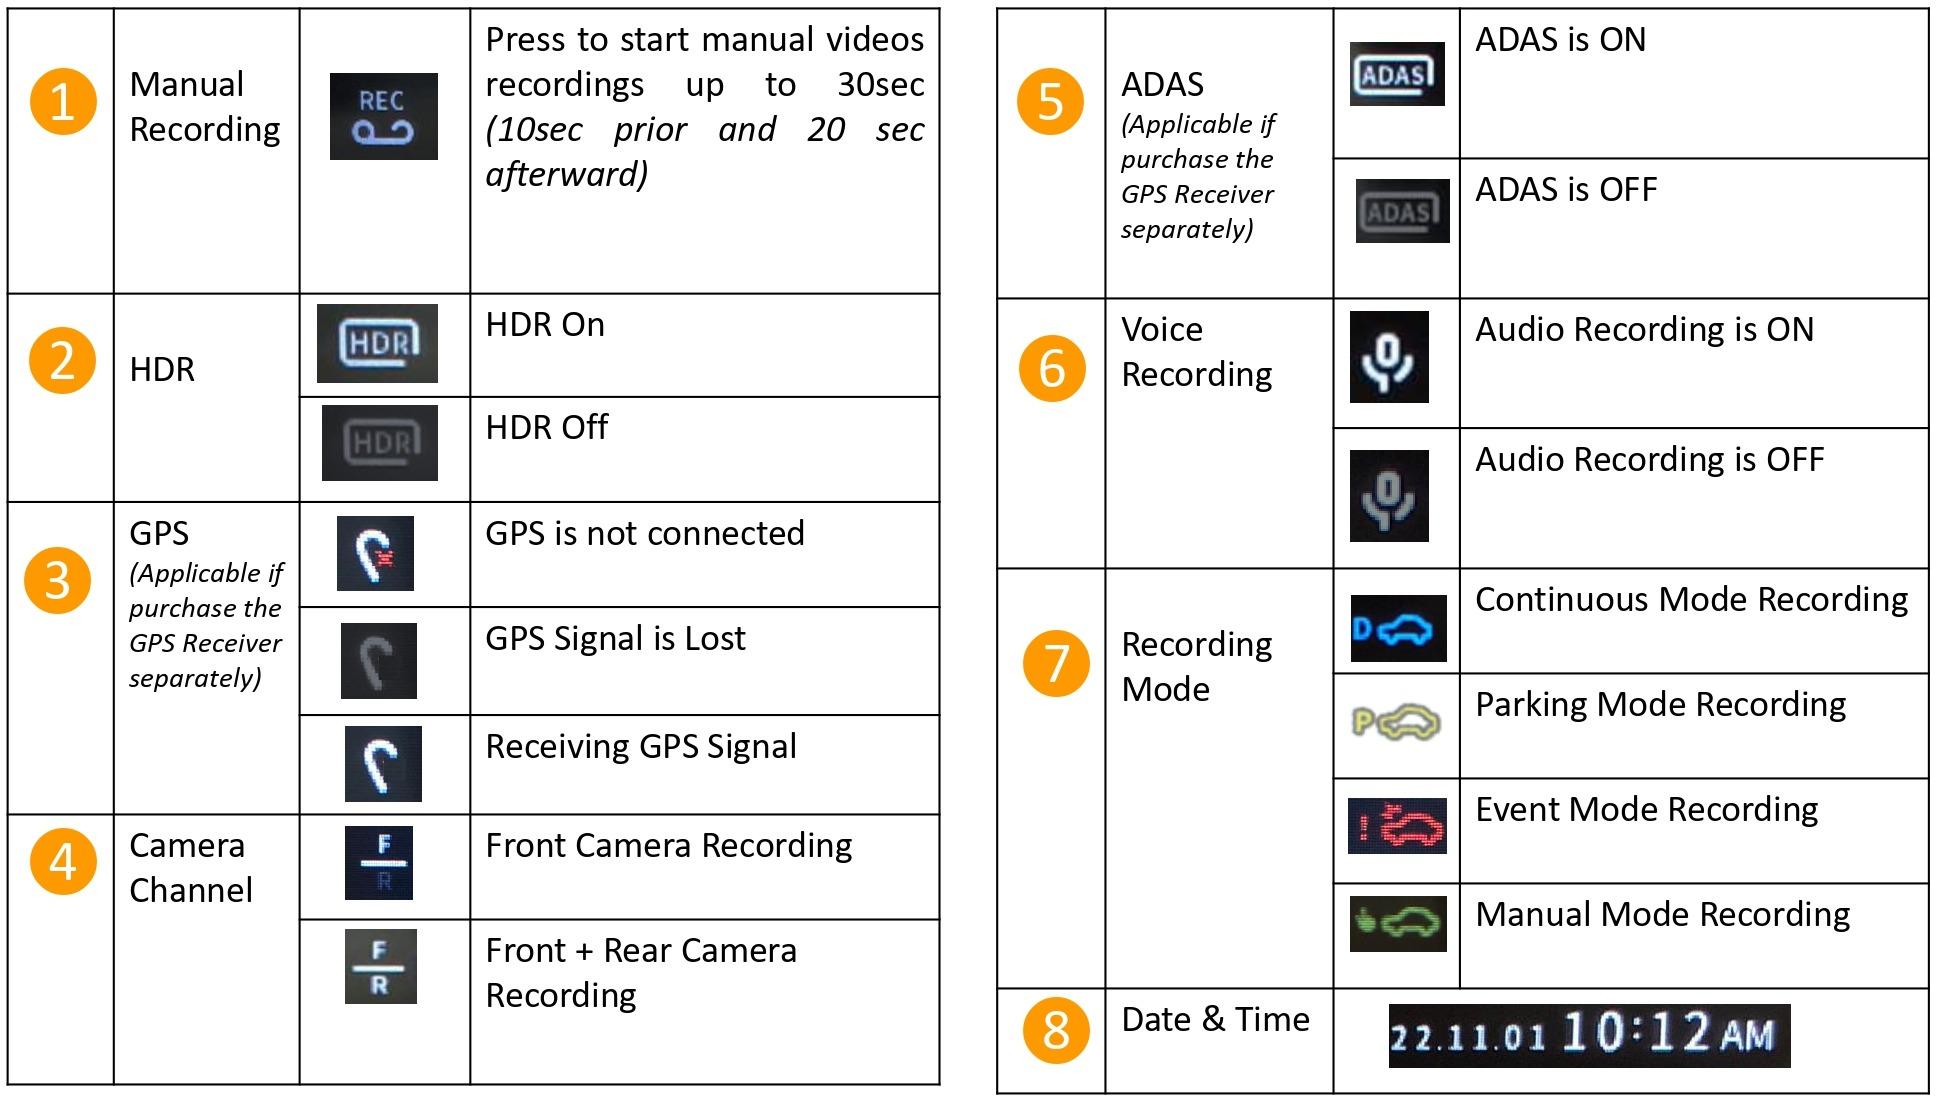
NOTE: Status Bar is always displayed and is located at the bottom of the screen so that the driver can easily check it when mounted on a vehicle.
3.0 MENU
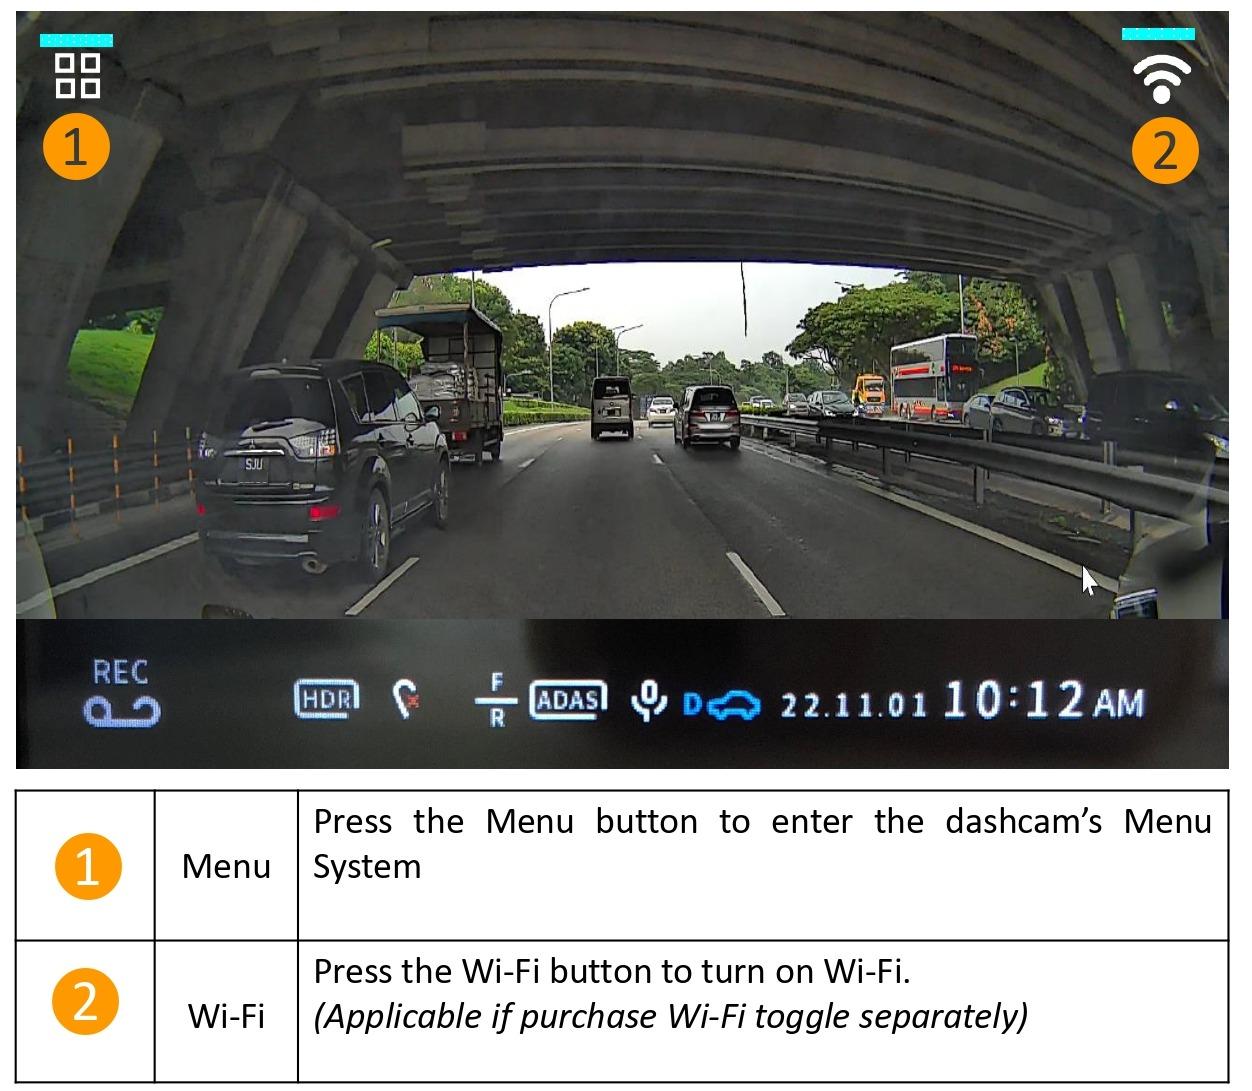
4.0 MENU SCREEN
-
Click on Menu icon.
-
Function will be displayed
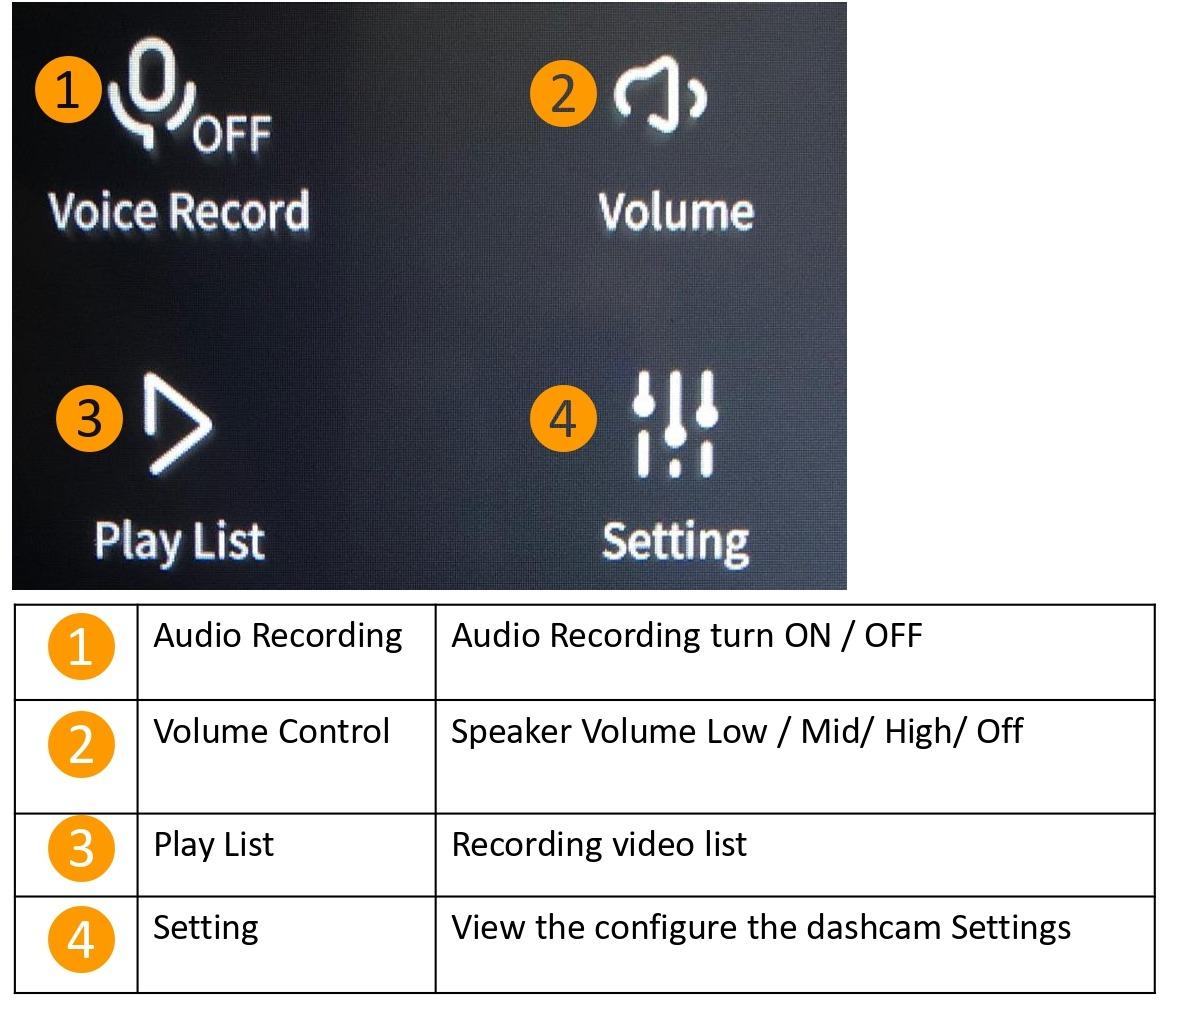
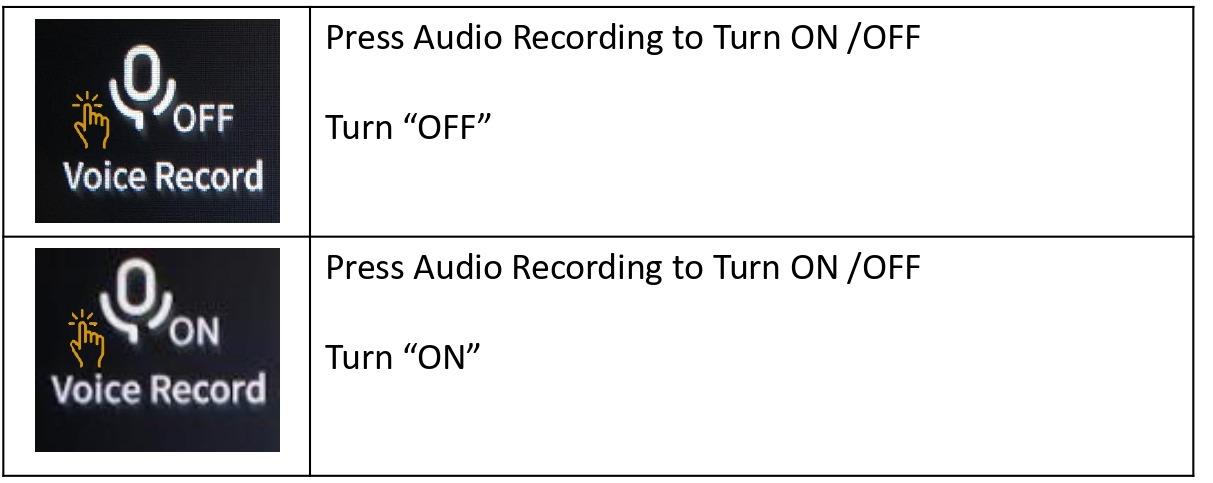
4.1 Audio Recording
- To turn "ON" or "OFF" for audio recording by pressing the Voice Record icon on the dashcam screen.
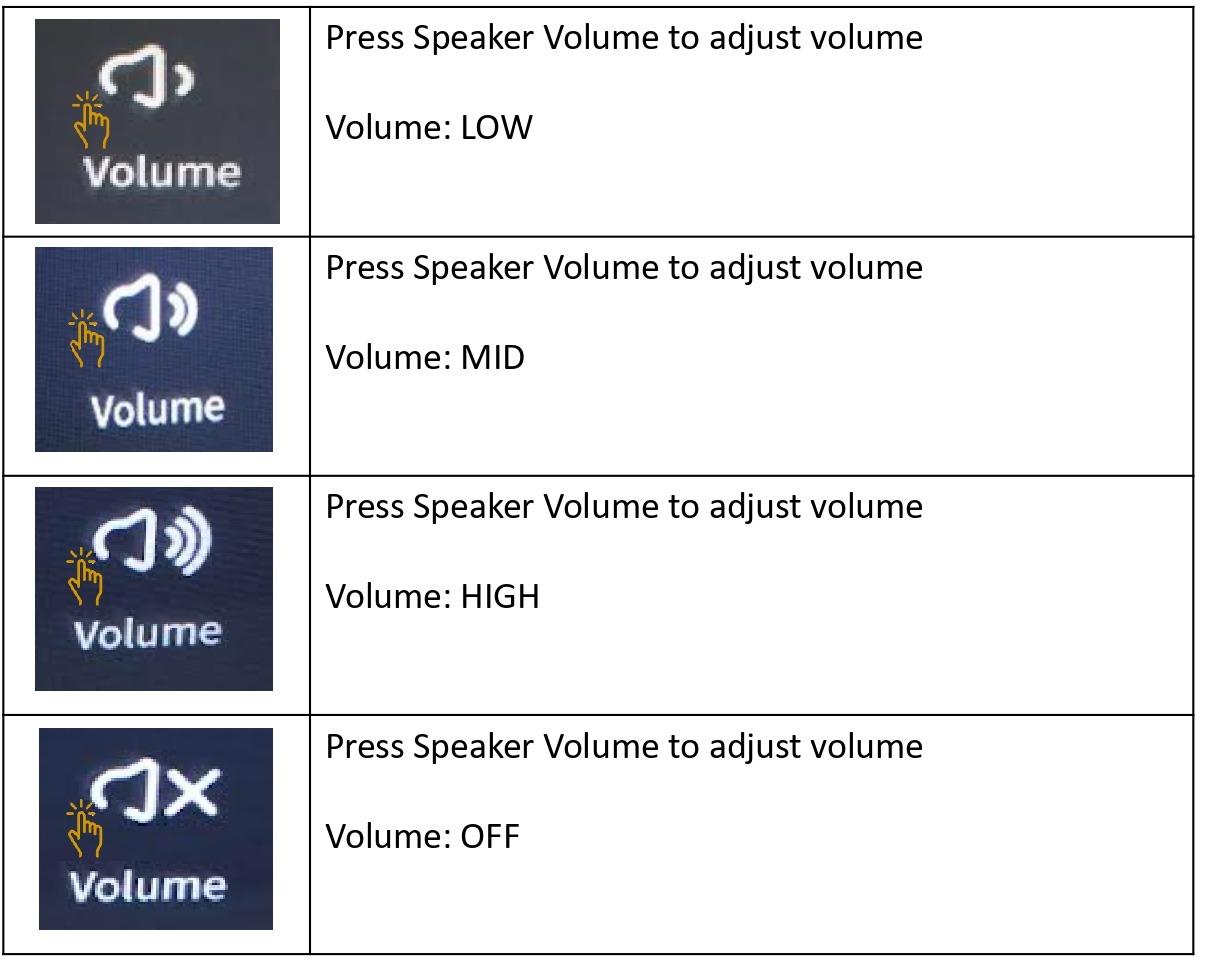
4.2 Volume Control
- Speaker Volume - Speaker volume can be adjusted accordingly or to be turn on or turn off.
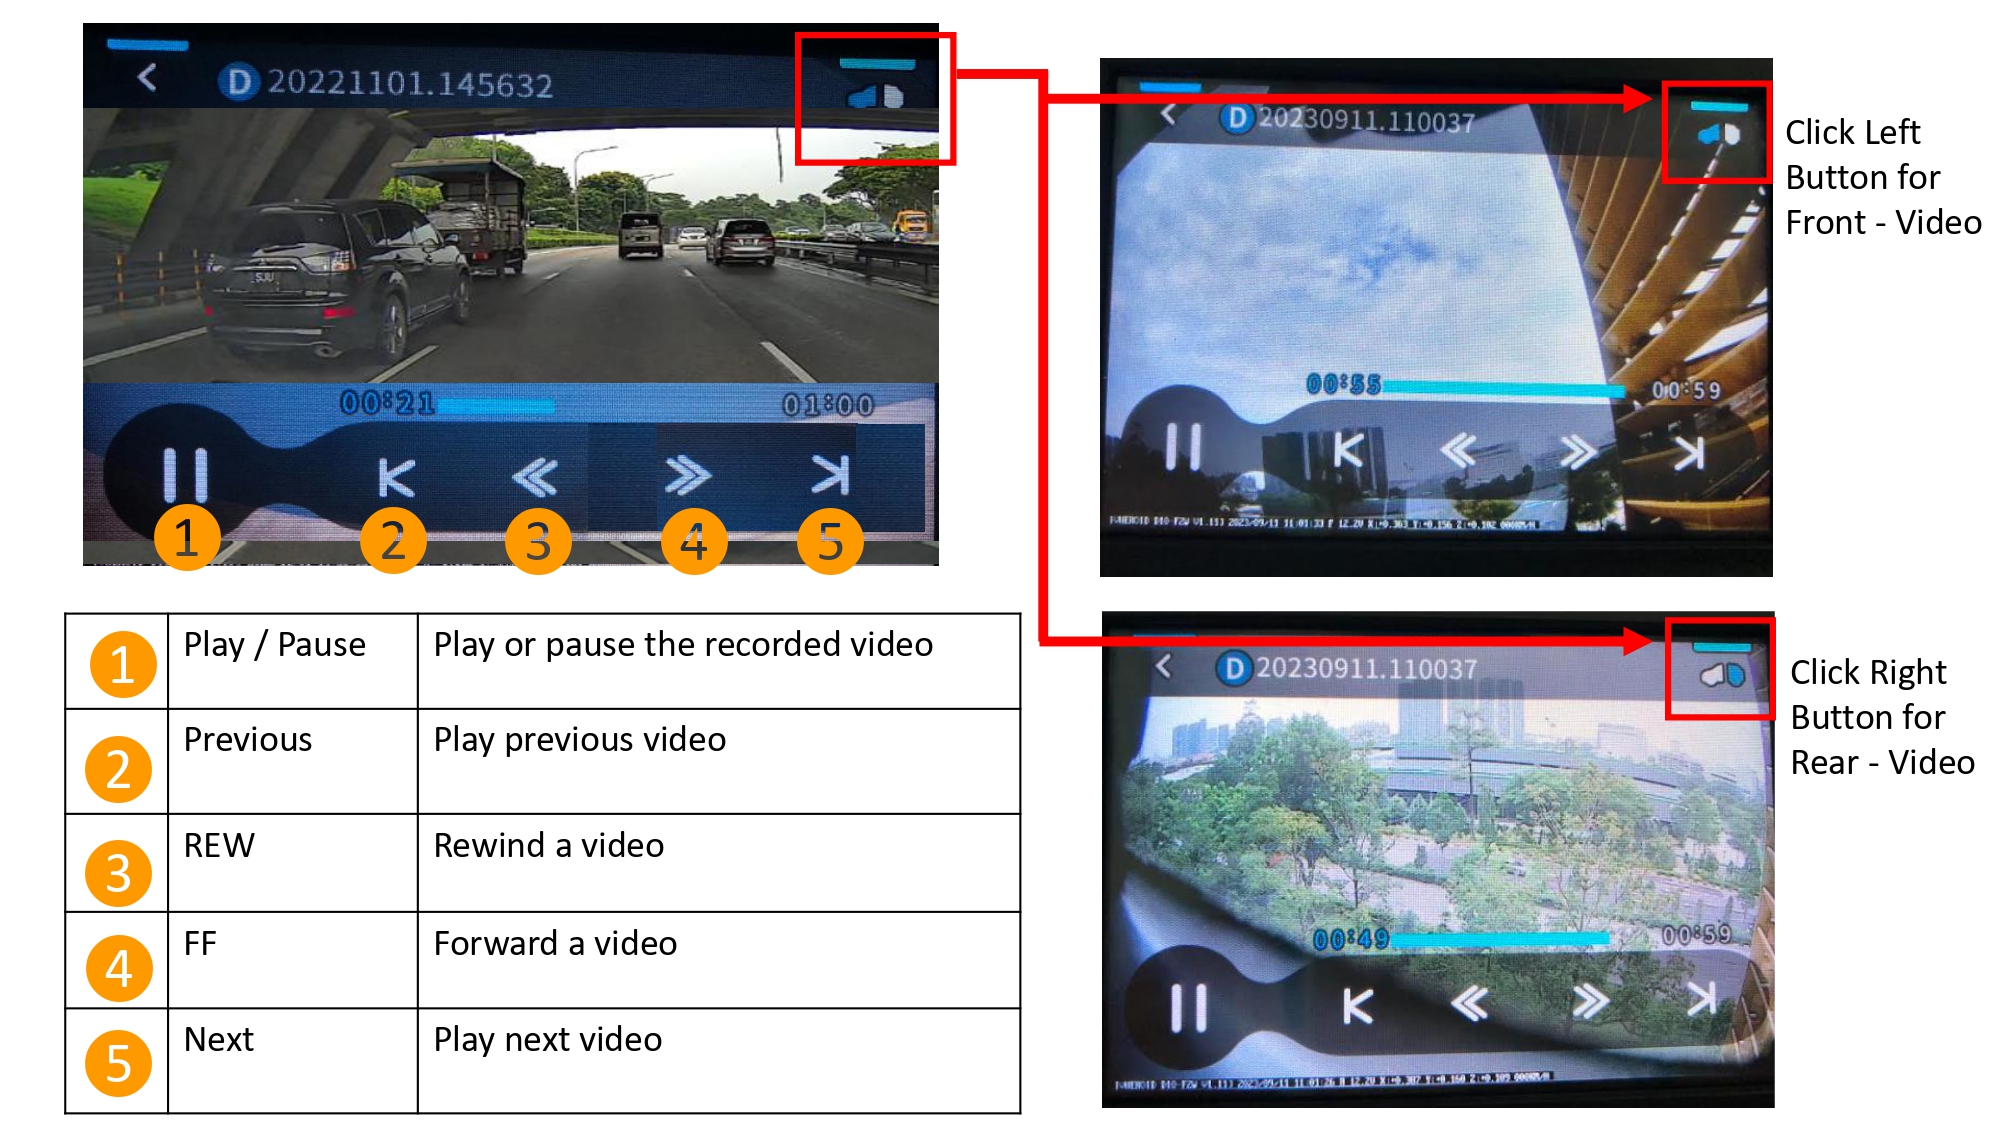
4.3 Play List
- To view the recorded videos, click on the Play List
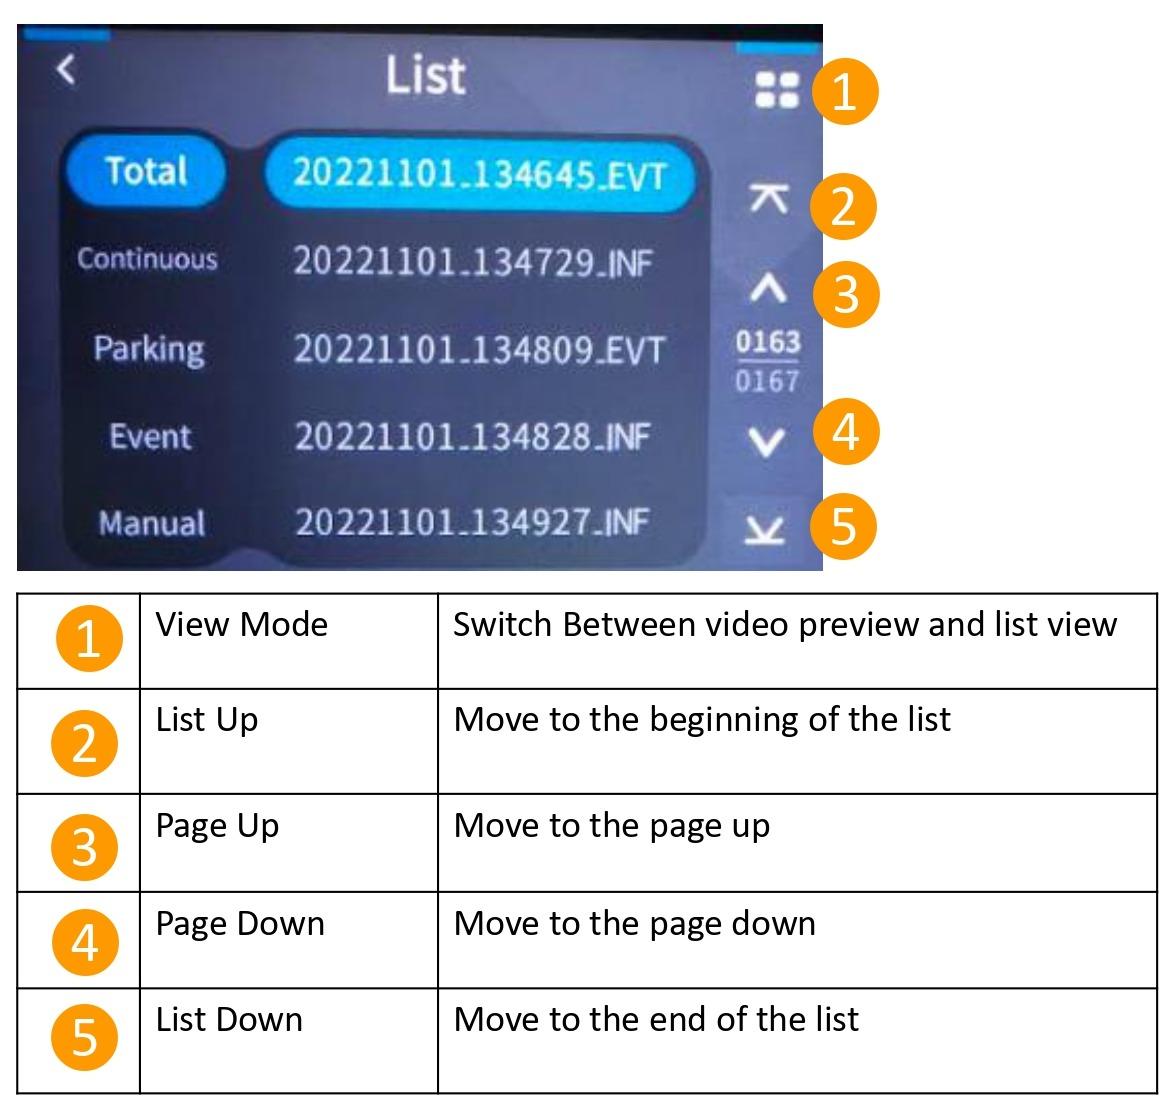
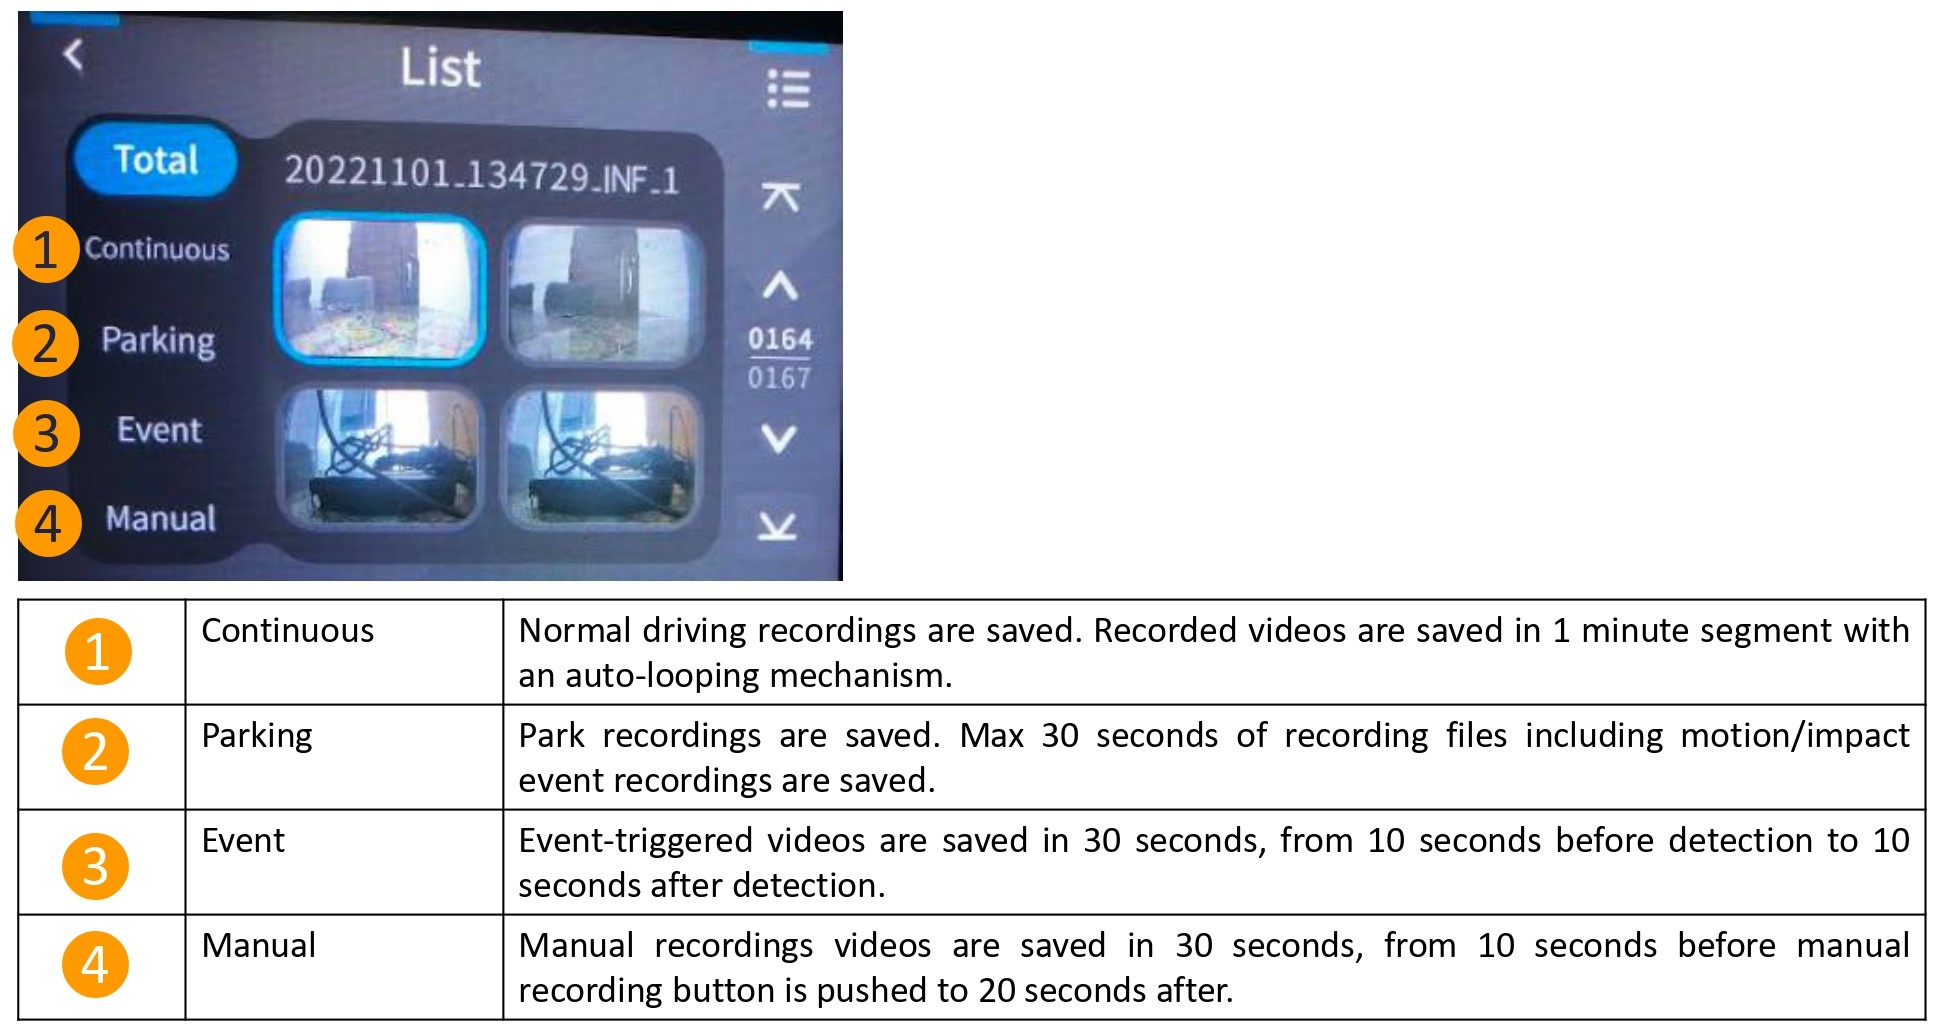
- Click on the video to play the recorded video.
4.4 Setting
- Setting Menu Tree
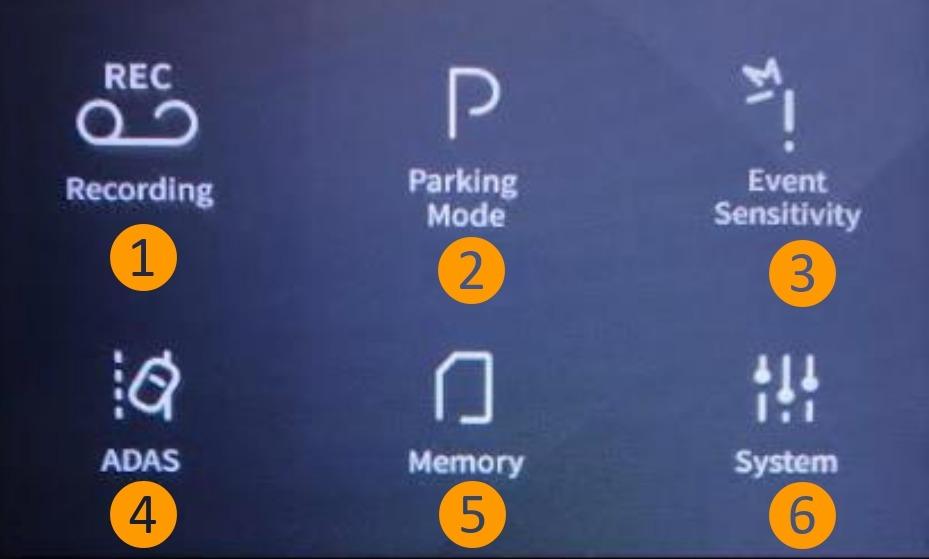
4.4.1 Recording
4.4.1.1 Recording mode
- Click on the Recording icon

-
Click on Recording Method.
- During the driving mode recording, user can choose either
- Motion Sensing (Normal Recording)
- Time Laps

Once the Driving Record setting is switch to either one setting Normal Recording or Time Lapse Recording, the dashcam itself will auto format the SD card.
Please ensure to save out any important videos/files before to change this setting
Default setting: Normal Recording
Normal Recording - 1 minute per video file.
Time Lapse - 20 seconds per video file. Each video file contains 5 minutes of recorded video.
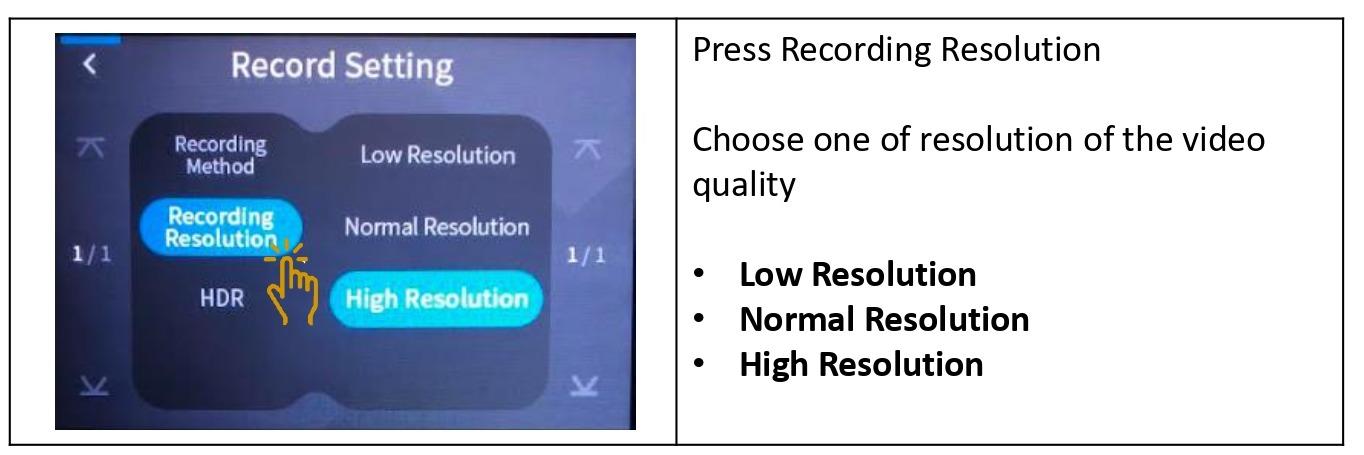
4.4.1.2 Recording Resolution
-
Click on Recording Resolution.
-
The image recording resolution can be select "LOW", "NORMAL" or "HIGH" quality.
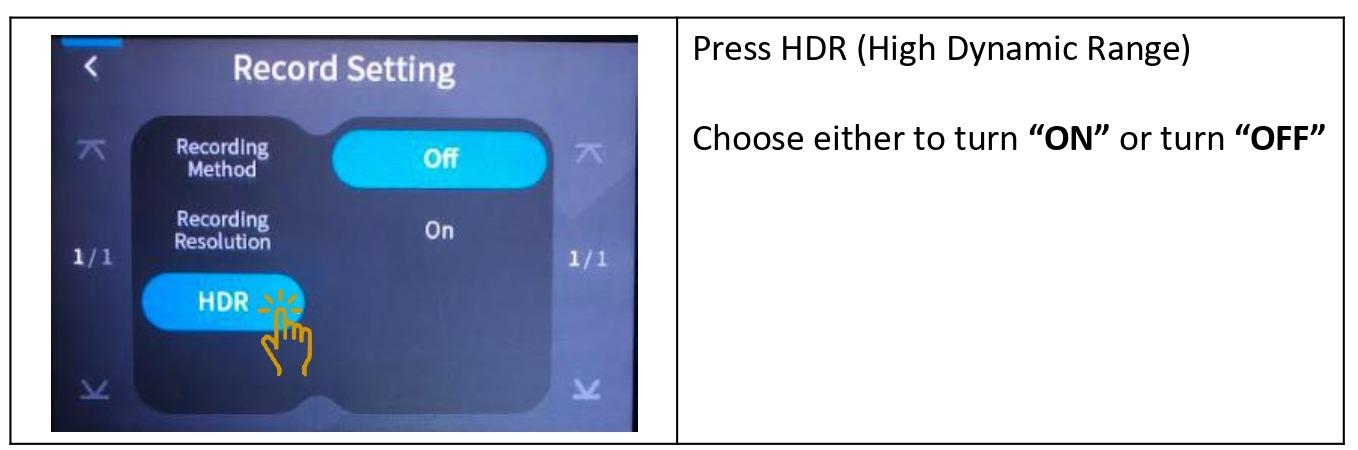
4.4.1.3 High Dynamic Range (HDR)
-
Click on HDR.
-
High Dynamic Range (HDR) improves the contrast in a video while maintaining clarity in high contrast or low-light conditions. This means the whole scene looks more like how your eyes see it.Click on "HDR" to be set .Select "ON" or "OFF"
- Choose "ON" or "OFF" to turn on or turn off HDR function.
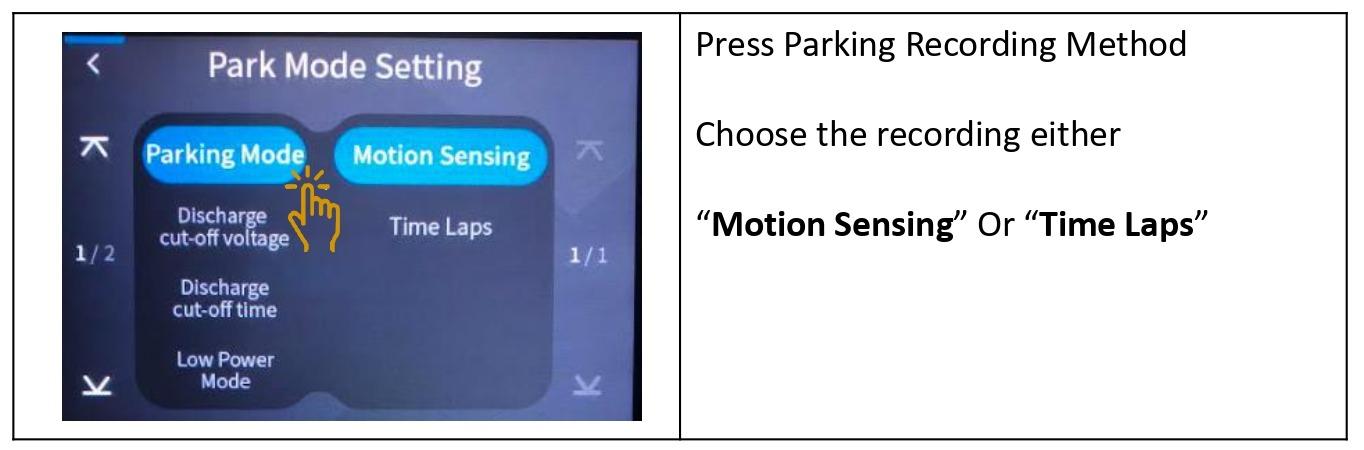
4.4.2 Parking Mode
- Click on "Parking Mode".
4.4.2.1 Parking Recording Mode
-
Click on Parking Mode.
-
During the parking mode recording, user can choose either based on "Motion Sensing" or "Time Lapse" recording.
-
Once the dashcam entered in parking mode recording, the LCD will turns off automatically.
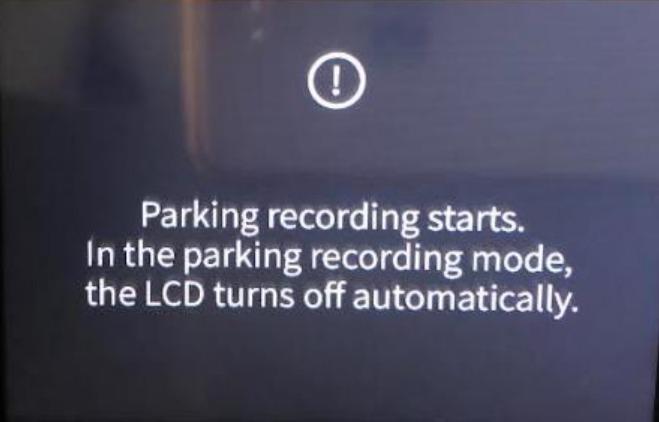
-
The LCD will turns on when it switched to Driving Mode. (Once engine starts)
-
Event Alarm will prompt is there any event files (Shock/Motion) has been recorded during the parking mode recording.
 Parking Mode
Time Lapse - 7 seconds per video file. Each video file contains 100 seconds recorded video.
Motion - 30 seconds per video file.
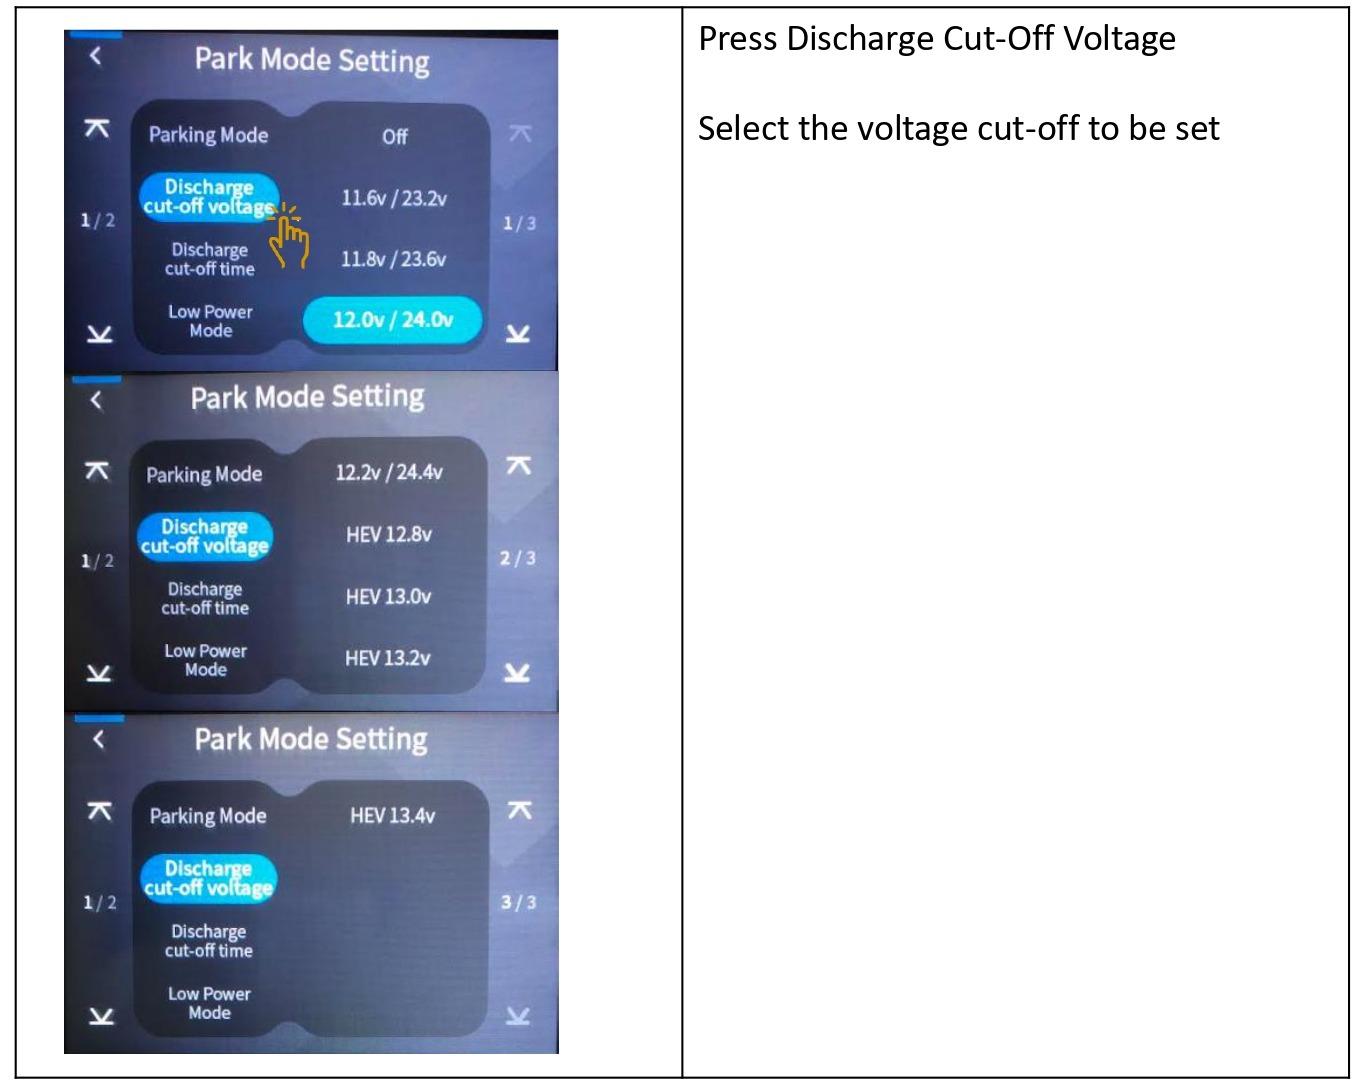
4.4.2.2 Discharge Cut-Off Voltage
Discharge Cut-Off Voltage allows user to choose a few pre set voltage cut off options.
The dashcam will stop recording once detected low voltage or voltage cut time (whichever comes first) during the parking mode recording.
-
Click on "Discharge cut-off voltage" to be set .
-
Select the voltage value to be set
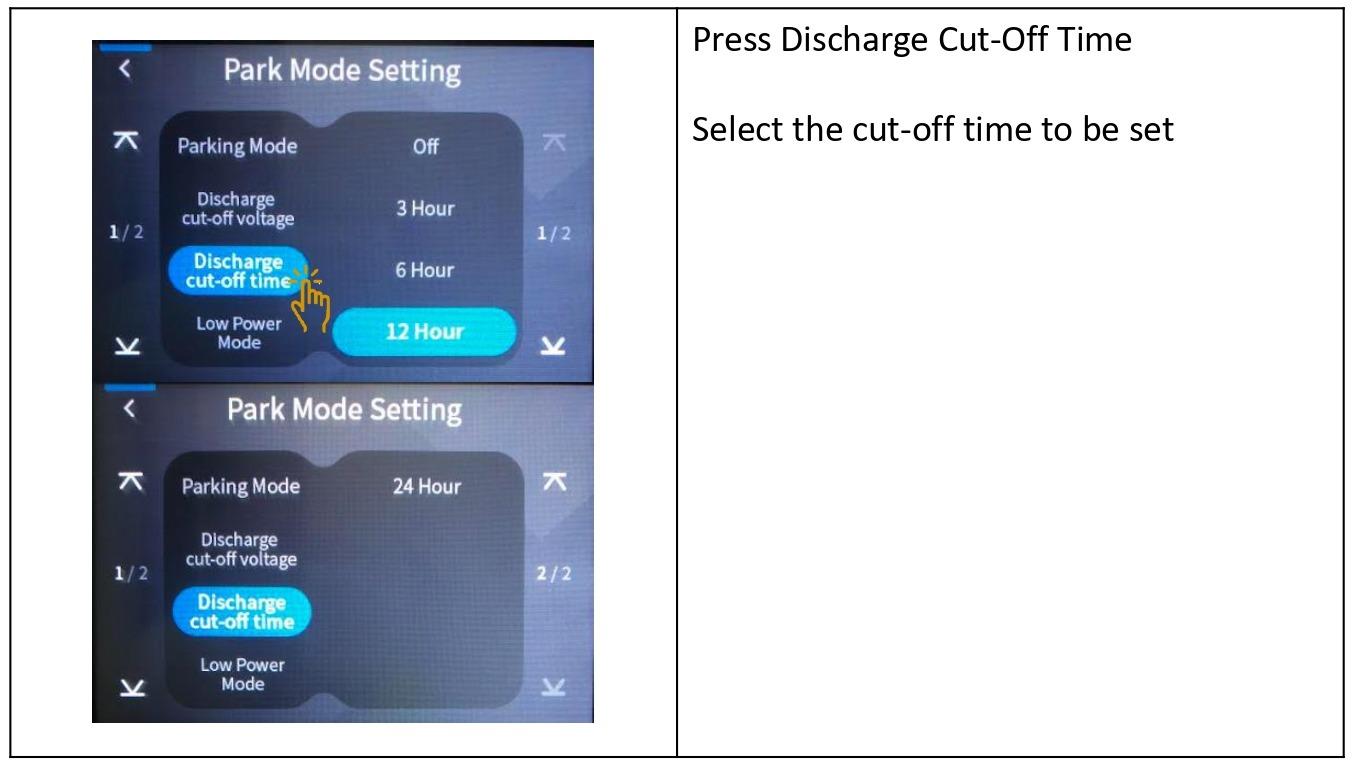
4.4.2.3 Discharge Cut-Off Time
Discharge Cut-Off Time allows user to choose a few pre set timer cut off options or disable the timer cut off.
The dashcam will stop recording once detected low voltage or voltage cut time (whichever comes first) during the parking mode recording.
-
Click on "Discharge Cut-Off Time" to be set .
- Select the cut time to be set.
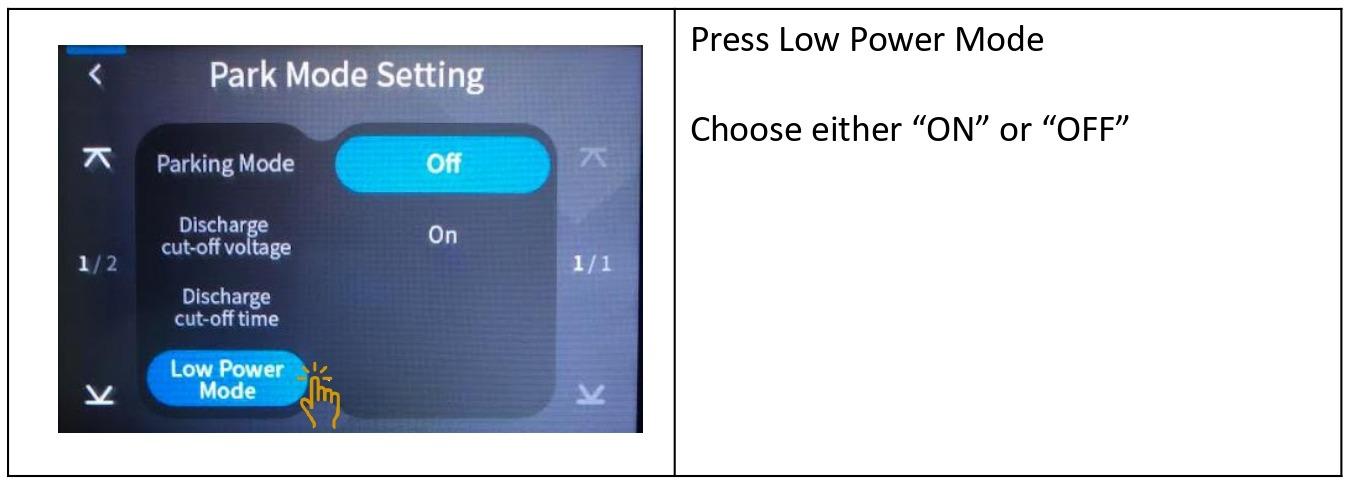
4.4.2.3 Low Power Mode
Low Power Mode enhances the dashcam energy saving in parking mode.
Once the Low Power Mode option is activated, the dashcam will consume very low power while on standby and will only start to record upon impact.
This will help to conserve power especially when user are away from the vehicle for a longer period of time.
Dashcam will not record upon any motion but only starts to record upon a strong impact. Currently this feature is available on D10-F2W and the default setting is off
-
Click on the Low Power Mode to be set.
-
Select "ON or "OFF".
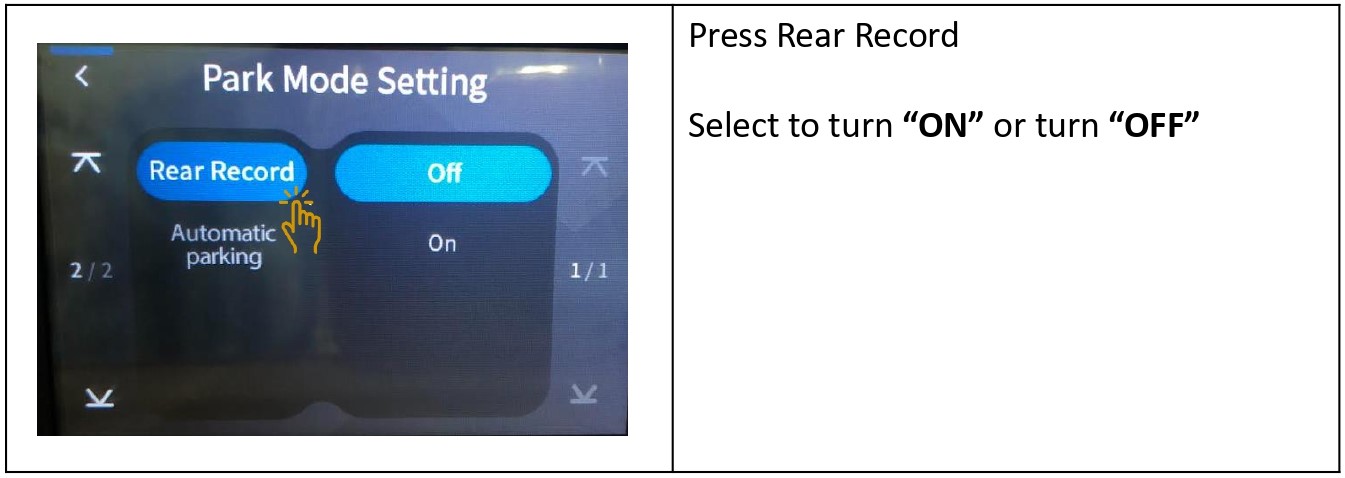
4.4.2.4 Rear Record
This function allows user to choose the Rear camera whether to record or not during parking mode.
-
Click on "Parking Record With Rear" to be set .
-
Select "ON" or "OFF".
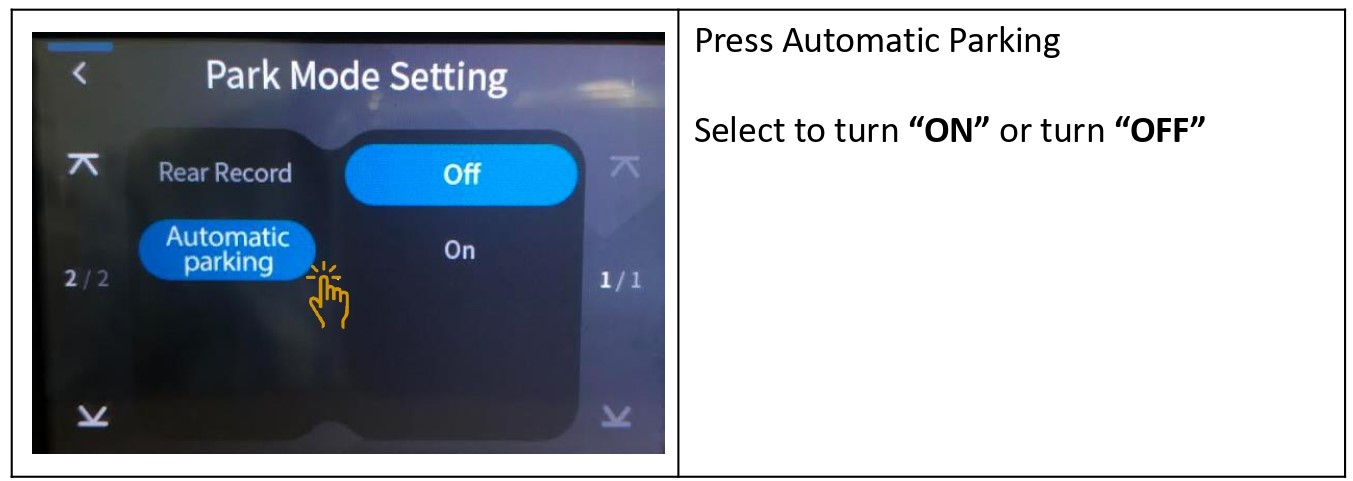
4.4.2.5 Automatic Parking
This function allows user to enable or disable Parking Mode function.
Click on "Automatic Parking" to be set .
-
Select "ON" or "OFF".
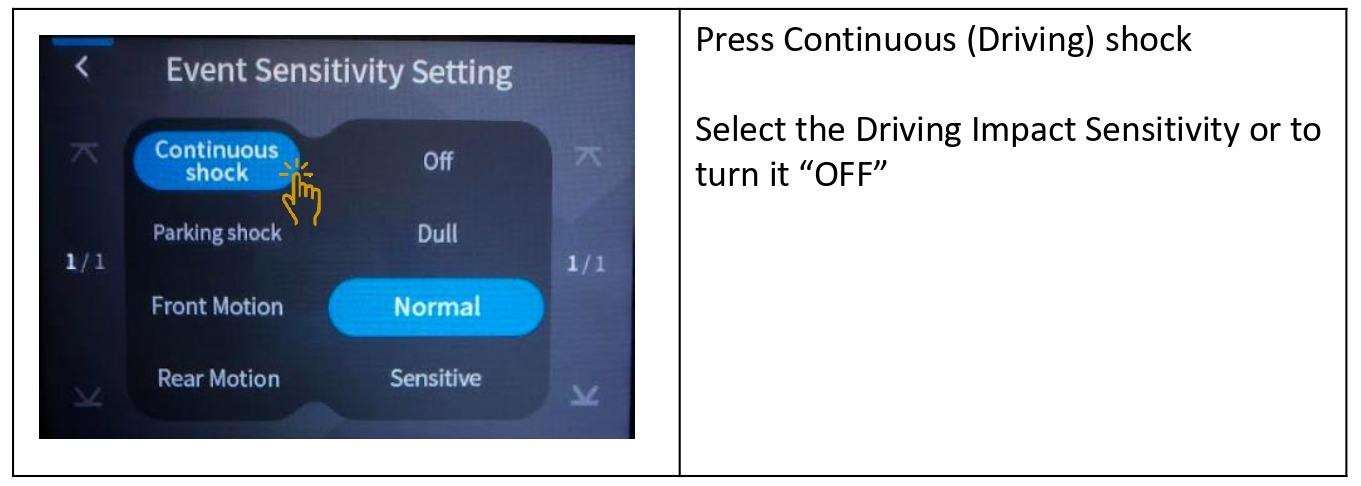
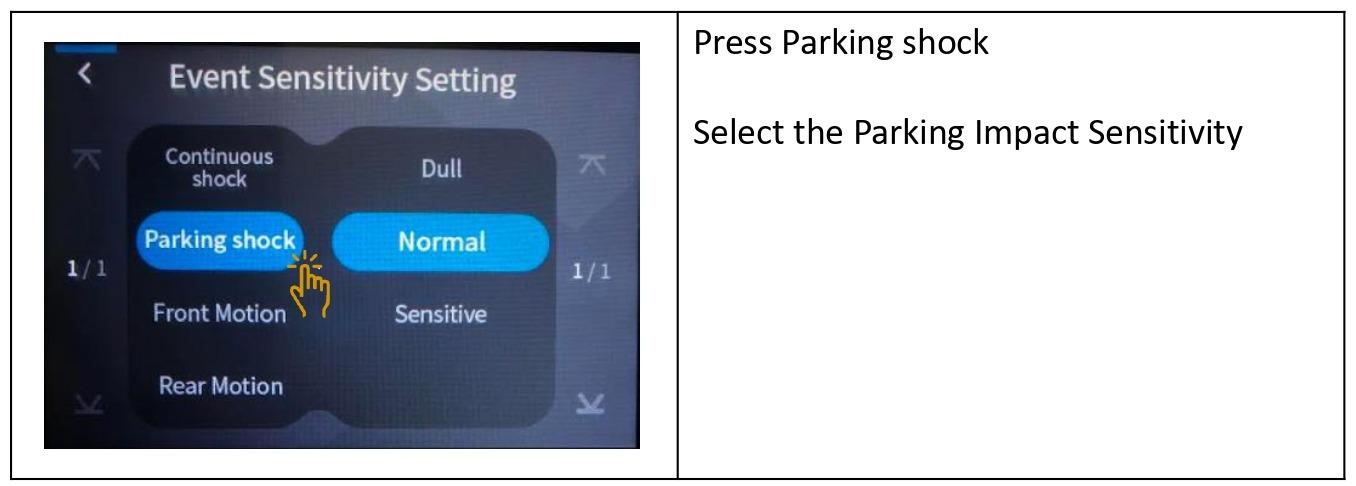
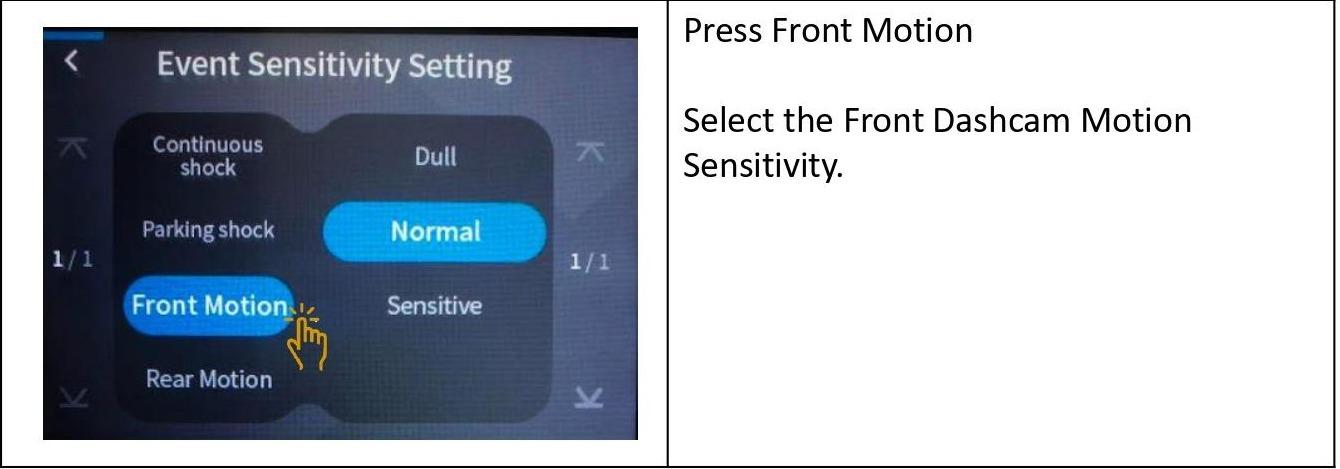
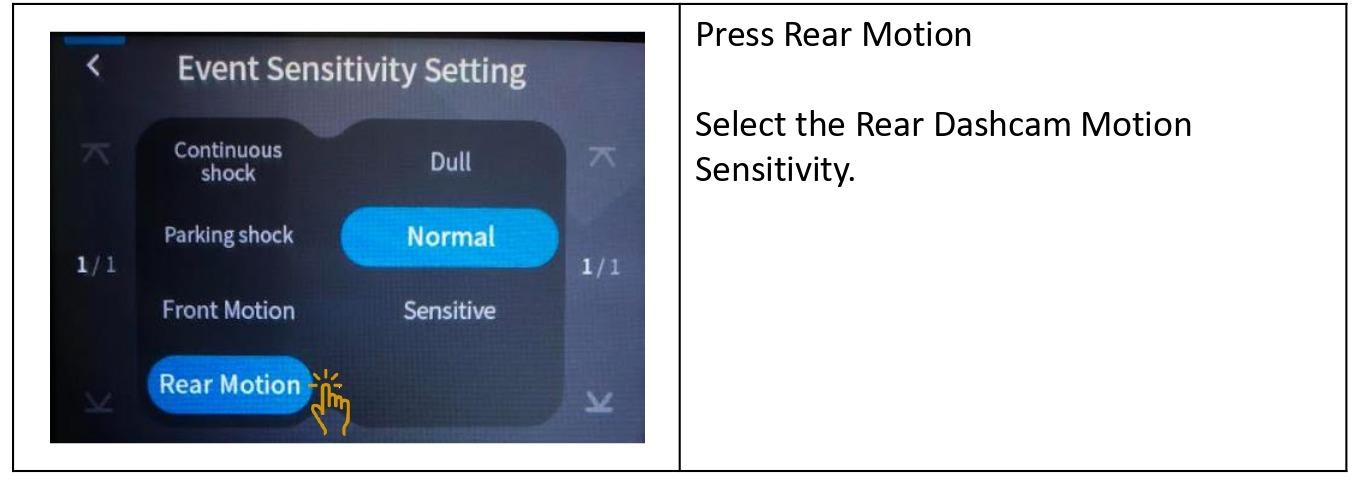
4.4.3 Event Sensitivity
Settings for impact and motion event sensitivity while driving and parking.
- Click on "Event Sensitivity".

4.4.3.1 Impact sensitivity in continuous mode
To set the Continuous (Driving) mode sensitivity
- OFF
- DULL (Less sensitive)
- NORMAL
- SENSITIVE
4.4.3.2 Impact sensitivity in parking mode
To set the Parking Shock mode sensitivity
- DULL (Less sensitive)
- NORMAL
- SENSITIVE
4.4.3.3 Front motion
To set the Front motion sensor sensitivity
- DULL (Less sensitive)
- NORMAL
- SENSITIVE
4.4.3.4 Rear motion
To set the Rear motion sensor sensitivity
- DULL (Less sensitive)
- NORMAL
- SENSITIVE
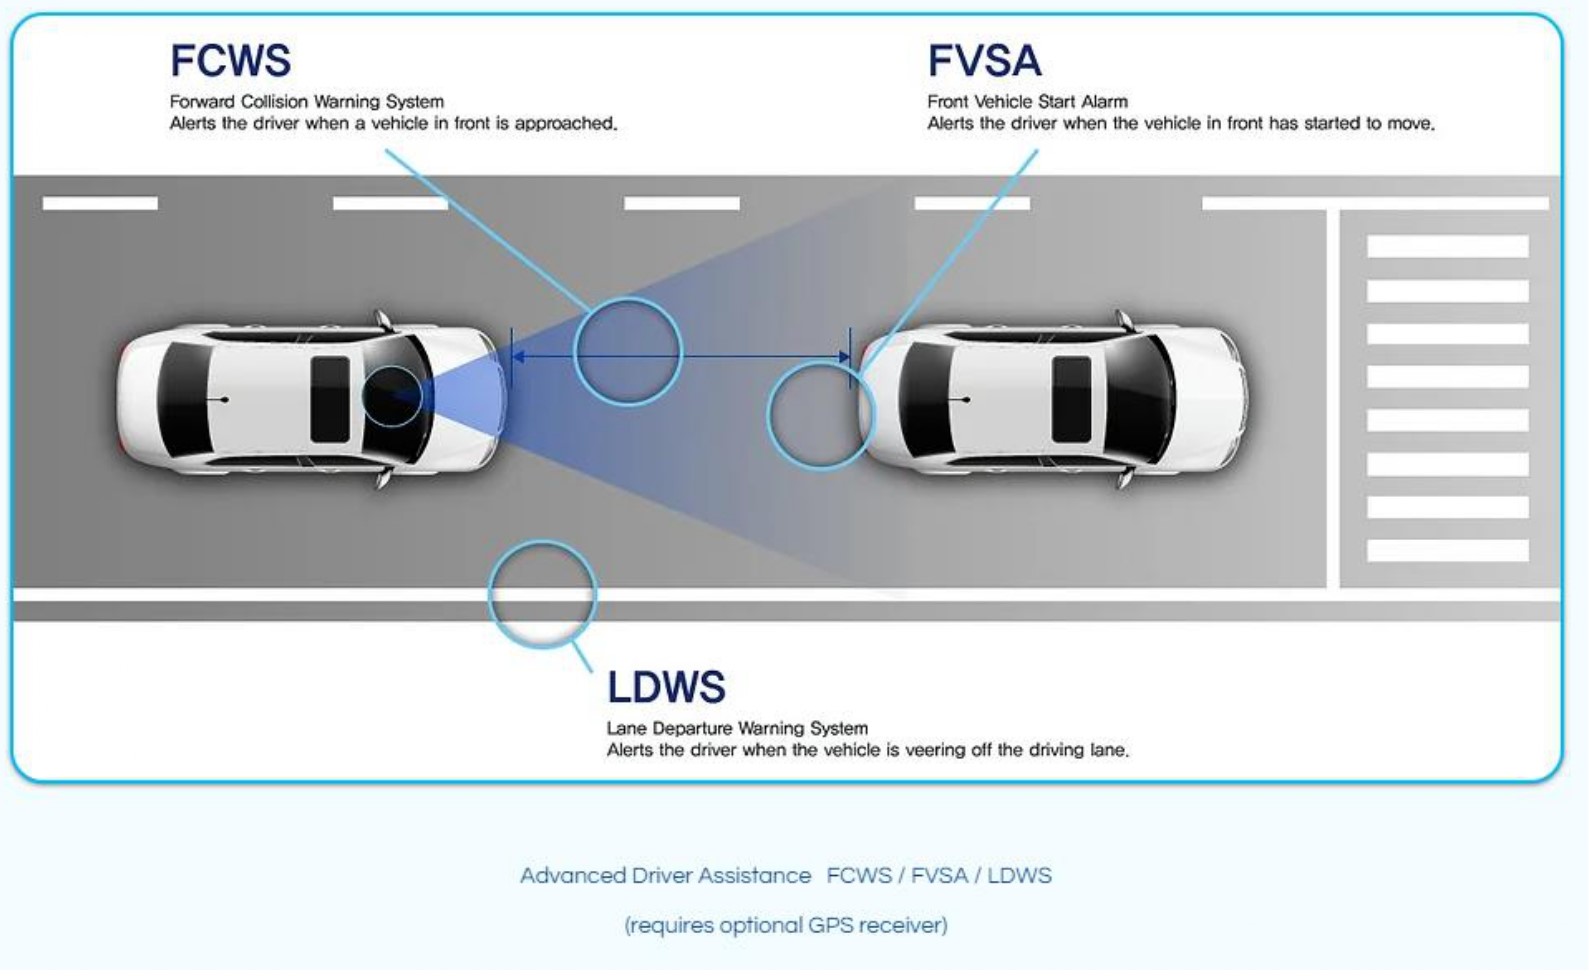
4.4.4 Advanced Driver Assistance System (ADAS)
- Click on "ADAS".

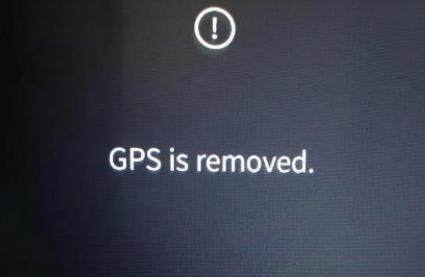
ADAS features are only applicable when purchase Optional Add-On GPS receiver.
If there is no GPS receiver connected to the dashcam, there will be an error message shown when ADAS is pressed.
Once the GPS is connected, user can Enable or Disable the below warning system features.
- Lane Departure Warning System (LDWS)
- Front Vehicle Start Alarm (FVSA)
- Forward Collision Warning System (FCWS)
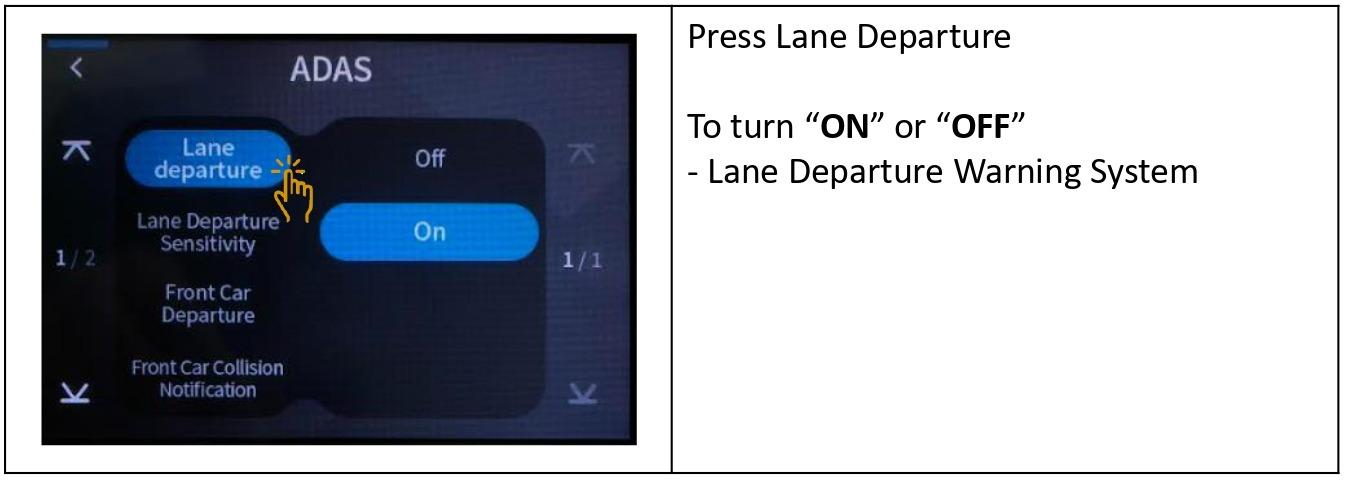
4.4.4.1 Lane Departure Warning System
Lane Departure Warning System can be turn "ON" or "OFF".
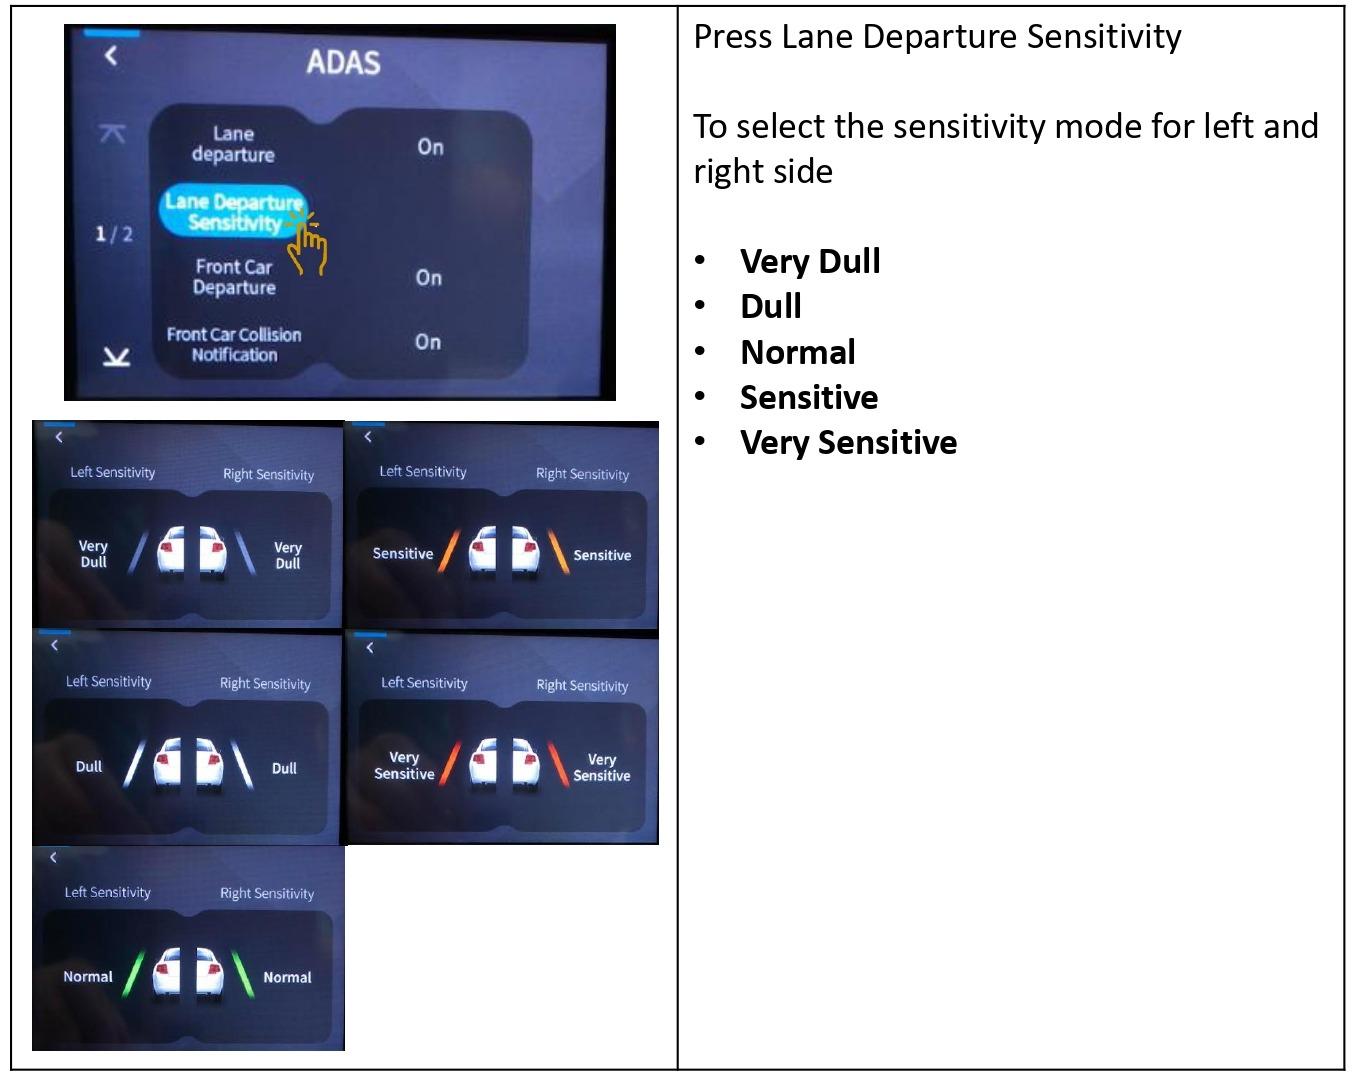
4.4.4.2 Lane Departure Sensitivity
Click on Lane Departure Sensitivity (Lane Departure Warning System) to set the sensitivity sensor.
- Very Dull
- Dull
- Normal
- Sensitive
- Very Sensitive
4.4.4.3 Front Car Departure Warning
Click on Front Car Departure (Front Vehicle Start Alarm) to turn "ON" or "OFF" the warning alarm.

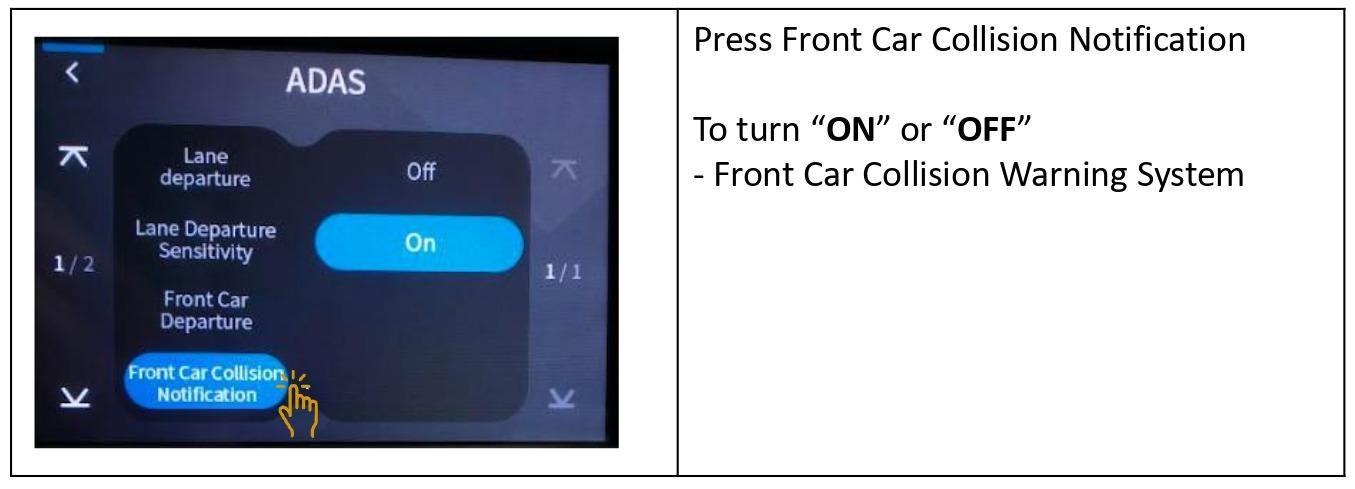
4.4.4.4 Front Car Collision Notification
Click on Front Car Collision Notification (Forward Collision Warning System) to turn "ON" or "OFF" the warning alarm.
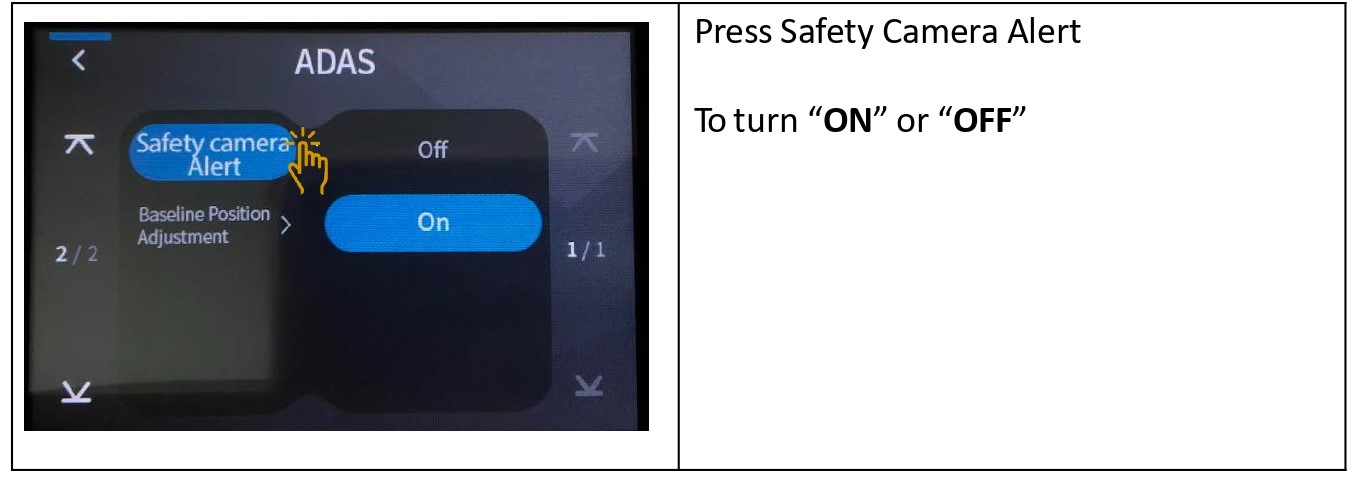
4.4.4.5 Guide (Safety Camera Alert)
Safety Camera Alert features are only applicable when purchase Optional Add-On GPS receiver.
Click on Guide to turn "ON" or "OFF" the Safety Camera Alert.
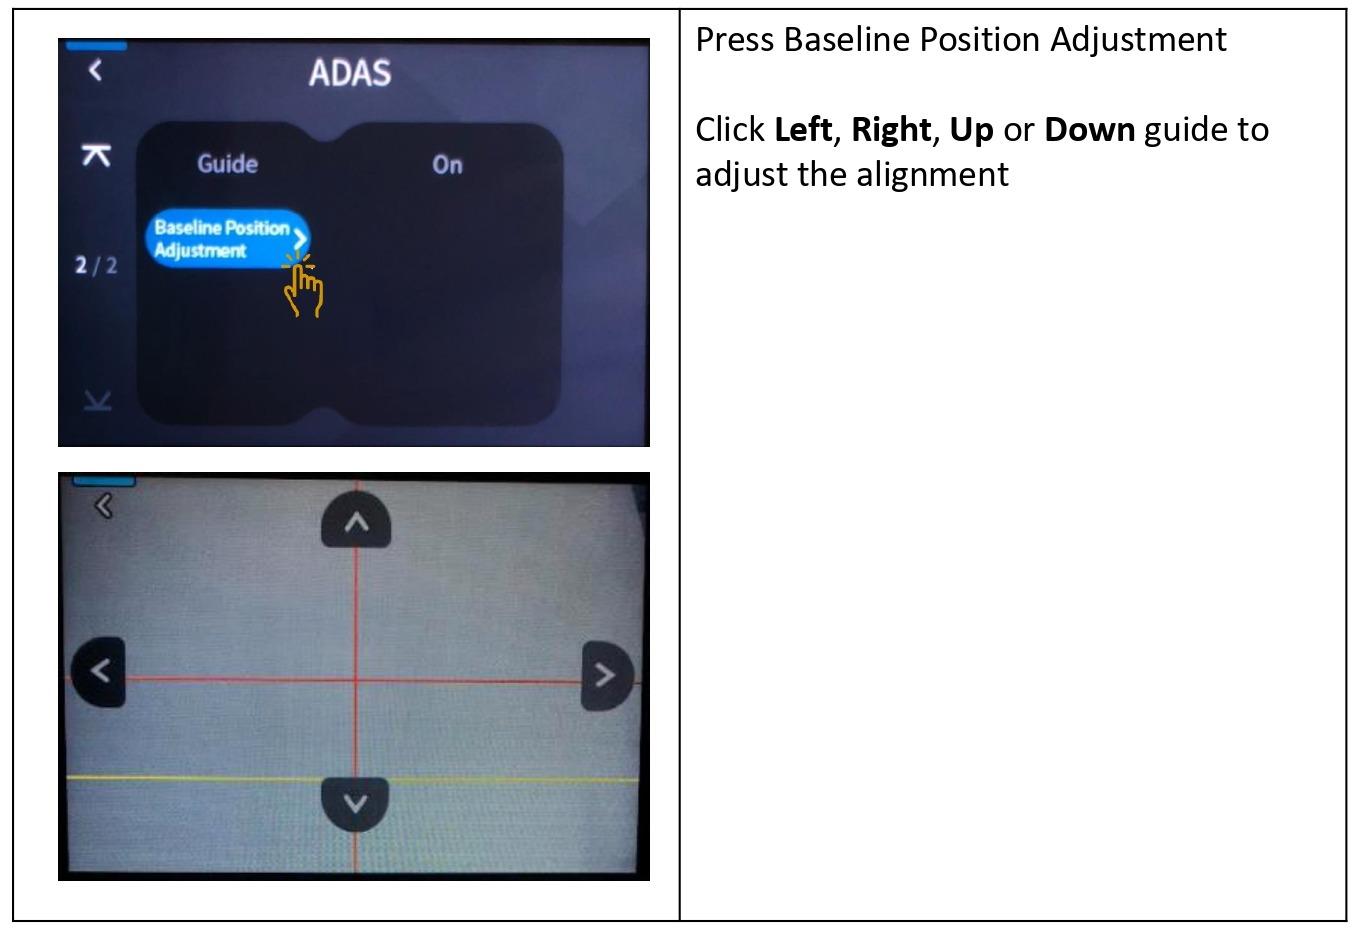
4.4.4.6 Baseline Position Adjustment
Click on Baseline Position Adjustment, to align the dashcam sensor accordingly.
4.4.5 MEMORY
- Click on "MEMORY".

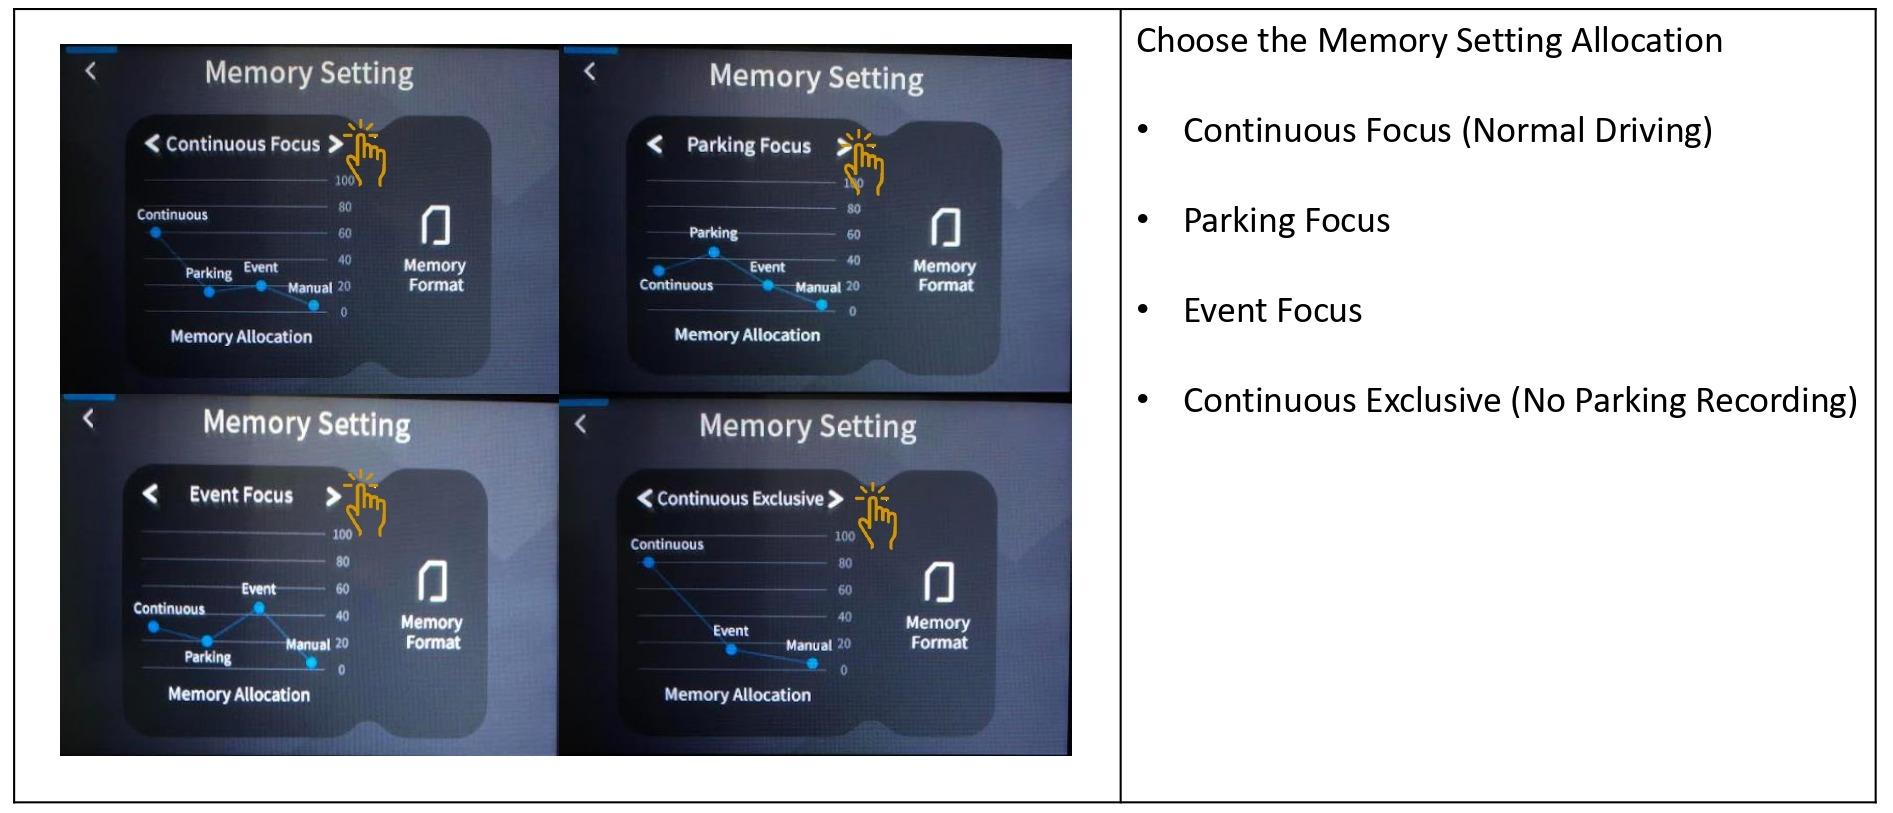
4.4.5.1 Memory Assign
Memory Assign - This function allows user to choose to prioritize the recorded videos in the memory card allocation.
| MEMORY ASSIGN |
Memory SD Card Capacity (32GB, 64GB, 128GB, 256GB) |
||
| Driving Memory Allocation | Parking Memory Allocation | Event Memory Allocation | |
| Continuous Focus - (Driving First) | 60% | 20% | 20% |
| Parking Focus | 30% | 50% | 20% |
| Event Focus | 30% | 20% | 50% |
| Continuous Exclusive - (Driving Only) | 80% | 0% | 20% |
- Choose the preferred memory setting
4.4.5.2 Format SD Card
- Click on the Memory Format Icon to format the SD card
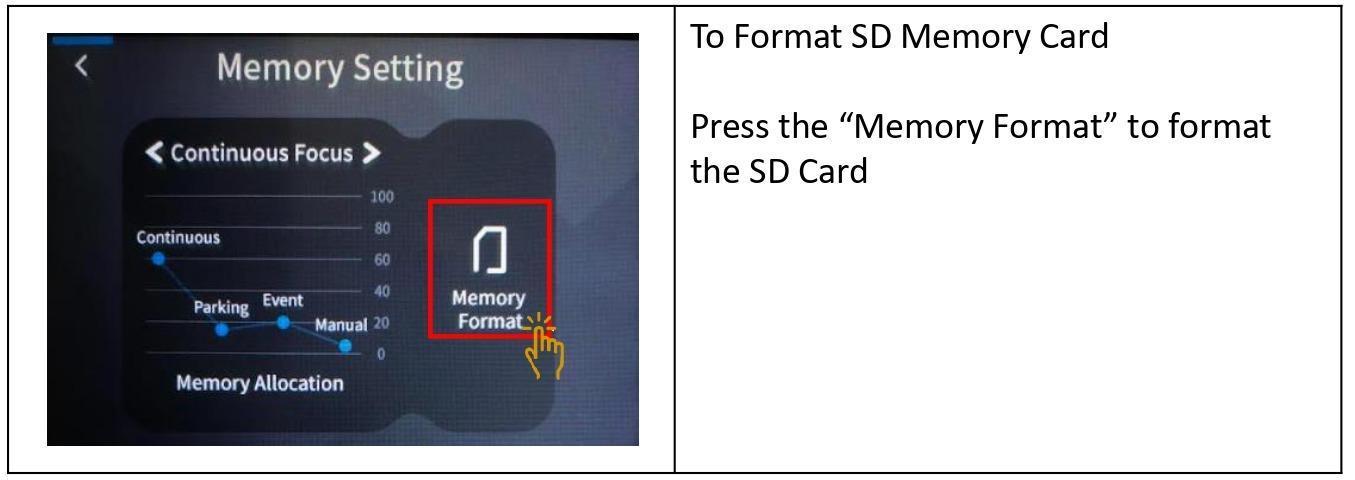
- Once saved, the dashcam will restart itself.
Please note that once formatted, all the videos inside the SD card will be erased.
4.4.6 SYSTEM
- Click on "SYSTEM".

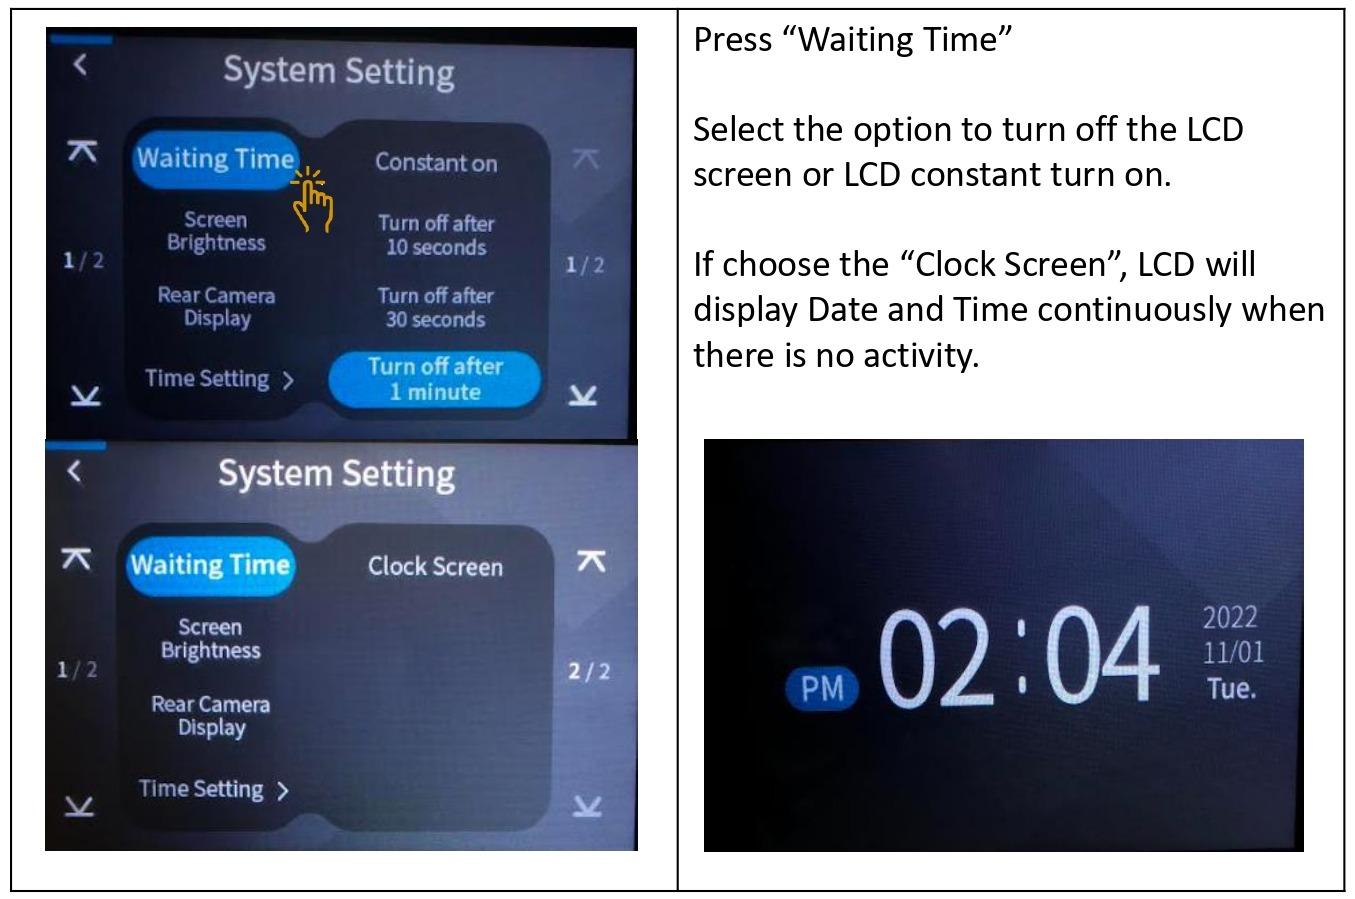
4.4.6.1 LCD Operating Time
To choose the option to turn off the LCD screen or to tun on constantly.
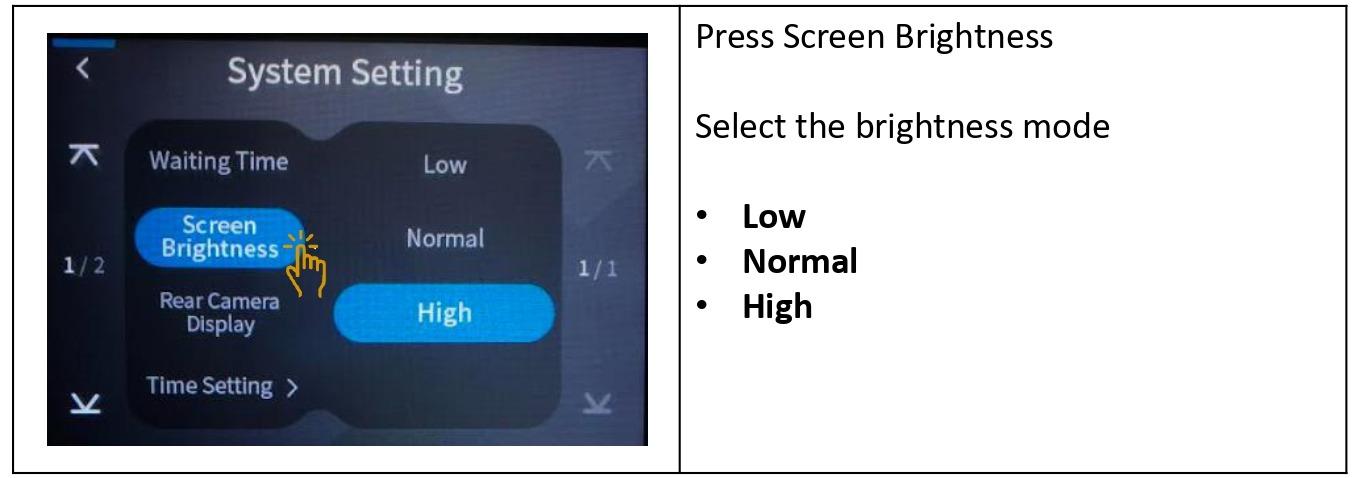
4.4.6.2 Screen Brightness
To choose the the screen brightness option.
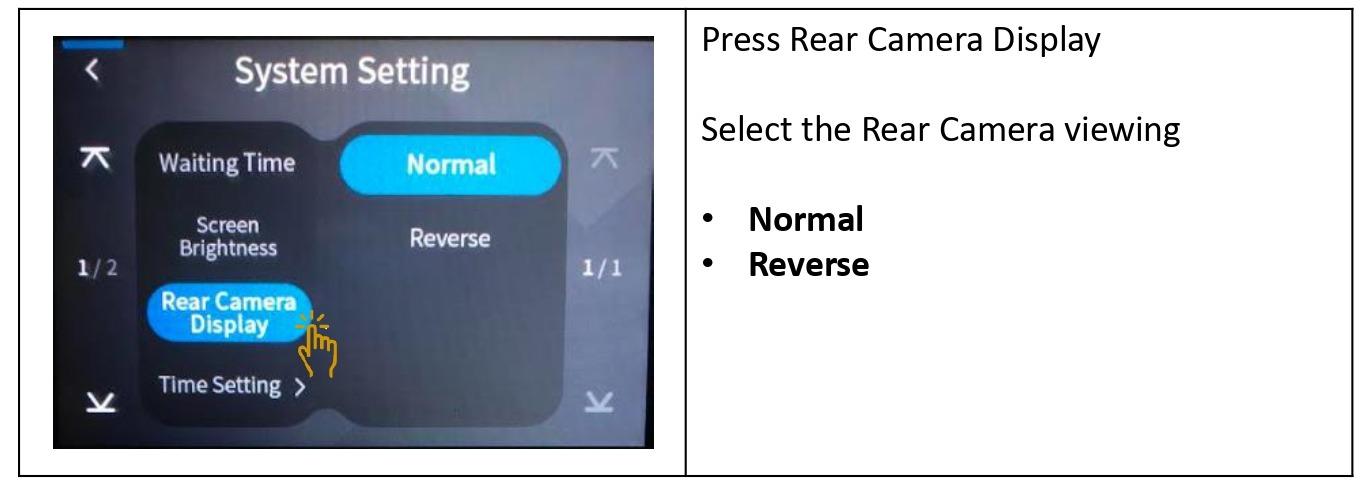
4.4.6.3 Rear Camera Display
To choose the the rear camera display in normal mode or reverse mode.
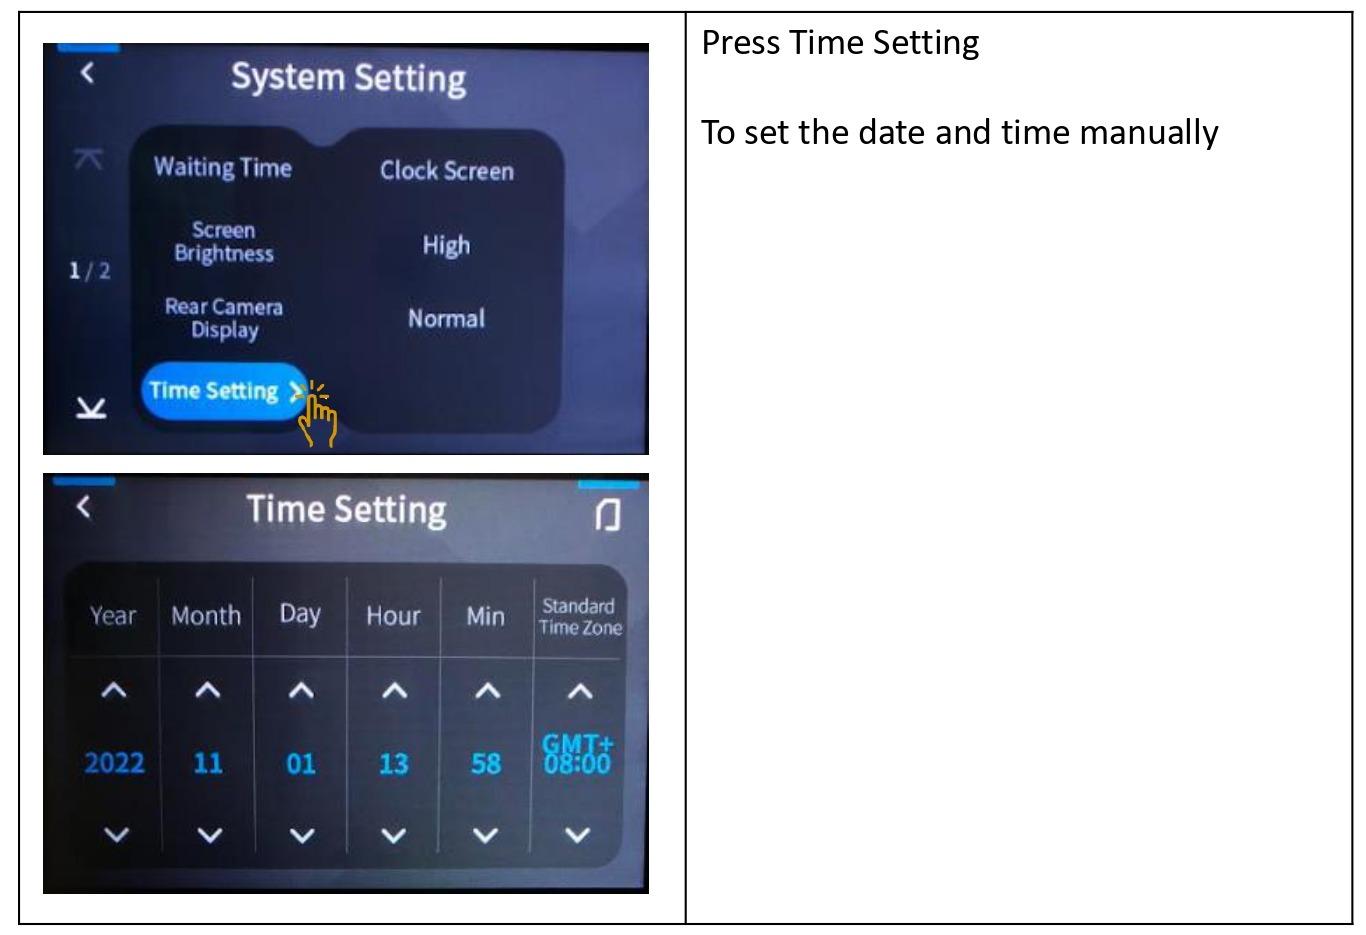
4.4.6.4 Time Setting
To set the time accordingly.
Singapore Time Zone: GMT +08.00
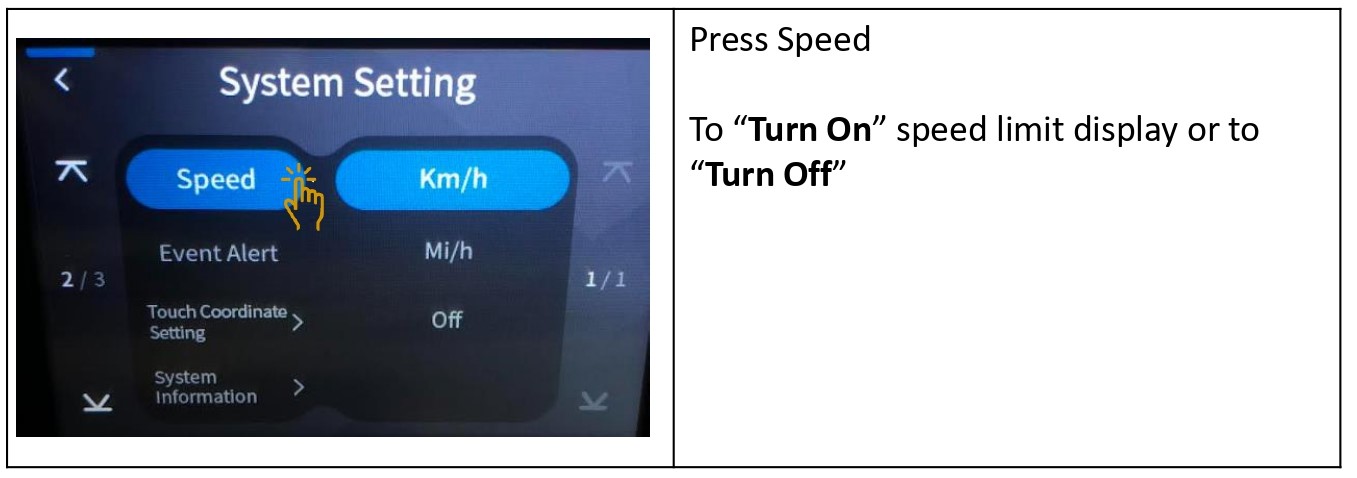
4.4.6.5 Speed
To choose whether to display Speed Limit in Km/h or Mi/h or to Turn Off.
4.4.6.6 Event Alert
To choose whether to Turn On or to Turn Off the Event Alert Alarm
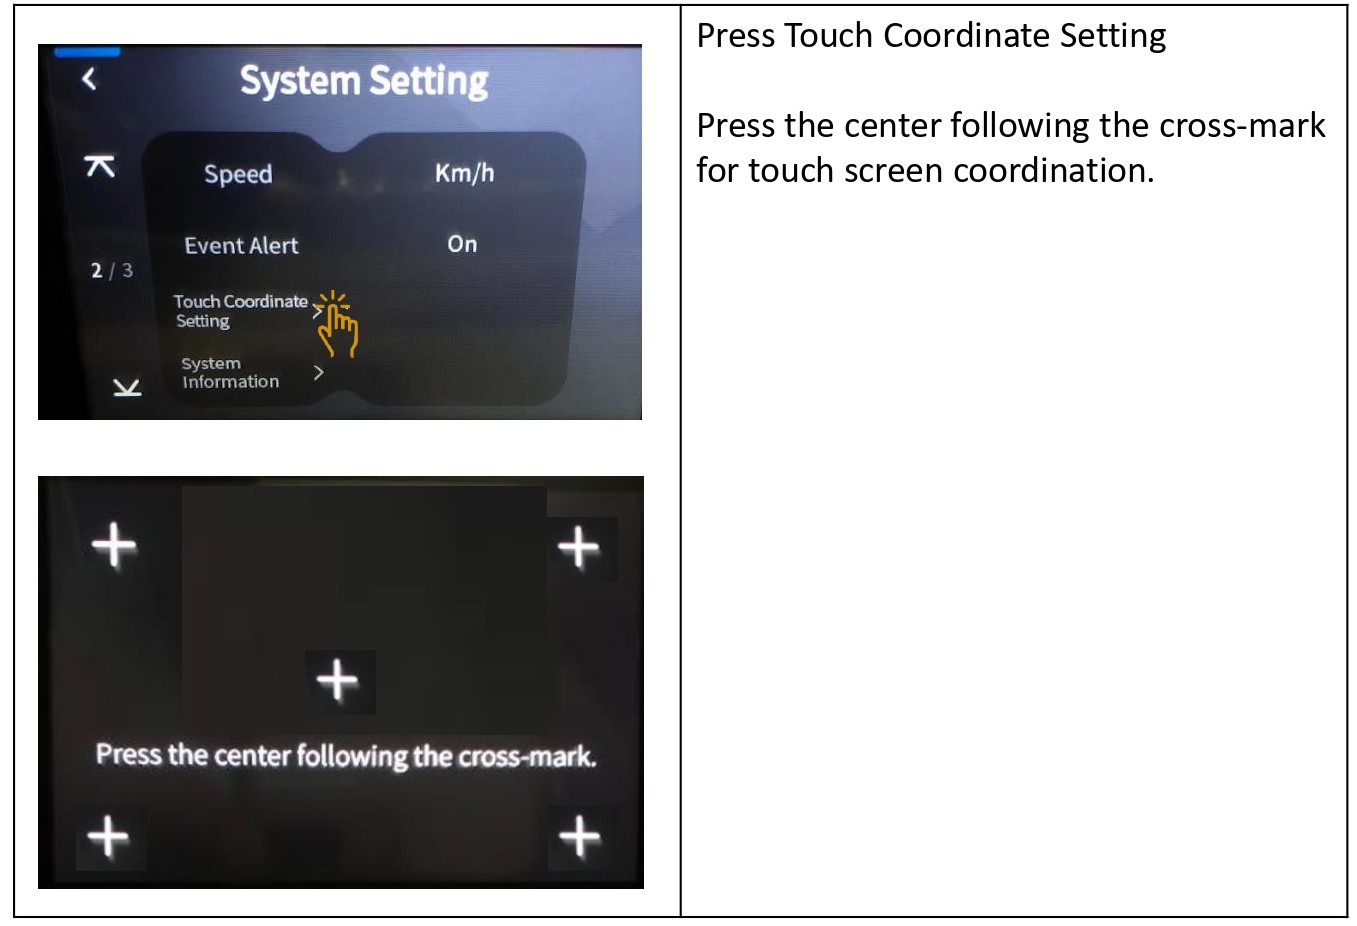
4.4.6.7 Touch Coordinate Setting
To calibrate the touch screen coordination alignment.
4.4.6.8 System Information
-
System information will display the Dashcam model and Firmware version.
-
To reset the dashcam back to factory default setting, click on "System Reset".
-
The dashcam will restart and back to factory default setting.

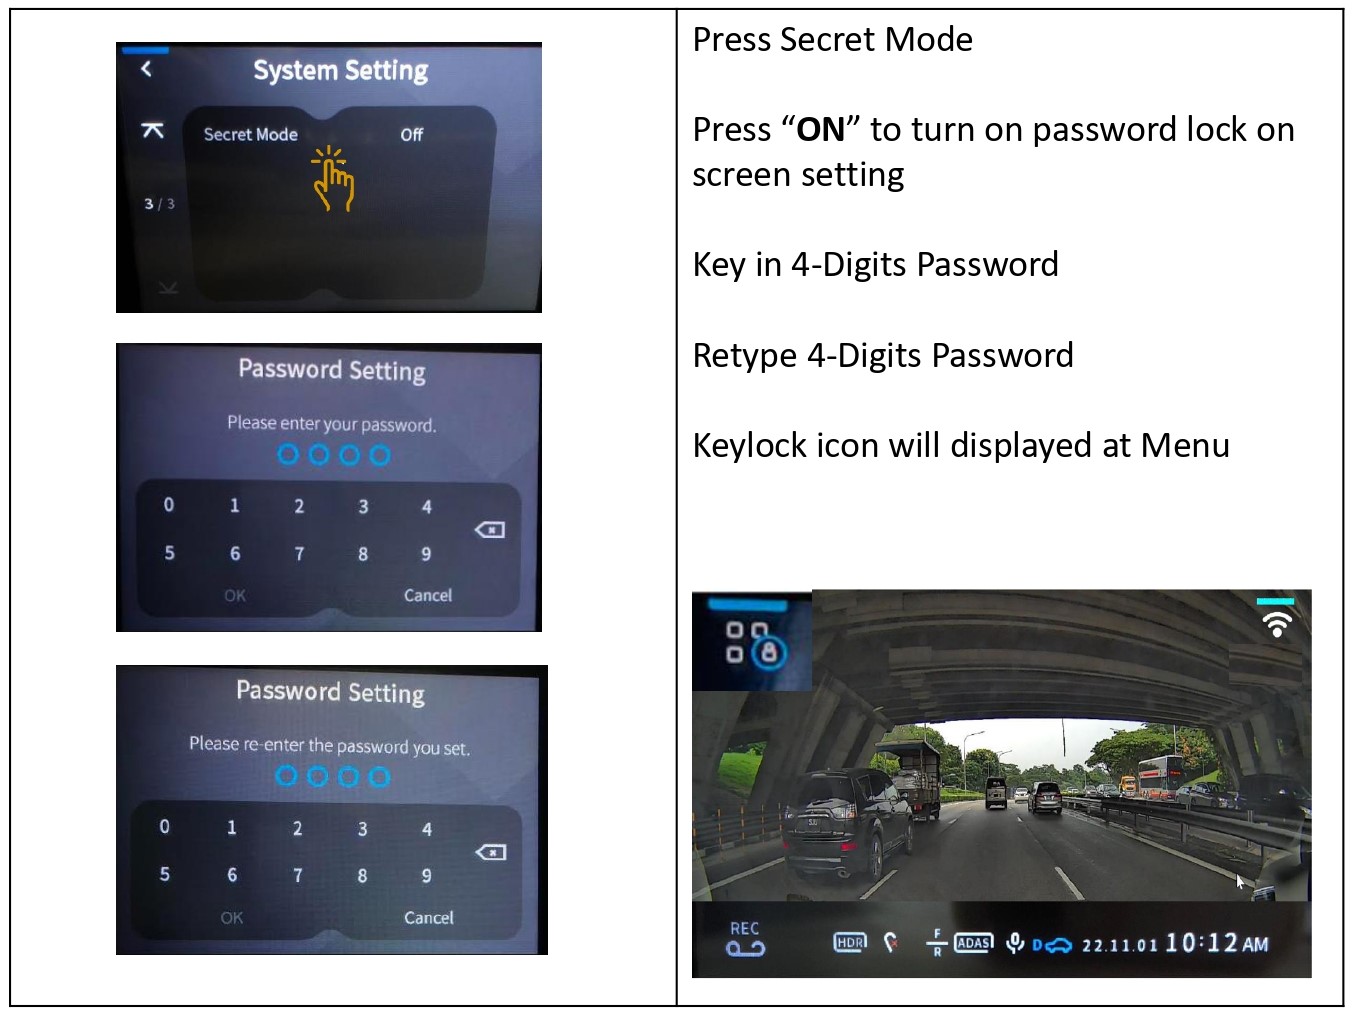
4.4.6.9 Secret Mode
-
This feature is to lock the touch screen with password.
-
User can input the preferred 4-Digit password.
-
Once password has been set, the touch screen will prompt to input password in order to access the setting inside the dashcam.