User Manual Cellink NEO 8+ S
Table of Contents
- 1.0 Introduction
- 2.0 Installation
- 3.0 App Download And Installing
- 3.1 App Store Download
- 3.2 Before Running The App
- 3.3 Apps Connection to Cellink
- 3.4 Function Description
- 3.5 Product Password Setting
- 3.6 Product Setting Screen (Tap To Fuse Box)
- 3.7 Product Setting Screen (Using Home Charger)
- 3.8 Warning to battery high temperature
- 3.9 Warning to Low Voltage Input
- 4.0 How to add capacity to CELLINK NEO8+ S
- 5.0 Disposal guidance of battery
- 6.0 Product Warranty
- 7.0 Customer Service
1.0 Introduction
Thank you for purchasing this Cellink dashcam battery made by Egen Inc.
This instruction manual contains information on how to operate your dashcam battery.
Before using the product, we recommend that you read through this manual to ensure correct usage.
To improve the performance of the product, the contents of this manual are subject to change without prior notice.
The CELLINK NEO8+ Battery is designed to power your dashcam in Parking Mode for extended periods of time without using your vehicle’s battery.
1.1 Safety
For user safety and to avoid property damage, read through this manual and follow these safety instructions to use the product correctly.
- Do not disassemble, repair, or modify the product yourself. Doing so may cause fire, electric shock, or malfunction. For internal inspection and repair, contact the service center.
- Do not use a damaged or modified power cable. Only use the cords provided by the manufacturer. Damaged or modified power cable may cause an explosion, fire, or malfunction.
- Do not install the product in an environment with high humidity, or combustible gases or liquids. Doing so may cause an explosion and/or fire.
- Do not spray water or wax directly onto the product while cleaning the inside of the car. Doing so may cause fire, electric shock, or malfunction.
- Do not install the product in a confined space or cover with material without ventilation. Failure to do may cause excessive heat or fire.
- Do not use cigar jack splitter to power the product as it normally has low power rating. Failure to do may cause excessive heat, fire or malfunction.
- Do not place the battery in microwave oven or a place with high pressure. Failure to do may cause explosion or fire.
- Do not throw or give the battery any types of shocks. Failure to do so may cause malfunction.
- If smoke or an unusual smell is emitted from product, detach the power cord immediately. Contact the service center or your distributor.
- Keep the terminals of the power cable clean. Failure to do so may cause excessive heat and fire.
- Plug in the power cord firmly so that it cannot easily be disconnected. Failure to do so may cause excessive heat or fire.
- Use the correct input voltage. Failure to do so may cause explosion, fire, or malfunction.
- Keep the product away from children or pets. Failure to do so may cause electrical shock or malfunction.
- If you charge the product using the cigar jack cable, make sure the switch is selected to FIX/ LOW for low current current. Failure to do so may cause excessive heat, fire or malfunction.
- Keep out of direct sunlight and high temperature environment when storing the product. Failure to do so may cause fire or malfunction.
- Cellink battery is a consumable item. If the battery is defective, please disposed responsibly and exchange with a new product.
- Do not use the battery in a static environment as it can affect the performance of protection circuit.
- Never use the product for anything else other than the power supply for dashcam.
1.2 Overview
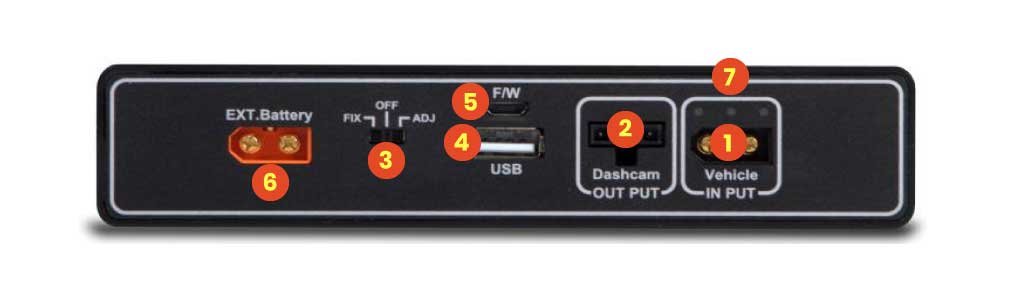
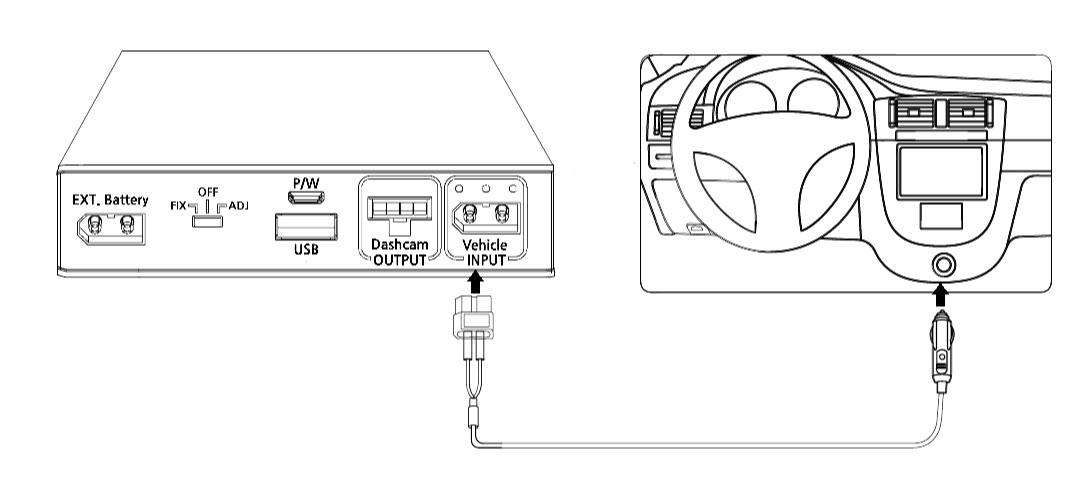
● 1. INPUT : The charging connector for connecting to the Cigar lighter socket and ACC Power contact in Fuse box.
● 2. OUTPUT : The discharging connector for connecting to the dashcam.
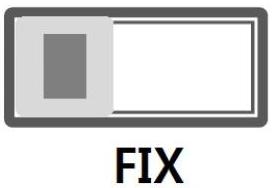
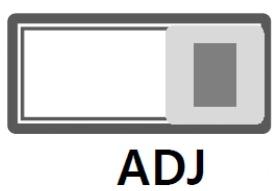
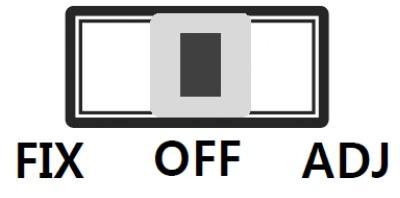
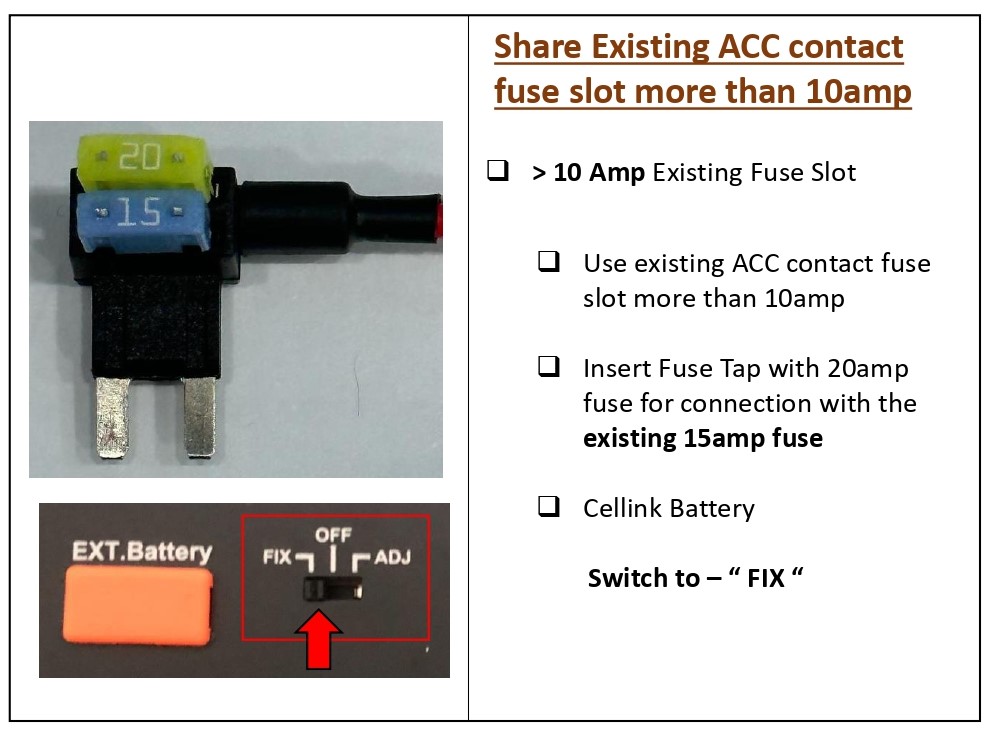
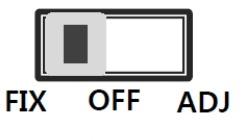
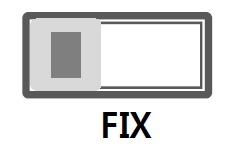
● 3. FIX/OFF/ADJ : The switch for adjusting the charge current.
▷FIX : System power on. Charging current is fixed at minimum or low charging mode. You cannot change the current setting using the app.
▷OFF : System power off.
▷ADJ : System power on. Charging current is adjustable from Minimum to Maximum by App.
● 4. USB : The 5V output connector for charging a mobile product as a Smart phone.
● 5. F/W : The connector for firmware up-date only(Technician Use Only)
● 6. EXT.Battery : Connector for connecting to an extra battery such as CELLINK NEO EXT to add the capacity.
● 7. LED Display : Red - charging | Green - Fully charged | Blue - Bluetooth connected | When the switch is turned on, 3 LEDs are flashing for a while.
|
LED Display -R : Red -G : Green -B : Blue |
|
Powered on | R,G and B LEDs are turned on simultaneously and then turned off in the R,G and B order. |
|
|
Pre-charging (after powered on) |
Red LED is on after several times flashed | |
|
|
Fully charged | Green LED is on | |
|
|
Bluetooth on | Blue LED is on after several times flashed. |


1.3 Product Properties
-
Bluetooth is built in, so the user can check the battery status in real time, including the time available and estimated charging time through the smartphone APP.
-
When the switch is set to ADJ, the smartphone APP allows the user to set the charging current of the product from minimum to maximum current.
-
CELLINK NEO8+ S offers the 2 types charging methods such as the vehicle’s cigar-lighter plug and fuse-box ACC power connection.
-
Charging starts as soon as the vehicle starts the engine, if the ADJ on the switch is selected, the users can change the charging current through the APP on the smartphone.
-
For better battery safety, a constant current with constant. voltage charging circuit and a secondary protection circuit is built-in.
-
A micro controller (MCU) is built in to control the current, voltage and voltage balance of the battery, and the battery protection circuit module is built-in for secondary protection to prevent the over-charge, over-discharge and over-current.
-
If you need more capacity, add the CELLINK NEO EXT battery to increase the capacity by connecting only the cables provided with the CELLINK NEO EXT.
-
The APP will put up a warning screen when the temperature inside the battery reaches the threshold of 80°C due to any abnormalities, the system will automatically stop to prevent overheating.
-
The battery will be automatically cut off the current when the reverse voltage input or external short-circuit of the product’s connectors occur.
-
The cycle life is improved more three times than the general Li-ion battery because of The lithium- phosphate iron (LiFePO4) battery is used, and we guarantee at least 1,500 cycles.
-
Compact design makes possible to install in confined spaces such as below the vehicle seat.
1.4 What’s Included
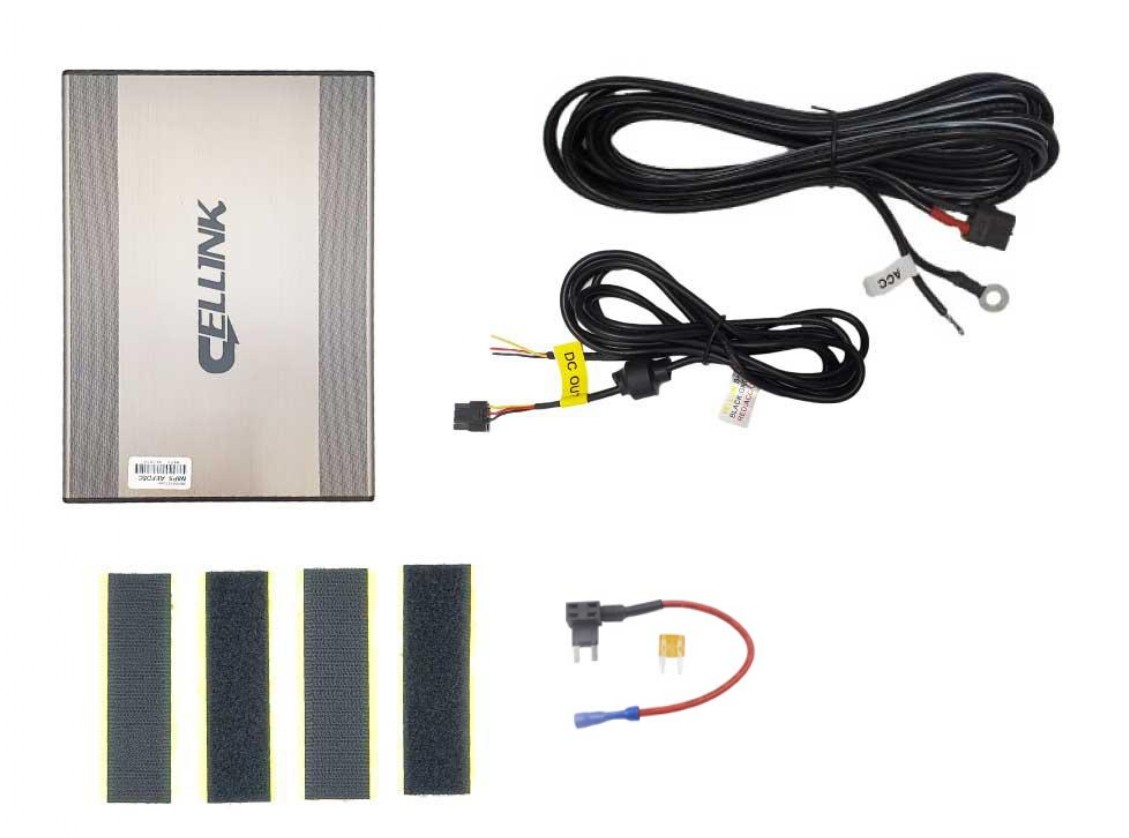
- Cellink NEO 8 S Battery x1
- Input Hardwiring Cable x1
- Output Hardwiring Cable (3-wires split) x1
- Fuse Tap Cable with 20A Fuse (Small) x1
- Velcro Tapes x 2 sets
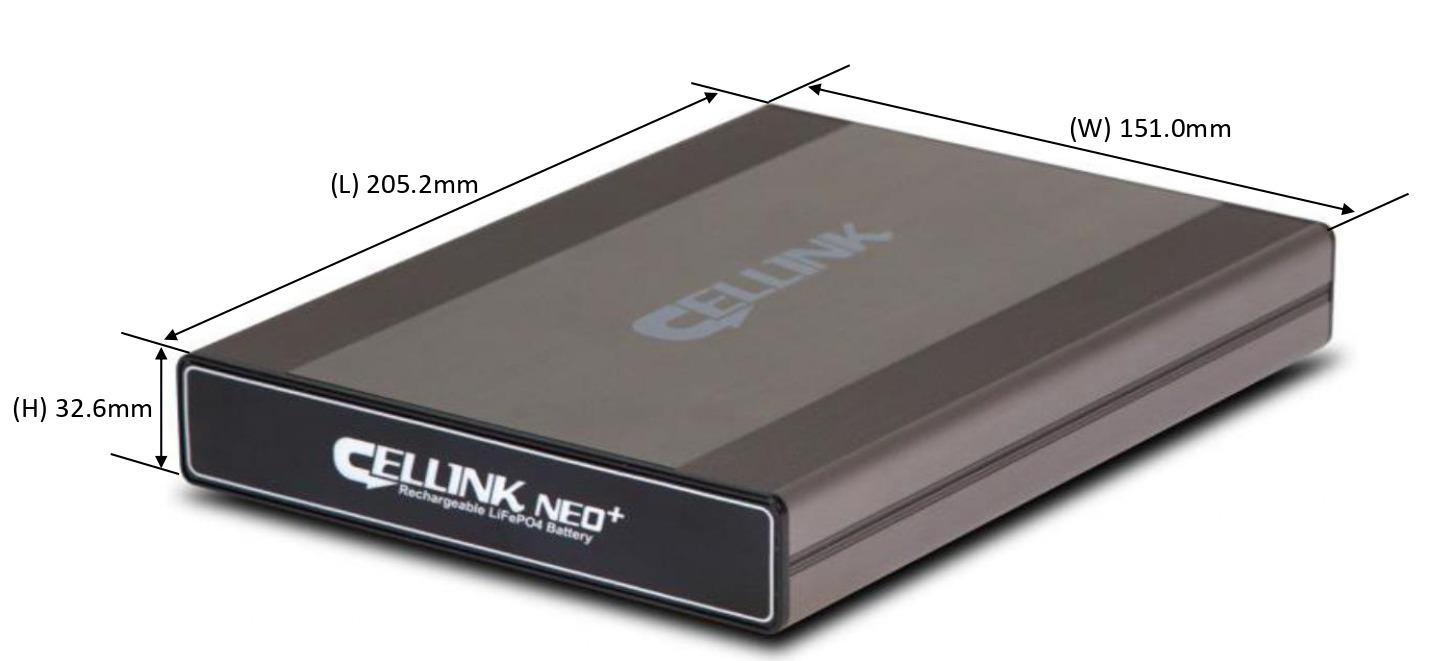
1.5 Specifications
| Input Power | ▷ When connected to the Cigar Lighter Socket : FIX only | DC12~17V | Max. 6A | ||
| ▷ When connected to the Fuse Box ACC power: ADJ | DC12~17V | Max. 13.5A | |||
| Output Power | ▷ Dashcam connector | DC 11.0V ~ 14.2V | Max 2A | ||
| ▷ USB connector | DC 5V | Max 2A | |||
| Charging Voltage & Current | FIX | ▷ When connected to Cigar Lighter Socket | DC 14.2V | Max 4.5A | |
| ADJ | ▷ When connected to Fuse Box ACC power | DC 14.2V | Max 8.5A | ||
|
Charging Time FIX - Fixed Current ADJ - Adjusted Current |
FIX | ▷ 4.5A charging | Approximately 100 minutes | ||
| ADJ | ▷ 8.5A charging | Approximately 50 minutes | |||
| SWITCH POSITION | LEFT (FIX) | CENTRE (OFF) | RIGHT (ADJ) # | |
|
|
|
|
||
| # Set the charging current in APP when select to ADJ | ||||
| Product Rating | 12.8V | 7,500mAh | 96Wh | |||
| Power Duration | About 24 hours* | |||
| *using 2-channel dashcam with average 4W power consumption | ||||
| Battery Type | Lithium Iron Phosphate (LifePO4) | |||

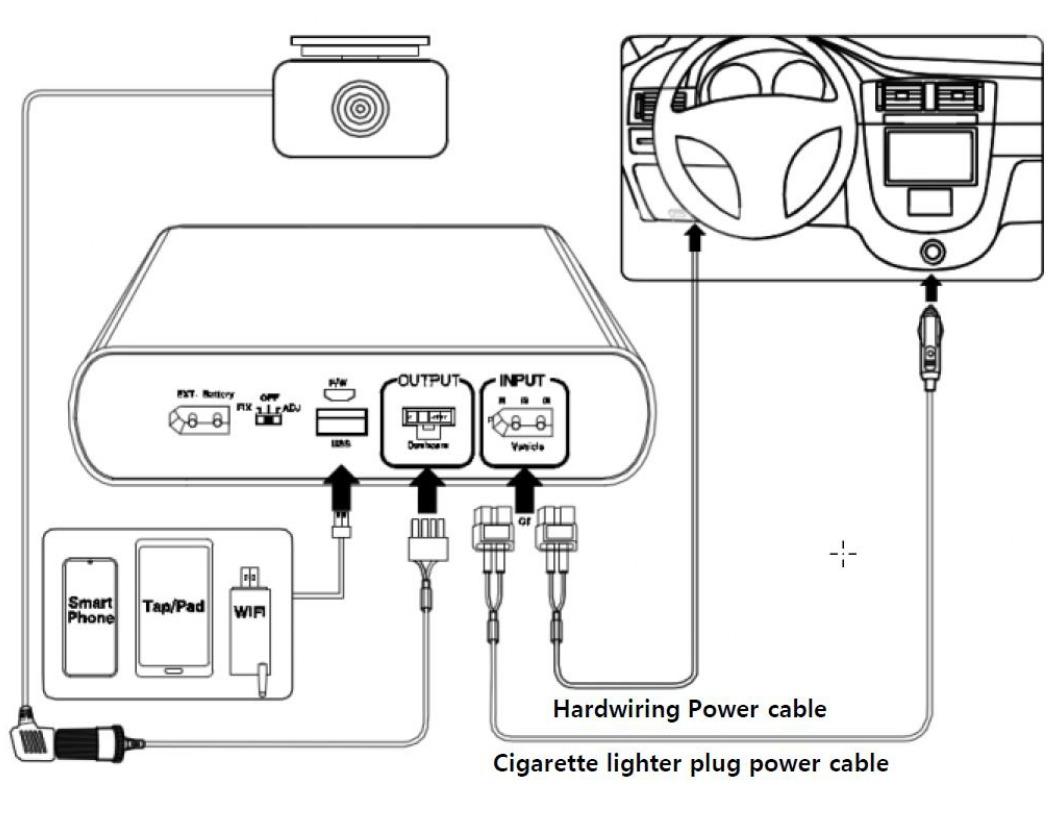
2.0 Installation
※ Please set to the power-off before installation.
2.1 Cigar-lighter Socket Connection
1. When connecting the product using the cigar lighter socket Input cable.

2.2 Fuse-Box Connection
1. When connecting the product using the Fuse-box ACC Input cable.
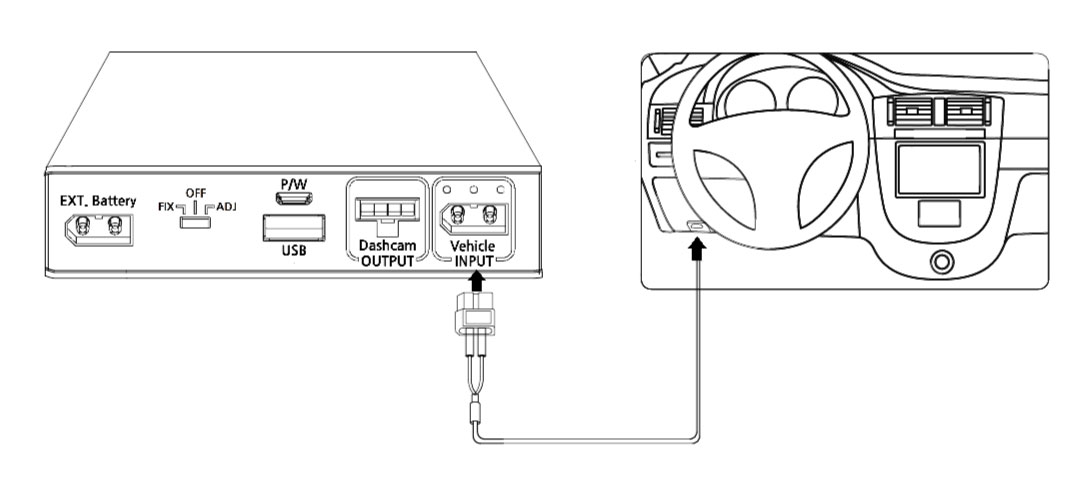

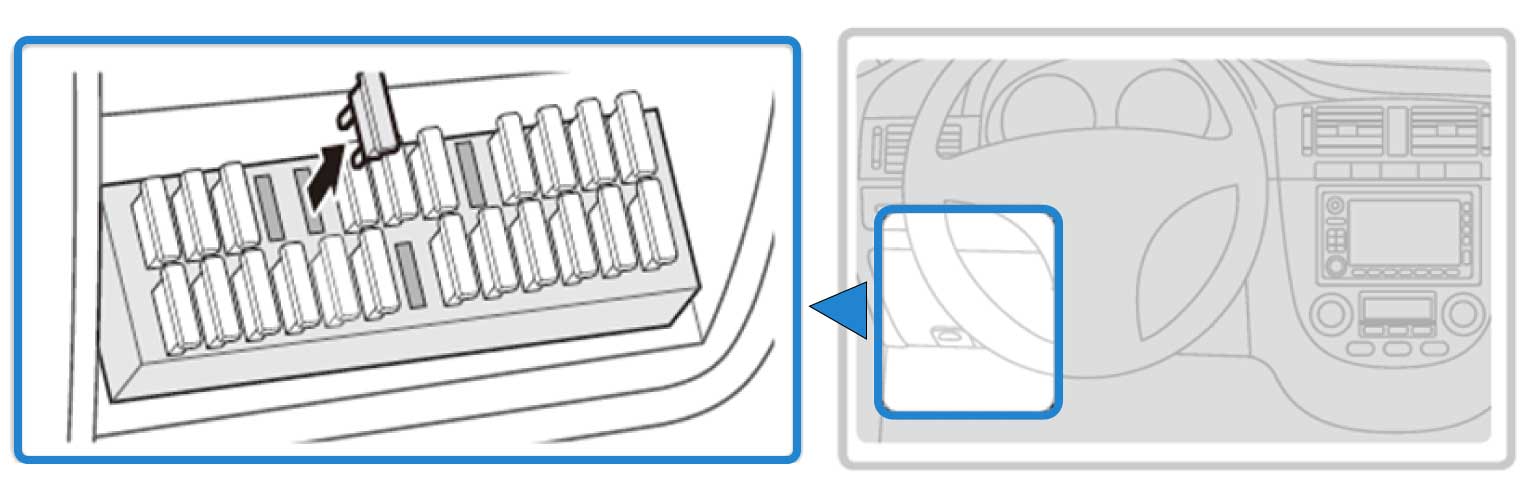
2.3 Fuse Box
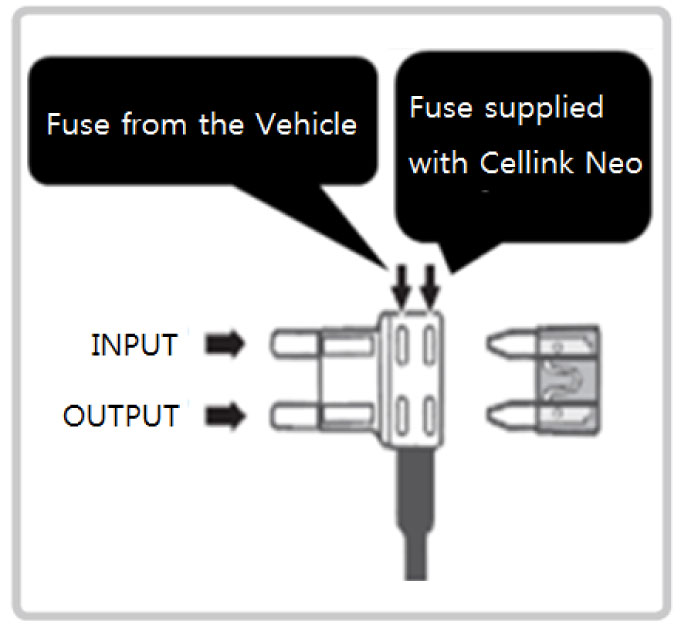
1) With the product’s power switch in the OFF position, connect:
- The hardwiring cable to the INPUT connector of Cellink battery and the other end to the fuse box.
- The output cable from the OUTPUT connector of Cellink battery to the products' cable connector.
2) Open your vehicle’s fuse box, check the fuse type, and select the correct fuse tap to match.
The fuse box location in the vehicle may vary depending on the manufacturer and model of your vehicle. For more information, refer to your vehicle’s manual.
Inside the fuse box, there's two types of power available, permanent power (BATT) and ACC contact. Since our Cellink battery is charged only when the ACC is on, you must connect only to ACC contact. If you connect to BATT contact with permanent power, the car battery will be drained or cause some error on the dashboard.
2.4 Fuse Connection
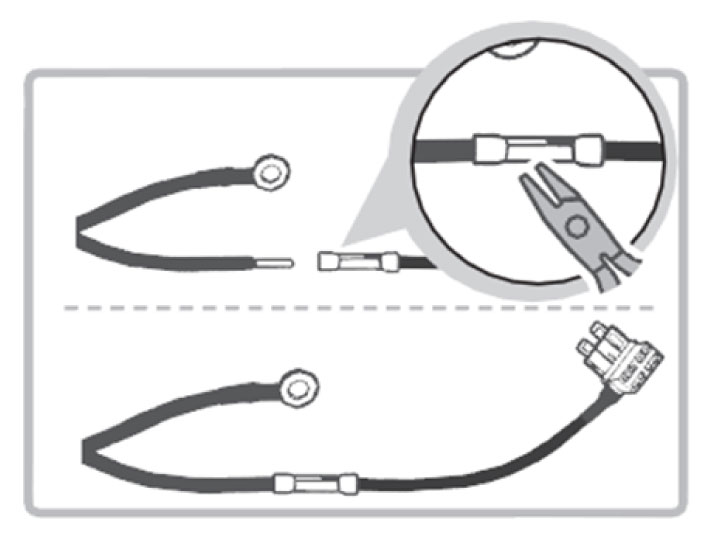
1) Insert the input cable into the sleeve at the end of the fuse holder cable, and then secure it by squeezing on the sleeve securely using appropriate tools, such as pliers.
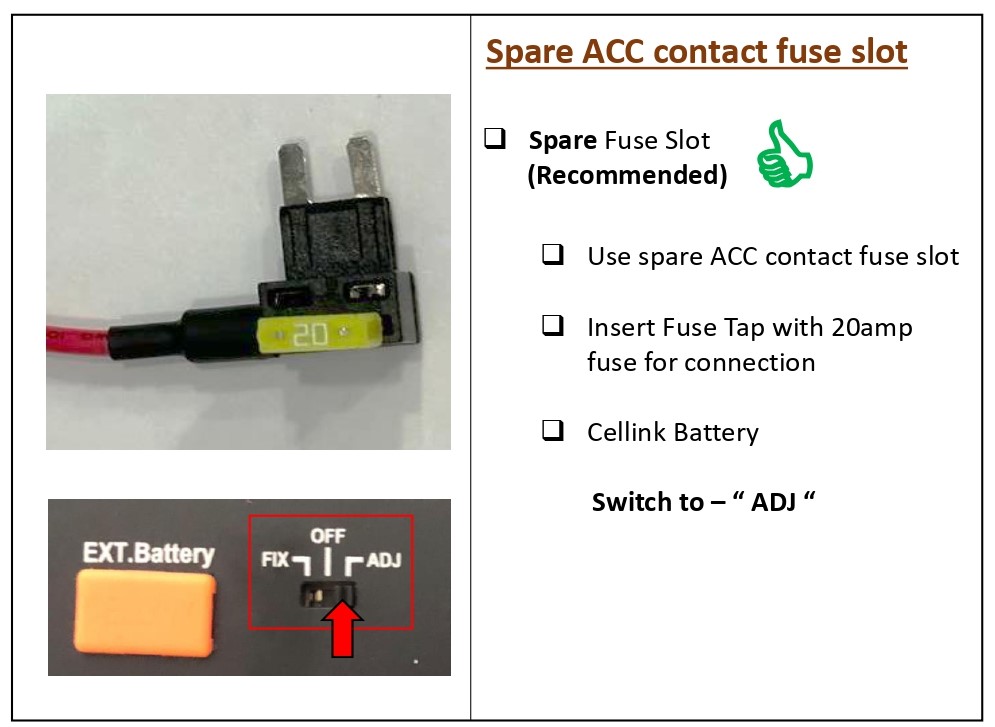
2) Preferably, look for spare ACC contact fuse socket in the fuse box and insert the fuse tap with the included 20A fuse.
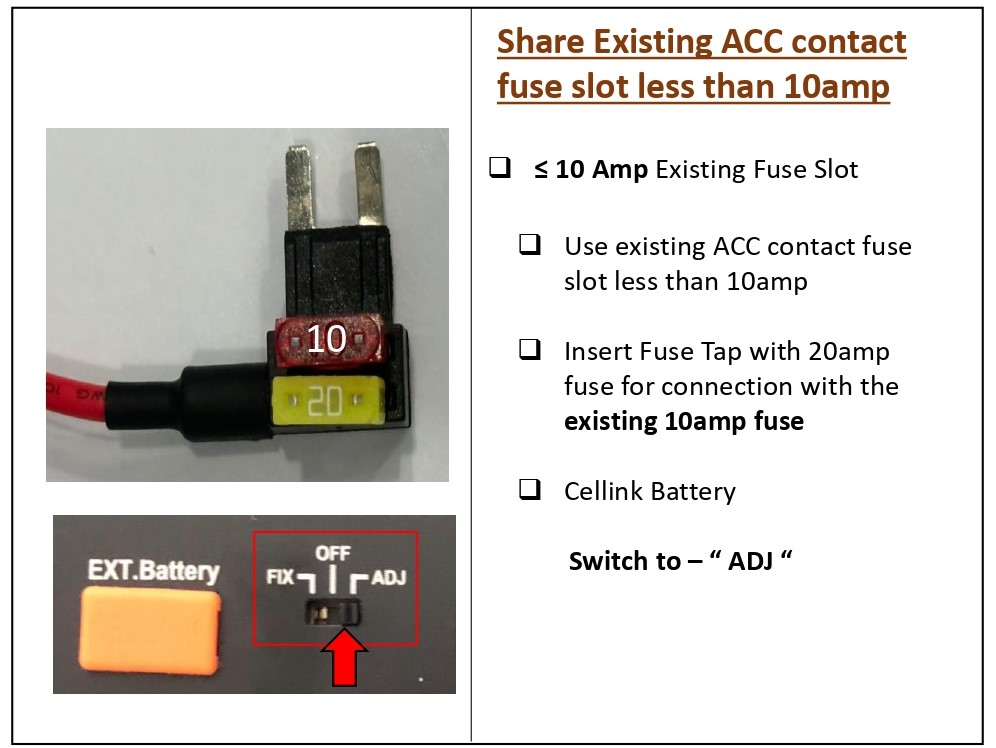
3) If you cannot find any spare ACC contact fuse socket, you can look for any existing fuse rated 10A or less with ACC contact. After removing the fuse from the socket, insert it to the fuse tap and plug the fuse tap cable back to the socket.
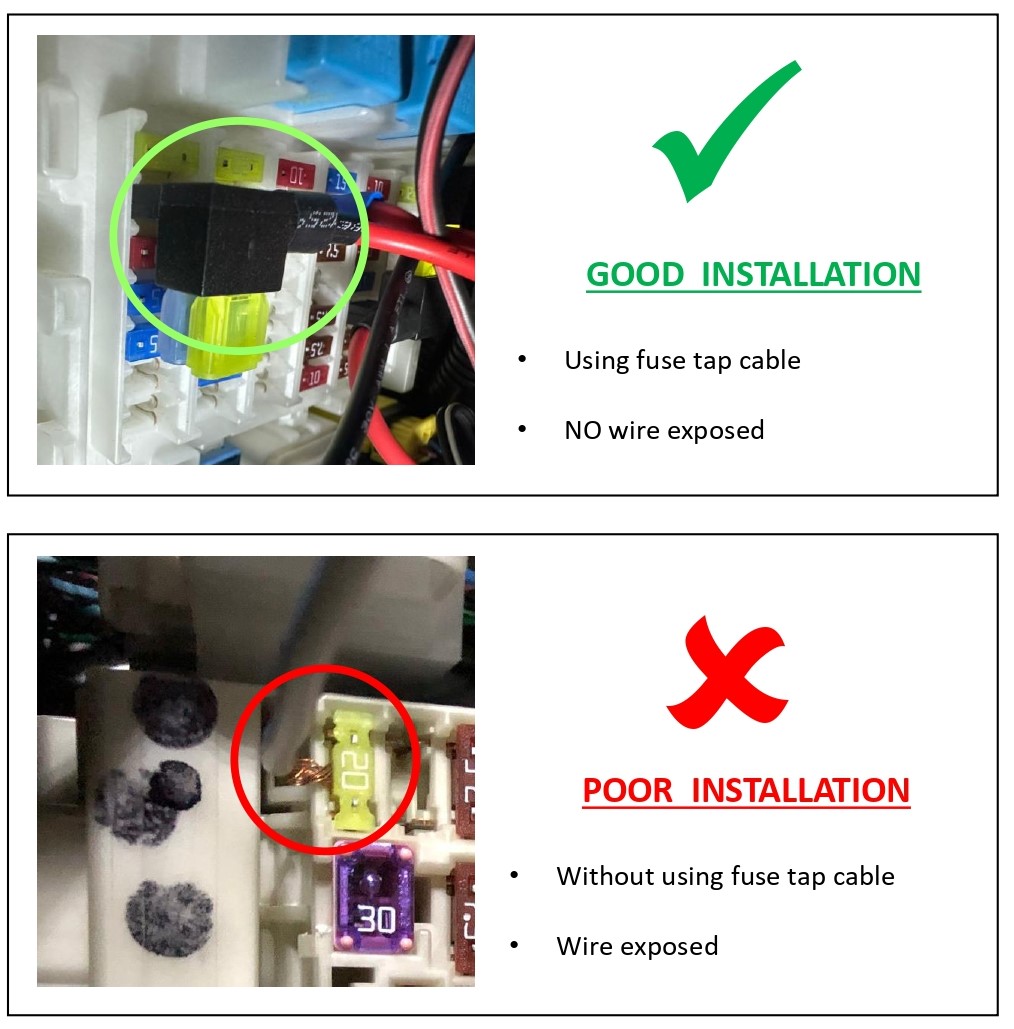
2.5 Fuse Tap
Insure that the fuse tap is plugged with the correct orientation with INPUT pin to the power source of the socket inside the fuse box.
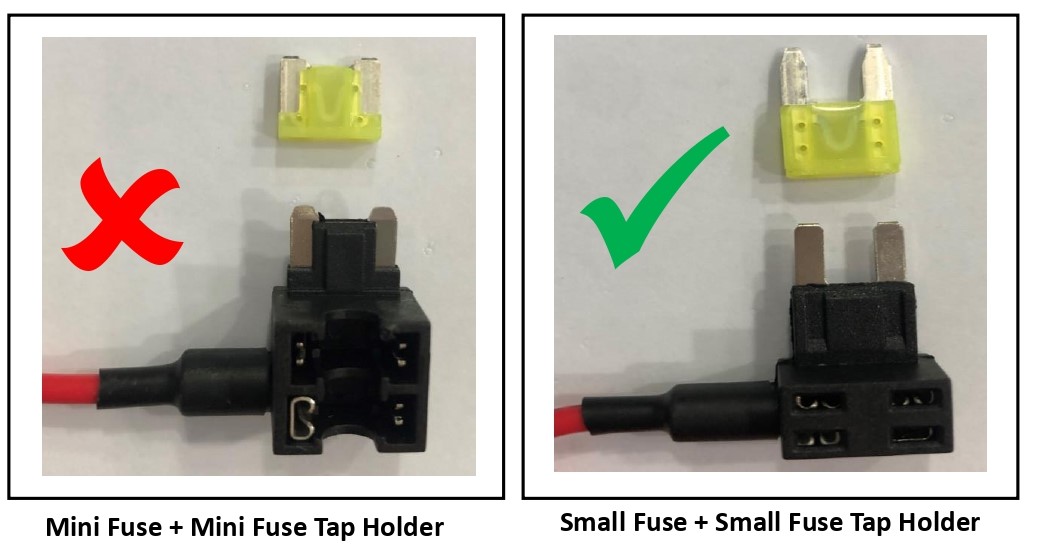
Fuse supplied with the Cellink NEO is rated 20A, please do not change with other ratings.
1. Do not use mini fuse and mini fuse tap holder.
If using the existing mini fuse in the vehicle change it to small fuse type
| CELLINK SWITCH POSITION | CHARGING AMPERE |
| FIX | Default: 4.5 ampere (Cannot adjust) |
| ADJ |
Can be adjust from 4.5ampere to 9.0ampere Please refer to Item 3.6 |
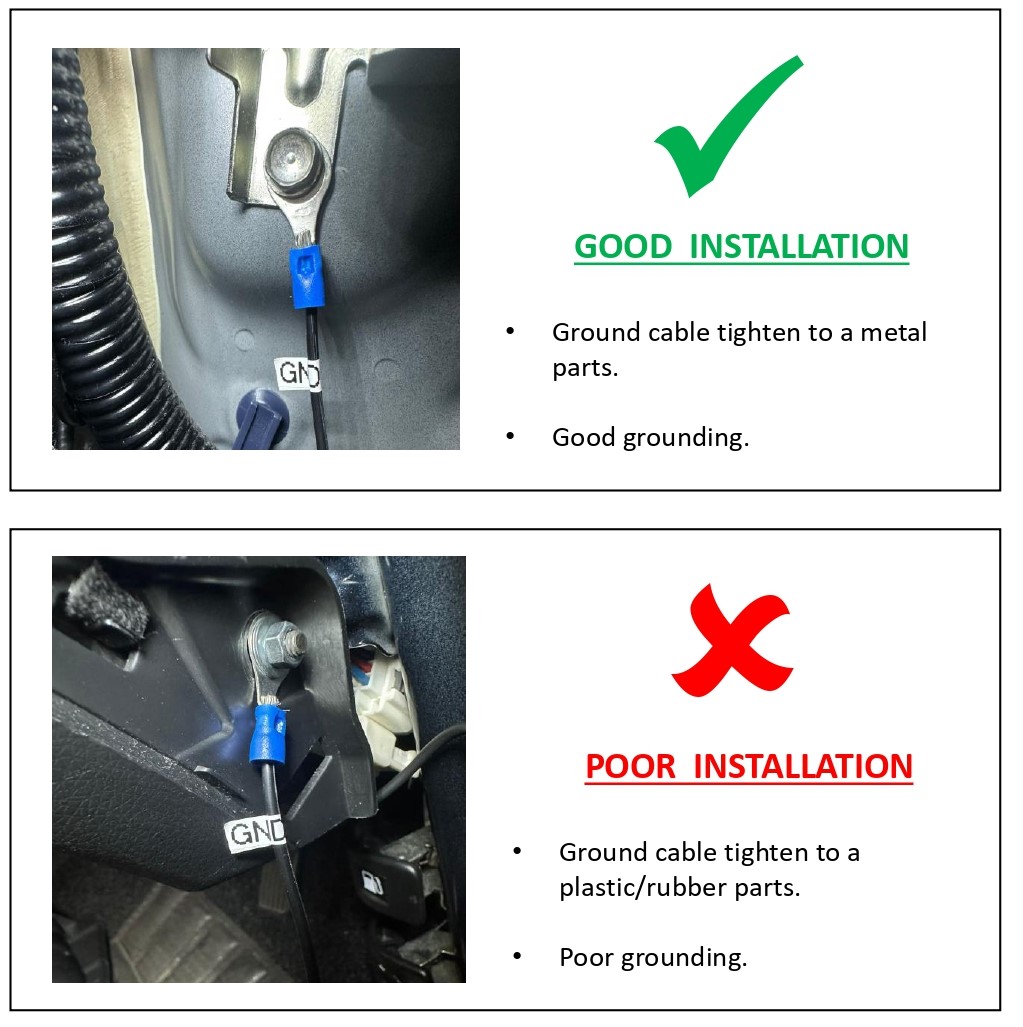
2.6 Ground Connection
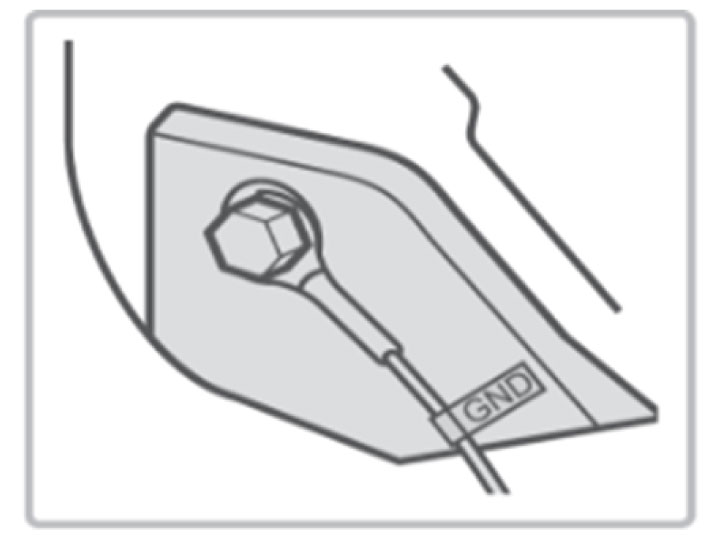
1) Find a bolt fixed on the vehicle’s and connect the ground (GND) cable to the bolt.
If the vehicle’s bolt is coated, remove the coating before connecting the ground (GND) cable. The power may not be supplied correctly due to the coating.
2.7 Proper Connection
1) Make sure that the product is connected properly.
2) Fix the product using the provided Velcro tape on the car floor such as under the car seat.
3) Turn on the switch and check that the LEDs operate properly (Refer to the LED Display table).
3.0 App Download And Installing
3.1 App Store Download
![]()
- Search for “CELLINK Neo Plus” and download the CELLINK Neo Plus App.
- For Android users, please download the app from "Google Play".
- For iOS users, please download the app from "App Store ".
3.2 Before Running The App
1. Turn on the battery you purchased before running the downloaded app.
2. Set to the power switch position is "FIX" or "ADJ".
3.3 Apps Connection to Cellink
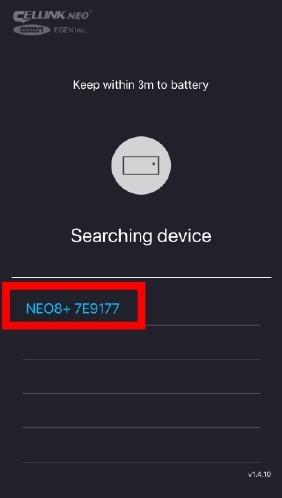
- When running the App on the smart phone, after loading, appear the "SEARCHING DEVICE" and the searched Bluetooth device as shown on the left picture.
- Click “Neo8+ S” with serial number of the unit on the searching list.
- If you rescan, the connected device is displayed in blue automatically.
Check the code attached on the bottom of the purchased product and click the same code on the smartphone to complete the installation.
3.4 Function Description
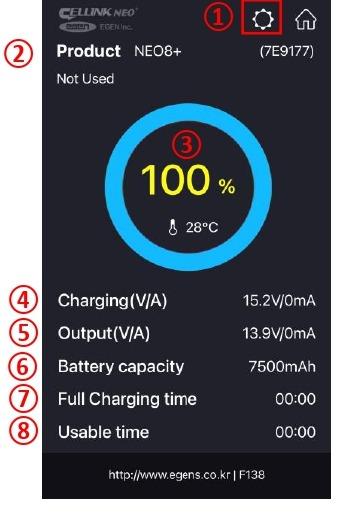
- The product’s settings.
- The product model name and the Bluetooth ID built-in to the product.
- The Battery’s charging state and the internal temperature.
-The animation image is changed during charge and discharge.
-Displayed in red : during charge.
-Displayed in blue : during discharge and 100% full charge. - The present voltage and charging current to the battery.
- The present voltage and discharge current from the battery.
- The capacity of the product.
- Estimated time to full charge(displayed "0" during discharge) at the present input power level.
- Available time as the current state(displayed "0" during charge) at the present output power level.
The App doesn’t always need to be turned on. However, if the battery’s internal temperature is
high or input voltage is low, you can receive an alarm message during the App is turned on.
3.5 Product Password Setting
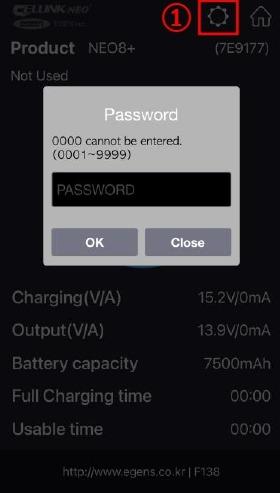
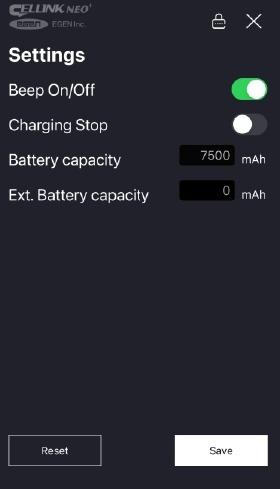
- You can enter the product setting screen by tapping the gear icon(①) on the main screen. The password is required to enter the product setting screen. The initial password is set to 1234.
- You can set your own password to prevent other users from changing
the product settings at will .
- It is recommended to change the password immediately after purchase.
- The “0000” cannot be used as a password and able to set within 0001~9999.
If you have forgotten your password, please contact our Customer Service Center.
3.6 Product Setting Screen (Tap To Fuse Box)
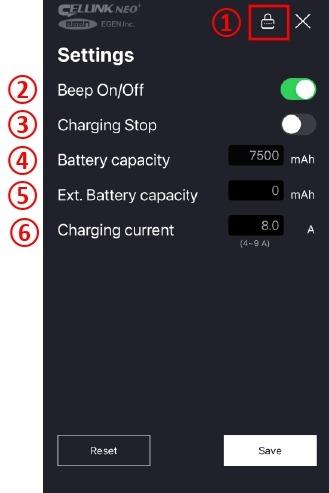
- Padlock Icon : User’s own password setting. Your own password setting makes sure to prevent others from changing the product settings.
- Beep on/off : Setting status of battery sound. (initial value : on)
- Charging Stop : The function to stop charging the battery.
- Battery capacity : means the nominal capacity of the product.
- Ext. Battery capacity : When you add an Extended battery pack like as “CELLINK NEO EXT7”, enter the capacity of the added battery.
- Charging current : You can change the charging current when you install the battery to the fuse-box and the switch is selected to the ADJ. Just enter the current within “4.5A~9.0A”.
3.7 Product Setting Screen (Using Home Charger)
If using Home Charger to charge the battery
- Set to the power switch position to FIX.
- There will be no Charging Current setting option as it is fixed due to using a home charger.
3.8 Warning to battery high temperature
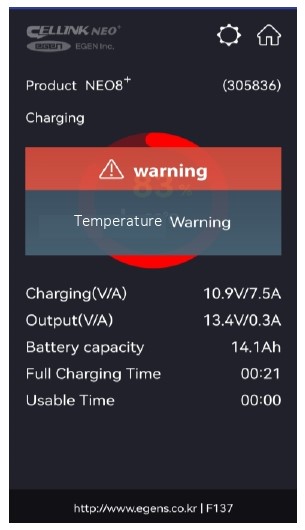
- The warning screen will be displayed and stop charging or discharging if the internal temperature is more than 80℃ to prevent the vehicle's and product's damage.
3.9 Warning to Low Voltage Input
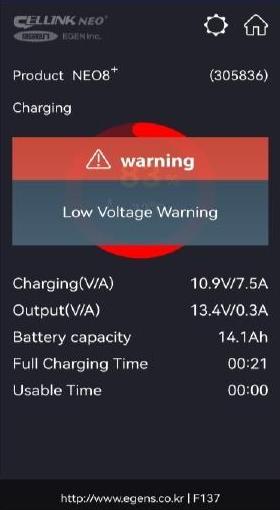
- The warning screen will be displayed and stop charging if the input voltage drops below 11V to prevent the vehicle's damage.
4.0 How to add capacity to CELLINK NEO8+ S
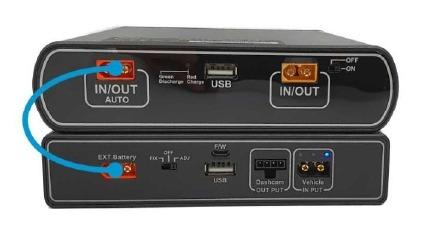
4.1 Adding 1 unit of NEO7+ Extended to Cellink NEO8+S
With the new NEO Extended 7+, it supports auto detection when connecting to the NEO 8+S. Battery capacity for NEO 8+S is 7,500mAh and NEO Extended 7+ is 6,800mAh.
Once you plug the link cable to the IN/OUT Auto port of NEO 8+S, the system will update the total capacity (7,600 + 6,800 = 14,300 mAh) automatically.
You can verify the capacity by using the smartphone app, Cellink NEO Plus which shows the total capacity of 14.3 Ah.
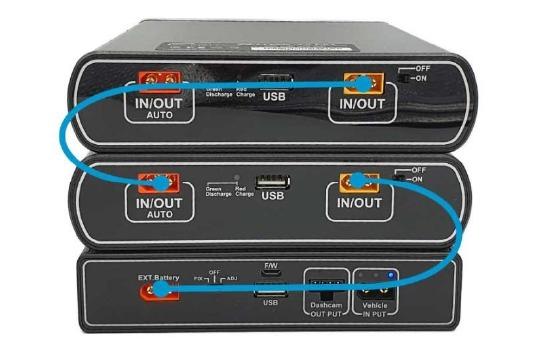
4.2 Adding more than 1 unit of NEO7+ Extended to Cellink NEO8+S
NEO Extended 7+ is also compatible with earlier models, NEO 6 and NEO 8+.
5.0 Disposal guidance of battery
- Don’t throw away your batteries, separate them with recycled items.
- Do not incinerate battery and put in the fire. Heat may cause explosion and fire.
- Do isolate them each other when disposing the secondary batteries having different electrochemical systems.
- Dispose of the battery in discharged state to prevent heat by short circuiting.
- Please dispose the battery responsibly in accordance with the regulations and requirements of your local authority in your country.
6.0 Product Warranty
- The warranty period of this product is 1 year from the purchase date.
- If the product fails during normal and correct use within the warranty period, our service center will repair the product free of charge.
- Any disassembly, modification or alteration of the product will void the warranty.
- The cost to repair or fix any malfunction or problem caused by incorrect usage during the warranty period may be charged to the consumer.
- The manufacturer shall not be responsible or liable for any loss or damage caused by incorrectly using the product.
7.0 Customer Service
- Manufacturer: EGEN Inc., Republic of Korea.
- Local Service Centre: Wow! Gadgets Pte Ltd, 8 Boon Lay Way 04-02 Tradehub 21 Singapore 609964 | Tel: (65) 61009691 | support@wowgadgets.com.sg