User Guide For Wi-Fi Application For S1-4K Infinite
Table of Contents
- 1. WI-FI VUEROID HUB APPLICATION APPS
- 2. LIVE VIEW
- 3. PLAYBACK
- 4. AI FEATURES
- 5. SETTINGS
-
- 5.1 Setting - Camera.
- 5.1.1 Setting - Camera - Resolution & Framerate
- 5.1.2 Setting - Camera - Bitrate
- 5.1.3 Setting - Camera - Frequency
- 5.1.4 Setting - Camera - Audio Recording
- 5.1.5 Setting - Camera - Video Enhancing
- 5.1.6 Setting - Camera - Time-Lapse at Driving
- 5.1.7 Setting - Camera - Event Sensitivity
- 5.1.8 Setting - Camera - Rotate & Mirror View
- 5.1.9 Setting - Camera - Event Video Protection
- 5.1.10 Setting - Camera - Rear Camera Usage
- 5.1.11 Setting - Camera - Interior Camera Usage.
- 5.1.12 Setting - Camera - Privacy Mode
- 5.2 Setting - Parking Recording Settings
- 5.2.1 Setting - Parking Recording - Auto Parking Recording
- 5.2.2 Setting - Parking Recording - Power Off Voltage.
- 5.2.3 Setting - Parking Recording - Low Power Mode Entry Time.
- 5.2.4 Setting - Parking Recording - Winter Mode
- 5.2.5 Setting - Parking Recording - Parking Mode Delay
- 5.2.6 Setting - Parking Recording - Video Enhancing
- 5.2.7 Setting - Parking Recording - Recording Type
- 5.2.8 Setting - Parking Recording - Interior Cam Recording - Parking
- 5.2.9 Setting - Parking Recording - Auto REC Off Zone
- 5.3 Setting - System
- 5.3.1 Setting - System - Speaker Volume
- 5.3.2 Setting - System - Voice Alert
- 5.3.3 Setting - System - Event Alert Tone
- 5.3.4 Setting - System - LED
- 5.3.5 Setting - System - Date & Time.
- 5.3.6 Setting - System - Time Zone
- 5.3.7 Setting - System - Daylight Saving Time
- 5.3.8 Setting - System - Quality
- 5.3.9 Setting - System - Memory Allocation
- 5.3.10 Setting - System - LCD Off
- 5.3.11 Setting - System - Speed Unit
- 5.3.12 Setting - System - Stamp
- 5.3.13 Setting - System - Wi-Fi
- 5.3.14 Setting - System - System Information
- 5.3.15 Setting - System - SD Card Format
- 5.3.16 Setting - System - Initialization
- 5.3.17 Setting - System - Factory Reset
- 5.3.18 Setting - System - Password.
- 5.3.19 Setting - System - Change Password.
- 5.3.20 Setting - System - Language
- 5.3.21 Setting - System - F/W Upgrade
- 5.1 Setting - Camera.
-
- 6. CUSTOMER SERVICE
1. WI-FI VUEROID HUB APPLICATION APPS
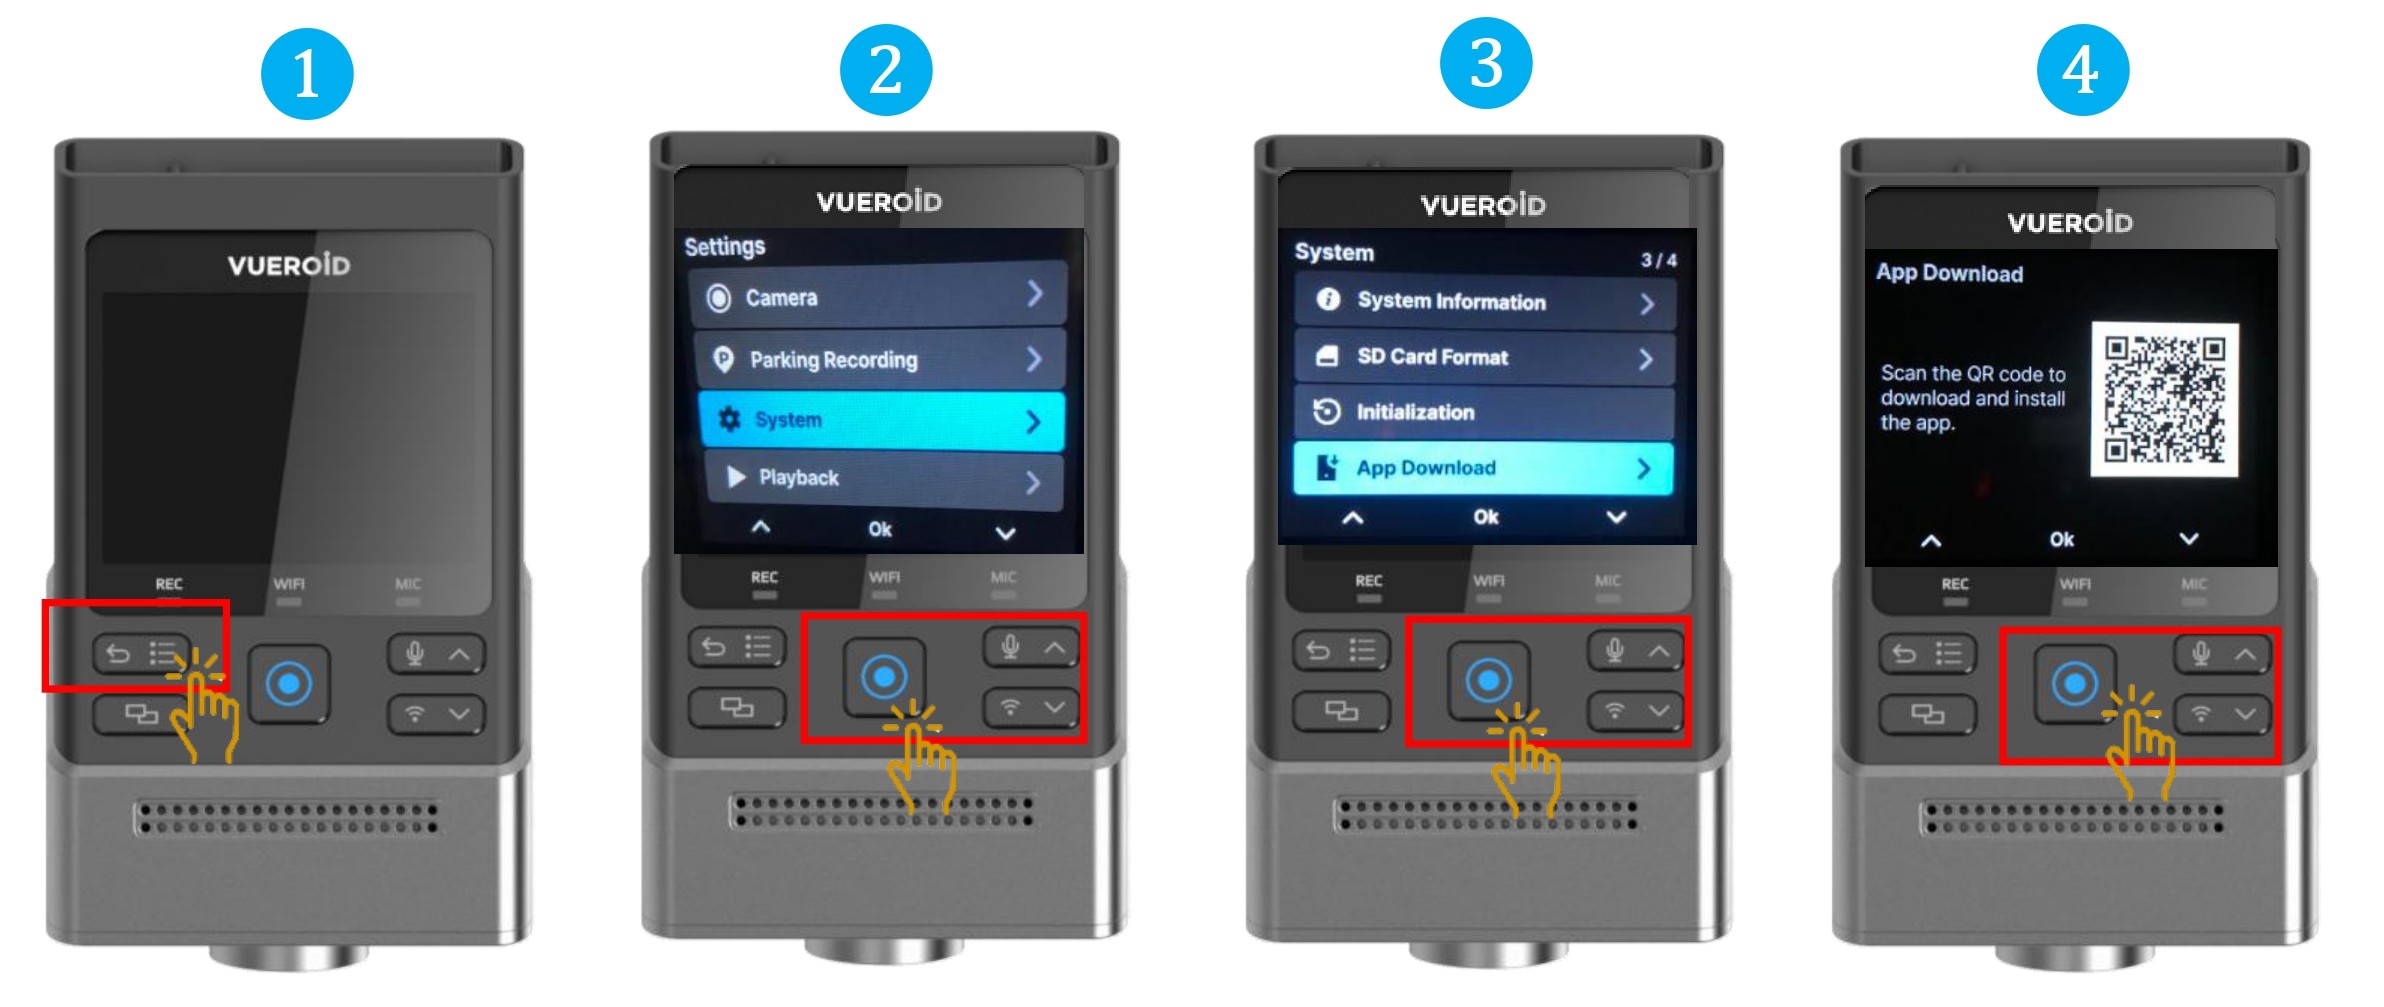
1.1 App Store Download

- Search for "Vueroid Hub" and download the app.
- For Android user, please download at Google Play Store
- For IOS user, please download at Apple Store.
- Alternatively you can scan QR from the dashcam to download and install the app.
1.2 Wi-Fi Vueroid App Connection.
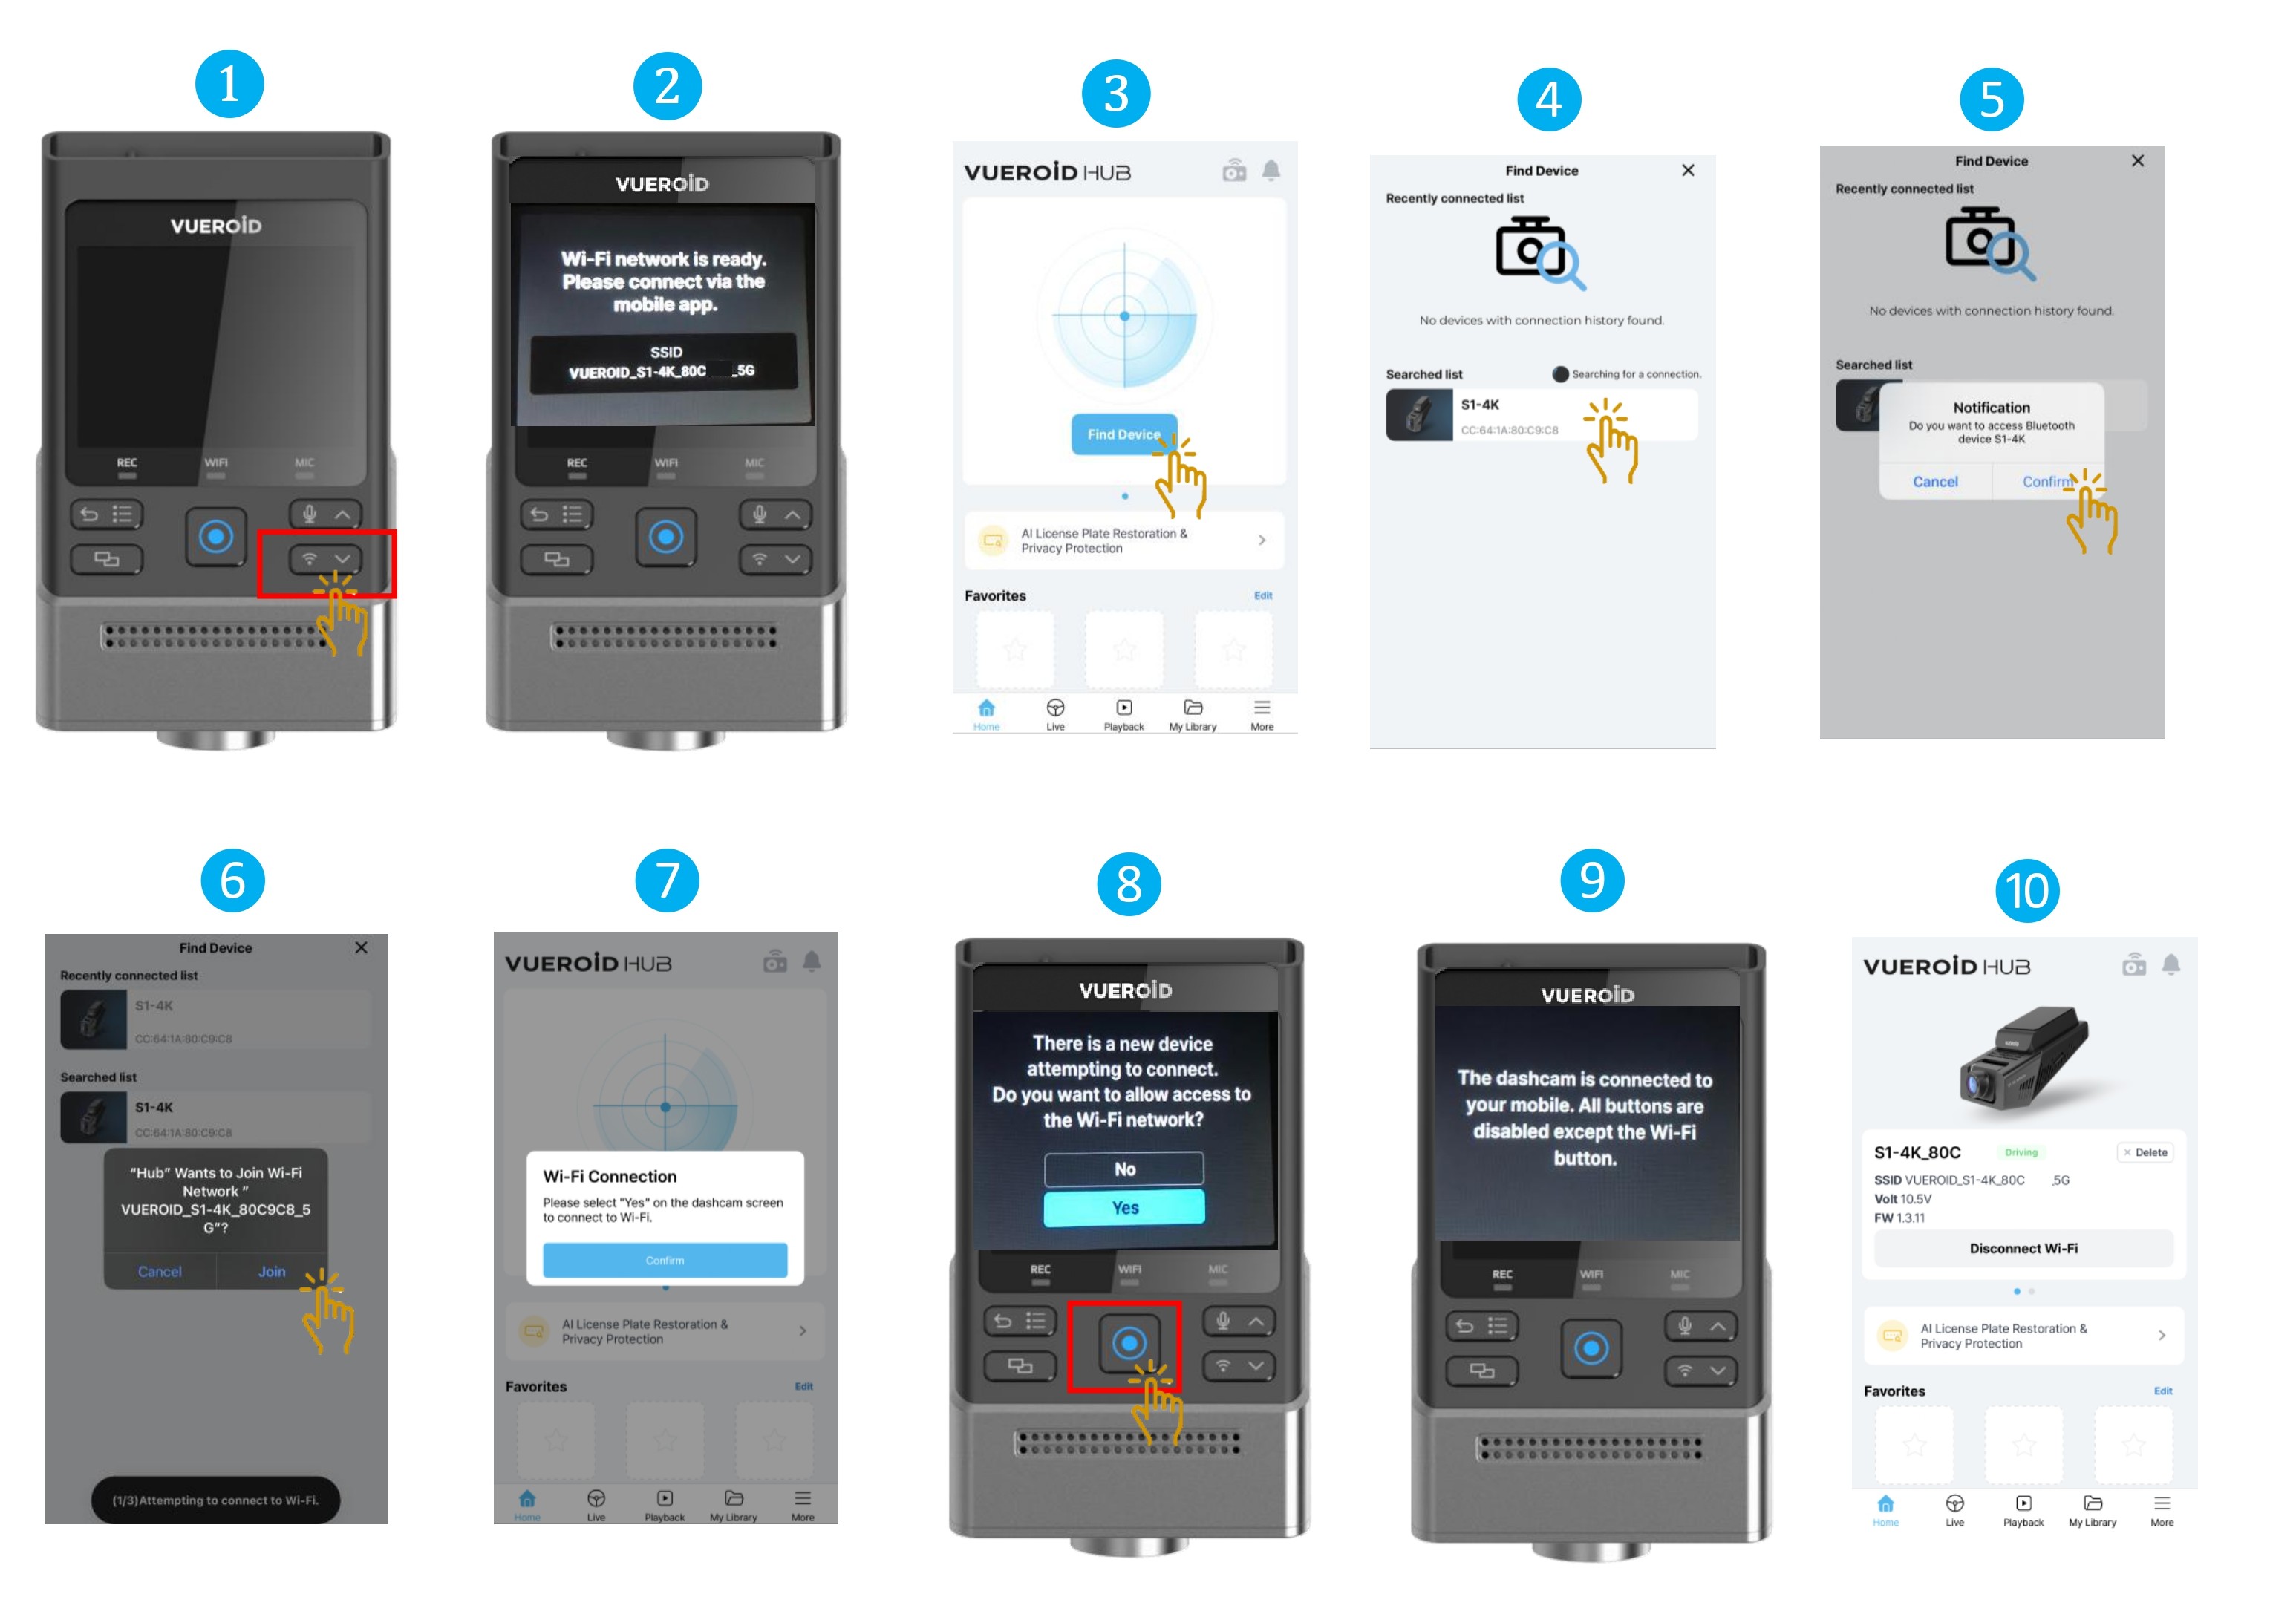
- Click on the "Wi-Fi" Button to turn it on.
- Once the Wi-Fi is ready, you can use the app to connect.
- Click on the "Find Device" on the app.
- Click on the dashcam once the SSID appeared.
- Click "Confirm".
- Click "Join" to connect the dashcam network.
- Once successfully joined, it will prompt instruction to click on the dashcam.
- At the dashcam, click "Yes".
- Once connected, all buttons will be disabled except the Wi-Fi button.
- Dashcam can be access via Vueroid Hub App.
- The VUEORID HUB App requires the following system OS:
Requires Android 10 (Q) or later.
Requires iOS 15.0 or later. - Initial connection, may take up 40 seconds.
- When navigating the app’s Playback and Setting menus, the recording will be paused.
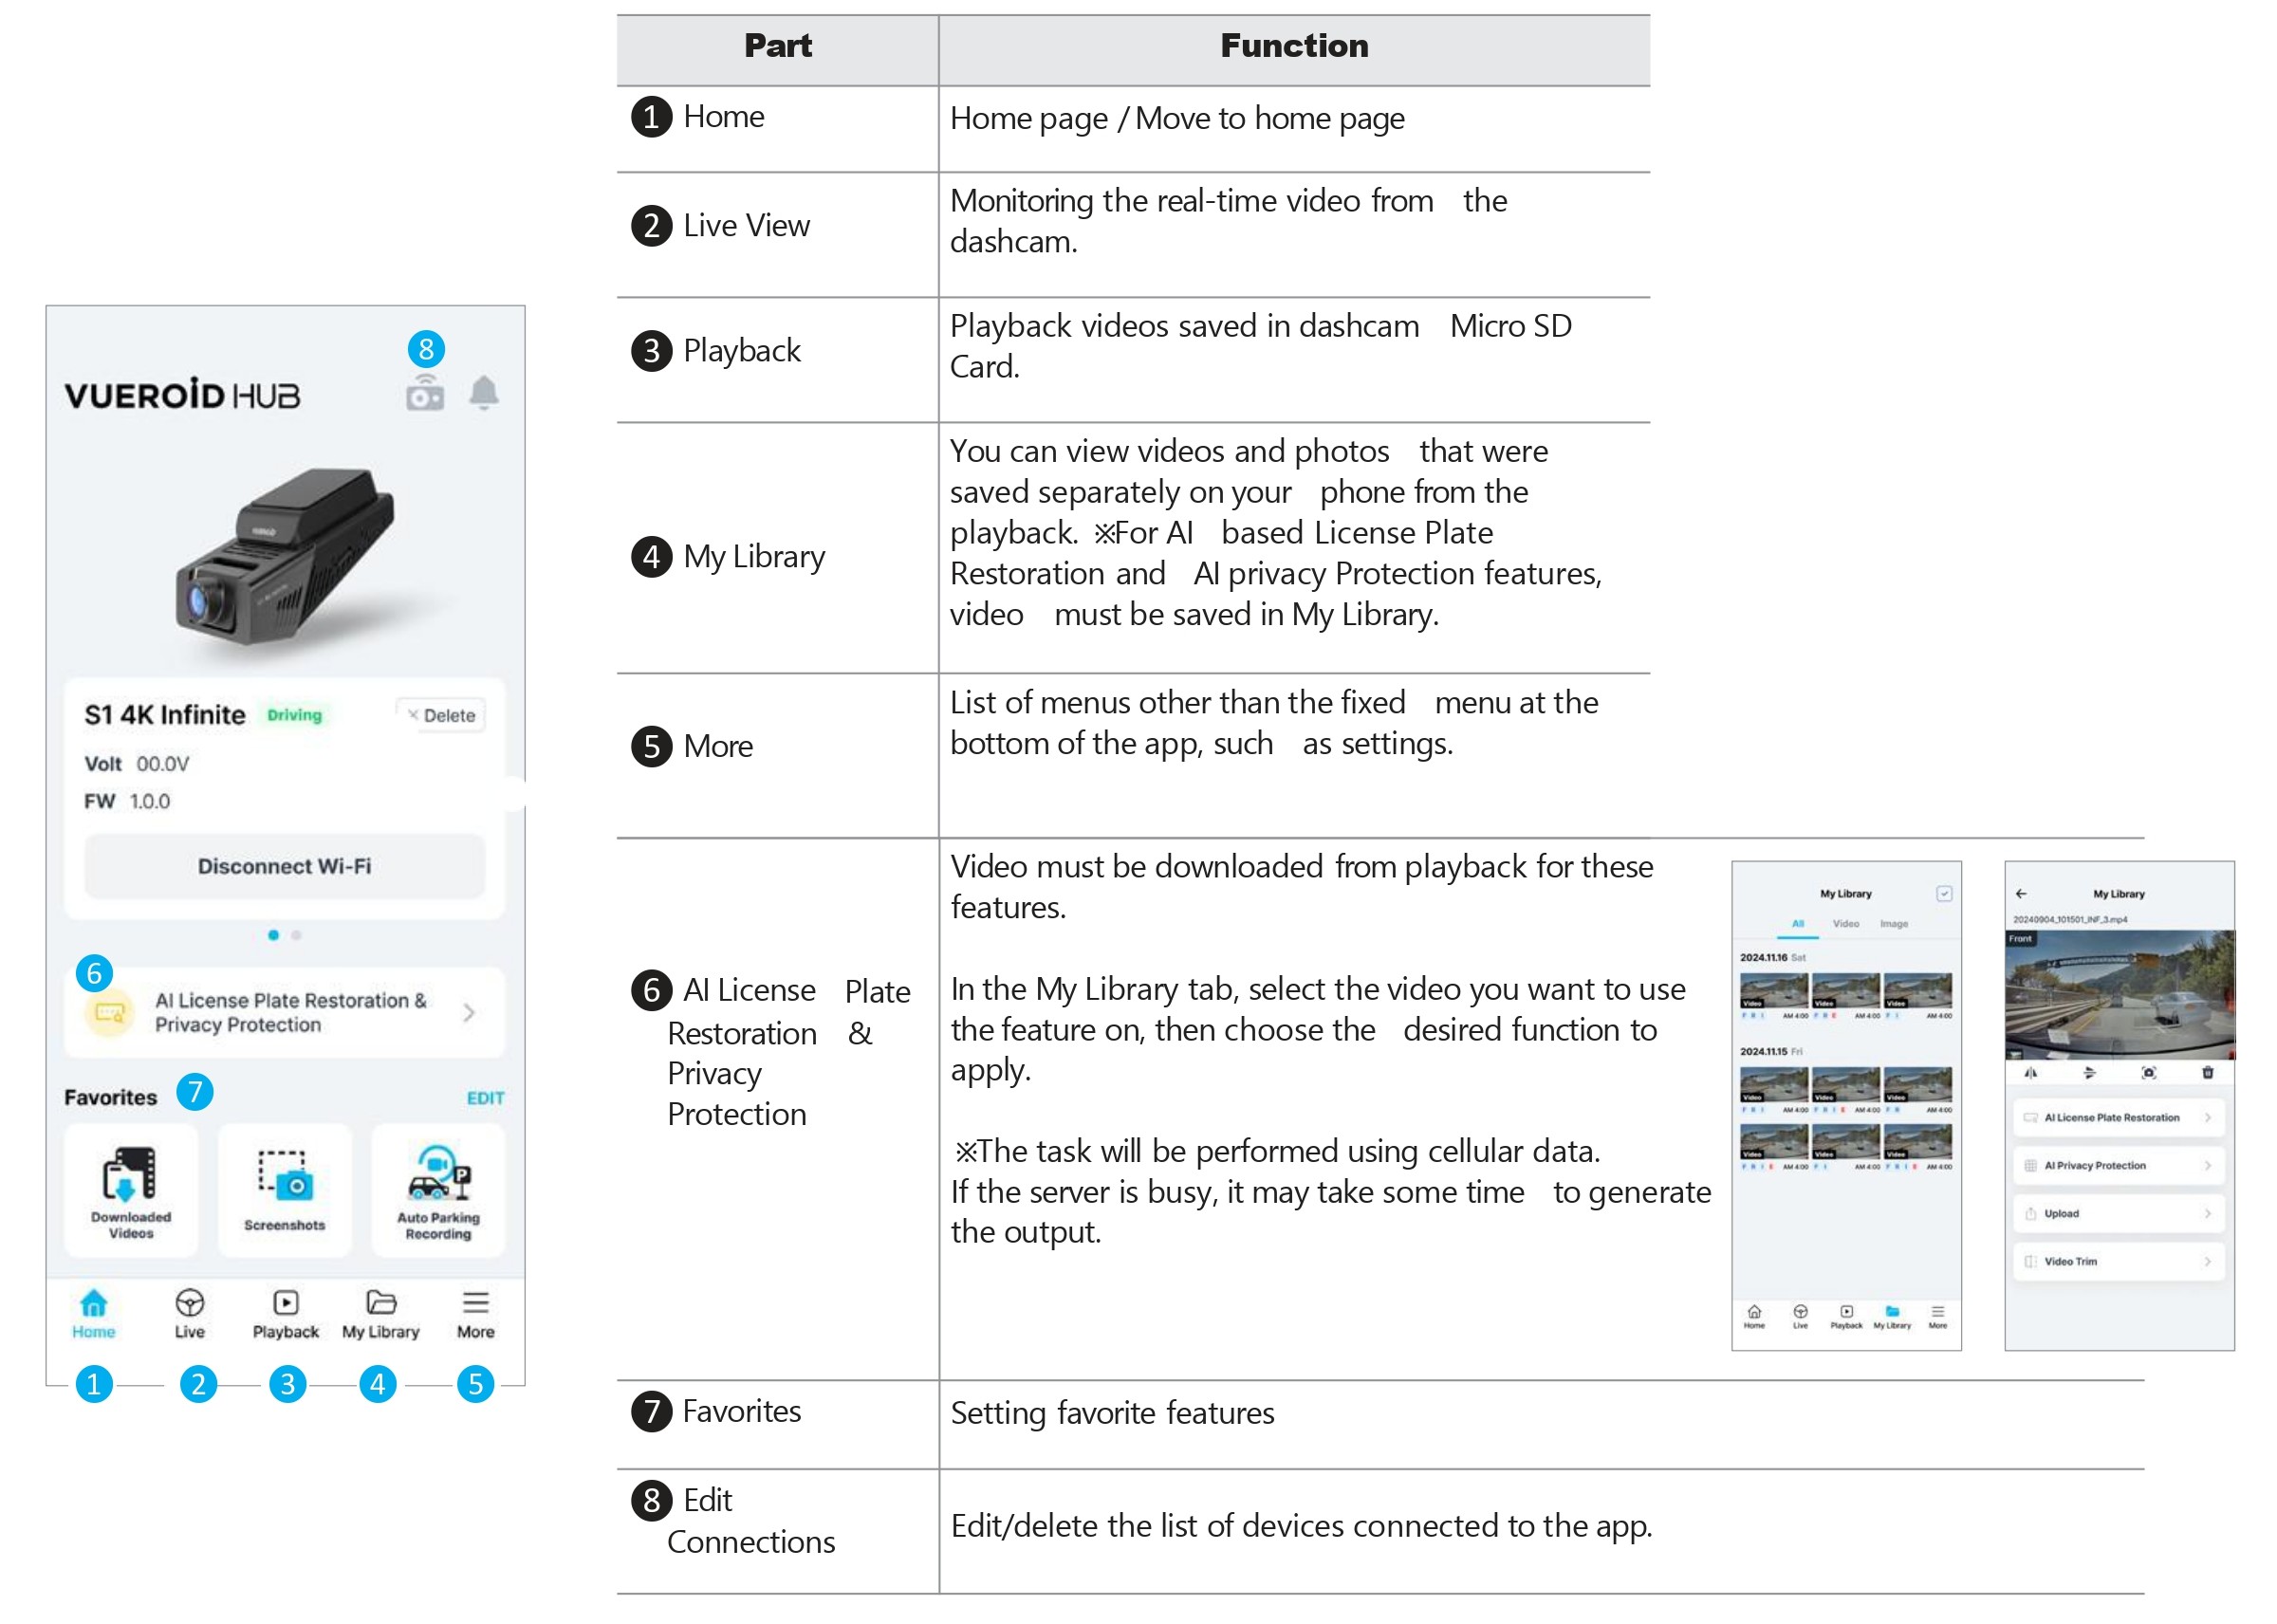
1.3 Layout Overview
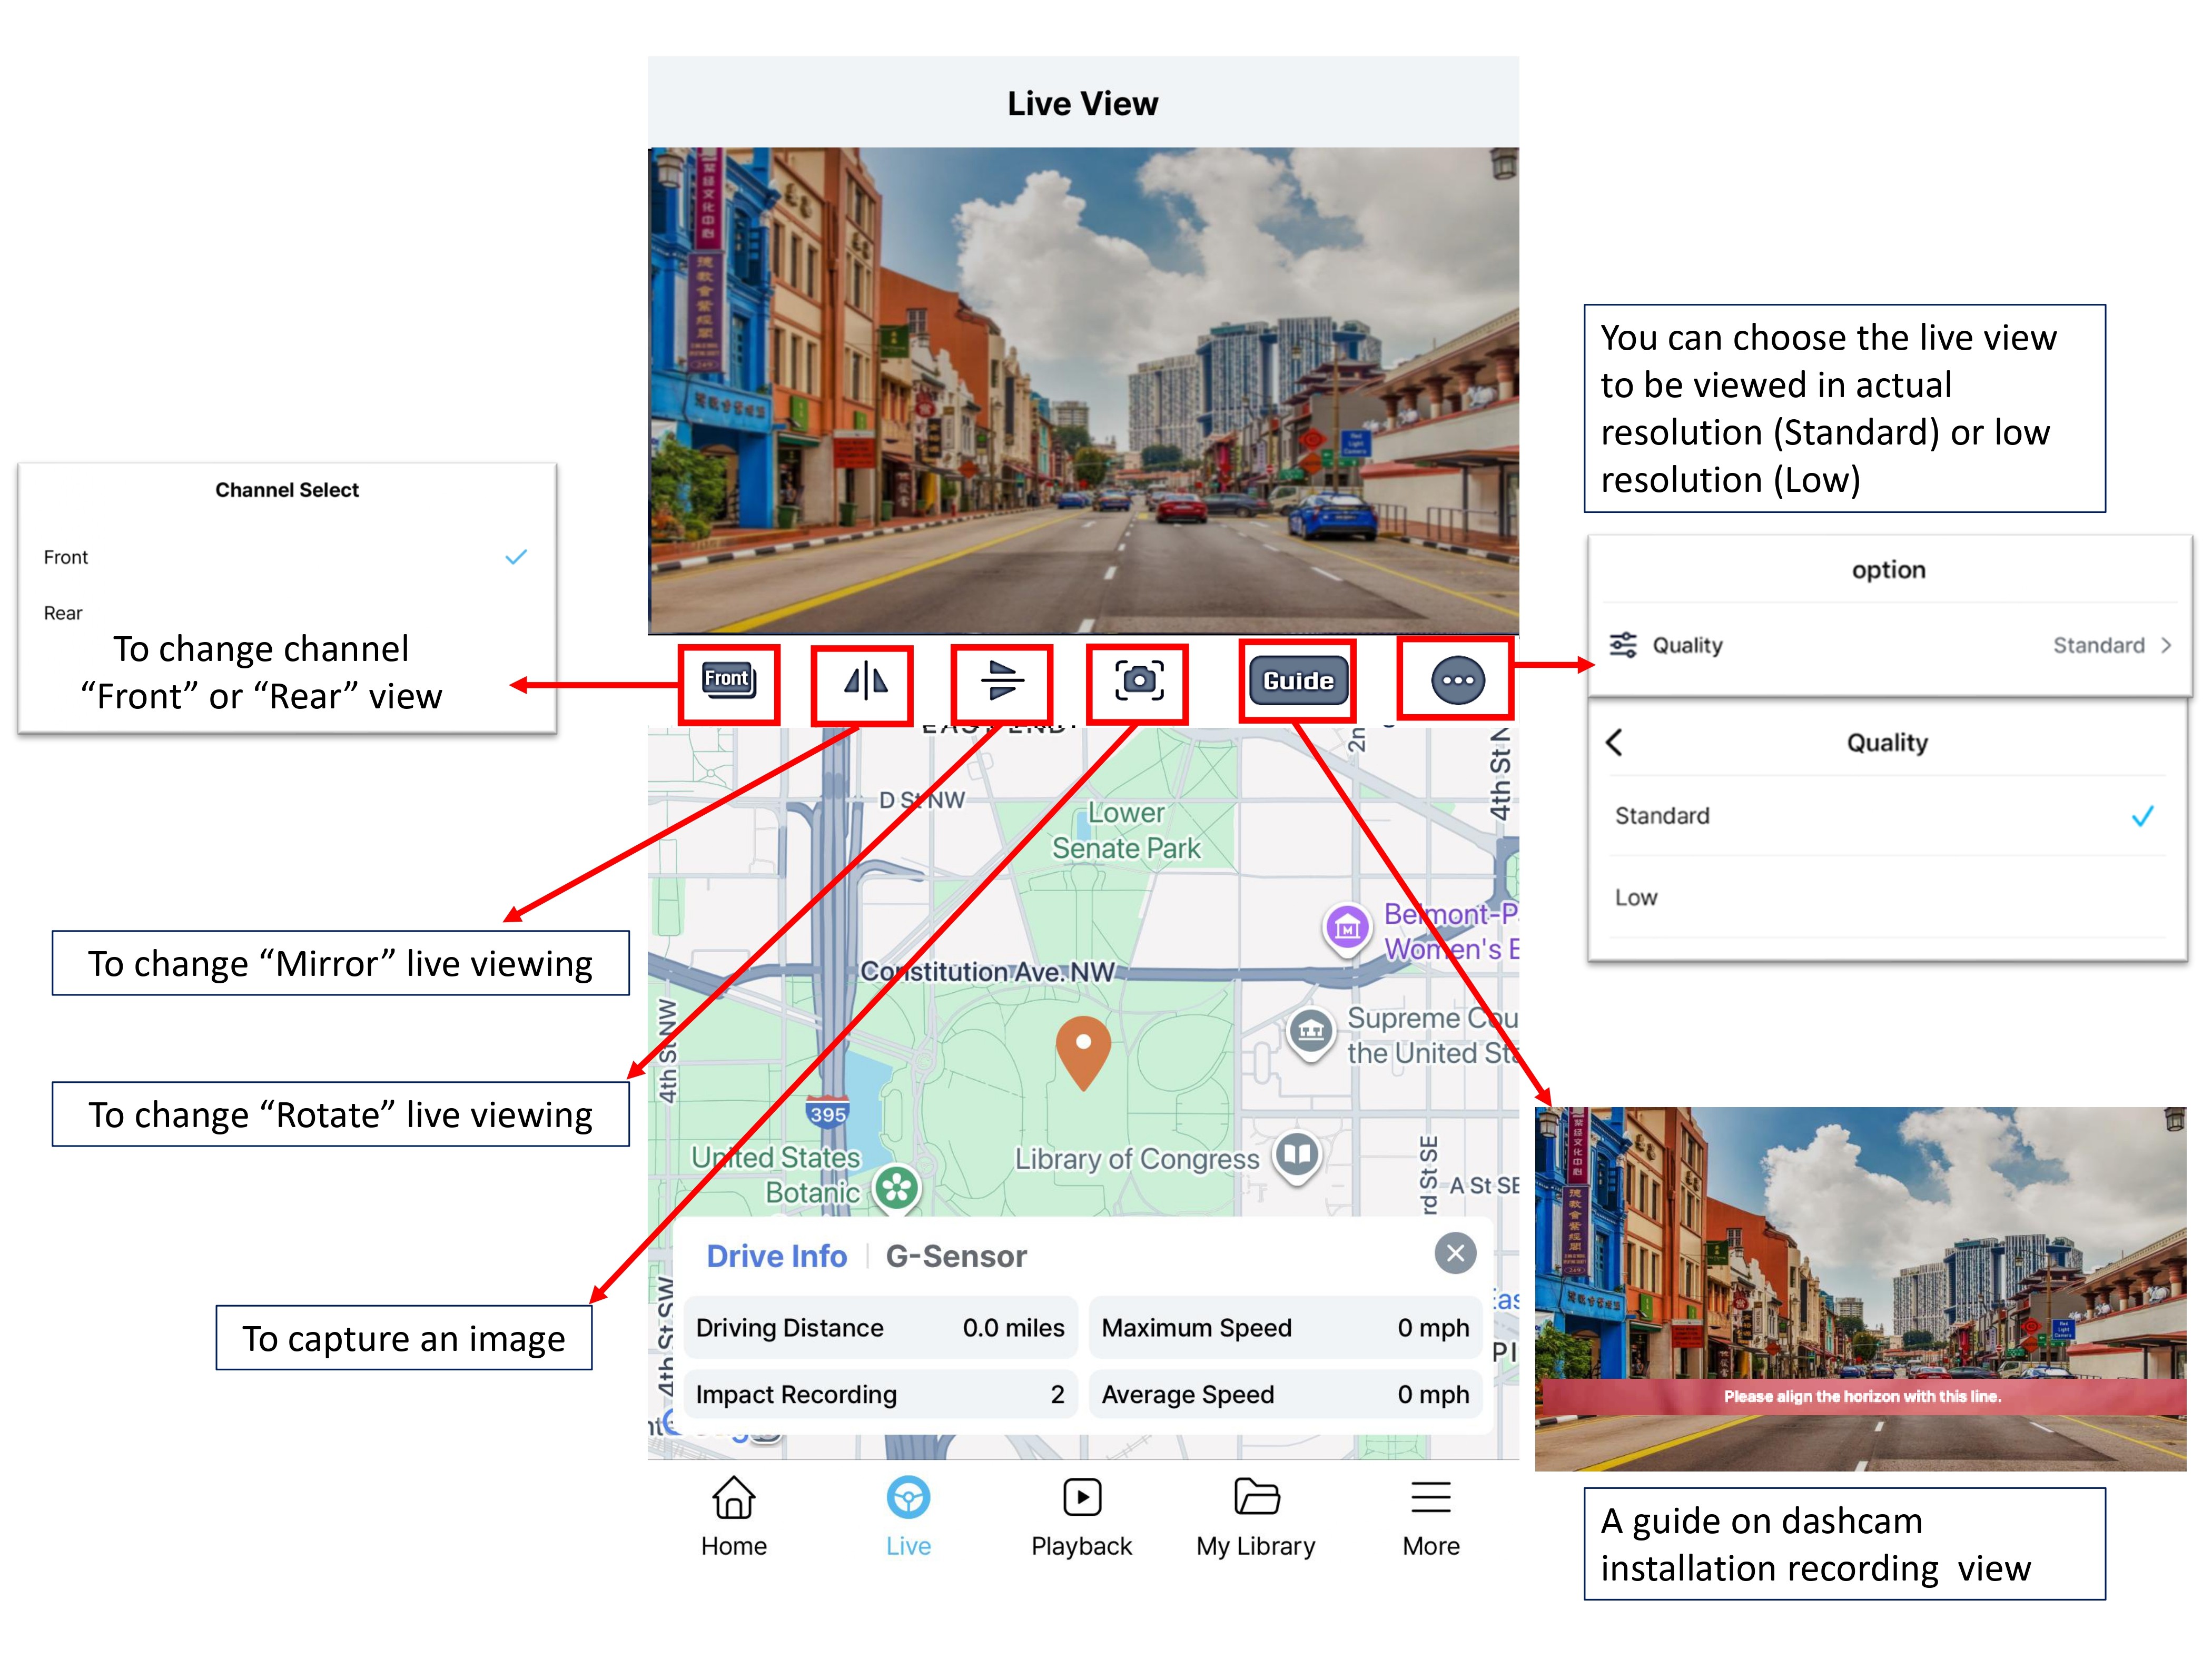
2. LIVE VIEW
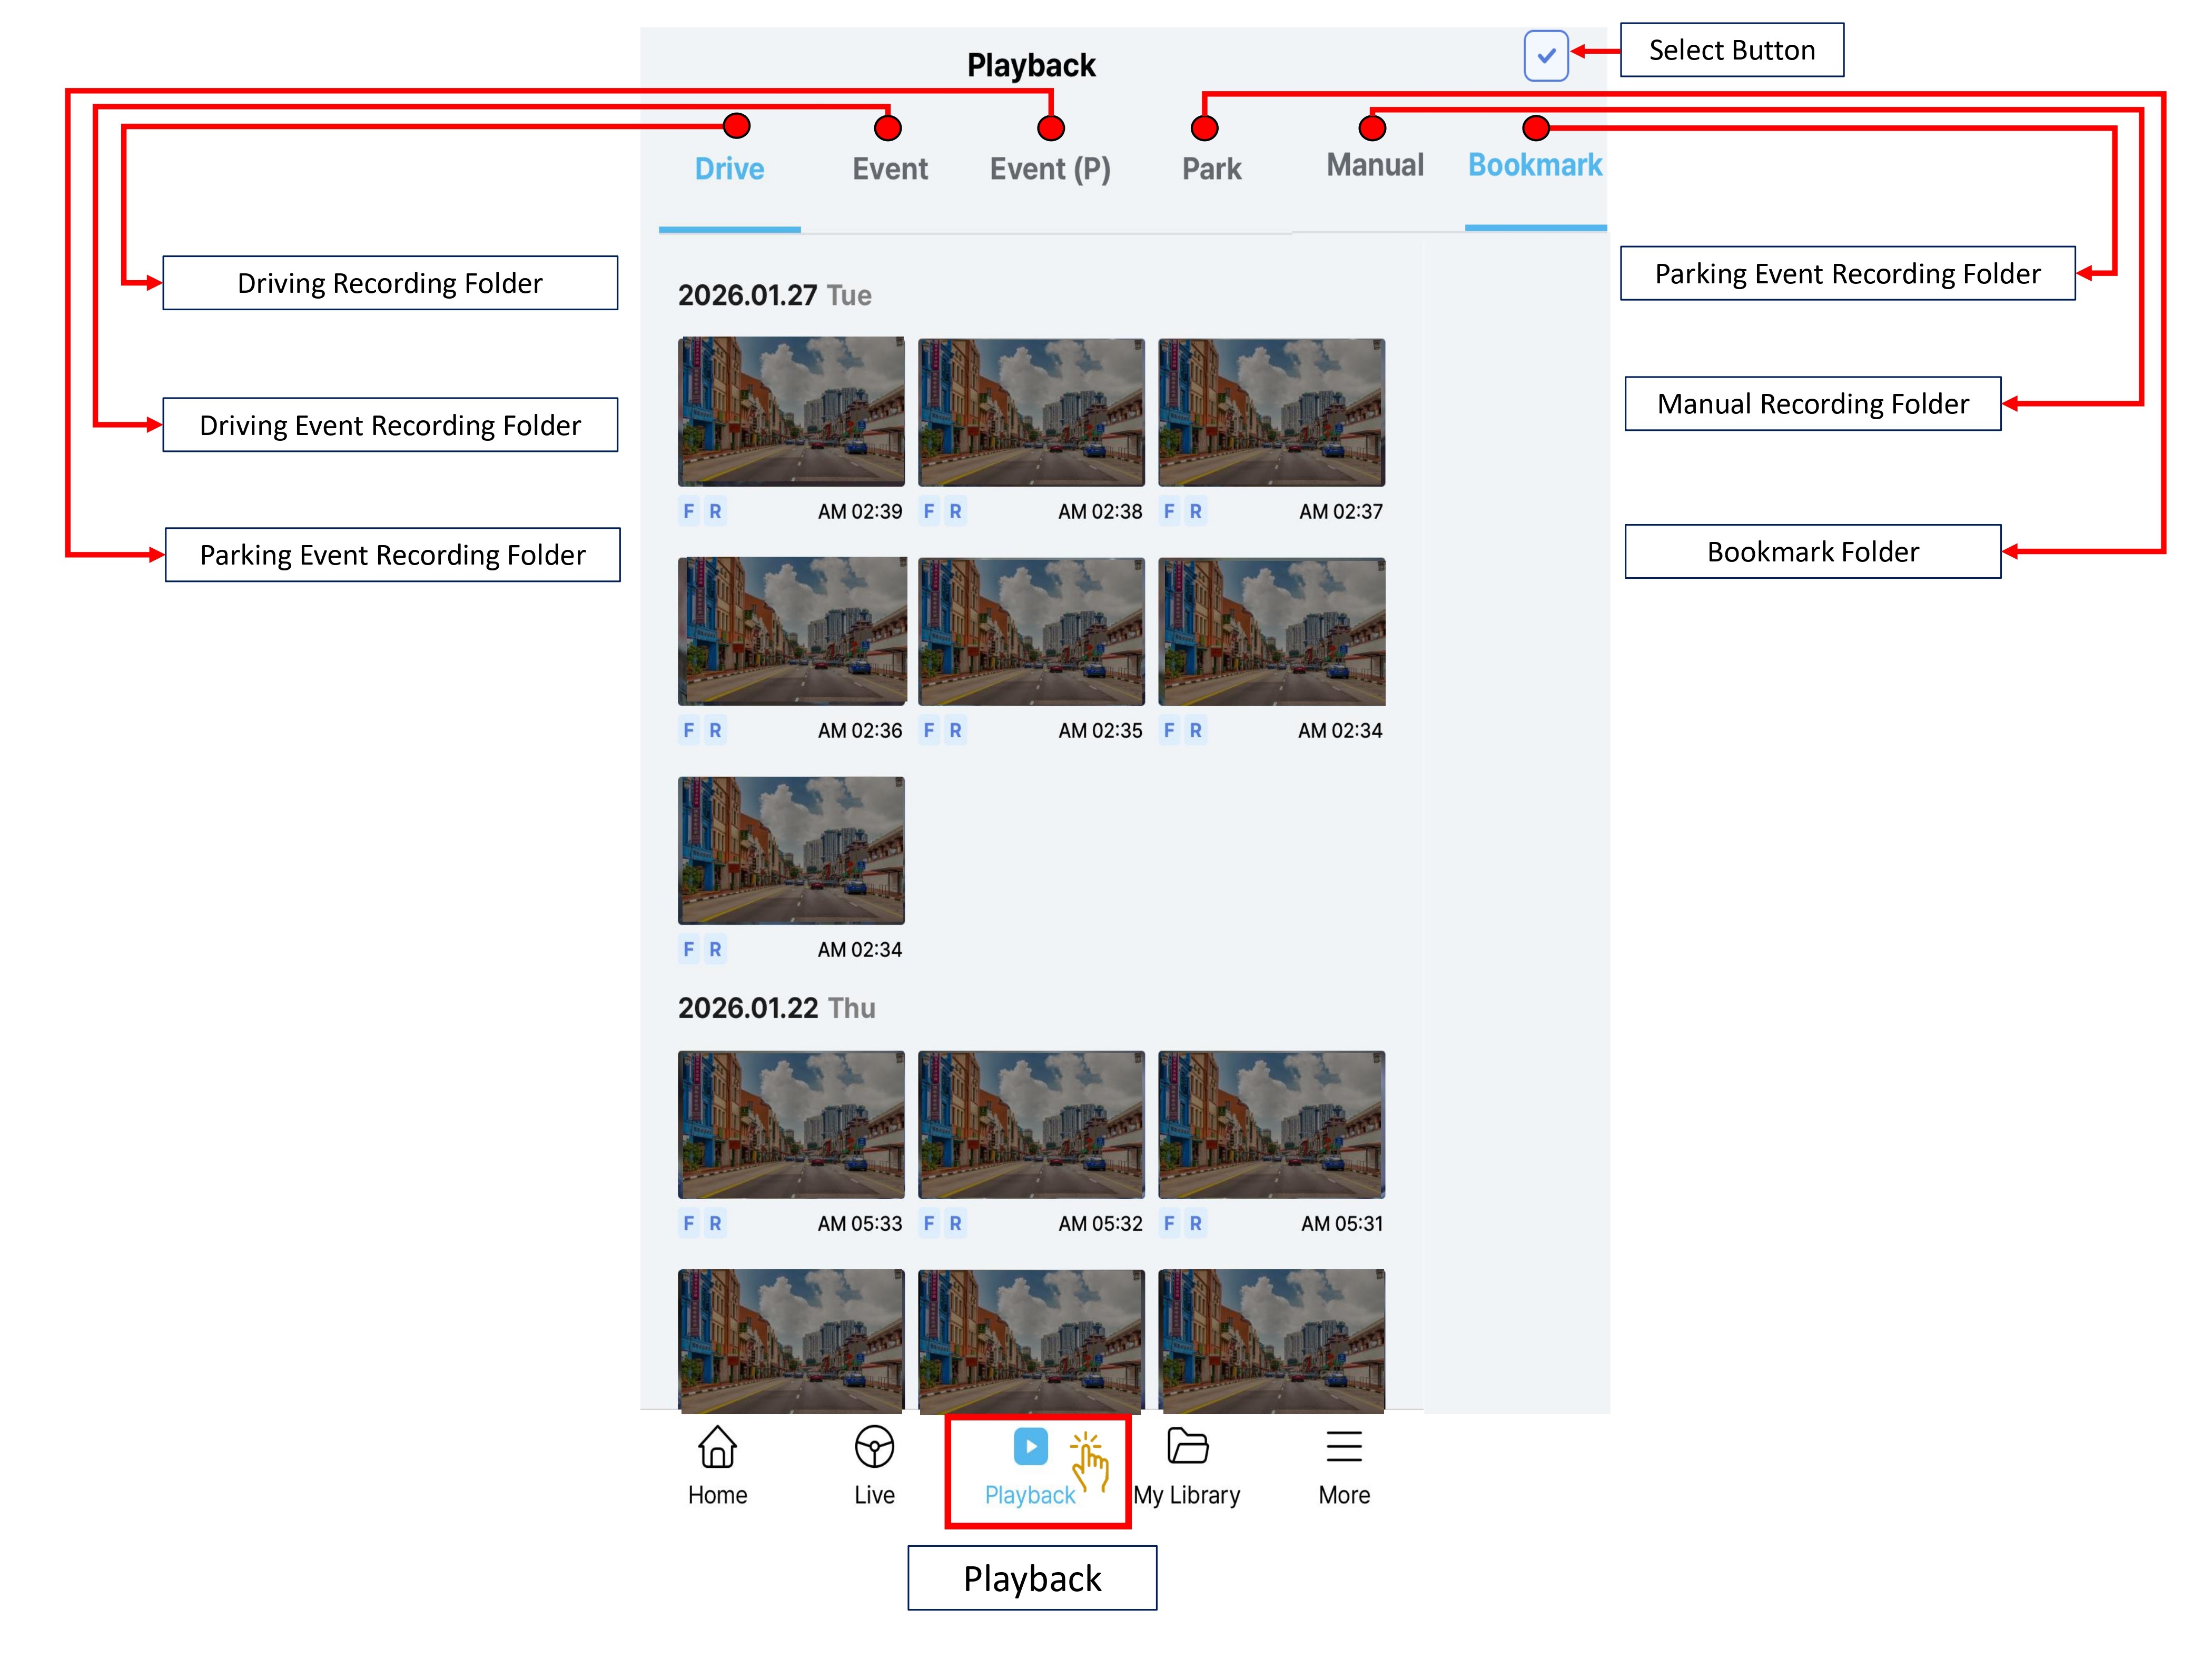
3. PLAYBACK
3.1 Playback Layout Overview
| Option | Detail |
| Driving Recording | Recording videos during the driving and saved in folder every 1 minute unit. |
| Time-Lapse at Driving | Recording at 1 fps per second instead of 30 fps (or 60fps). 5 minutes of video per recording file. |
| Impact (Event) Recording | When an impact is detected while driving, capturing 10 seconds before and 20 seconds after the impact. When impact recording is activated, a buzzer sound is played. ※ The buzzer On/Off option can be changed in Settings > System > Alert > Event Alert Tone. |
| Manual Recording |
Manual recording can be started by pressing the Manual/Enter button on the device. It will record 10 seconds before the button is pressed and 20 seconds after. |
| File Type | SD Card Folder |
| Driving Recording | INF Folder |
| Impact Recording while Driving | EVENT Folder |
| Impact Recording while Parking | PEVENT Folder |
| Motion / Time Lapse Recording | PARK Folder. |
| Manual Recording | USER Folder |
| Screenshot image | Bookmark Folder |
3.2 Playback and Download Video.
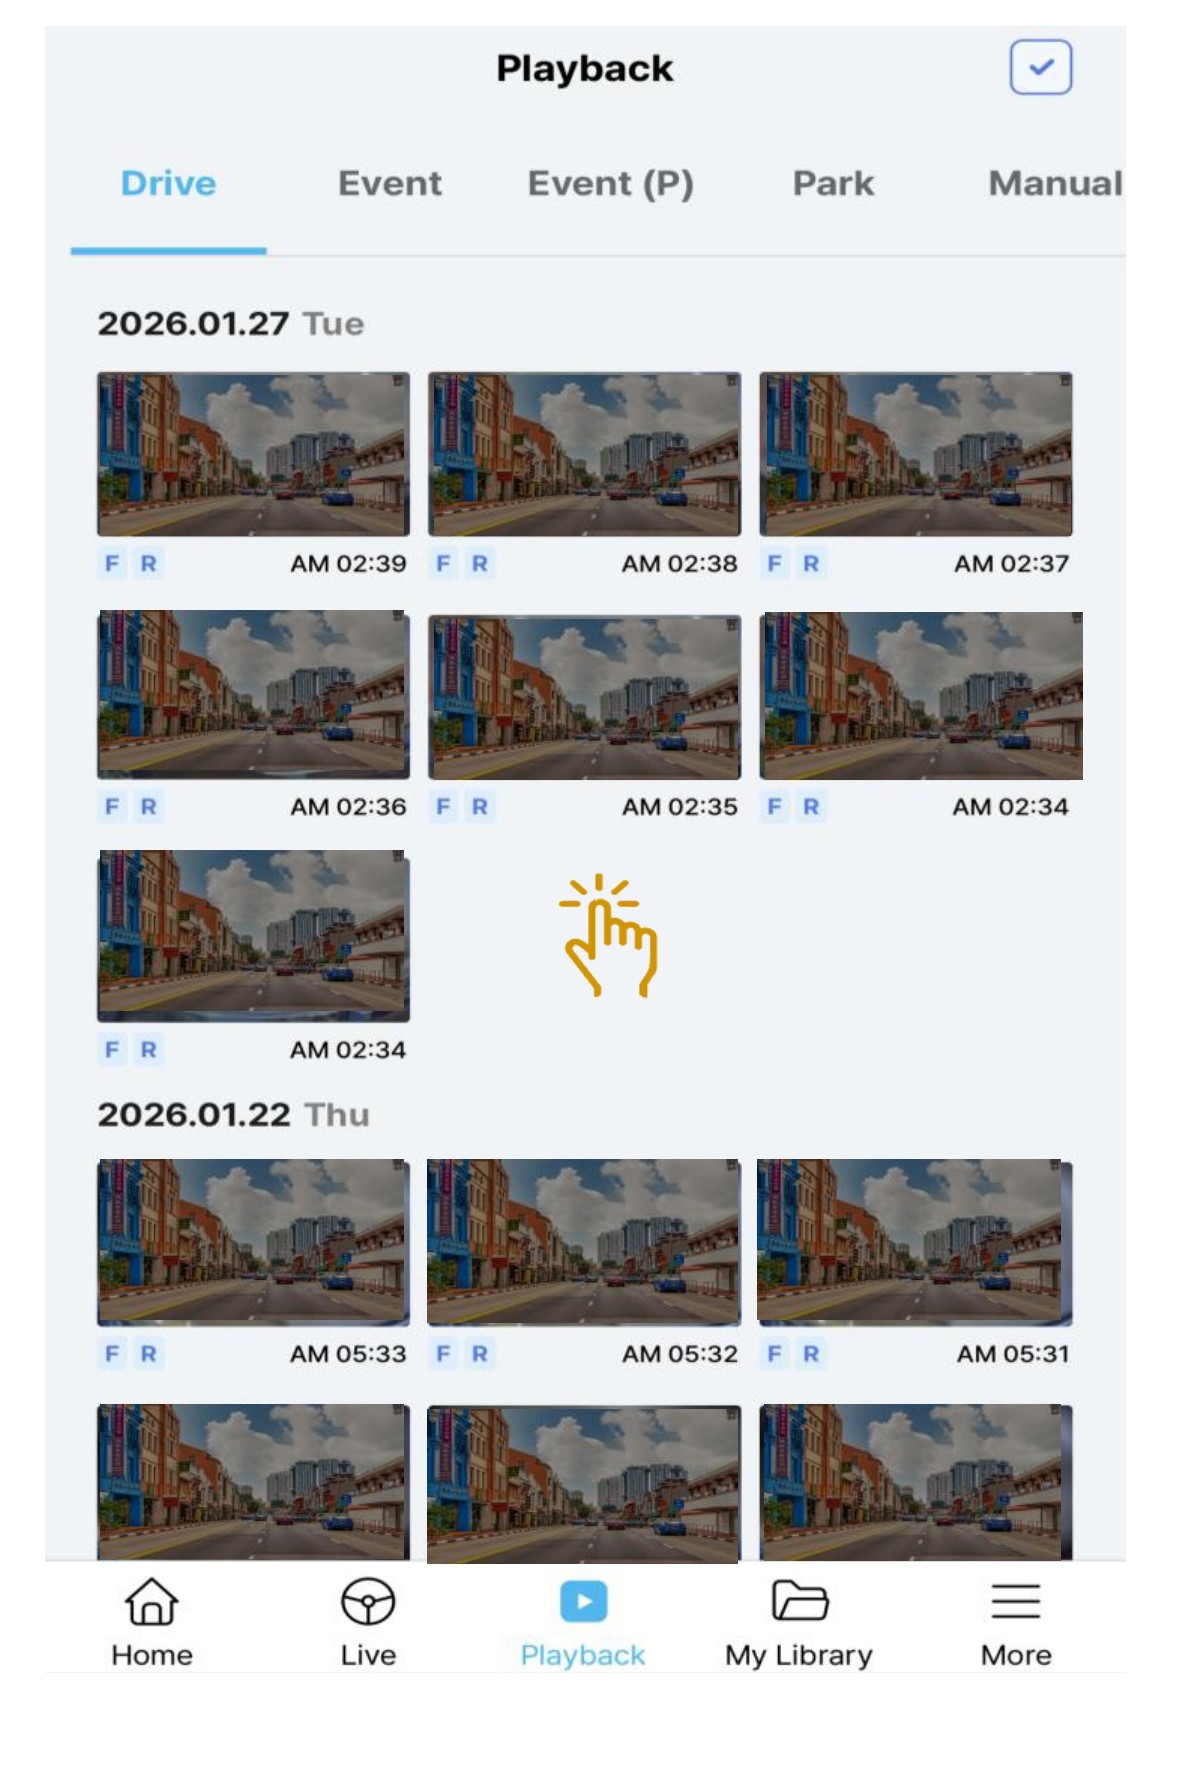
- Click on any video to be playback/download
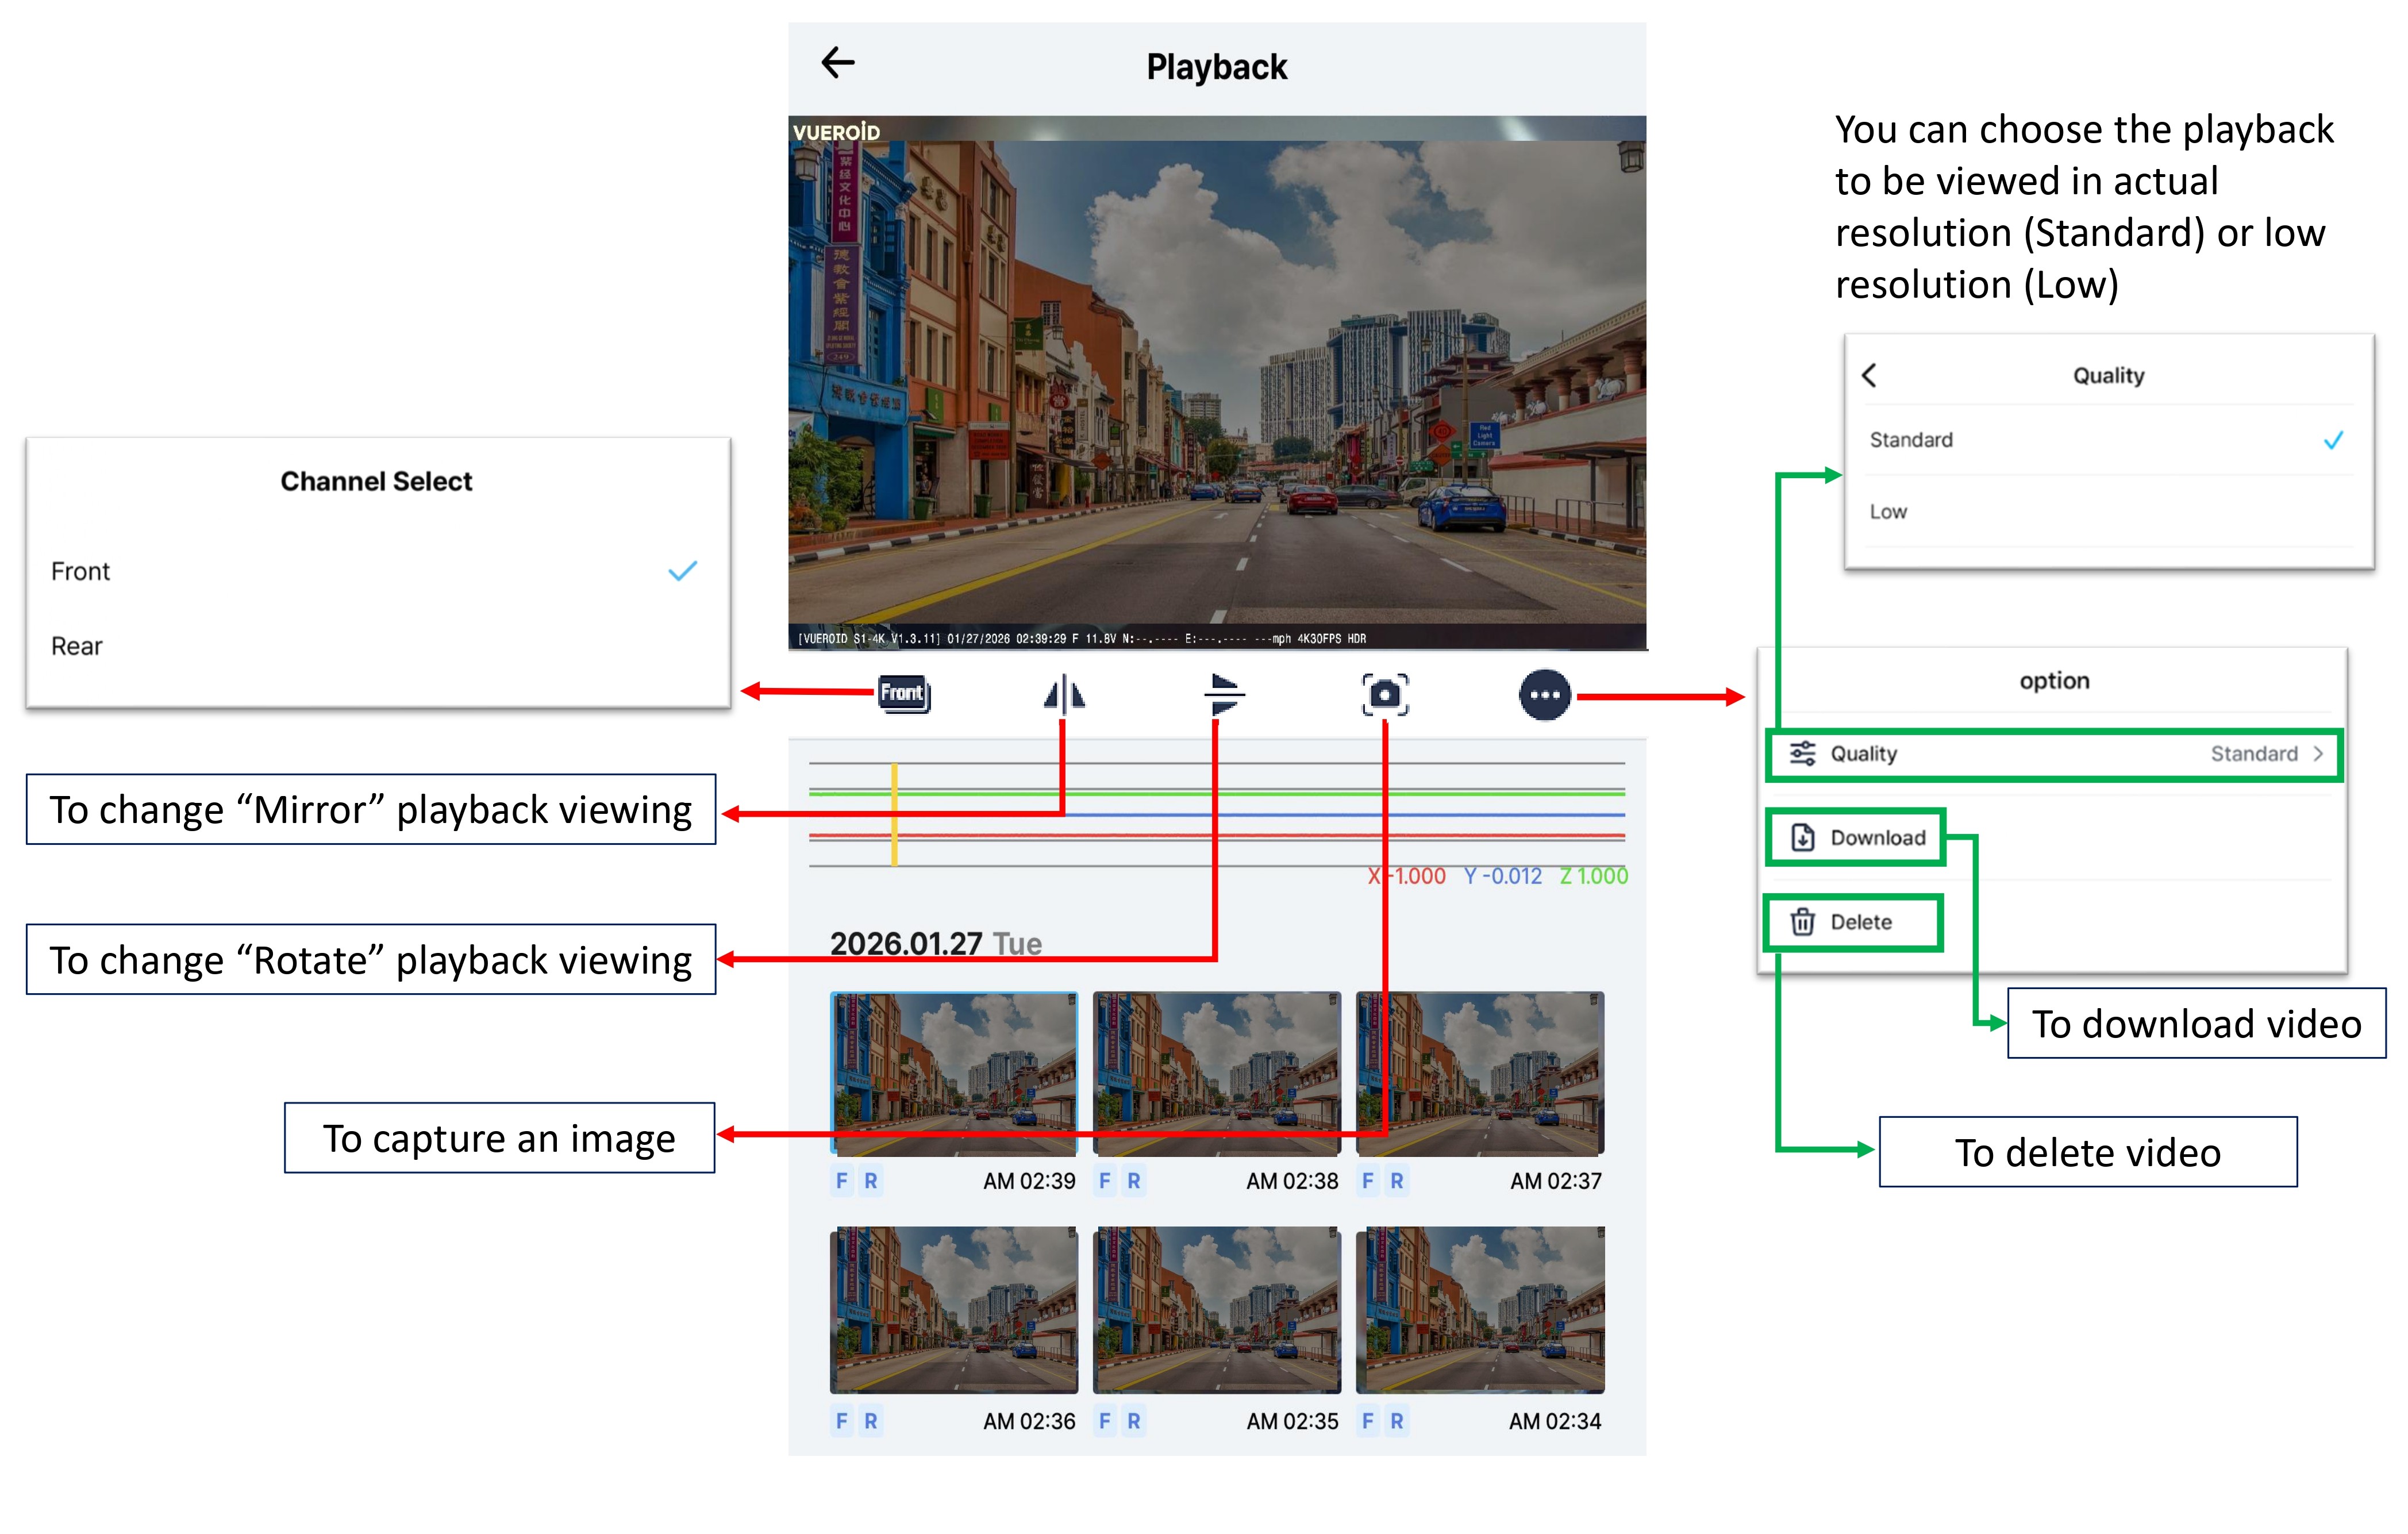
- Once the video is selected, you can choose to view the Front/Rear videos by clicking the Channel selection button.
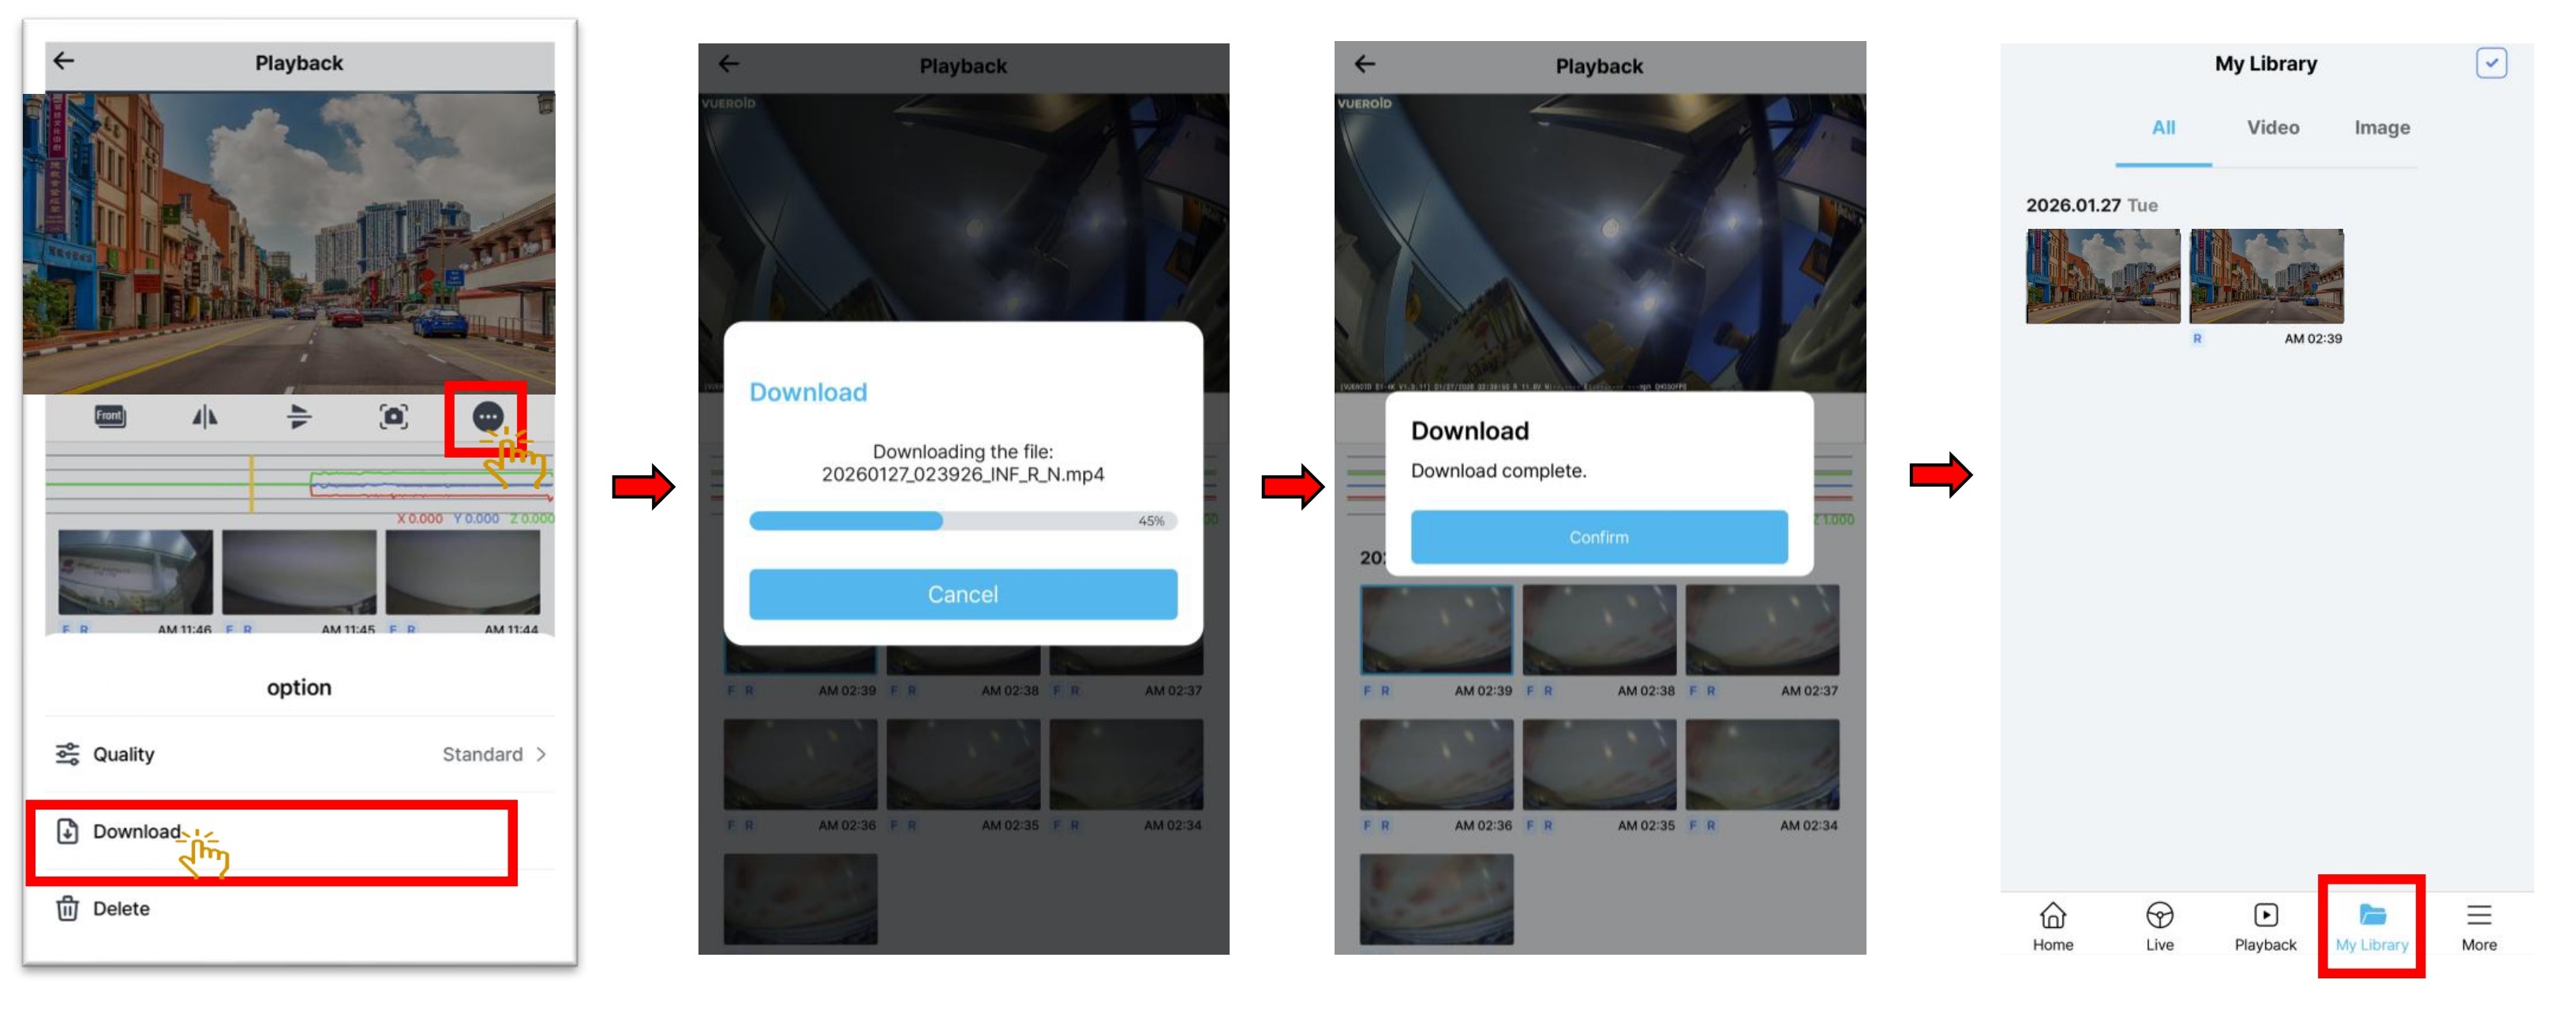
- To download video, click on the Download icon. Choose the Front/Rear videos by clicking the Channel selection button to download. If Front video is playing, the downloaded video will be the Front and similar to the rear video.
- Downloaded videos will be saved inside "My Library" folder.
3.3 Sharing Downloaded Video.
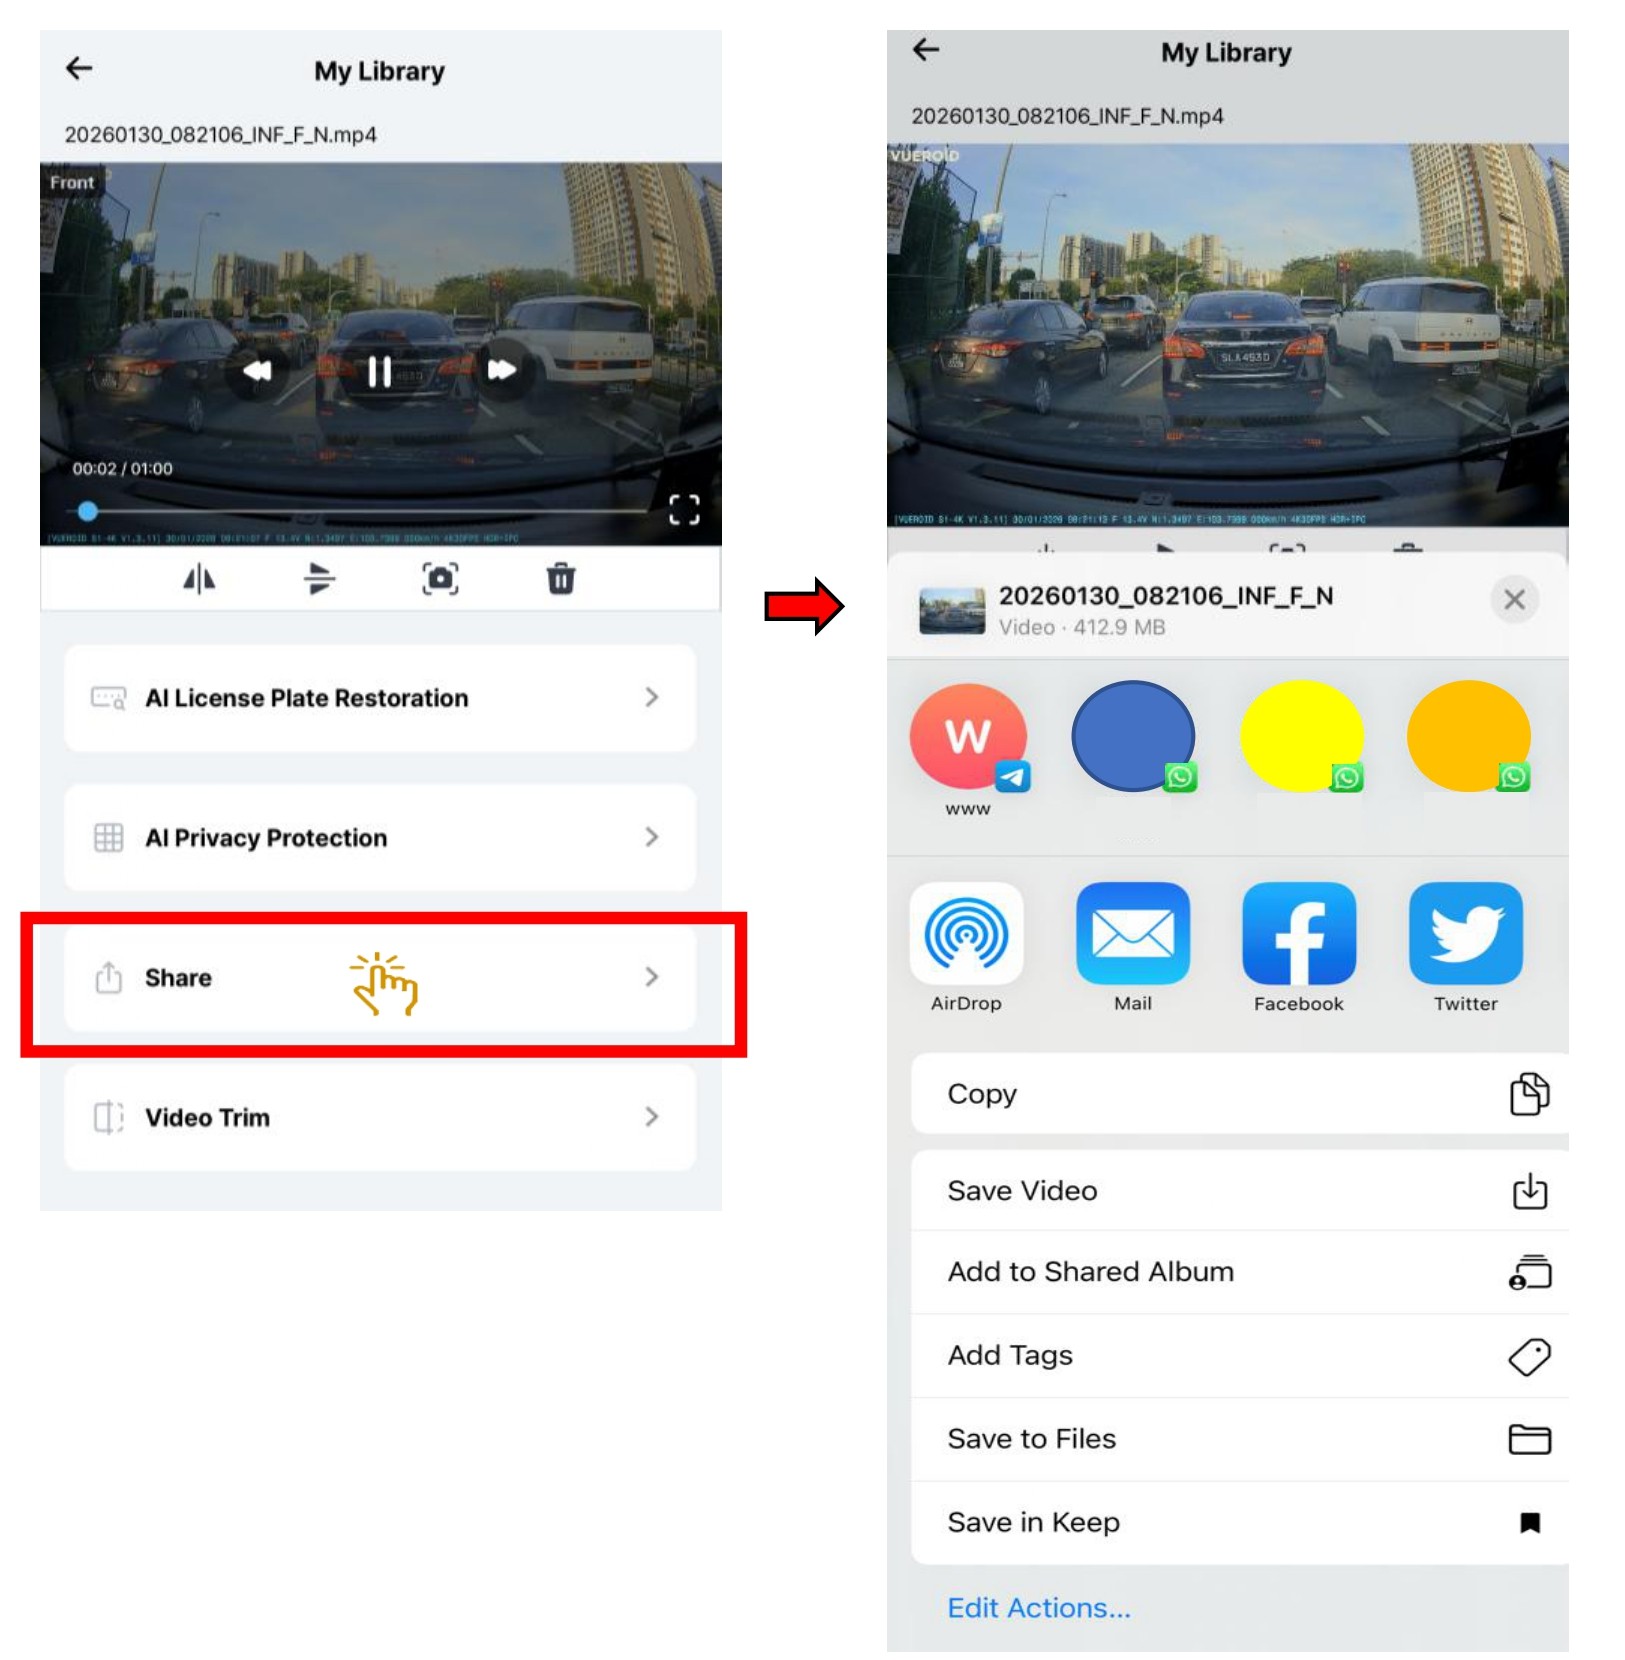
- In My Library folder, choose the recorded video file that you wish to share.
- Once video is selected, click on "Share".
- The recorded video can be share via email, social media platform or saved to user phone
3.4 Trimming Video.
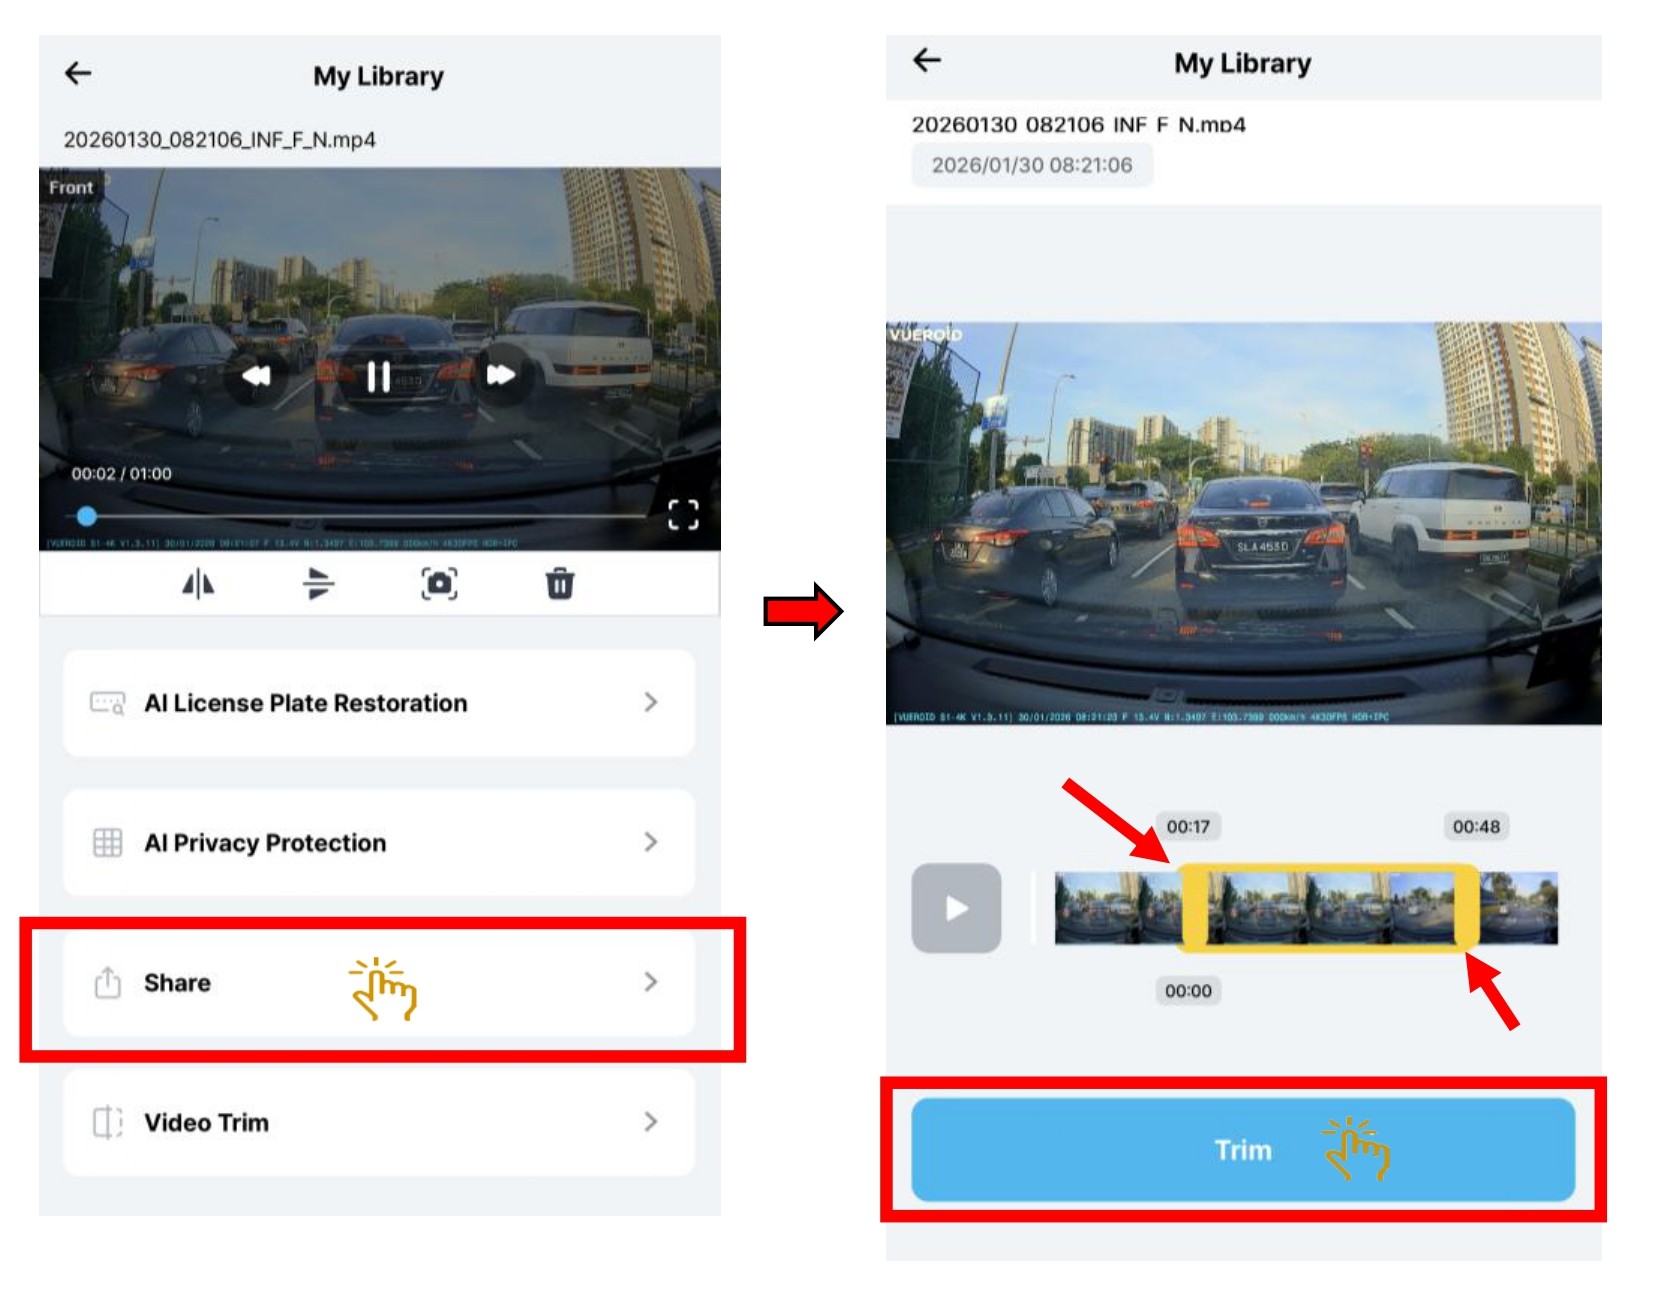
- You can trim the video length as per your preferences.
- Just slide the slider accordingly to the video frame you need.
- Click "Trim" and it will saved inside "My Library"
3.5 Delete Video.
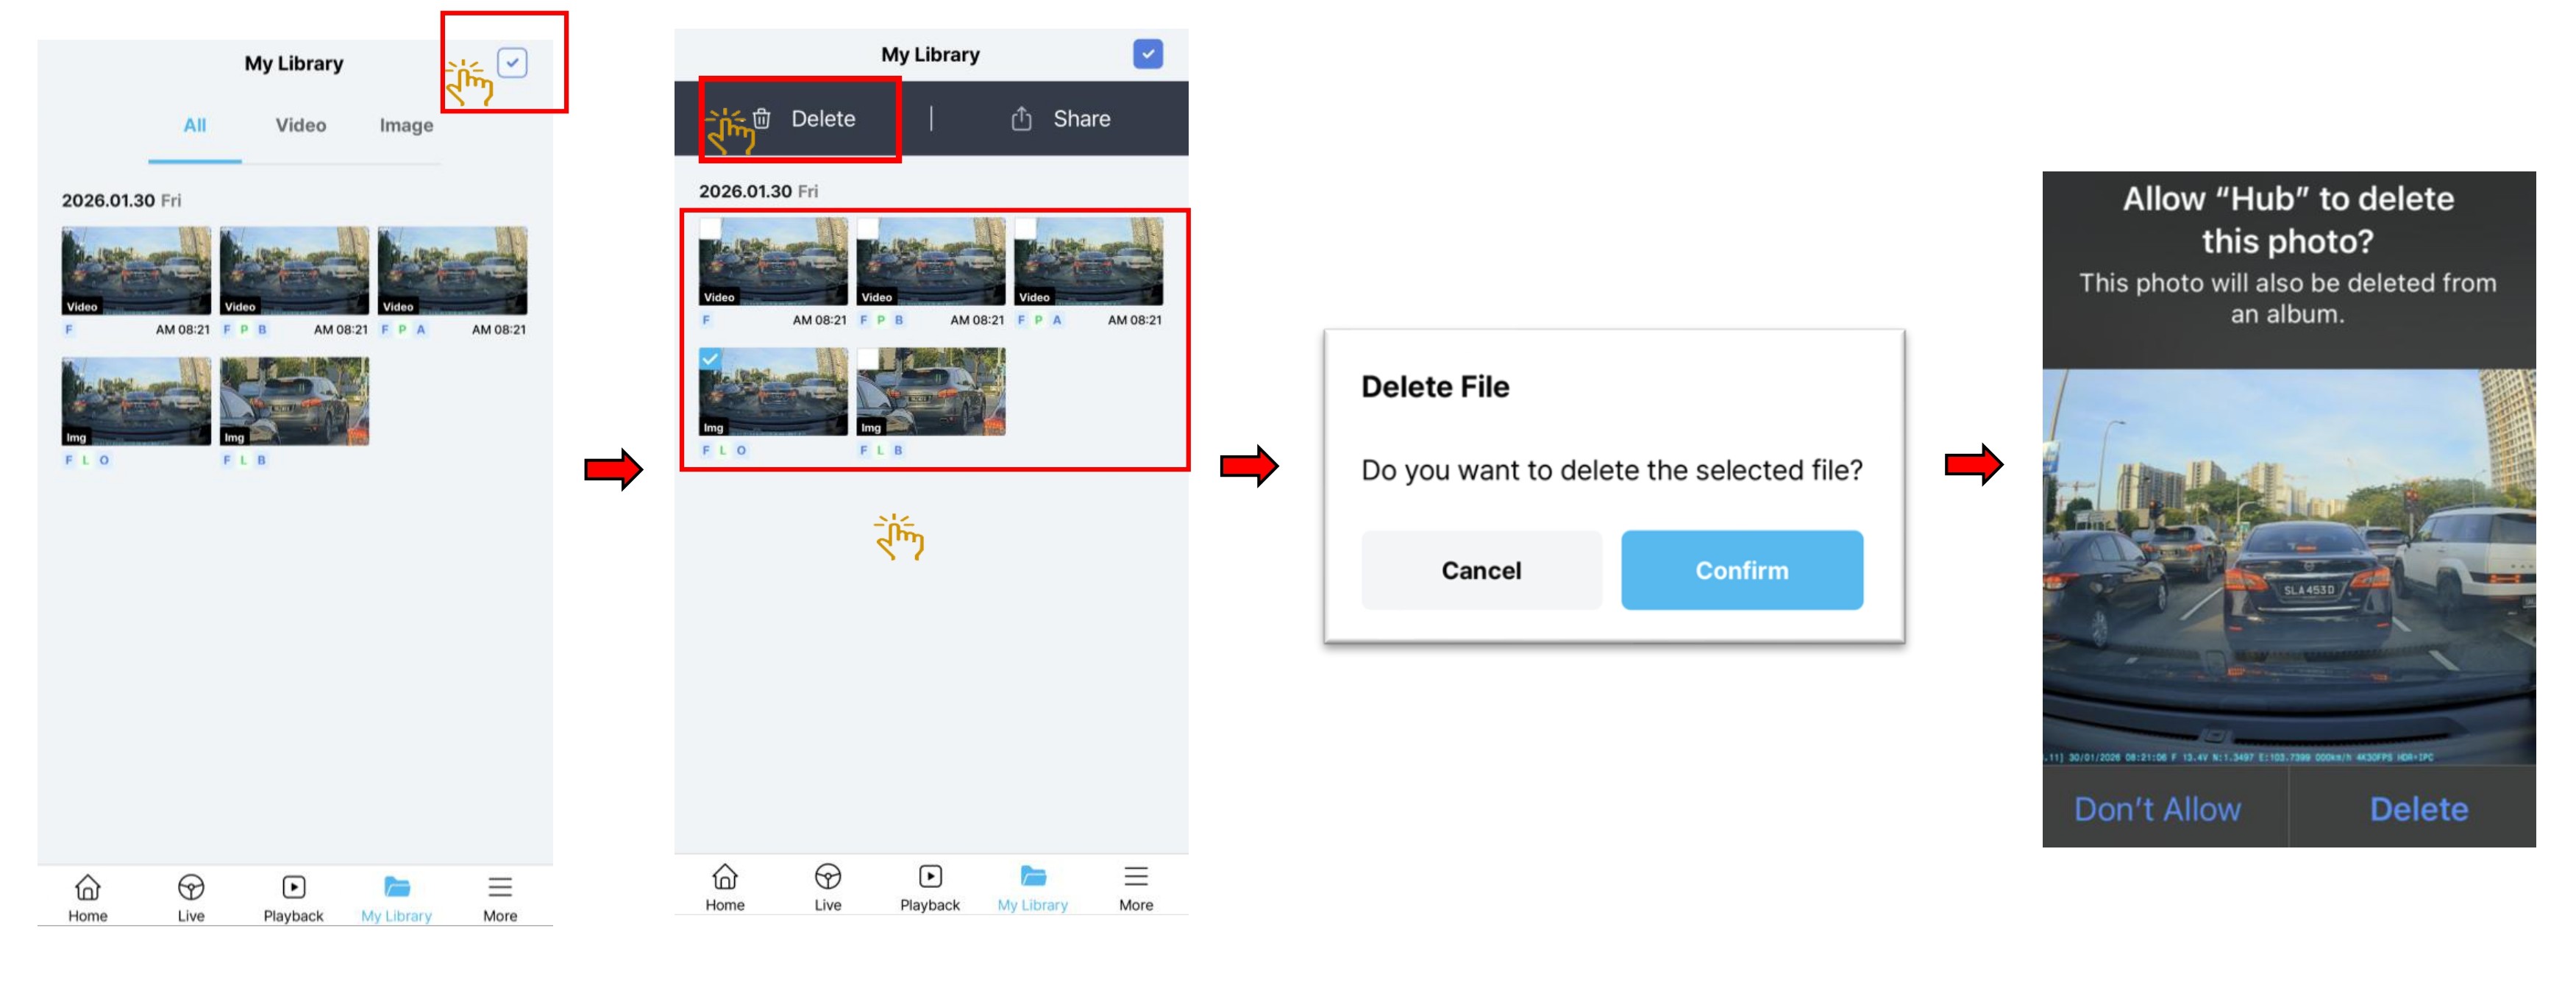
- In "My Library", click on the top right select button.
- Click on the videos that need to be deleted.
- Click "Delete" button.
- Click "Confirm" if you wish to delete the selected videos inside the apps folder.
- You also can choose to delete or not for that selected videos that saved inside your phone album previously.
4. AI FEATURES
4.1 AI License Plate Restoration
- AI License Plate Restoration enhances blurry or degraded license plate, making them clear and easy to recognize.
- The recognition accuracy may vary depending on the video, so please use it for reference only.
- This feature is processed and provided through the Vueroid Cloud server via the Vueroid Hub App or PC Viewer, based on the customer’s choice.
- Uploaded videos are permanently deleted from the server immediately after the requested function is performed.
The AI in not trained to process license plates that are already clearly readable by the human eye. If you attempt to restore a plate that is already legible, the results may be poor and inaccurate.
AI restoration values are algorithm-based estimated and may differ slightly from the actual values. We recommend using them only as supplementary information for accurate judgement or important decision-making.
4.2 AI Privacy Protection
- AI Privacy Protection automatically blurs personal information, such as vehicle license plates and the faces of pedestrians or drivers, to protect privacy in the recorded footage.or important decision-making.
5. SETTINGS
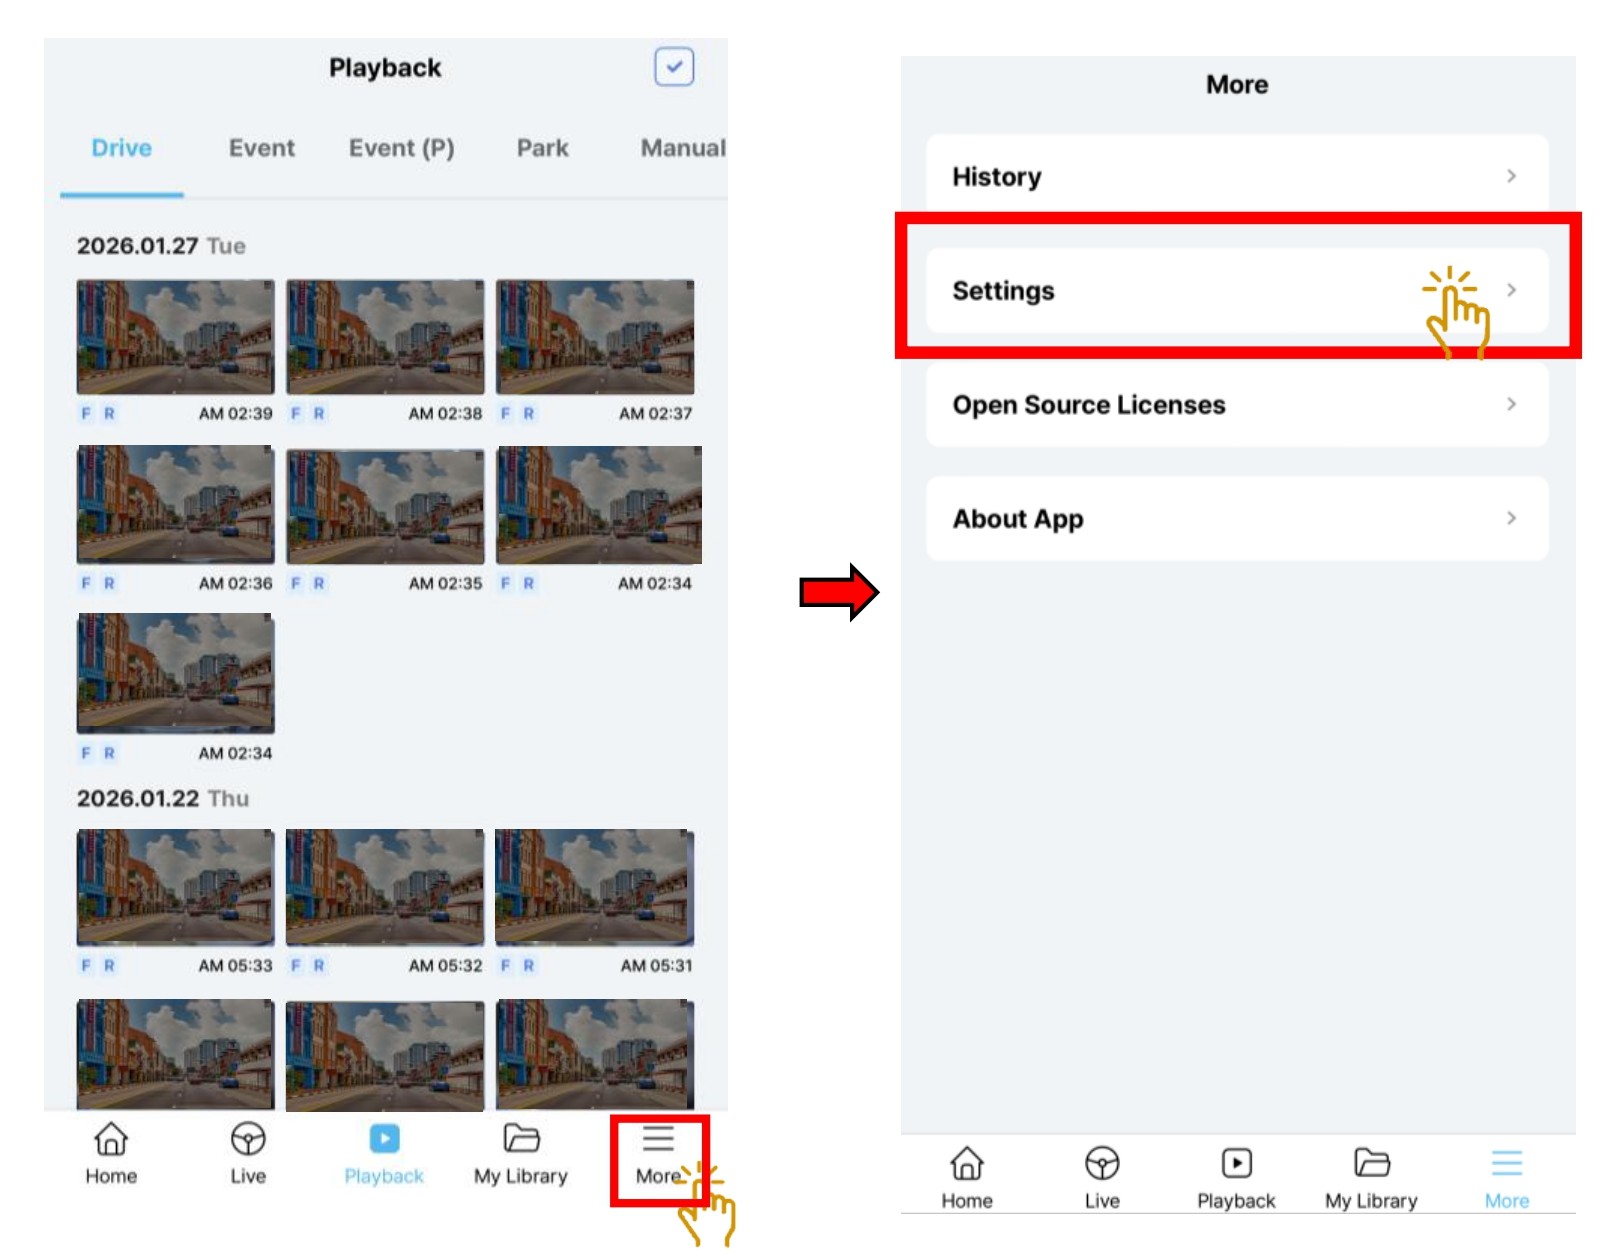
- To access the Setting, click on "More".
- Then click on "Settings".
5.1 Setting - Camera.
5.1.1 Setting - Camera - Resolution & Framerate
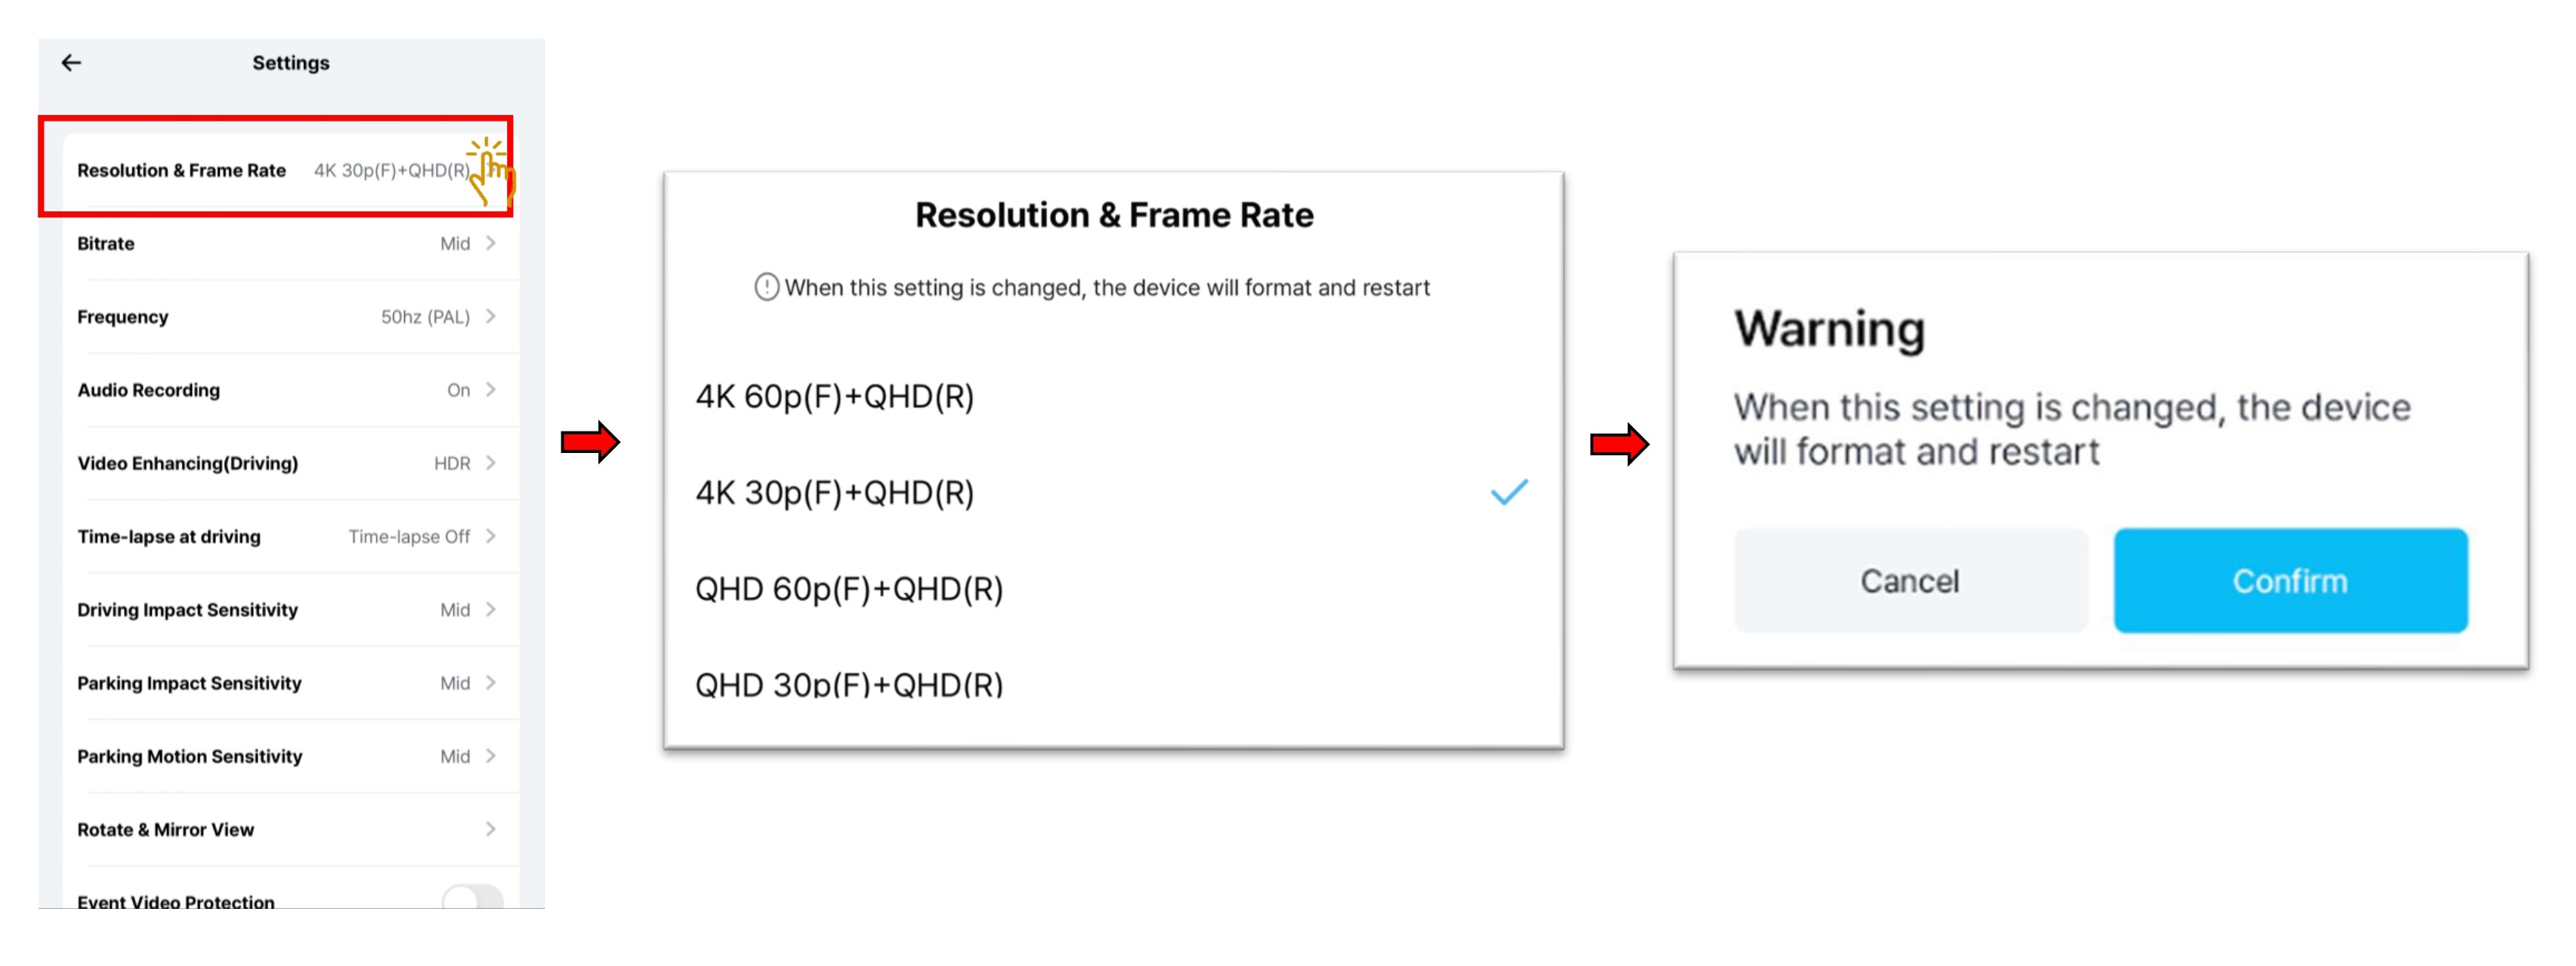
- Select "Resolution & Frame Rate".
- Choose the resolution type your preference.
If you change the Resolution & Framerate or Bitrate, the Micro SD Card will be formatted, and the device will automatically reboot afterward. Therefore, it is recommended to save a copy of your videos on an Micro SD Card before changing the resolution and bitrate.
5.1.2 Setting - Camera - Bitrate
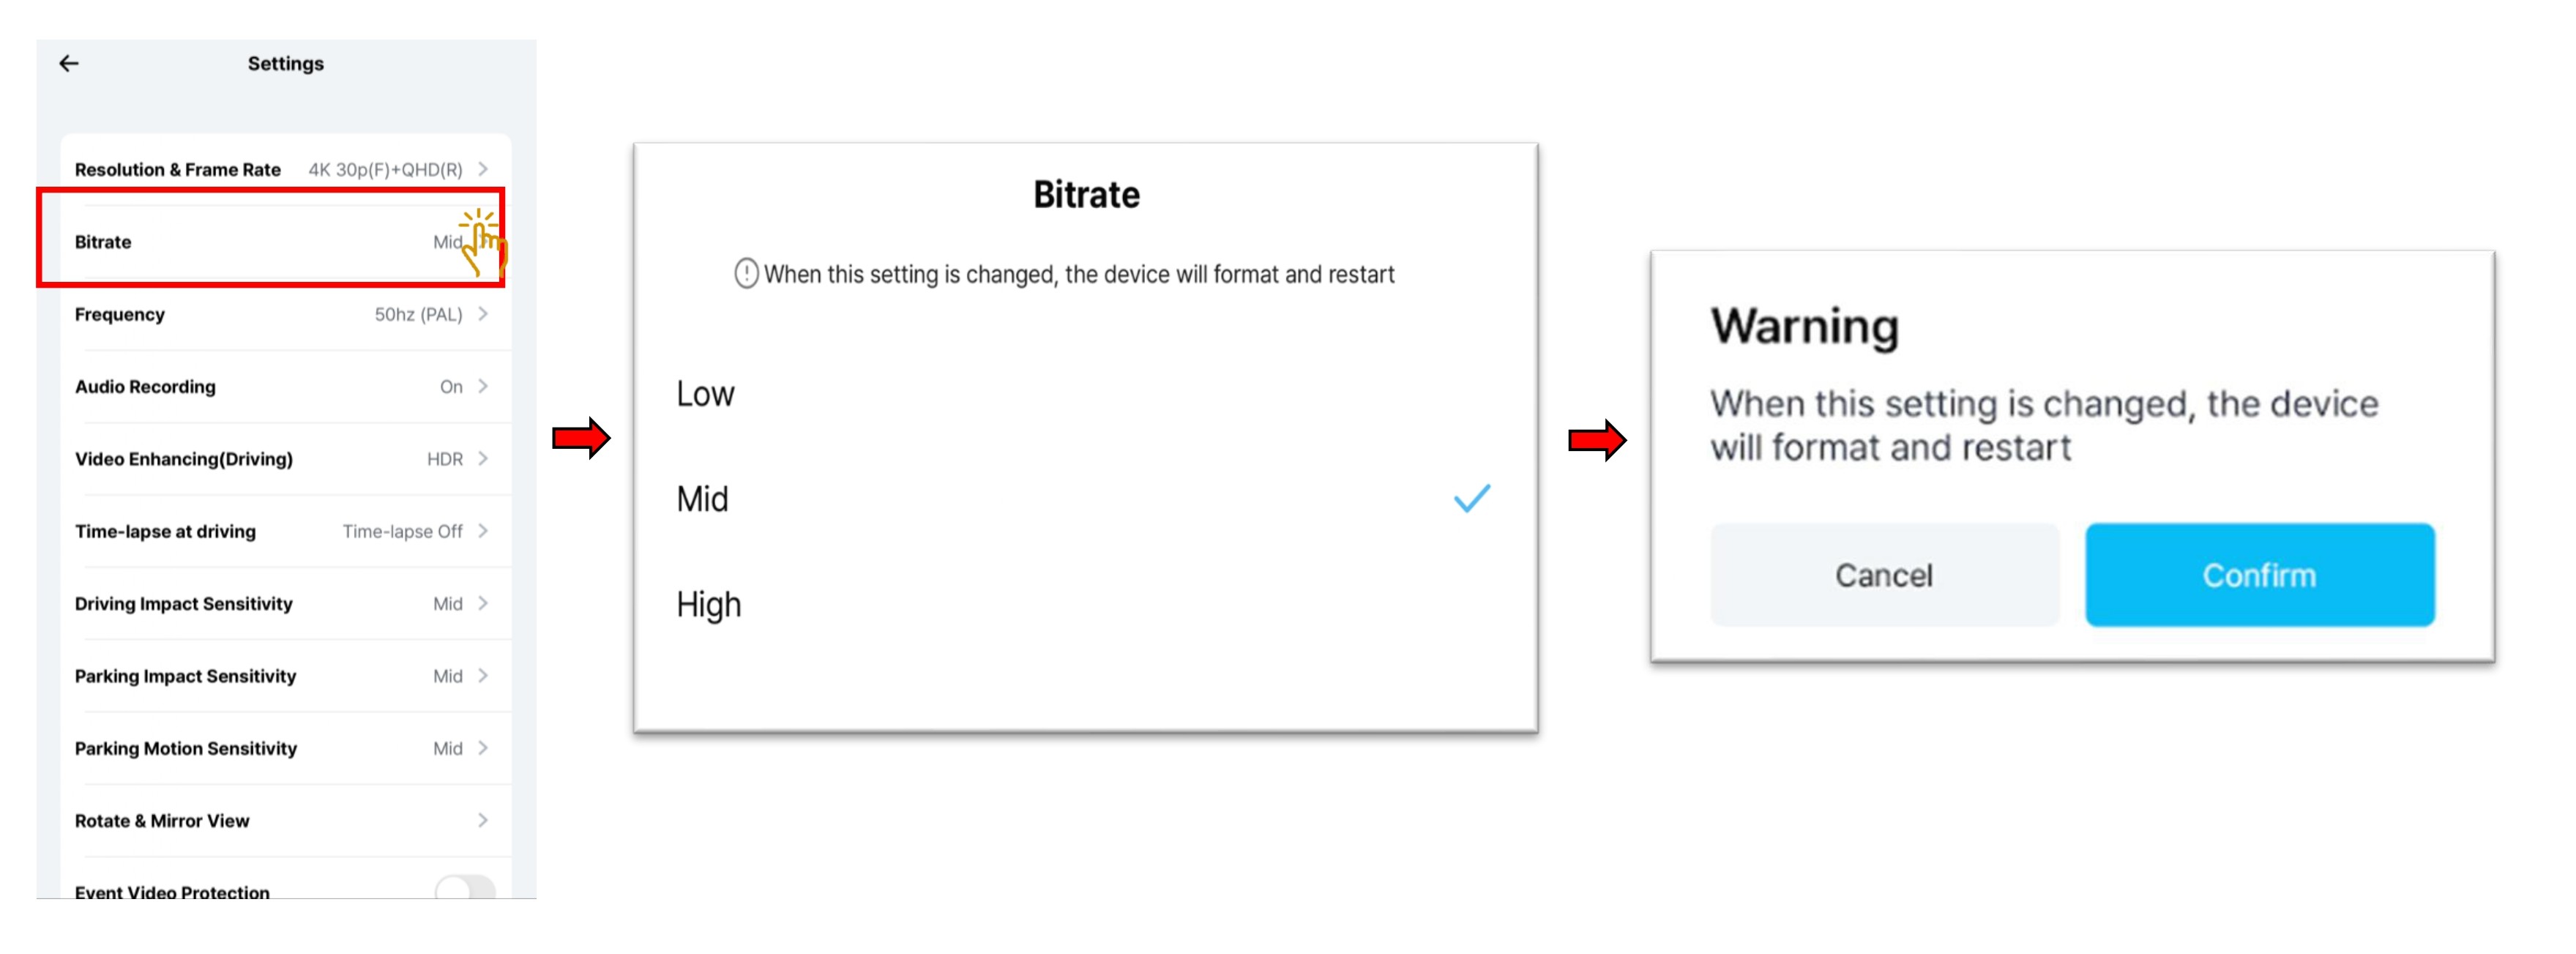
- Select "Bitrate".
- Choose the bitrate " High", "Mid" or "Low" type your preference.
- The bitrate setting adjusts the amount of data recorded per second. Higher bitrates improve video quality but also increase file size, which may reduce recording time on the Micro SD Card and its life span. Lower bitrates allow for longer recording times but may slightly reduce video quality.
If you change Bitrate settings, the Micro SD Card will be formatted, and the device will automatically reboot afterward. Therefore, it is recommended to save a copy of your videos on an Micro SD Card before changing the resolution and bitrate.
5.1.3 Setting - Camera - Frequency
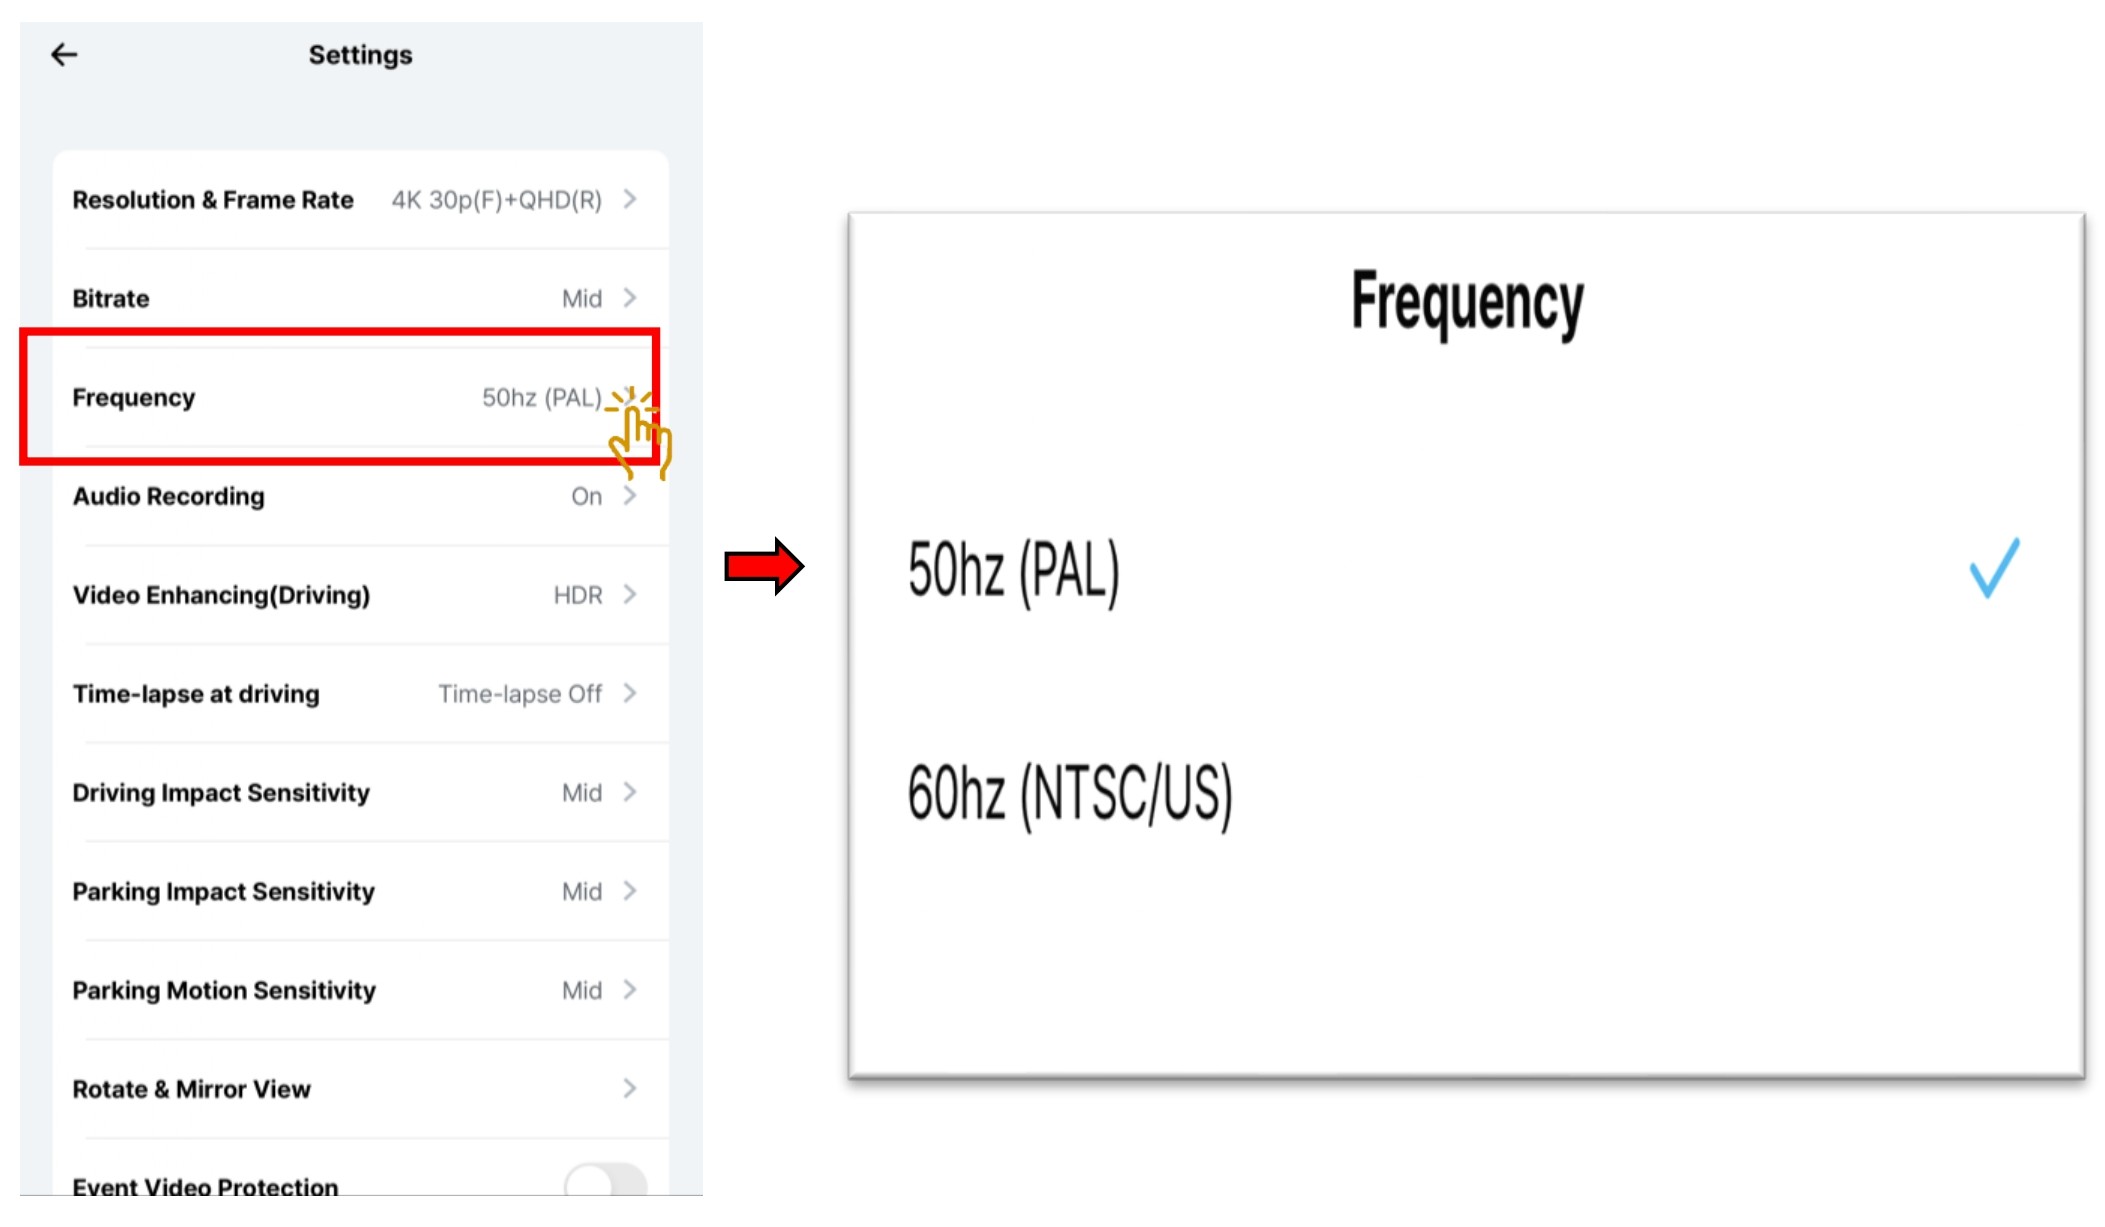
- Choose "Frequency".
- To minimize flicker in the video, select proper hz. There may be different hz from country to country.
5.1.4 Setting - Camera - Audio Recording
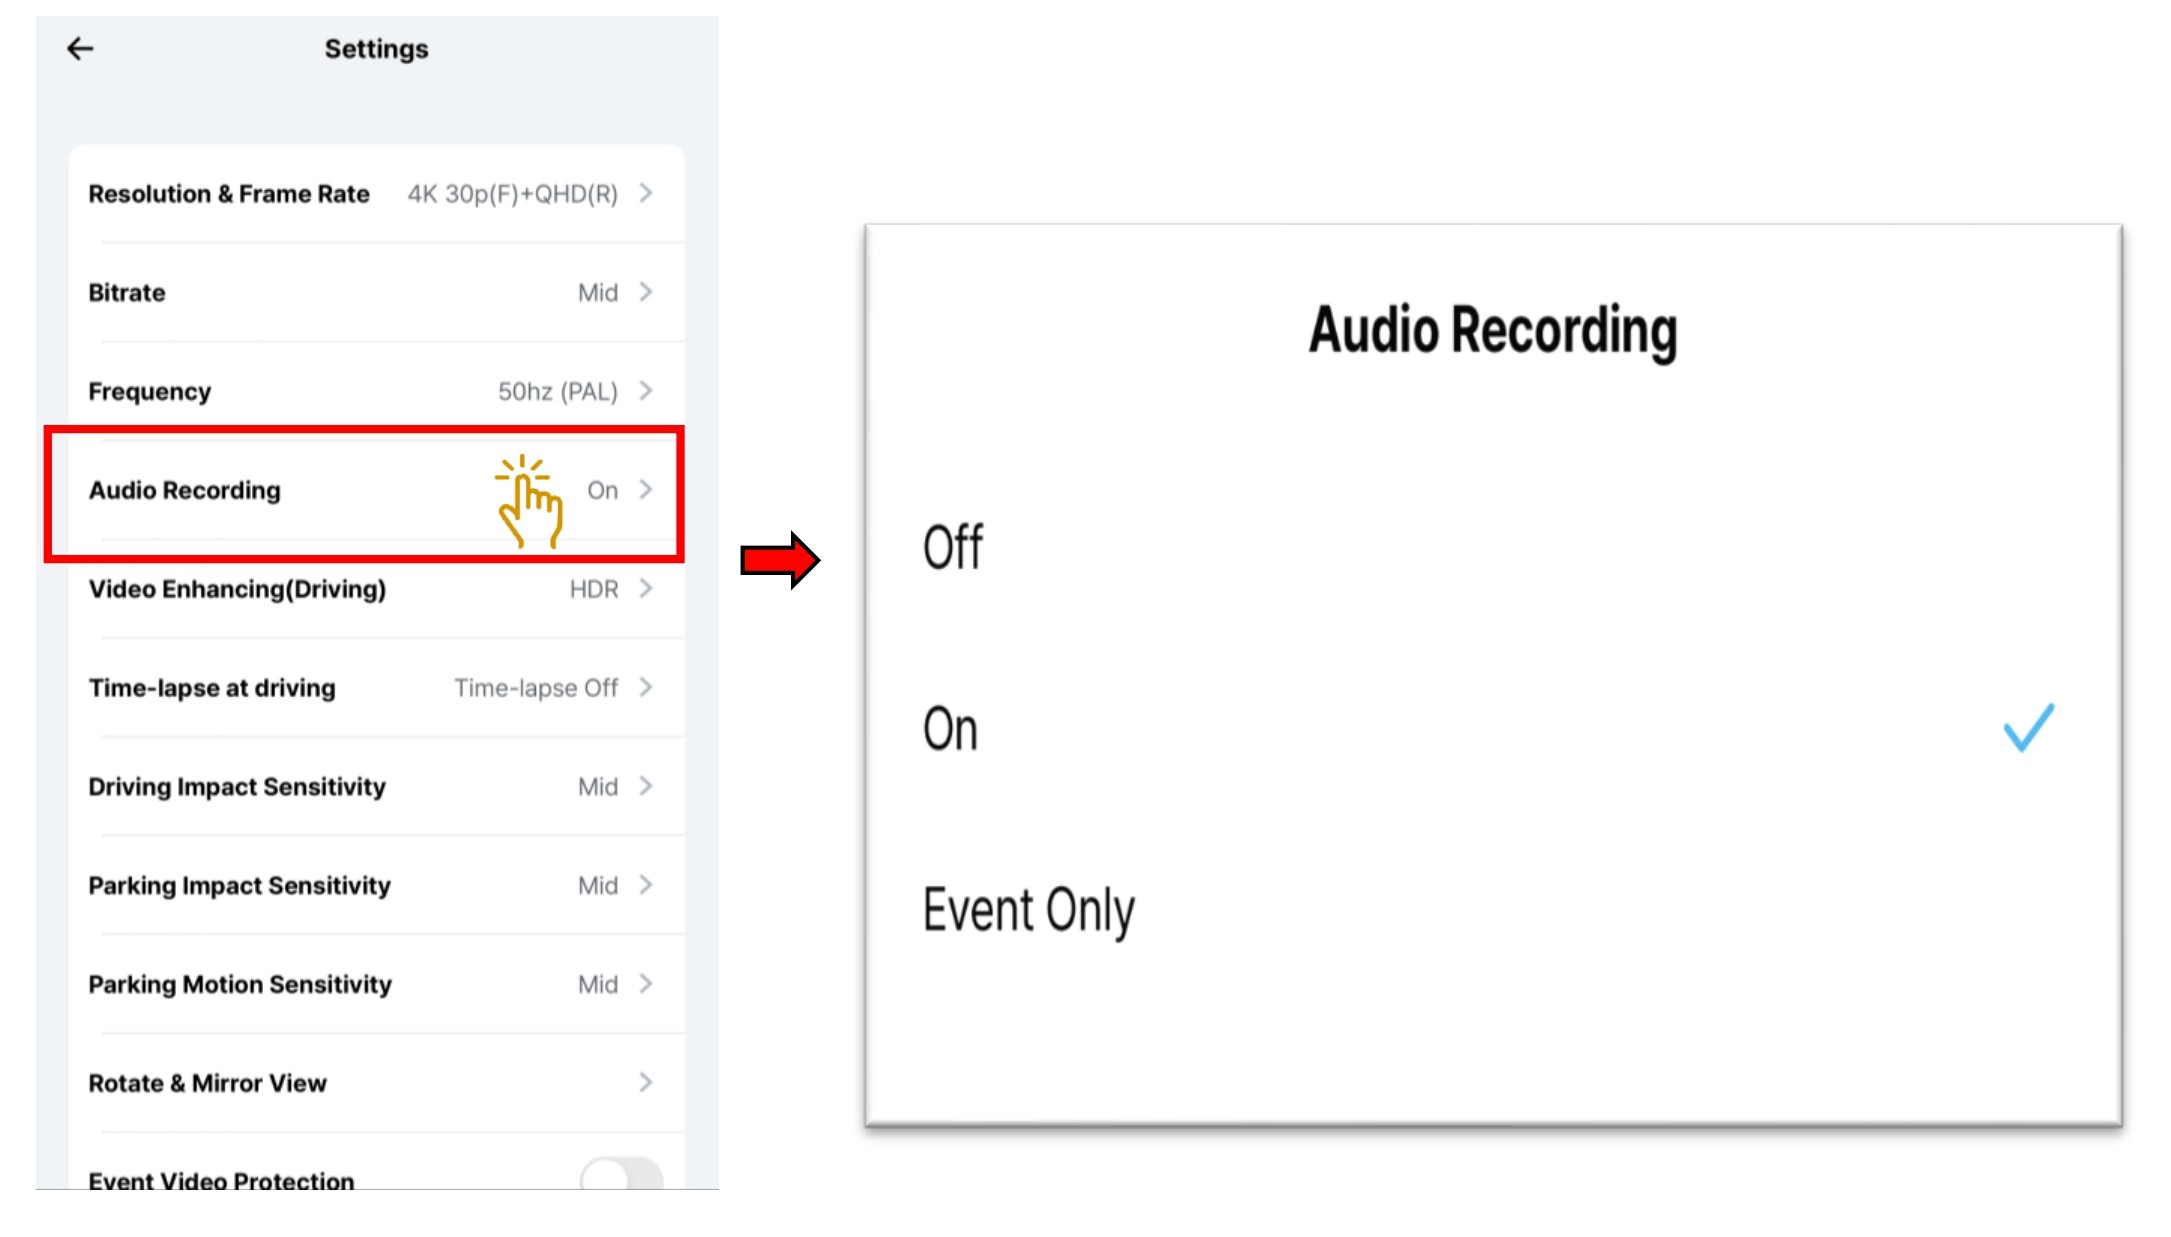
- Select "Audio Recording".
- Choose either
OFF - Voice Recording Off
ON - Voice Recording On
Event Only - In the event of an accident, the recording will capture all the sounds at that moment only.
5.1.5 Setting - Camera - Video Enhancing
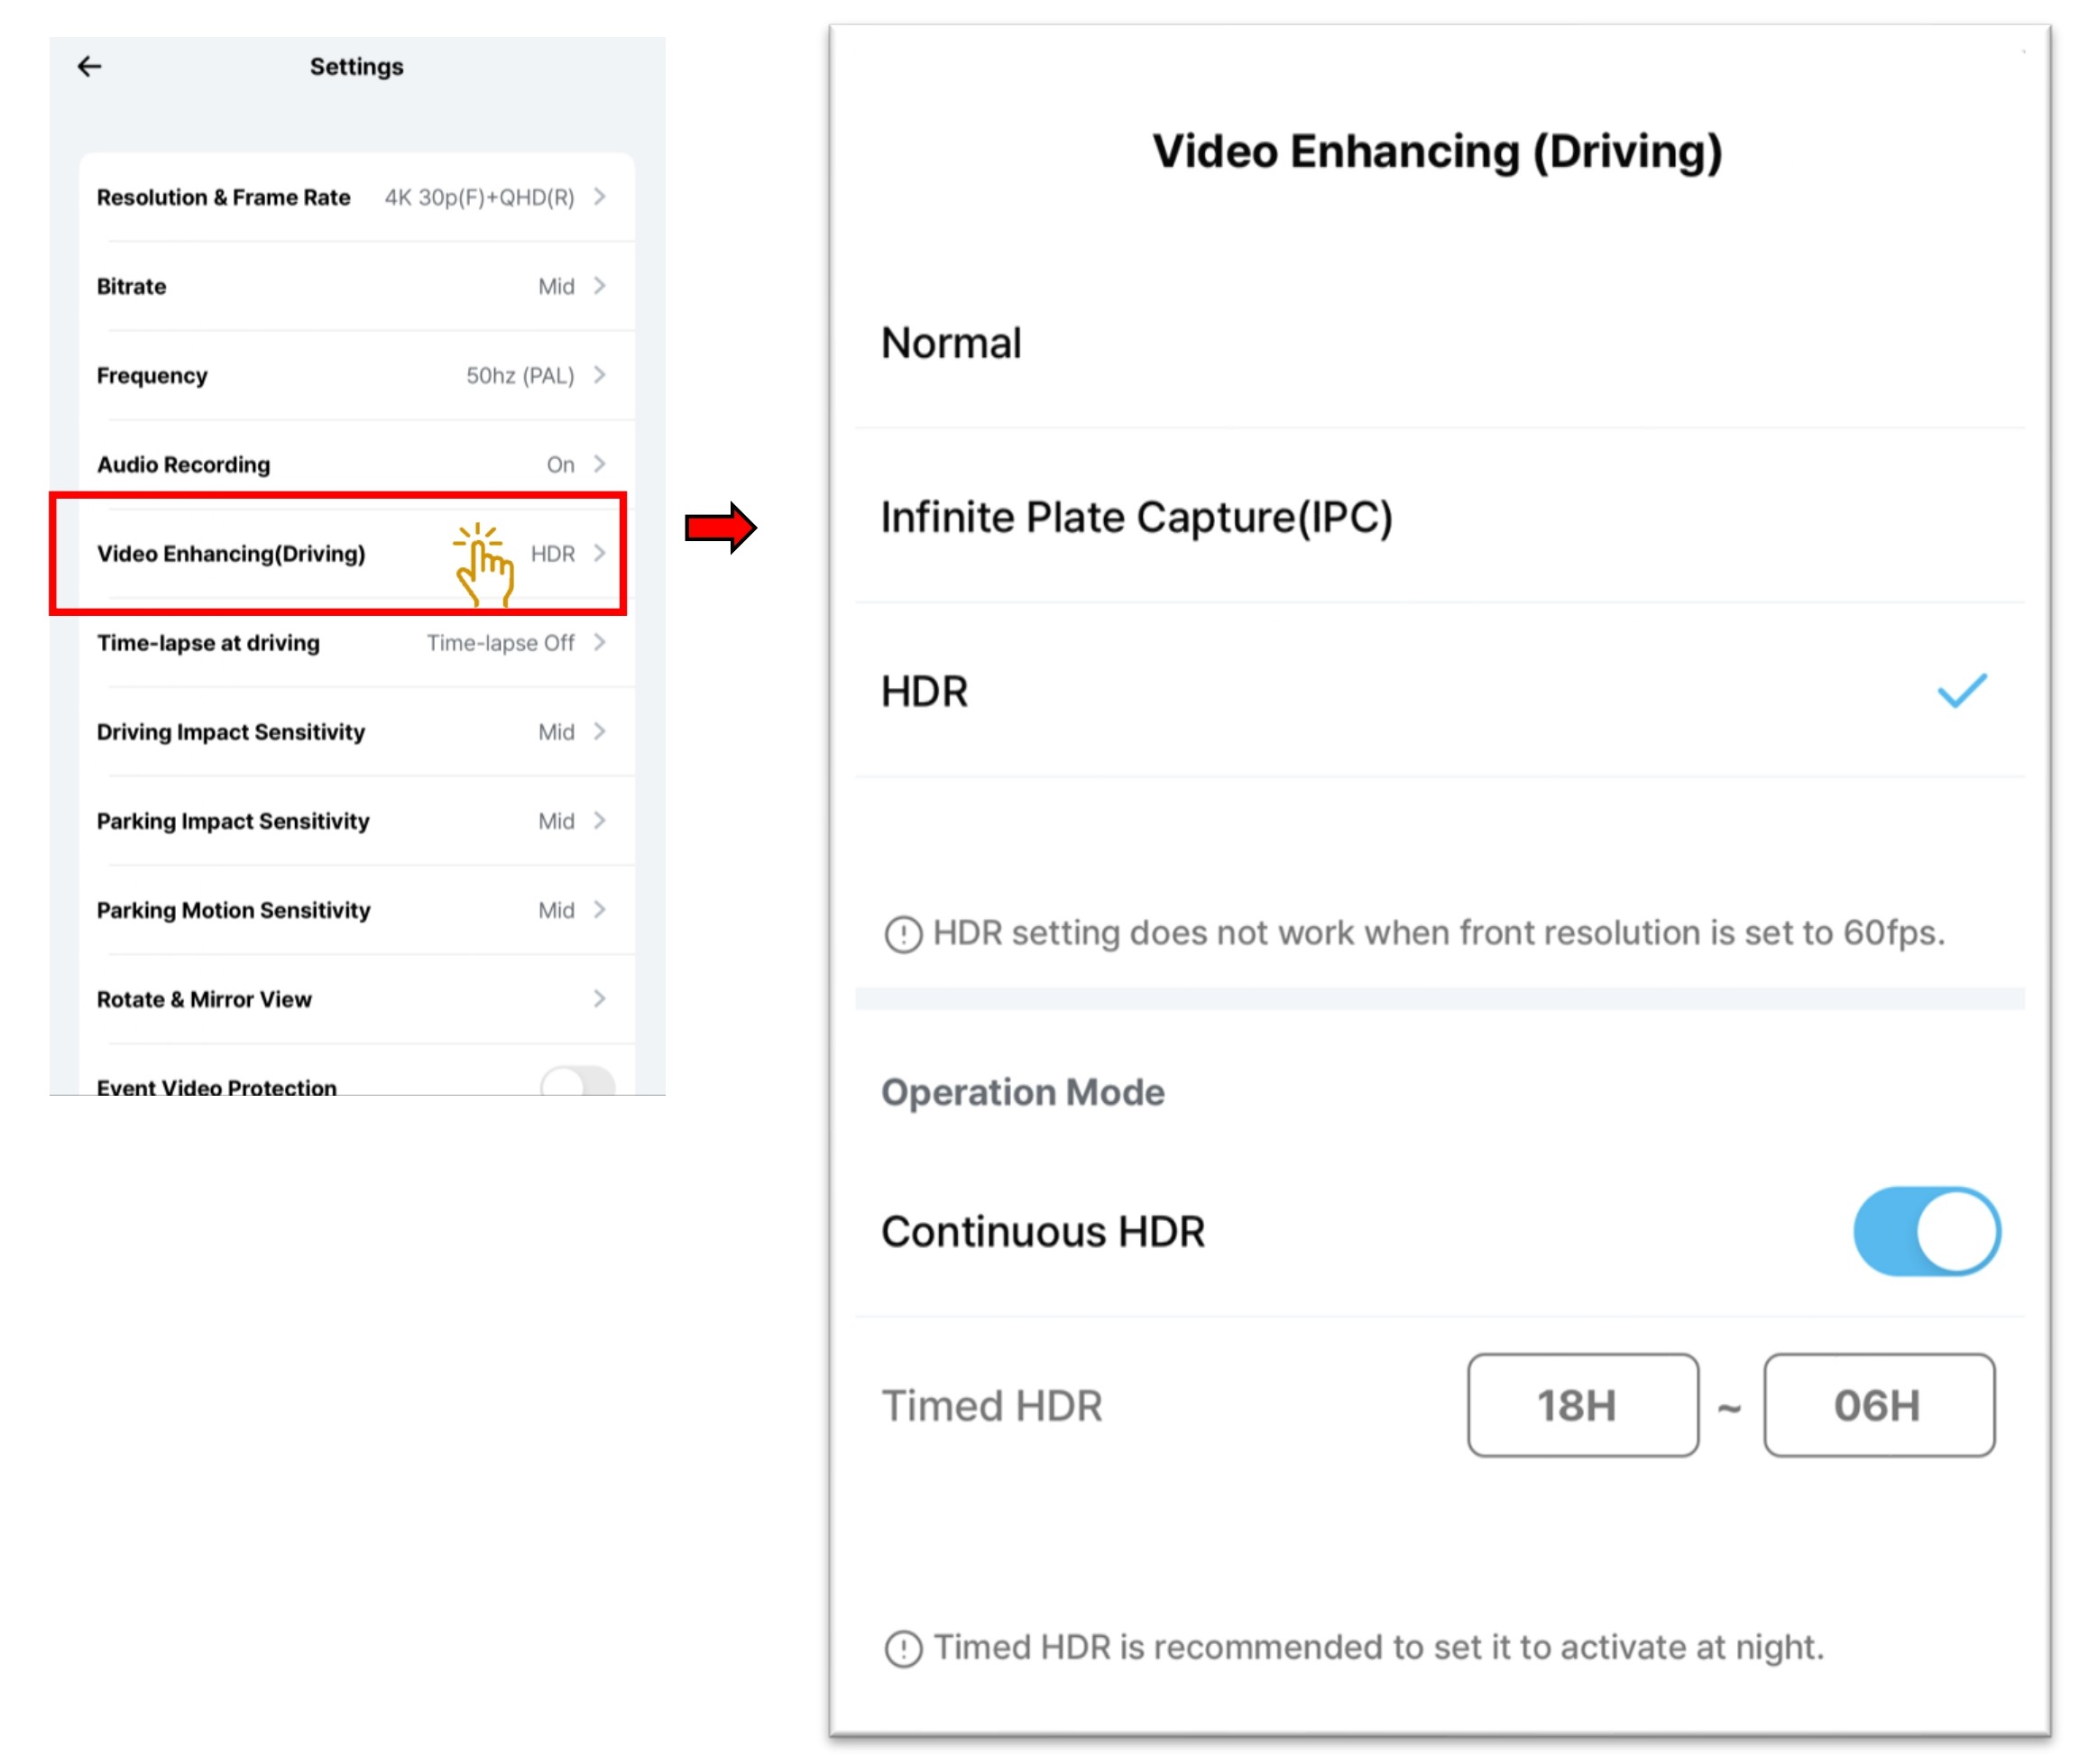
- Select "Video Enhancing".
- Choose either
Normal - Normal video recording.
HDR + IPC - Infinite Plate Capture is based on HDR, displaying images by focusing on license plates so that license plates can be easily identified.
HDR - The HDR(High Dynamic Range) is for expressing a richer contrast between light and dark areas in photos or videos. - HDR+ IPC and HDR Timer option can automatically turn on or off during the driving recording.
- If you want to set timer on HDR + IPC / HDR, click on "Operation Mode".
- If turn "On" Continuous On, HDR + IPC / HDR will be on continuously.
- If turn "Off" the Continuous On, you can set the timer accordingly. This setting is recommended to activate at night time.
InformationHDR / Premium Night Vision is not supported at 4K 60FPS and QHD 60FPS
5.1.6 Setting - Camera - Time-Lapse at Driving
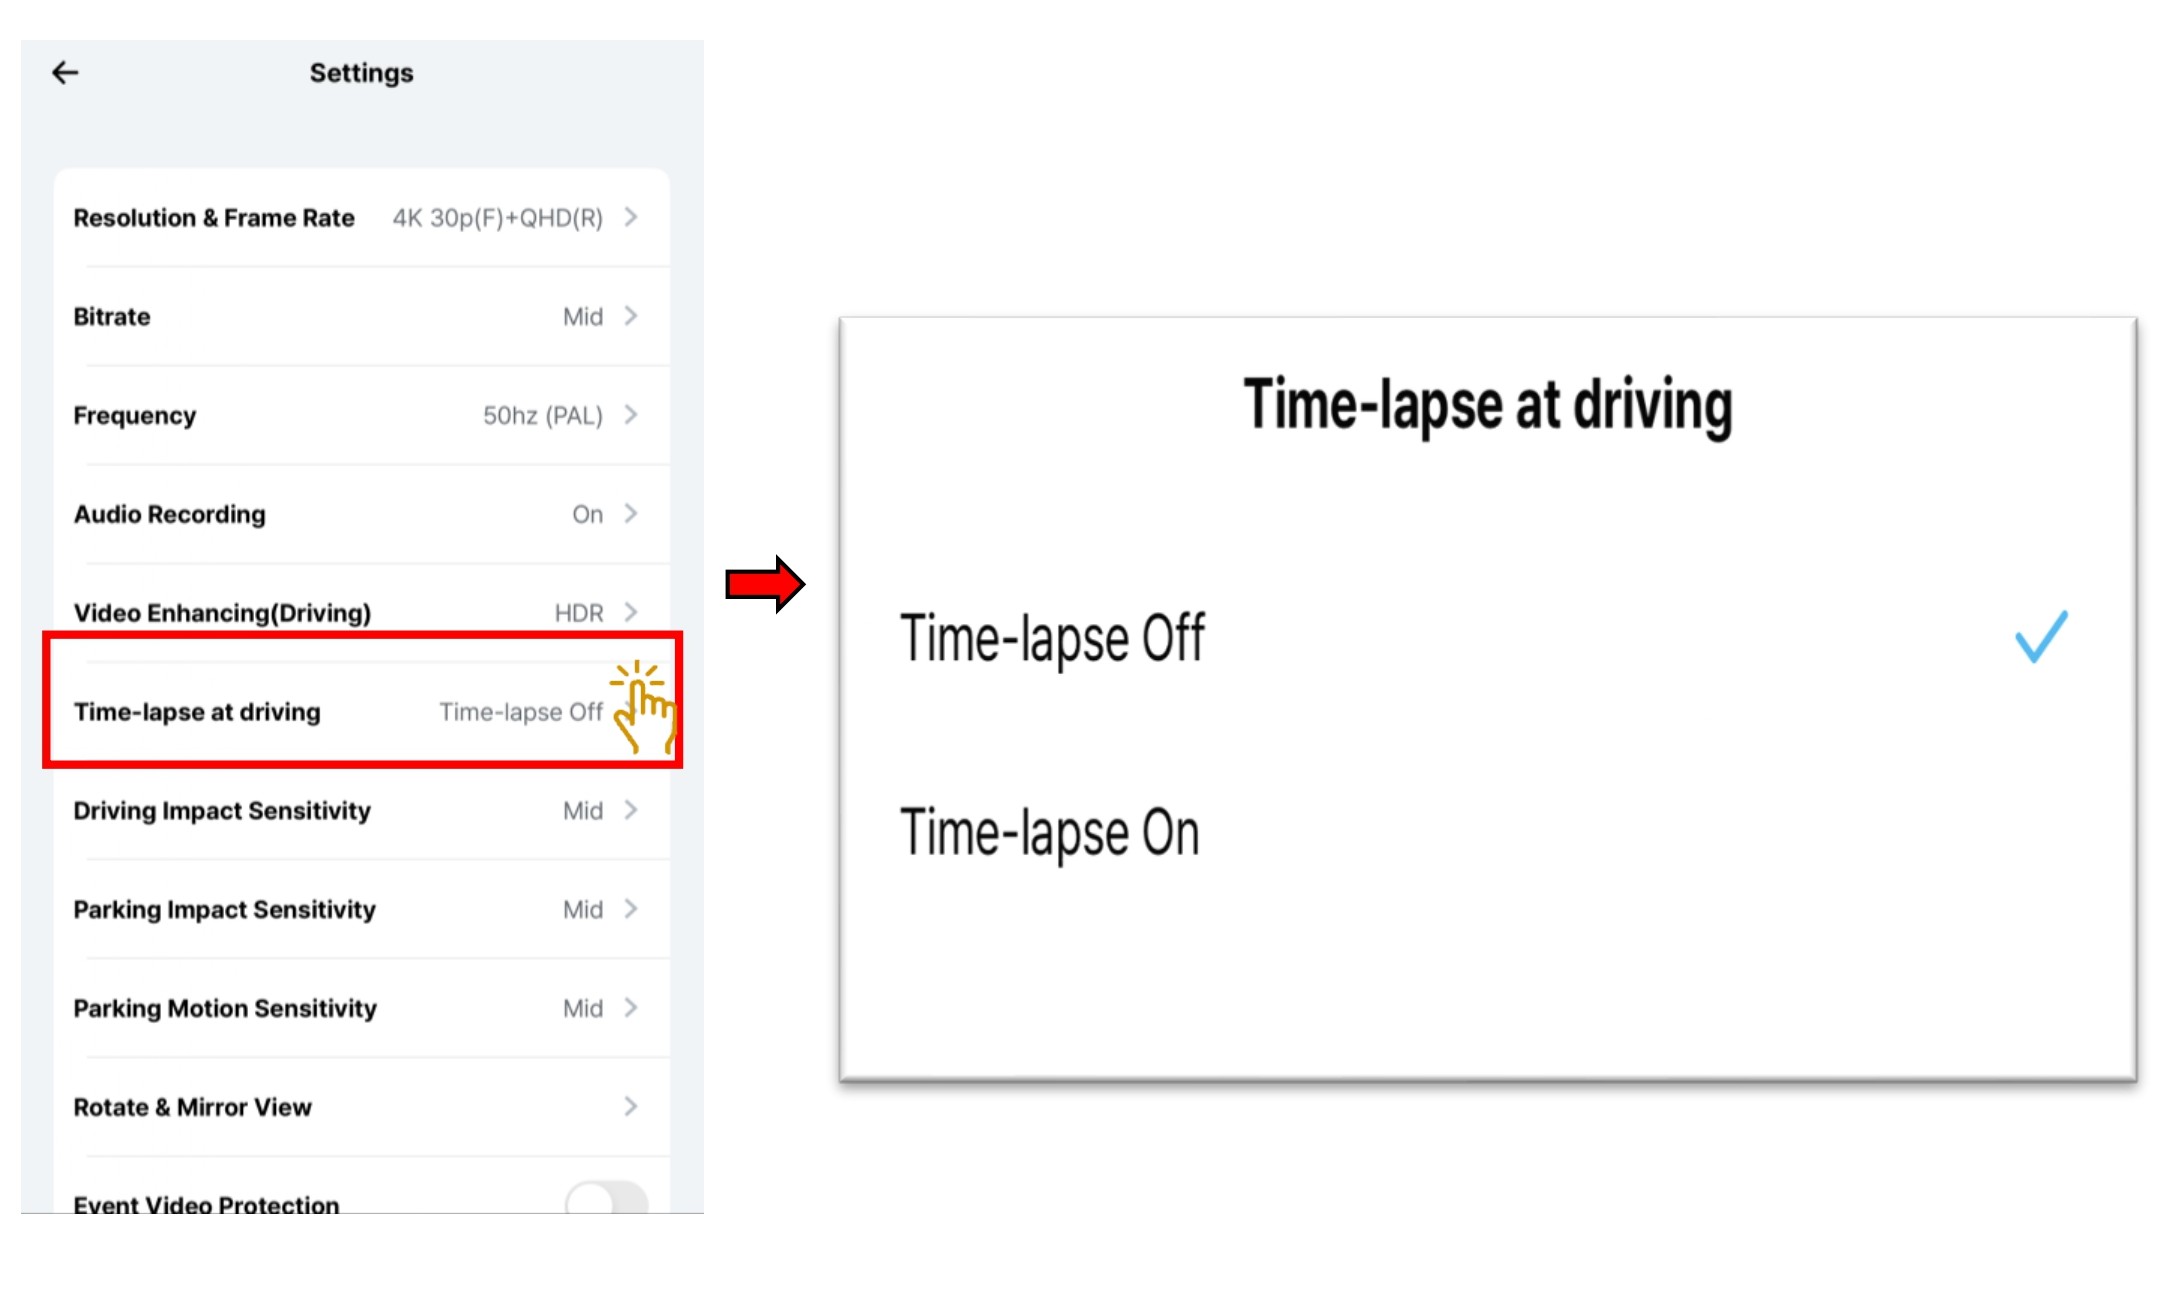
- Select "Time-Lapse at Driving".
- Choose to turn "On" or "Off".
- Time-lapse recording mode is recording at 1 fps instead of 30 fps (or more). Event recording files captured during time-lapse mode, including impact events and manual recordings, are saved at their originally set framerate.
5.1.7 Setting - Camera - Event Sensitivity
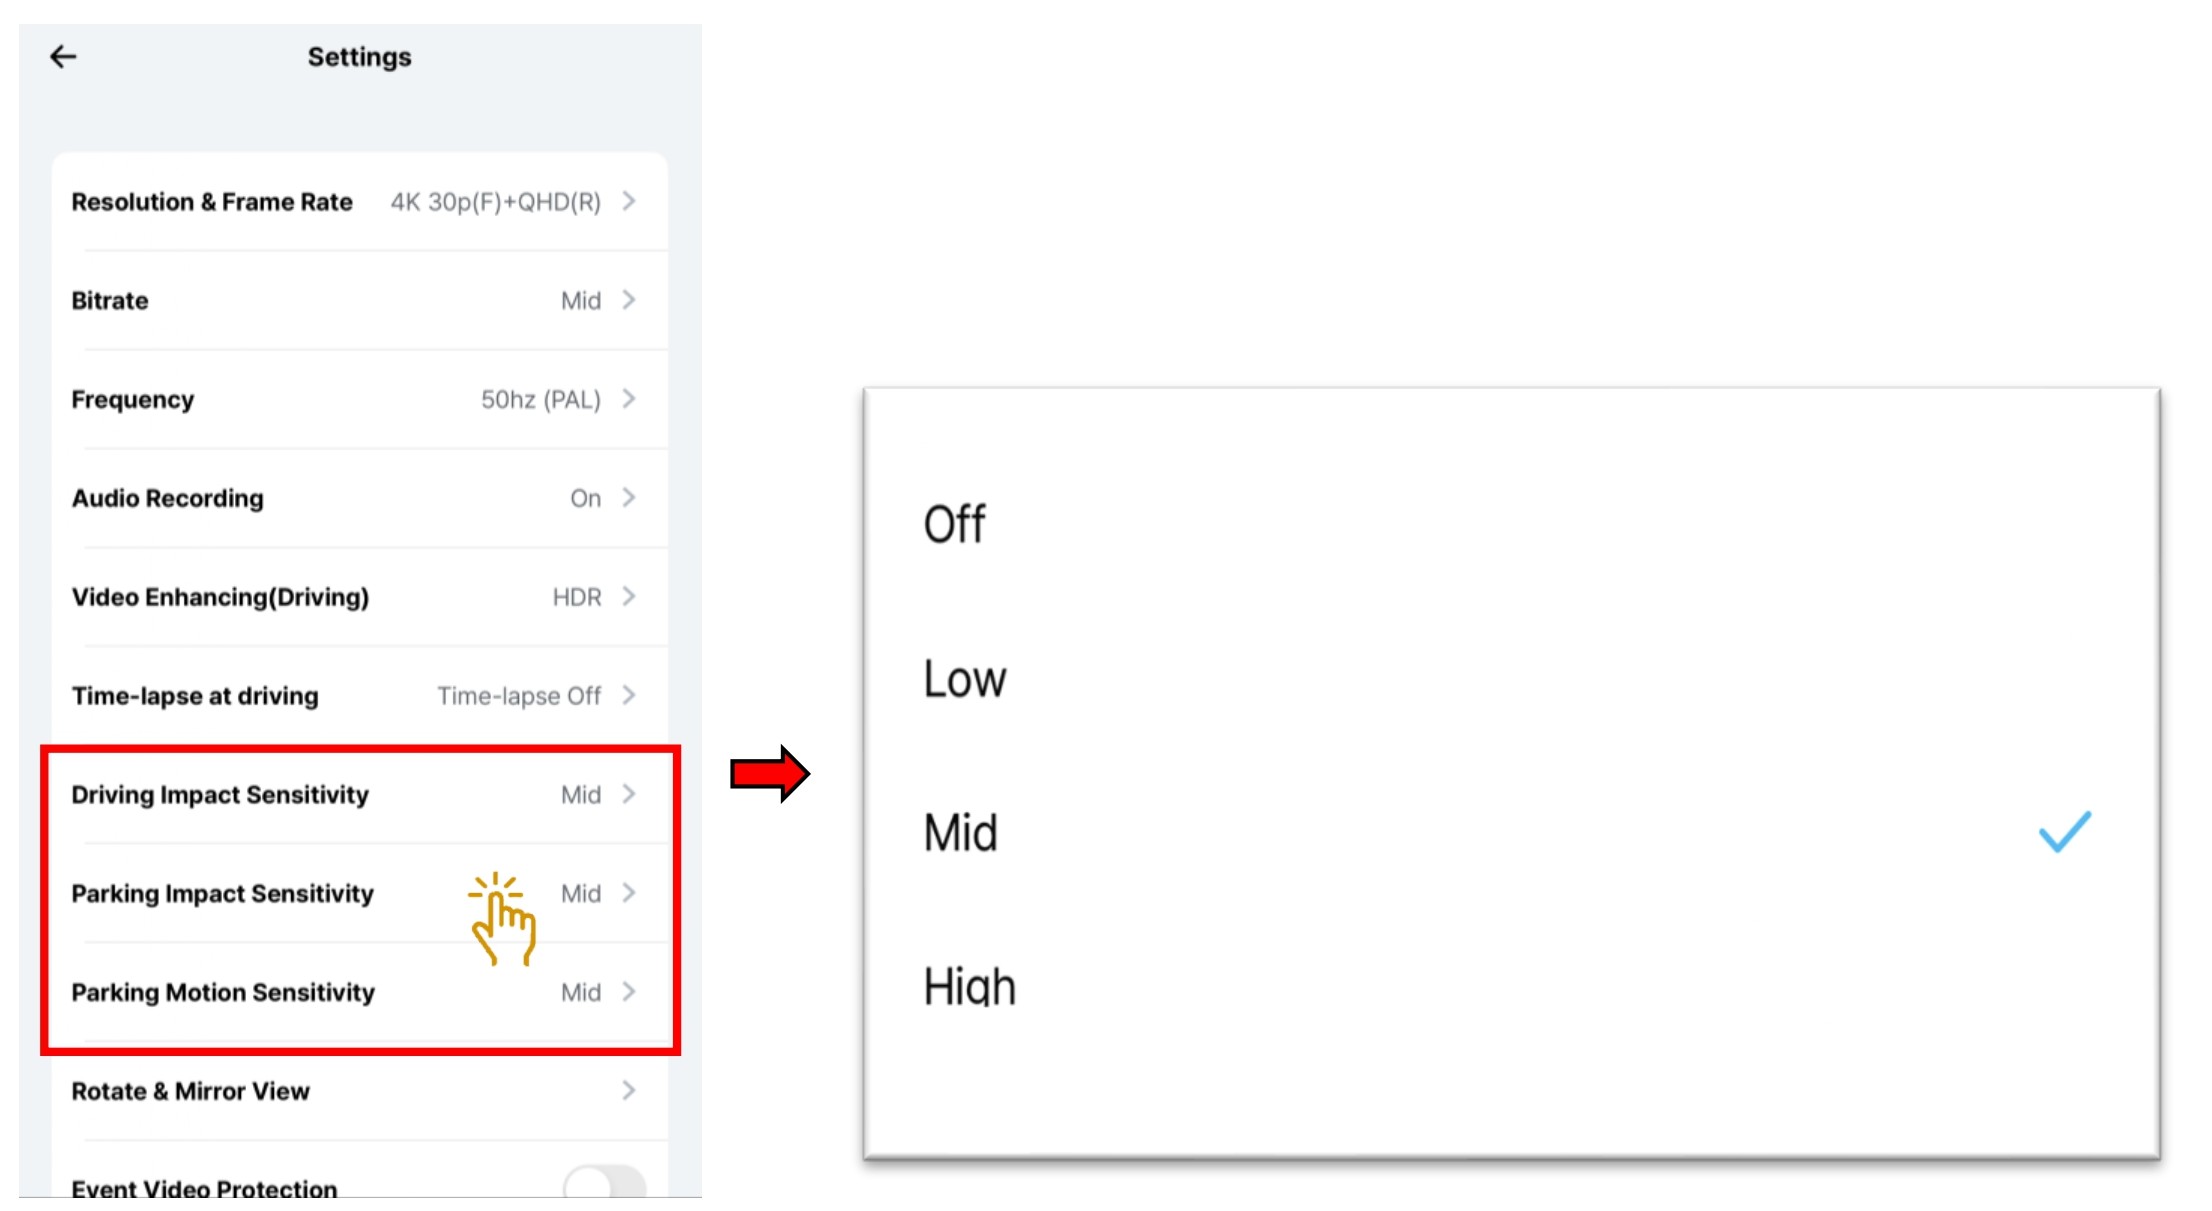
- Select "Driving Impact Sensitivity" / "Parking Impact Sensitivity" / "Parking Motion Sensitivity".
- Choose either the following to set the sensor sensitivity
Driving Impact Sensitivity - "Off" . "Low", "Mid" or "High"
Parking Impact Sensitivity - "Off" . "Low", "Mid" or "High"
Parking Motion Sensitivity - "Off" . "Low", "Mid" or "High" - For driving, impact sensitivity based on the g-sensor can be set from low to high. For parking, motion and impact sensitivity can be configured separately. If motion sensitivity is turned off, only impacts will trigger recordings during parking.
5.1.8 Setting - Camera - Rotate & Mirror View
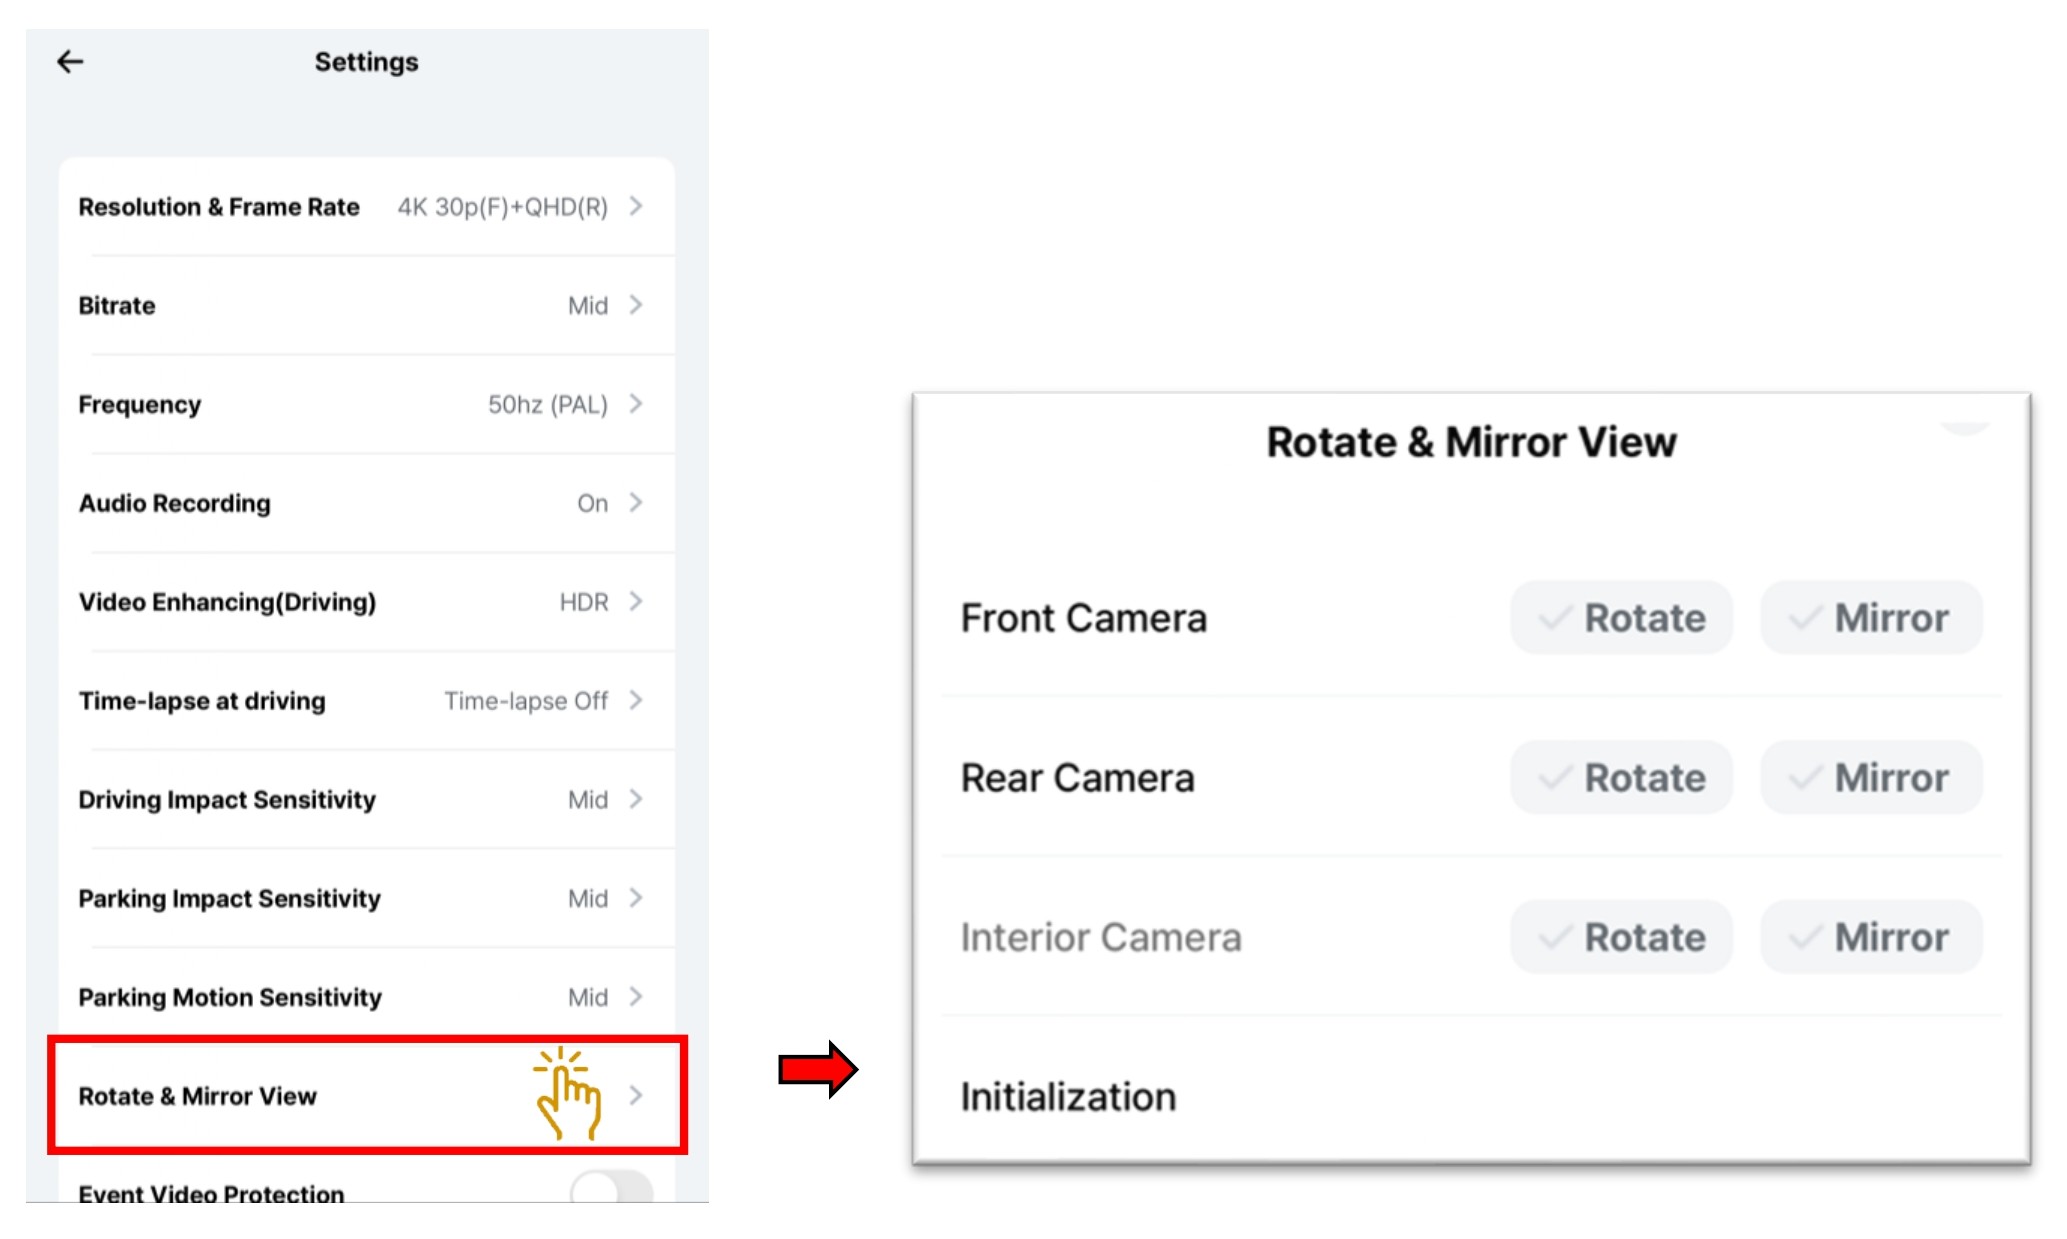
- Select "Rotate & Mirror View".
- Choose either the following to manually rotate or flip the video.
Front Camera - "Rotate" , "Mirror"
Rear Camera - "Rotate" , "Mirror" - Initialization will reset the viewing settings, and both “Rotate” and “Mirror” will be set to Off.
5.1.9 Setting - Camera - Event Video Protection
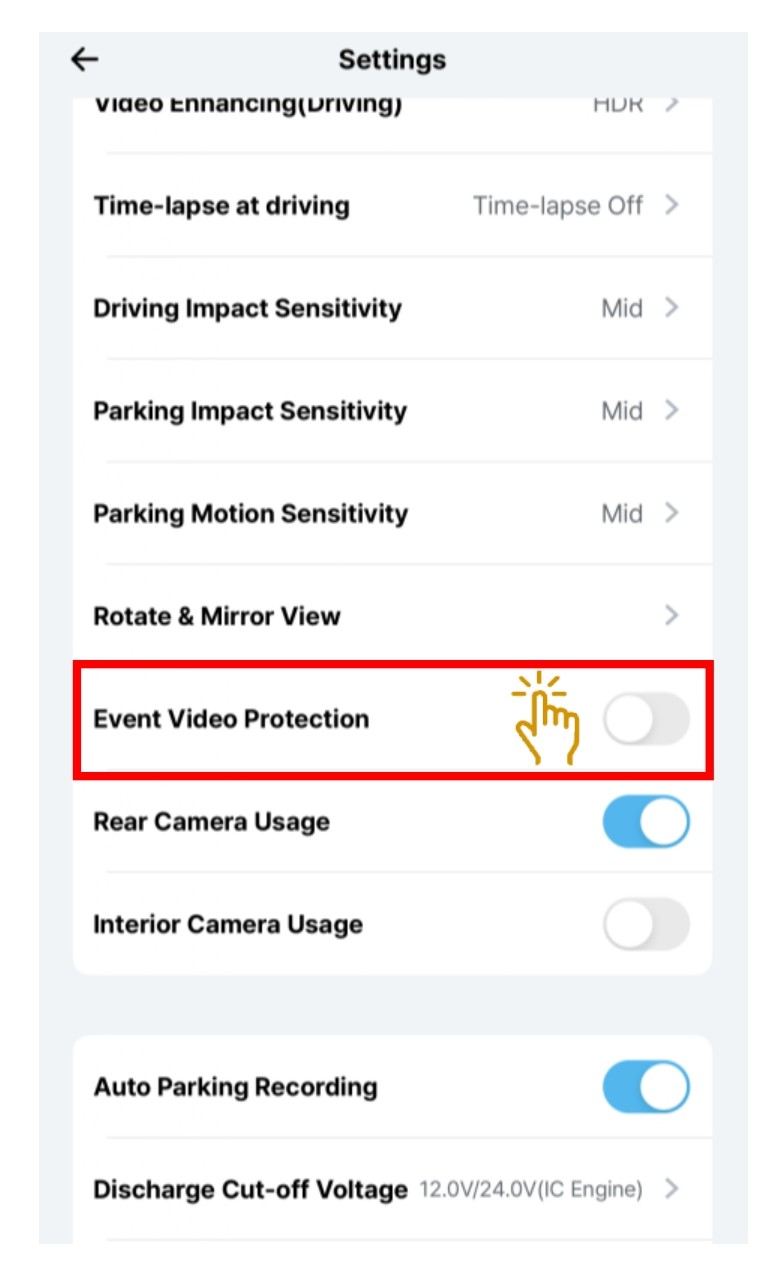
- Select "Event Video Protection ".
- Toggle to turn "On" or "Off".
- If an impact is detected by the G-sensor, it will be saved as an event recording. These files will not be overwritten when event video protection is enabled.
If the event recording folder is full, event recording will stop. In this case, a device pop-up and voice guidance will prompt the user to delete files.
To ensure stable recording, we recommend backing up event folder files regularly.
5.1.10 Setting - Camera - Rear Camera Usage
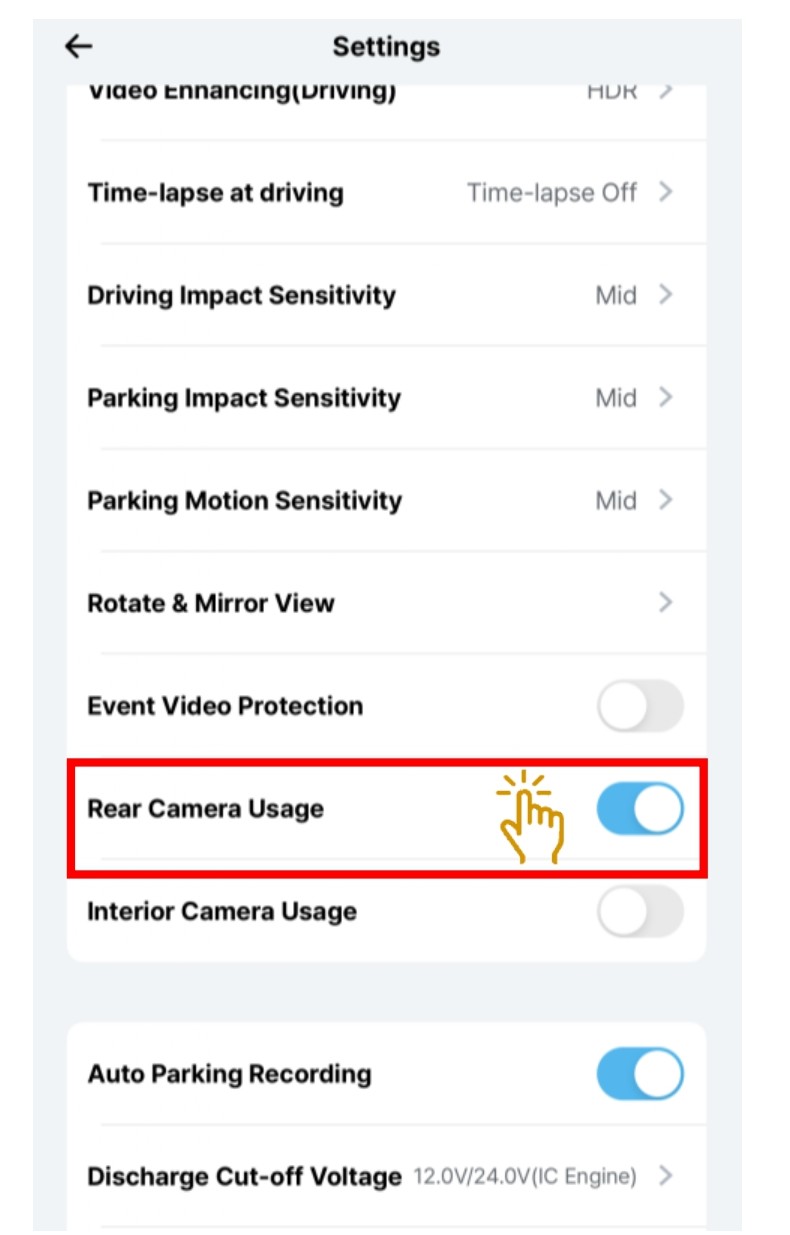
- Select "Rear Camera Usage ".
- Toggle to turn "On" or "Off" for Rear Camera.
- You can manually select the camera(s) you wish to record from.
Since front camera recording starts automatically when the main unit is powered on, you can only select whether to record from the rear and/or interior cameras.
5.1.11 Setting - Camera - Interior Camera Usage.
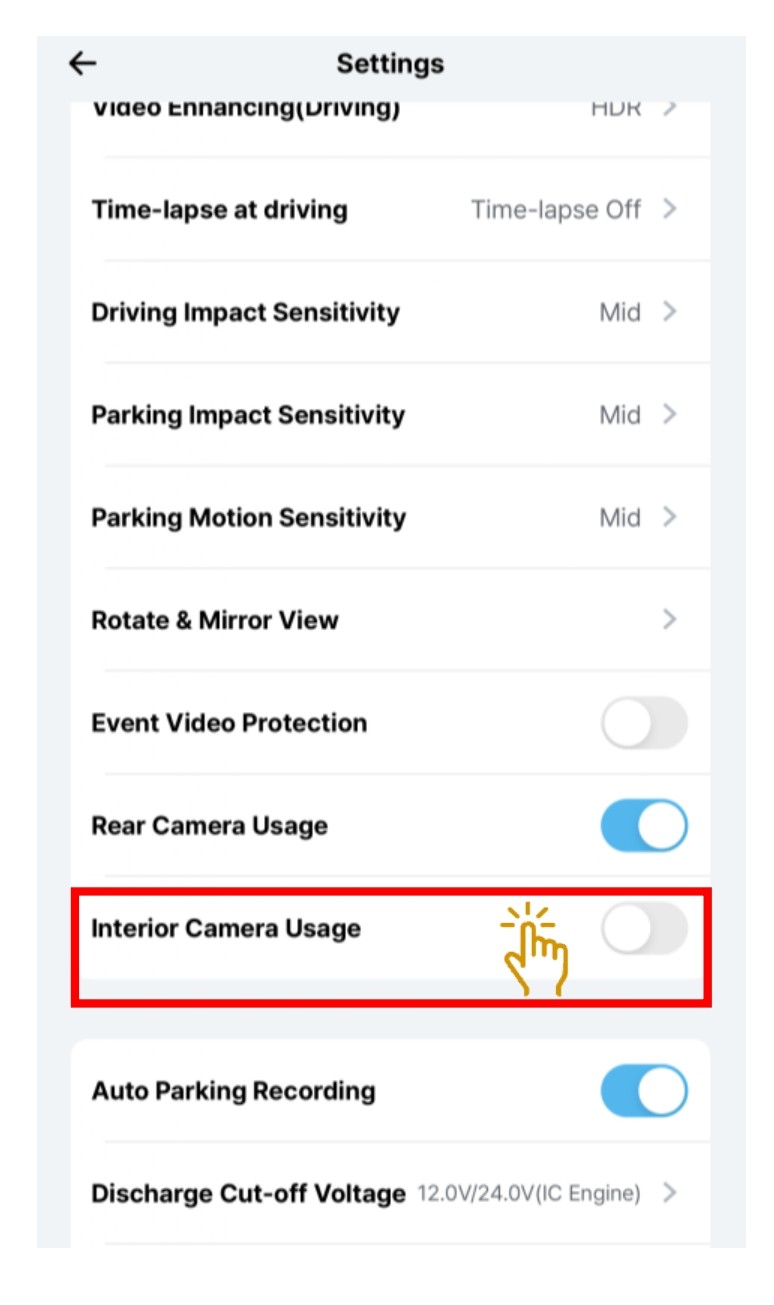
- Choose "Interior Camera Usage ".
- Toggle to turn "On" or "Off" for Interior Camera.
- You can manually select the camera(s) you wish to record from.
Since front camera recording starts automatically when the main unit is powered on, you can only select whether to record from the rear and/or interior cameras.
5.1.12 Setting - Camera - Privacy Mode
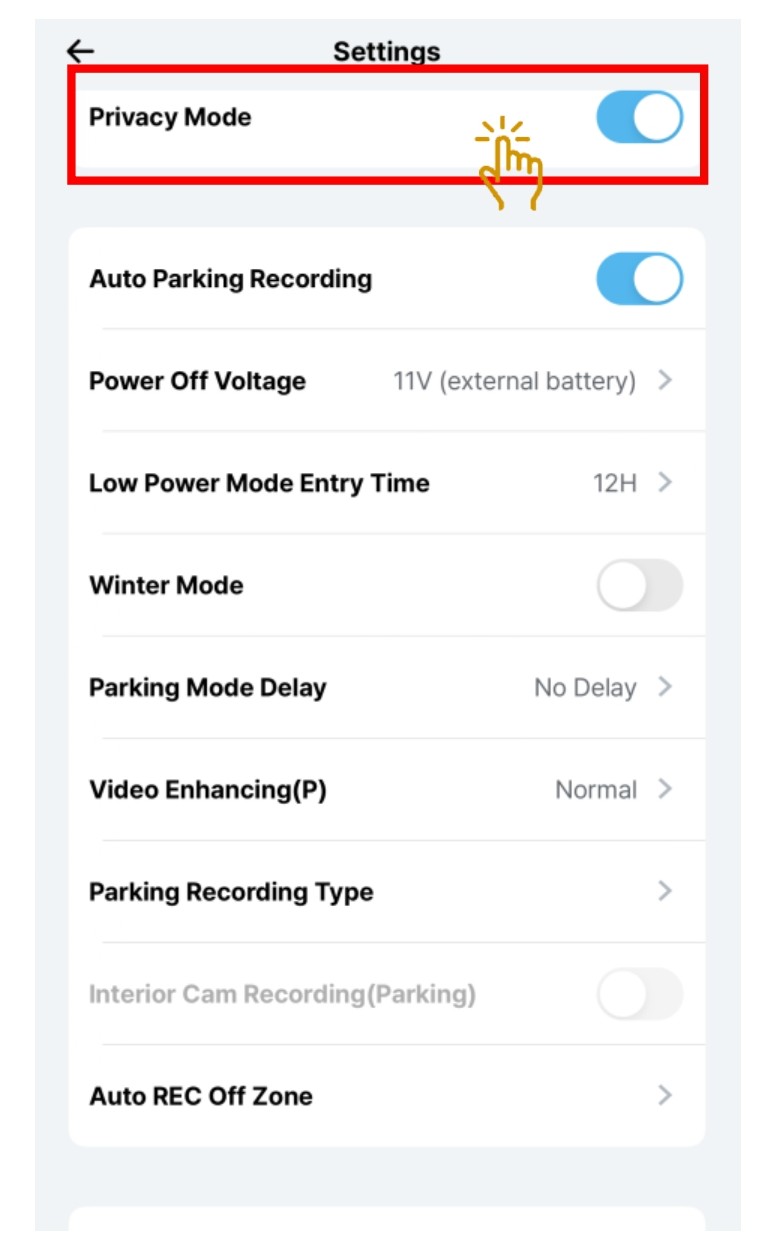
- Select "Privacy Mode " .
- Toggle to turn "On" or "Off".
- This feature deactivates audio recording and the interior camera.
Pressing and holding the View Mode button on the device performs the same function.
5.2 Setting - Parking Recording Settings
5.2.1 Setting - Parking Recording - Auto Parking Recording

- Select "Auto Parking Recording "
- Toggle to turn "On" or "Off"
- Choose whether or not to automatically switch to parking mode. (Selecting “Off” will fully power down the device and disable recording while the vehicle is parked). In Live View, you can also turn the feature On/Off by pressing and holding the device’s Confirm button.
5.2.2 Setting - Parking Recording - Power Off Voltage.
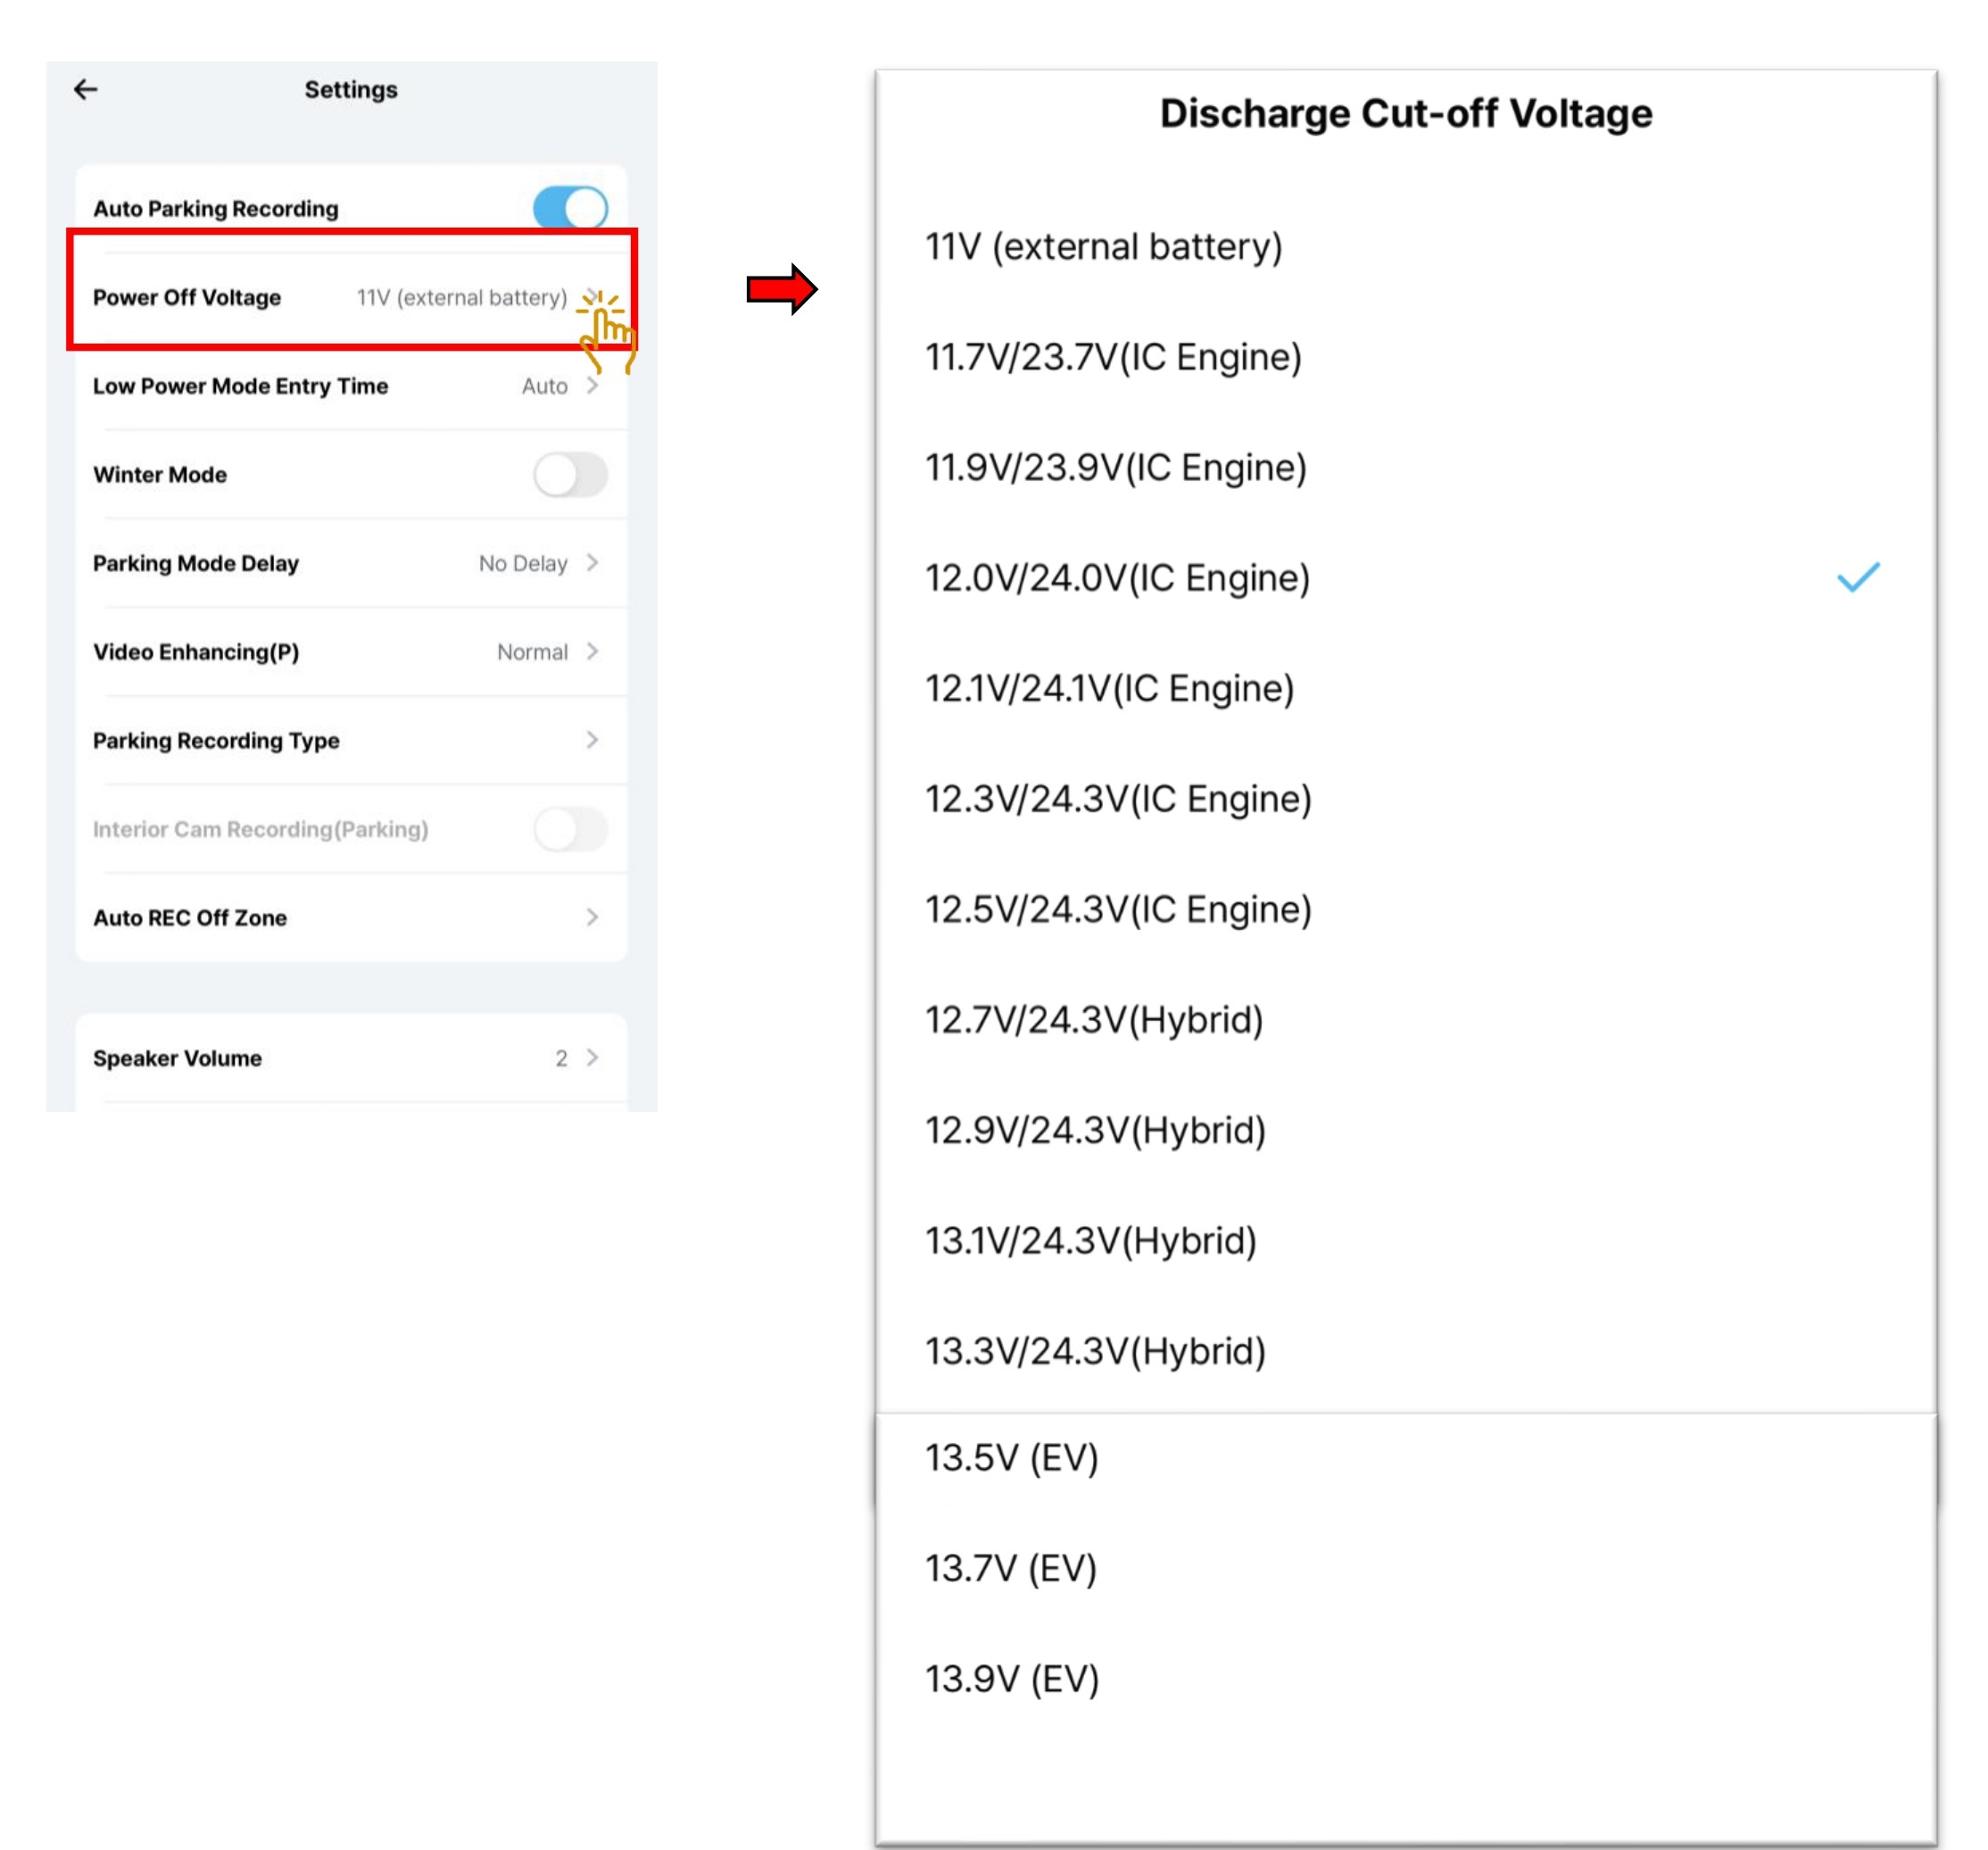
After entering the parking mode, Vehicle Battery Protection can prevent discharge of the vehicle battery.
- Select " Power Off Voltage".
- Choose the pre-set voltage cut off settings.
- If the vehicle's battery voltage drops below a predetermined level, the device will stop parking recording and remain turned off until the vehicle is started again.
- Vehicle types (IC Engine, Hybrid, EV) are provided for reference only.
5.2.3 Setting - Parking Recording - Low Power Mode Entry Time.
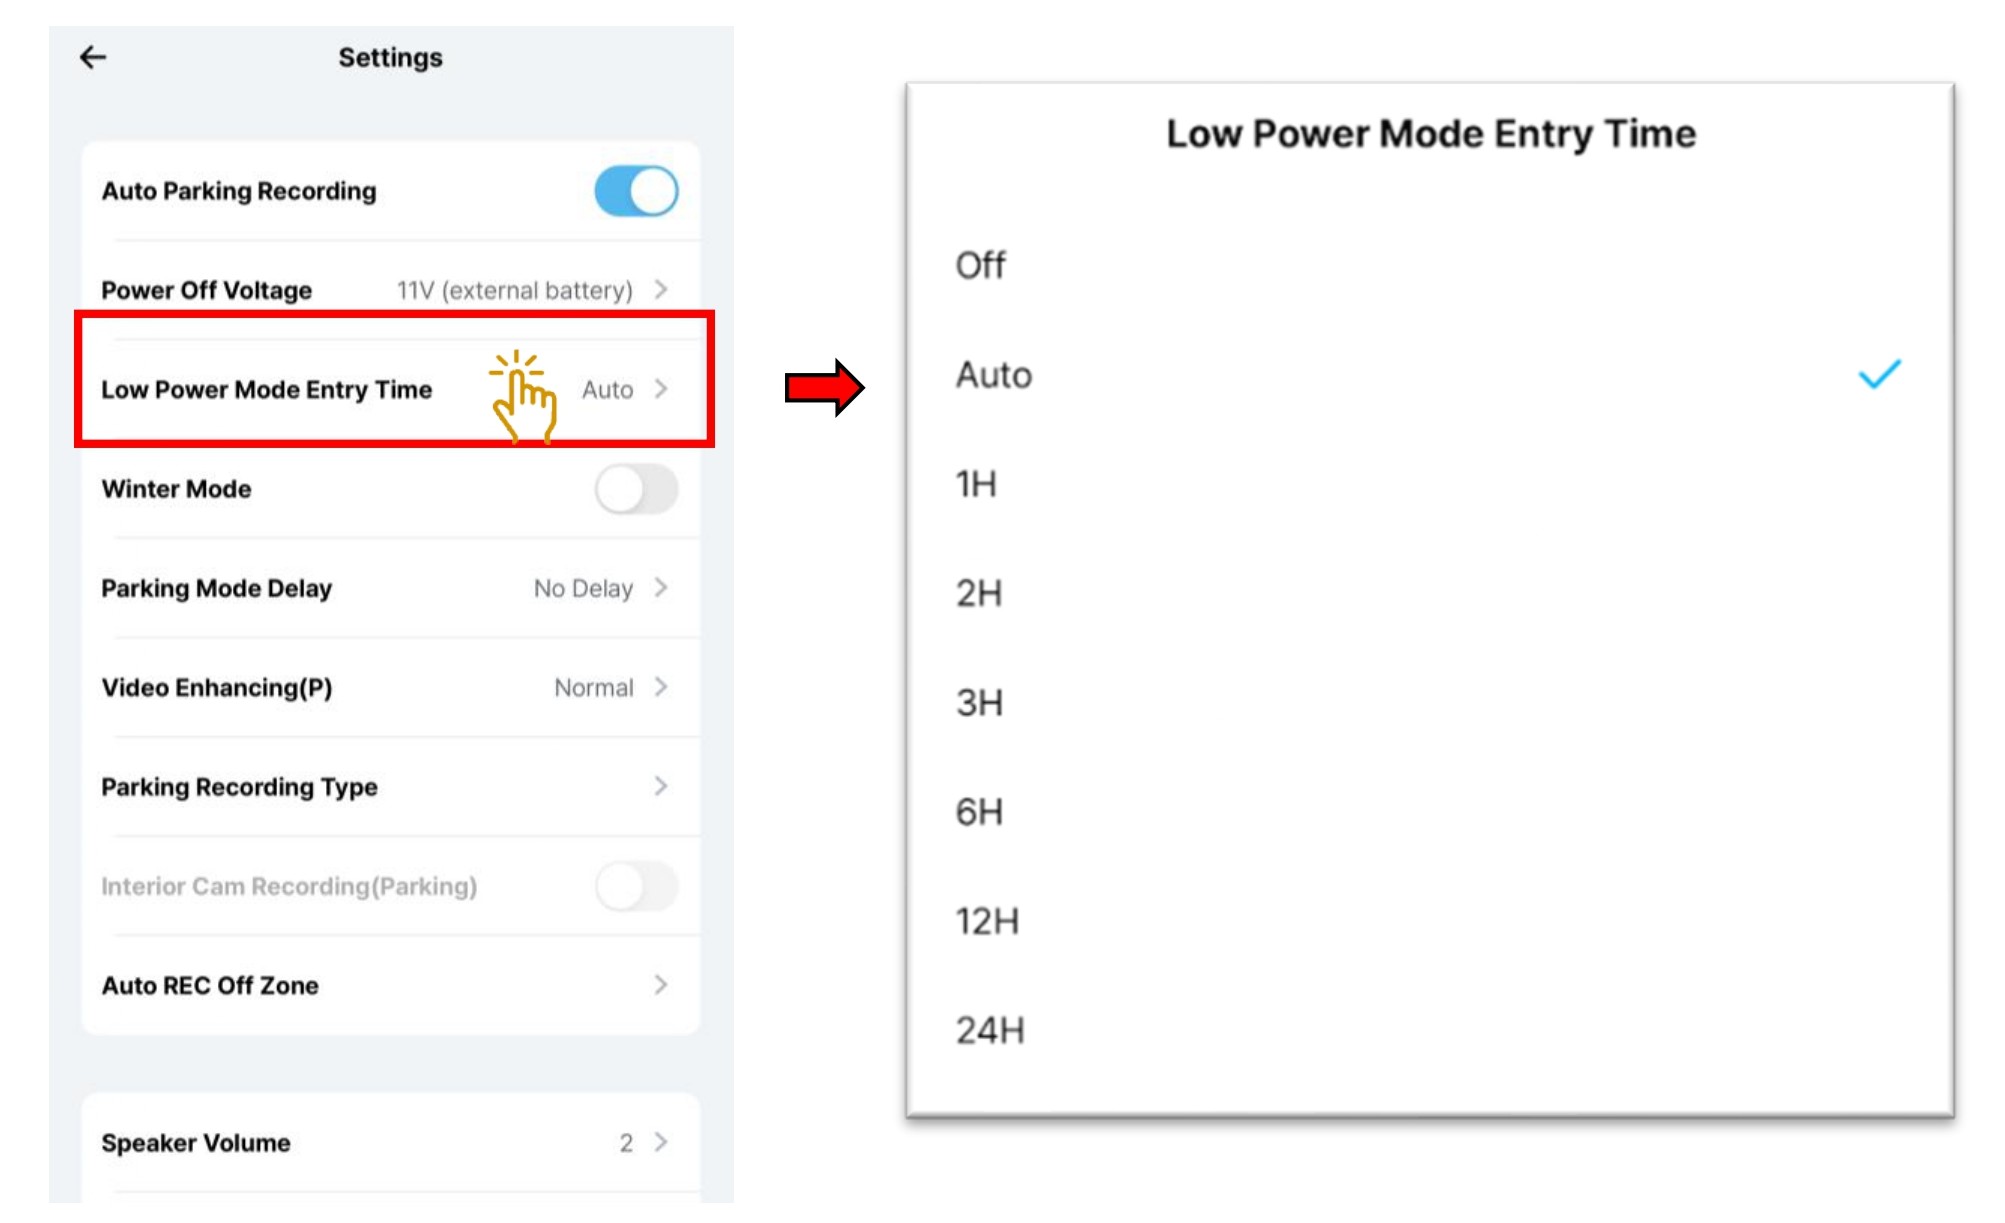
- Select " Low Power Mode Entry Time".
- Choose the pre-set time cut off settings.
- After a set time, the device will enter Low Power Mode during parking mode.
5.2.4 Setting - Parking Recording - Winter Mode
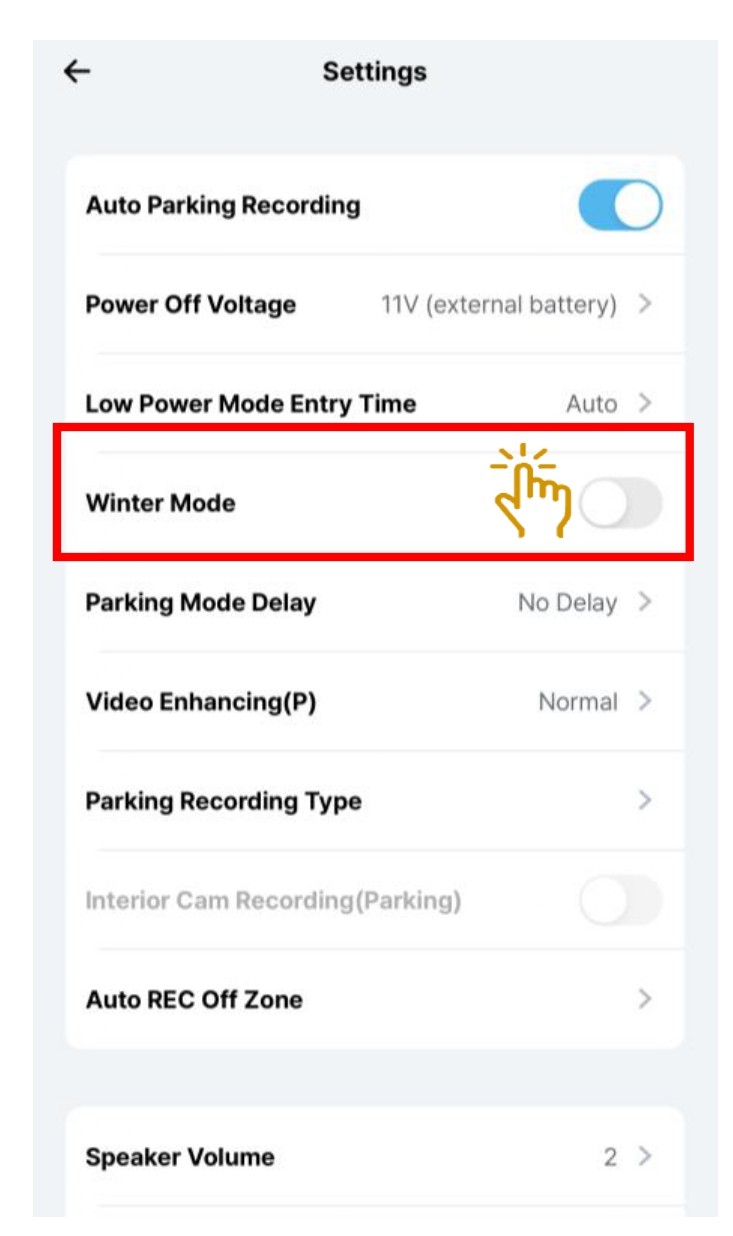
- Select " Winter Mode".
- Winter mode(From 1st of November to 31st of March) is a strong discharge prevent mode for winter. The Cut-off Voltage will be automatically raised by 0.2V from the set voltage.
- This mode is not applicable to Singapore region and is set to OFF by default.
5.2.5 Setting - Parking Recording - Parking Mode Delay
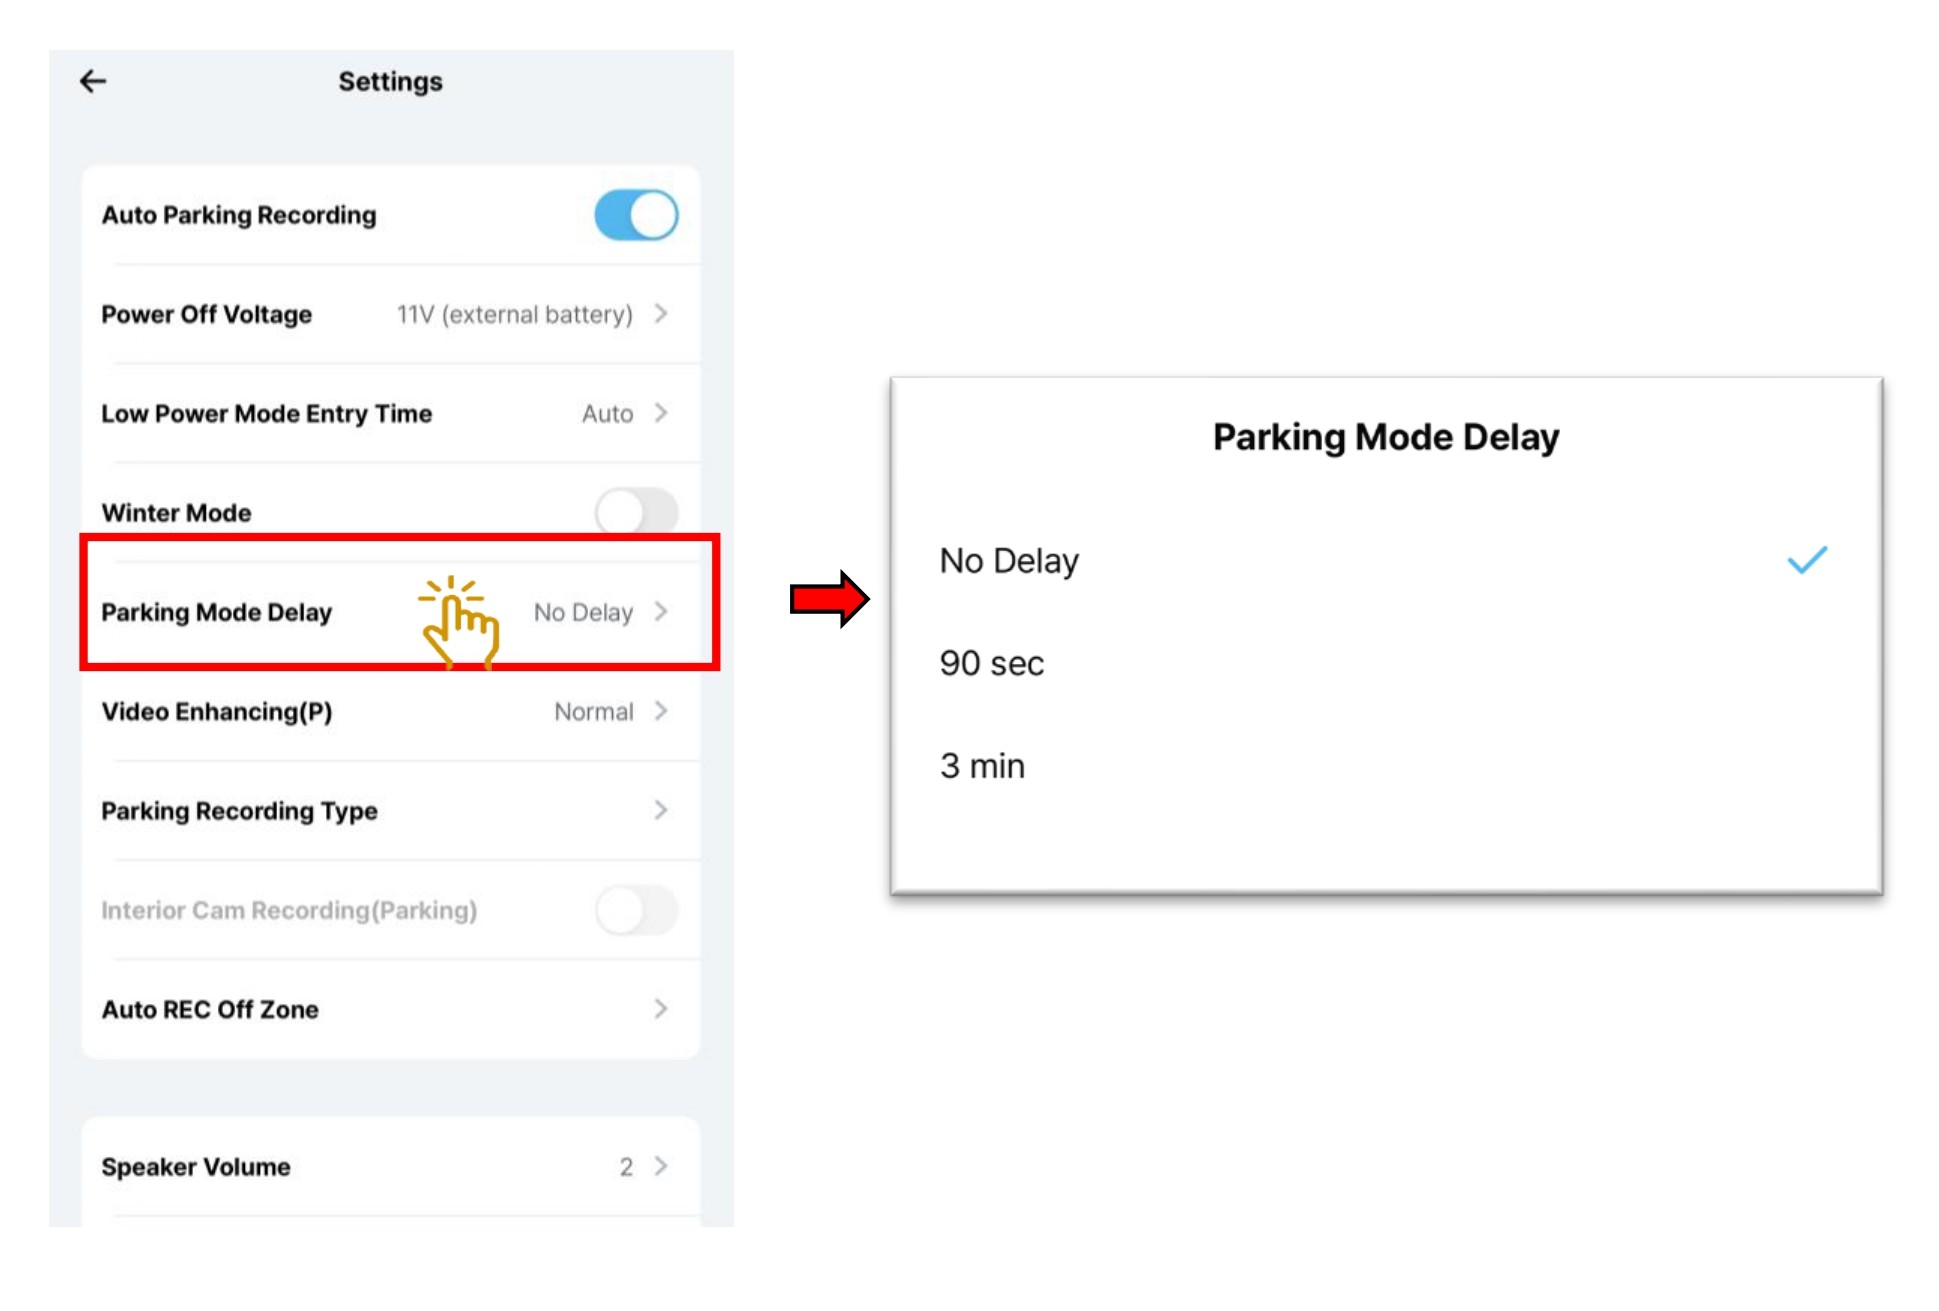
- Select "Parking Mode Delay ".
- Choose the pre-set delay time settings.
- Delay entering into parking mode for a set amount of time after the vehicle is turned off.
5.2.6 Setting - Parking Recording - Video Enhancing
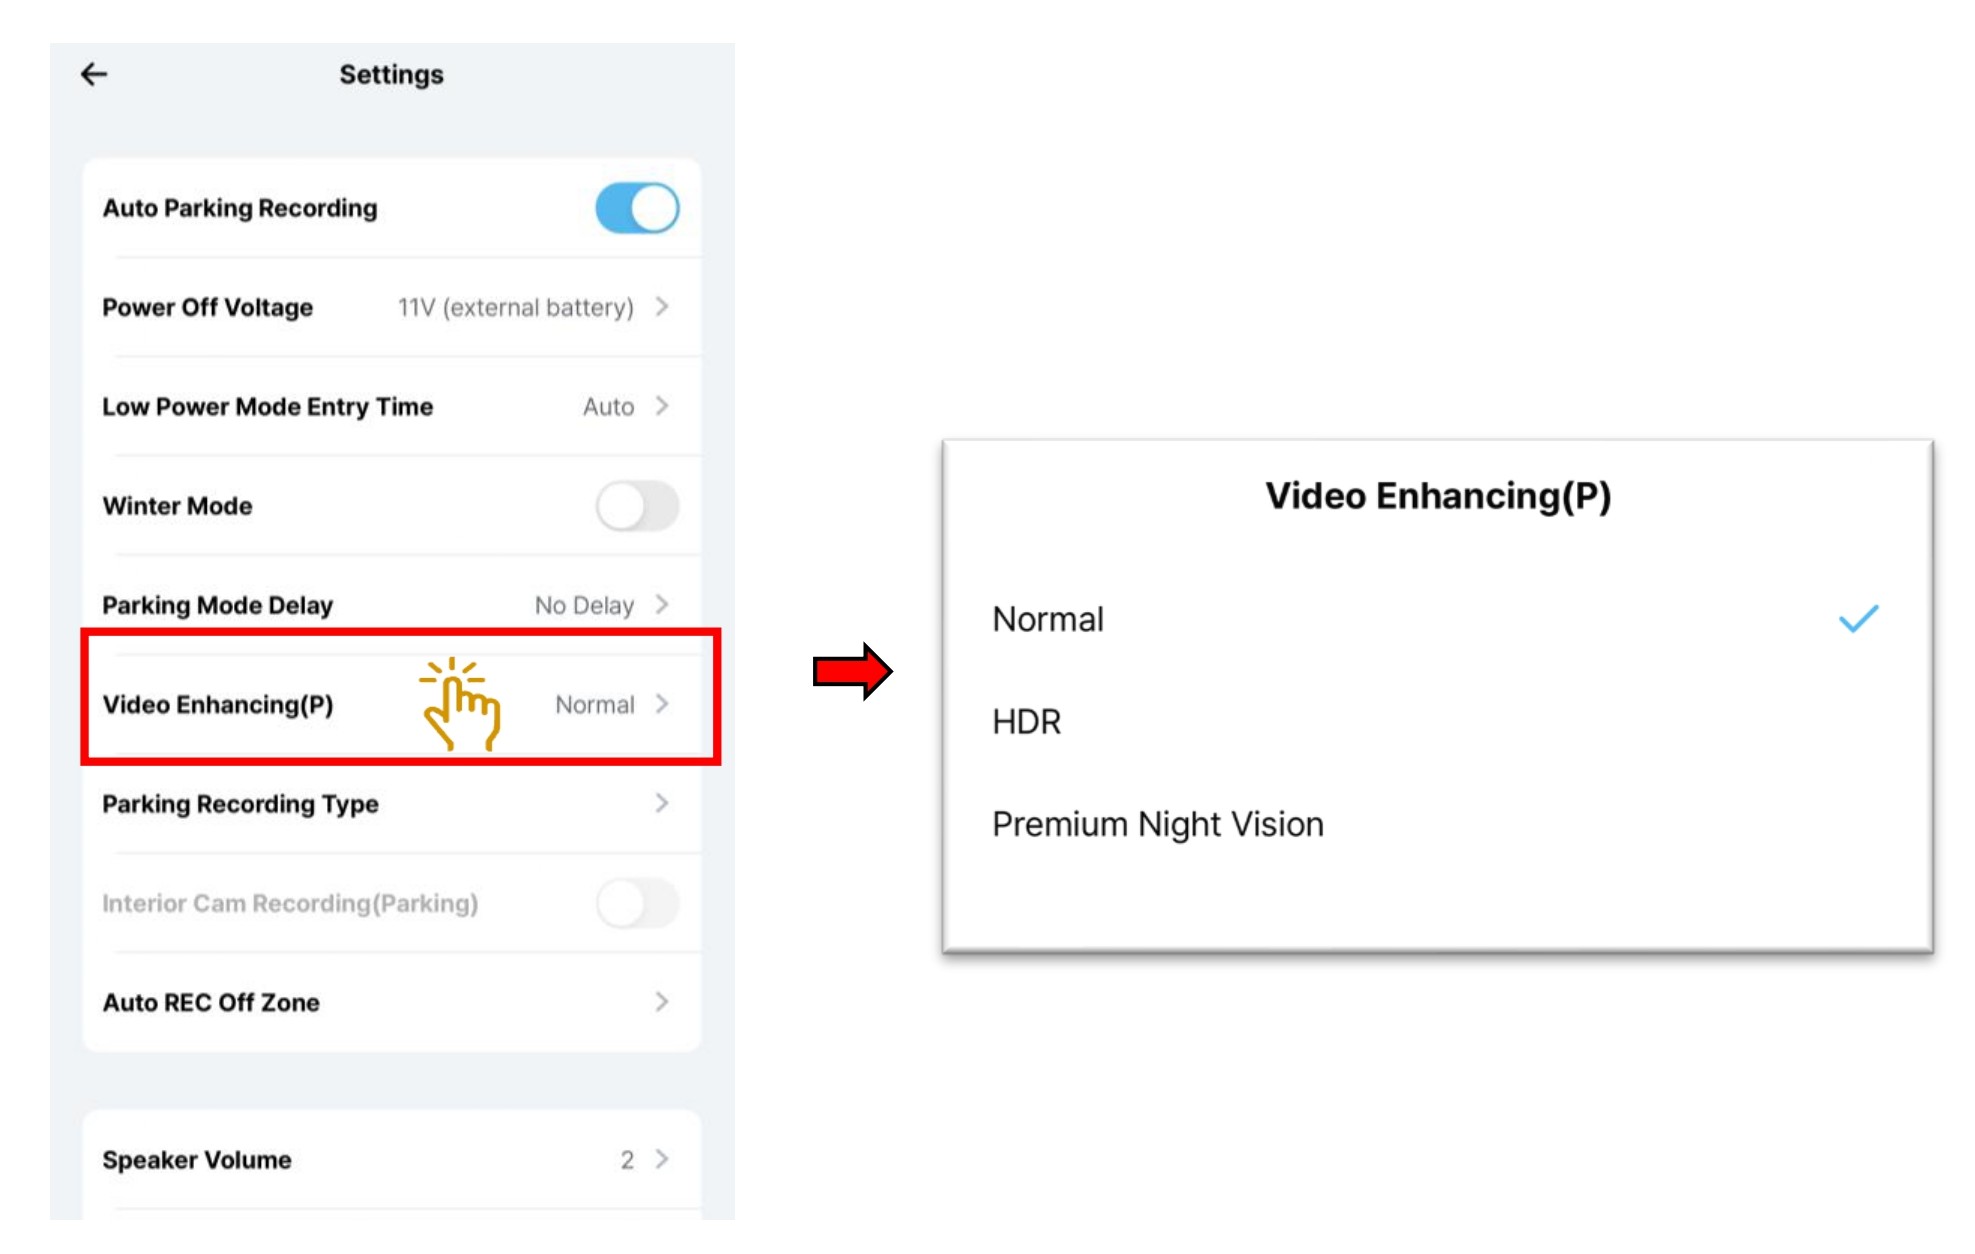
- Select "Video Enhancing "
- Choose the video enhancing mode.
- You can select Video Enhancing mode for video quality during the parking mode.
※ The HDR(High Dynamic Range) is for expressing a richer contrast between light and dark areas in photos or videos.
※ Premium Night Vision is specialized in nighttime, for extremely dark environments.
※ Parking recording does not apply HDR Timer.
HDR / Premium Night Vision is not supported at 4K 60FPS and QHD 60FPS
5.2.7 Setting - Parking Recording - Recording Type
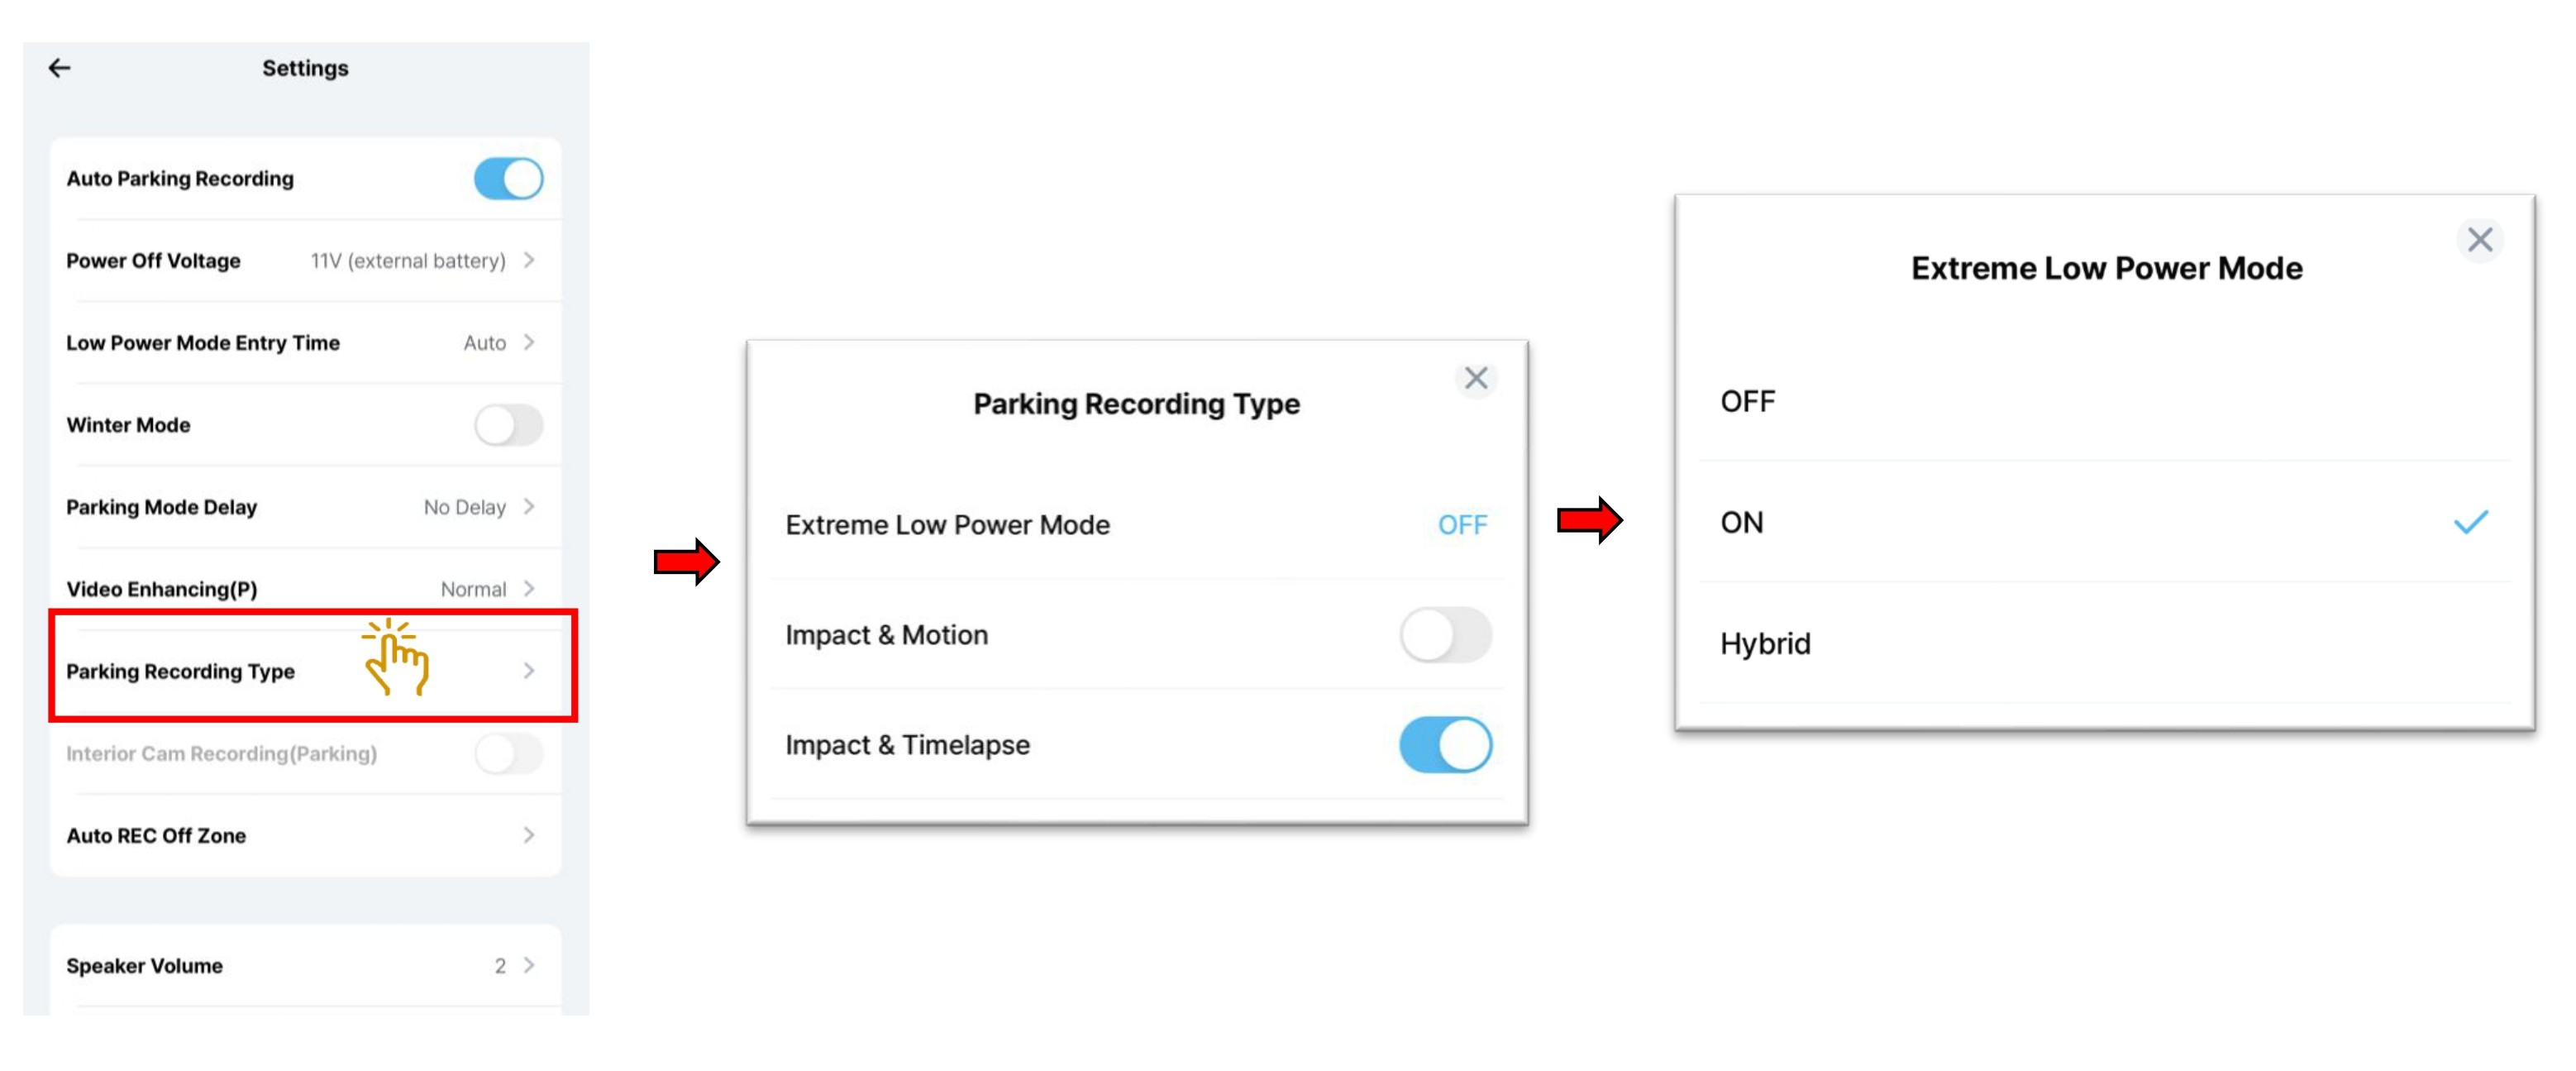
- Select "Recording Type ".
- Choose the recording type mode.
- Extreme Low Power Mode: Off - Normal parking will be recorded upon the selection of Impact + Motion or Impact +Timelapse.
- Extreme Low Power Mode: On - Dashcam will enter Low Power Mode where the dashcam will not record until there is an impact detected.
- Extreme Low Power Mode: Hybrid - Dashcam will enter Low Power Mode once it reached the Low Voltage Cut Off setting.
Pre-Set Low Voltage Cut Off 12V Extreme Low Power Mode Low Power Mode Entry Time OFF AUTO 1 - 48Hr ON ELPM will "On" once enter parking mode. ELPM will "On" once enter parking mode. ELPM will "On" once enter parking mode. OFF No ELPM ELPM will "On" once detected 12V and continuous in this ELPM mode. Not suitable for tap on vehicle engine power Enter ELPM after the set time (If Power Off Voltage is detected before the set time, the device turns off) HYBRID Enter ELPM when12.2V Power Off Voltage is detected during parking recording. Turn off when 12V Power Off Voltage is detected during ELPM parking recording. Enter ELPM when12.2V Power Off Voltage is detected during parking recording. Turn off when 12V Power Off Voltage is detected during ELPM parking recording. Enter ELPM after the set time. If 12.2V Power Off Voltage is detected before the set time, the device enters ELPM. During ELPM parking recording, the device turns off when 12V Power Off Voltage is detected.
5.2.8 Setting - Parking Recording - Interior Cam Recording - Parking
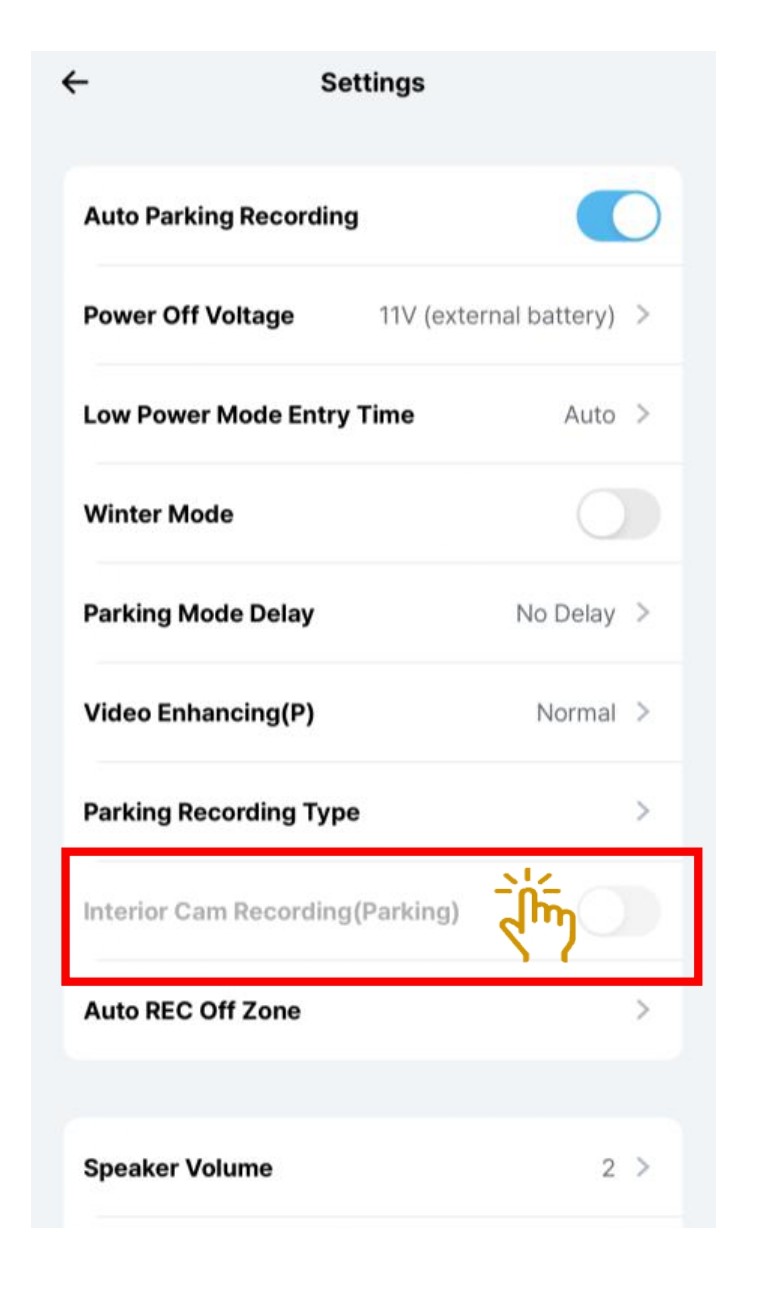
- Select "Interior Cam Recording".
- Toggle to turn "ON/OFF" the interior cam recording while in parking mode.
5.2.9 Setting - Parking Recording - Auto REC Off Zone
You can designate areas where parking recording is not preferred to save the vehicle’s battery. (e.g., home, workplace, etc.).
If the vehicle enters one of these designated areas and the engine is turned off, parking recording will not start automatically, even if the auto parking recording is enabled.
Up to three zones can be set, with a radius of 30, 50, or 100 yards(m) based on the current GPS location.
Settings are based on GPS coordinates, and you must enter the settings menu at the desired location to register or modify the zone.
Dashcam GPS location must be detected to do this setting.
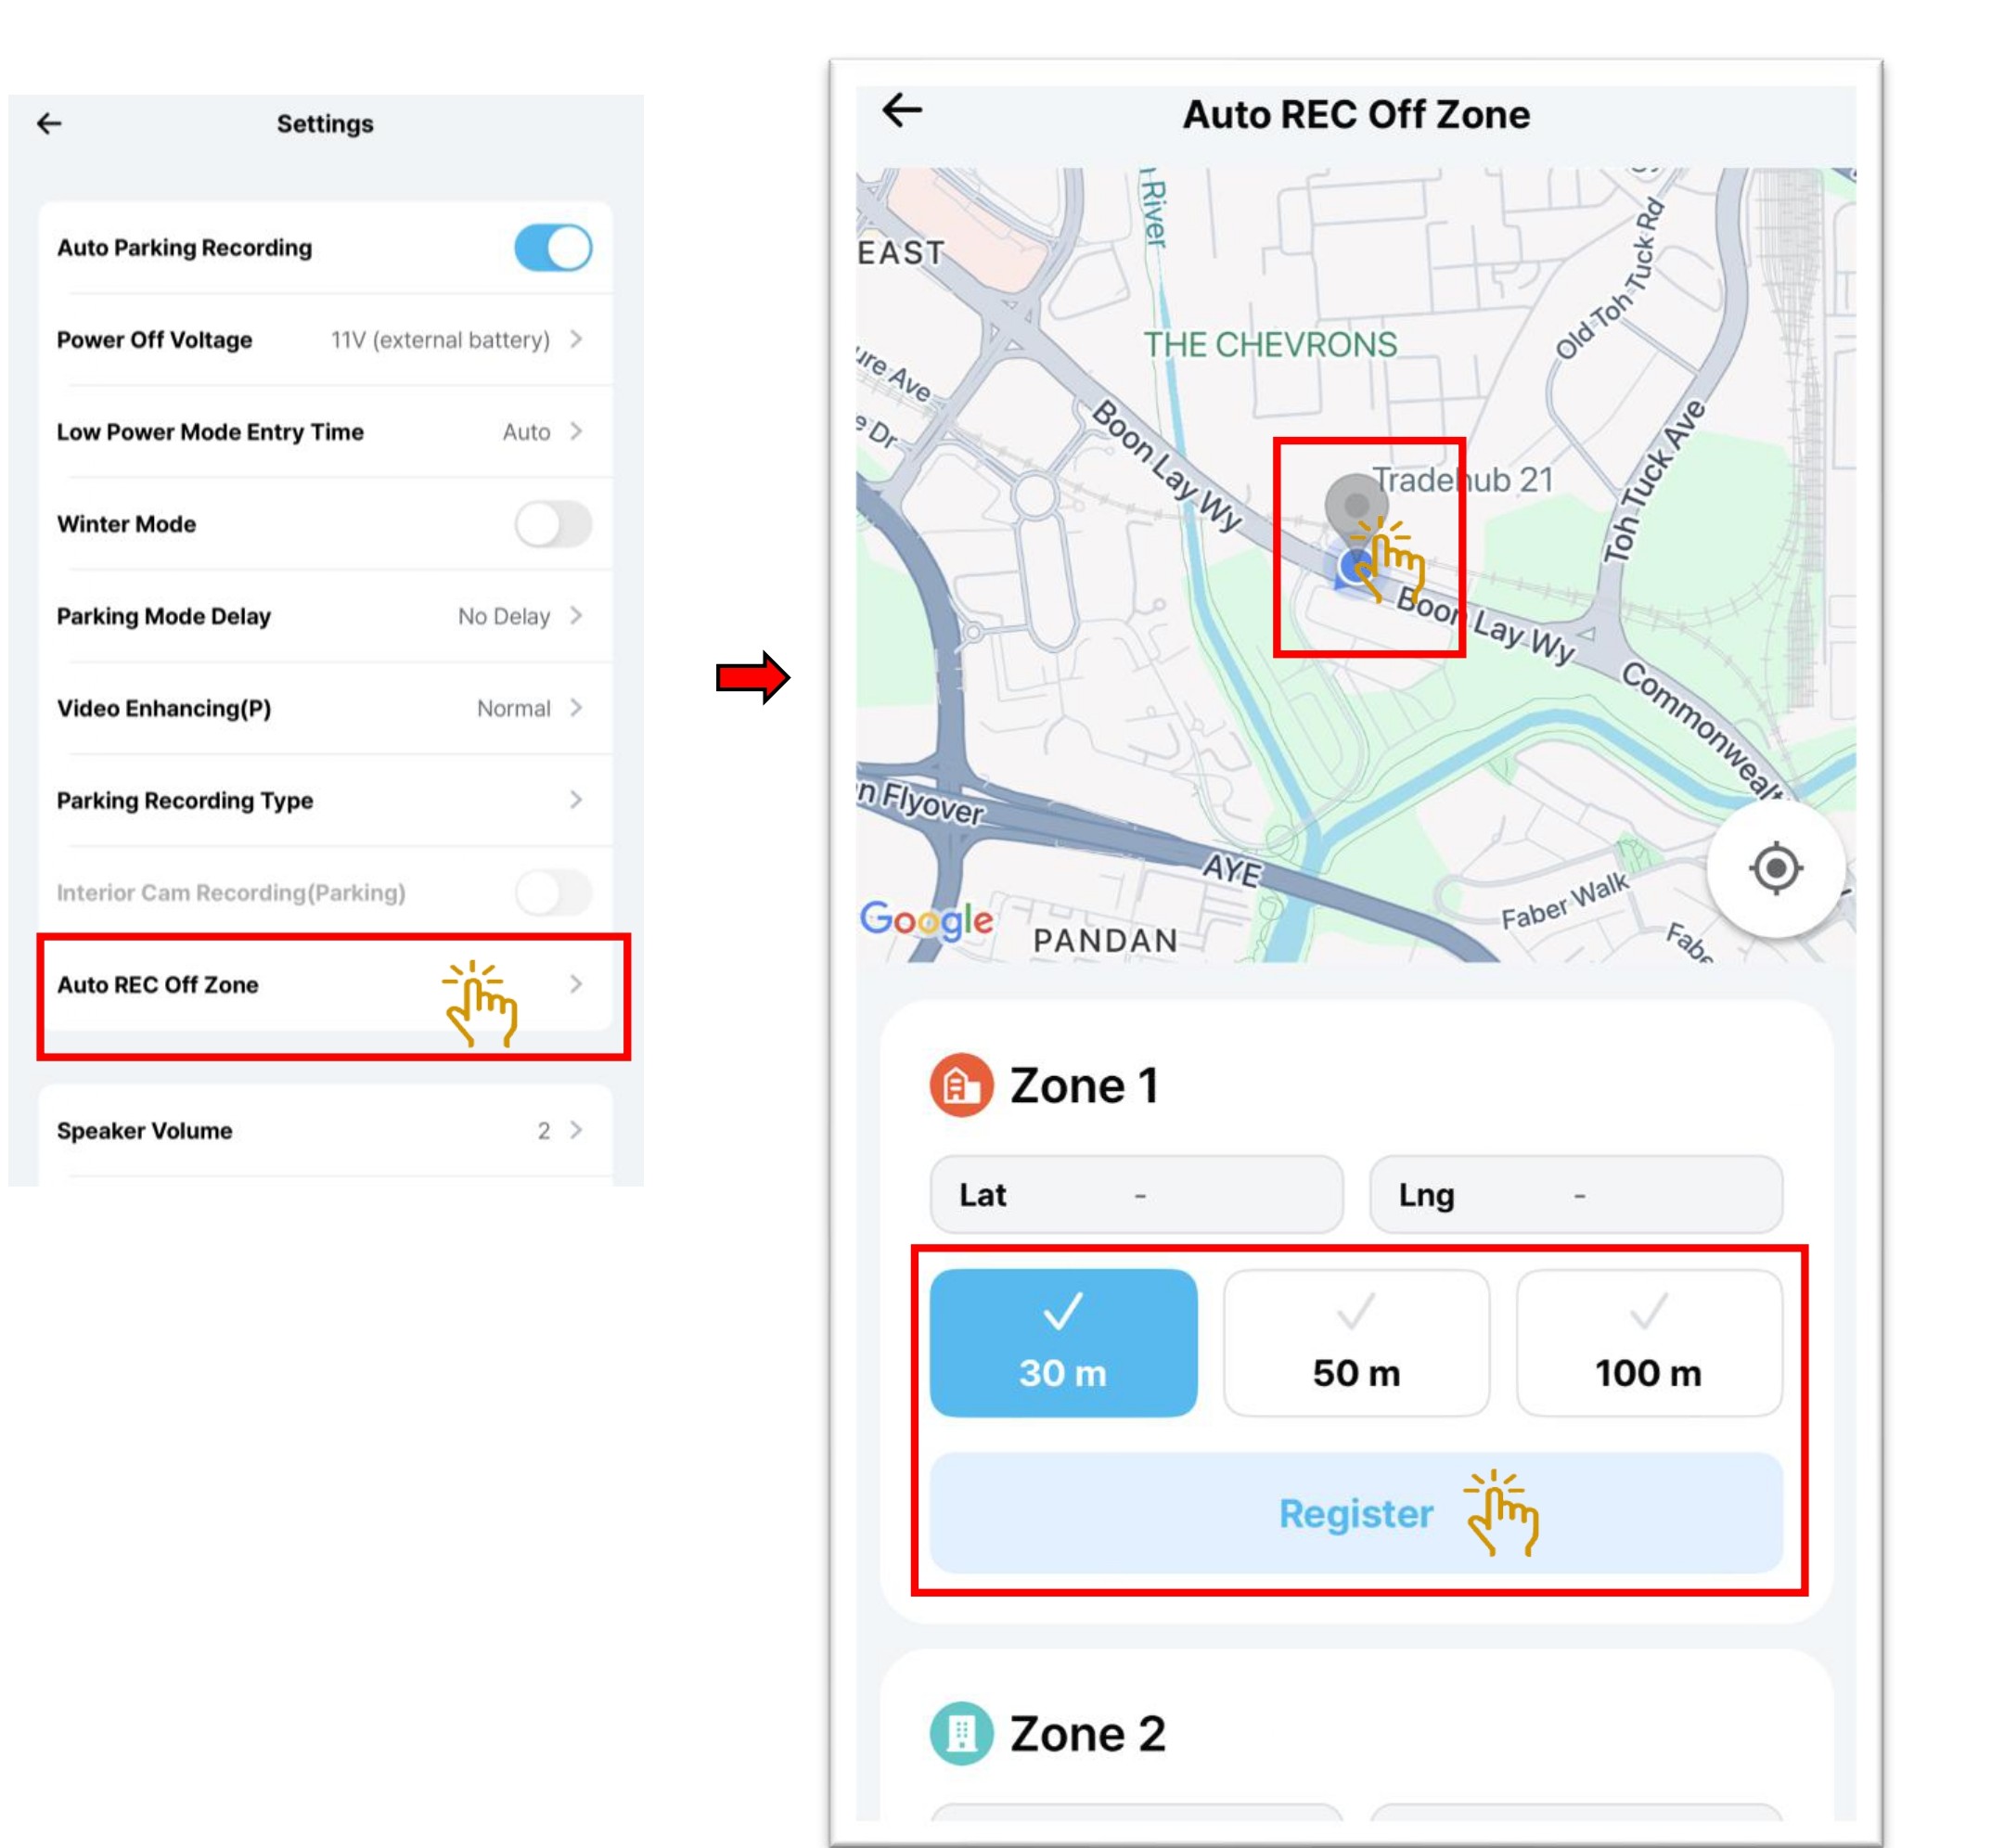
- Choose "Auto REC Off Zone".
- Select the "Zone".
- Move the drop point to the area where you do not require the dashcam recording during parking mode.
- Once confirmed the area, choose "Register ".
- You also can select the radius setting of 30, 50, or 100 m.
InformationThe dashcam must be GPS detected in order to use this "Auto Rec Off Zone"
5.3 Setting - System
5.3.1 Setting - System - Speaker Volume
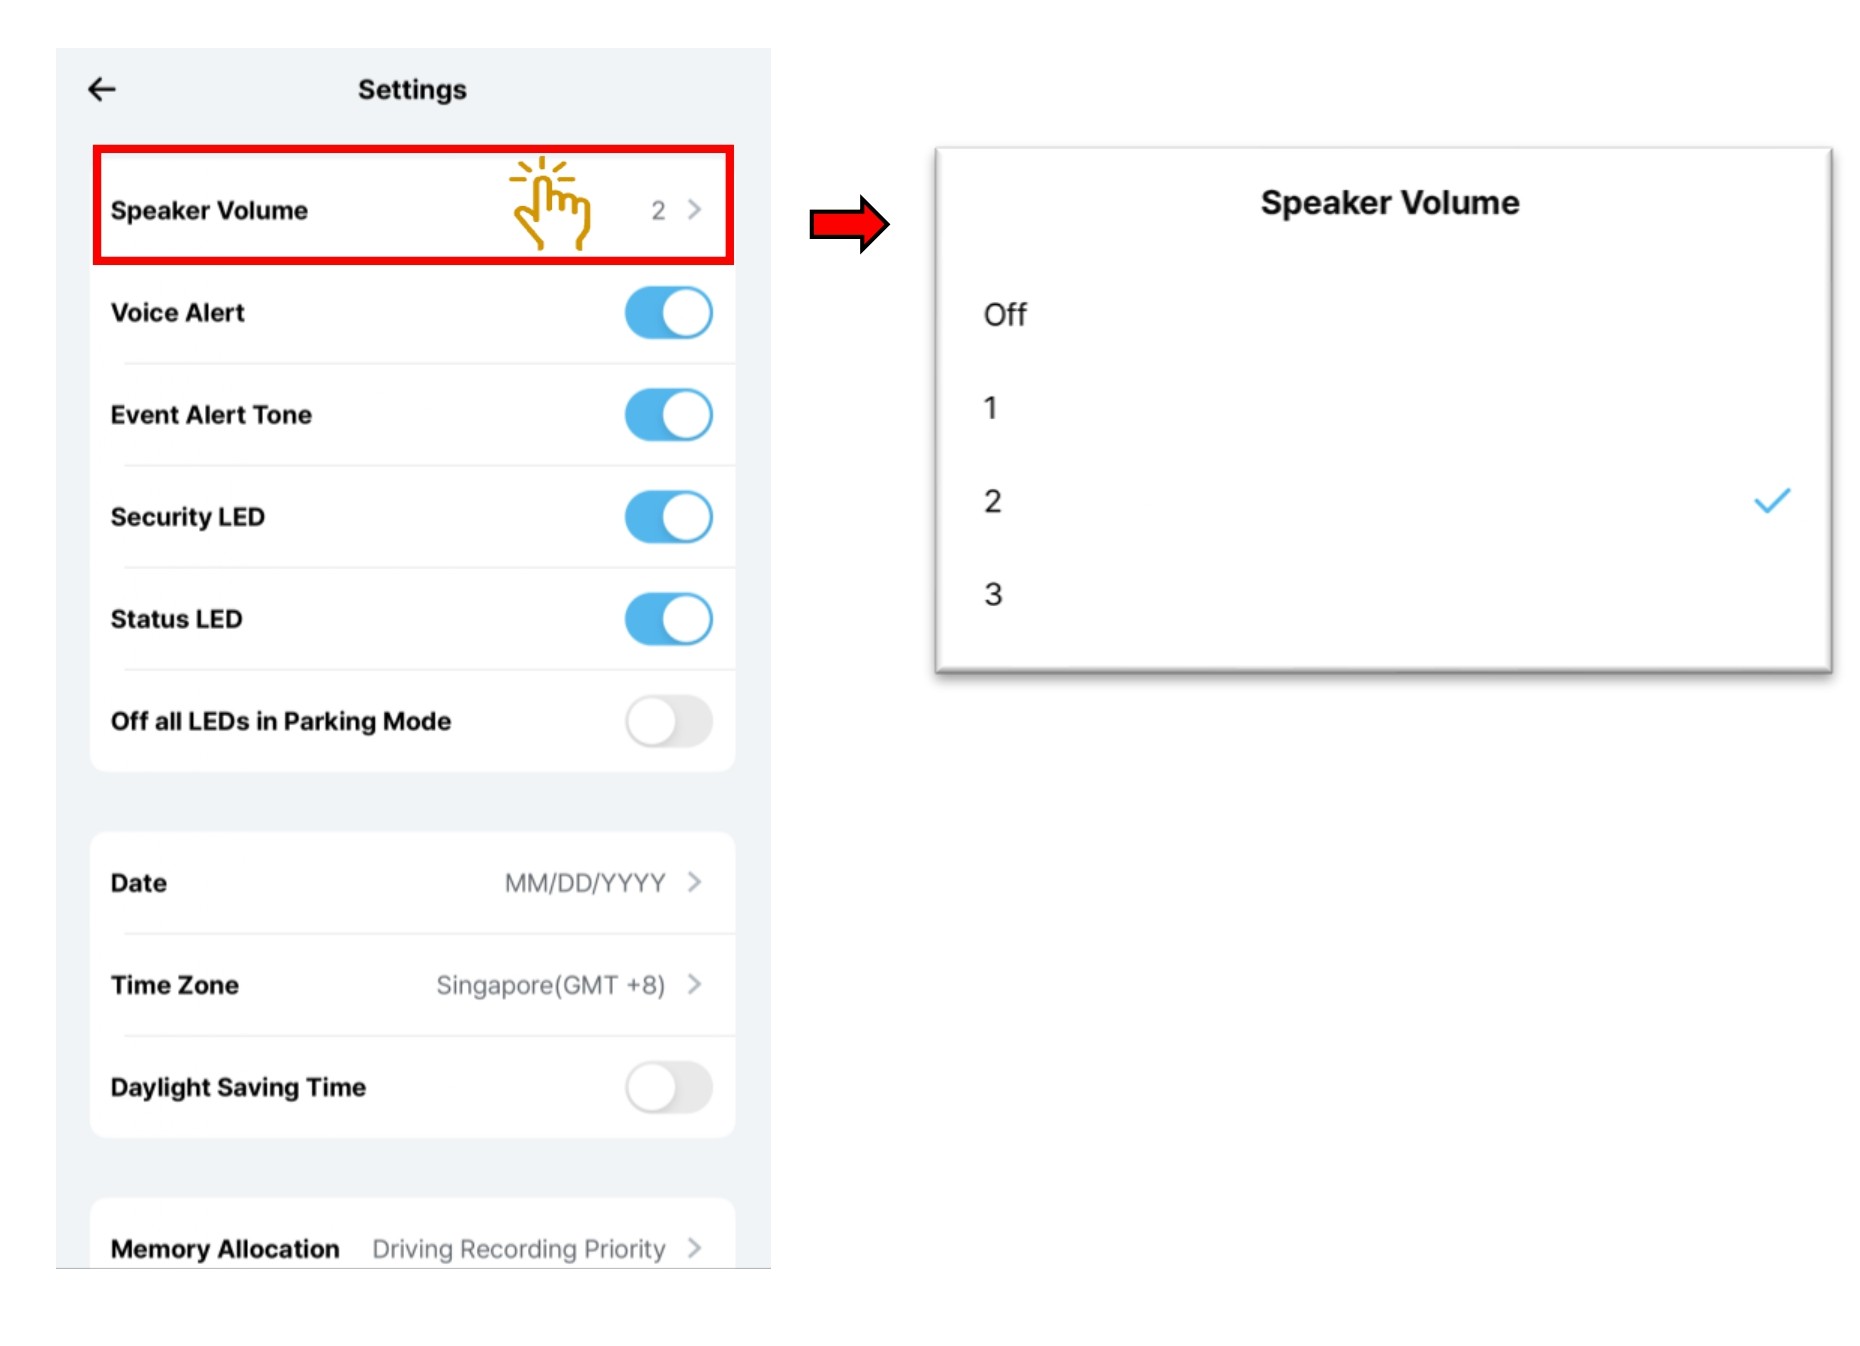
- Select "Speaker Volume".
- Choose the loudness volume from 1 to 3 or to turn it off.
5.3.2 Setting - System - Voice Alert

- Select "Voice Alert".
- Toggle to turn On/Off.
5.3.3 Setting - System - Event Alert Tone
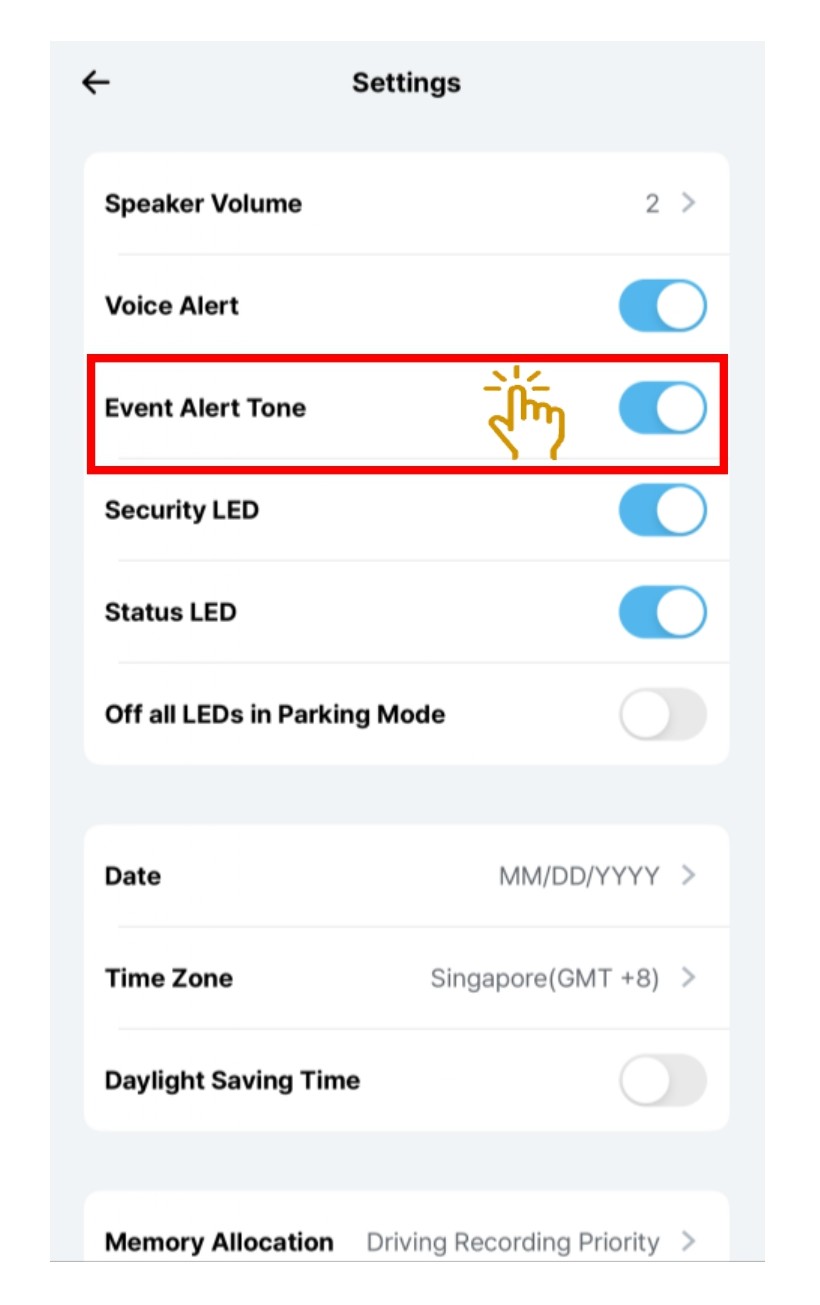
- Select "Event Alert Tone".
- Toggle to turn On/Off the buzzer sound, that is played when impact is detected.
5.3.4 Setting - System - LED
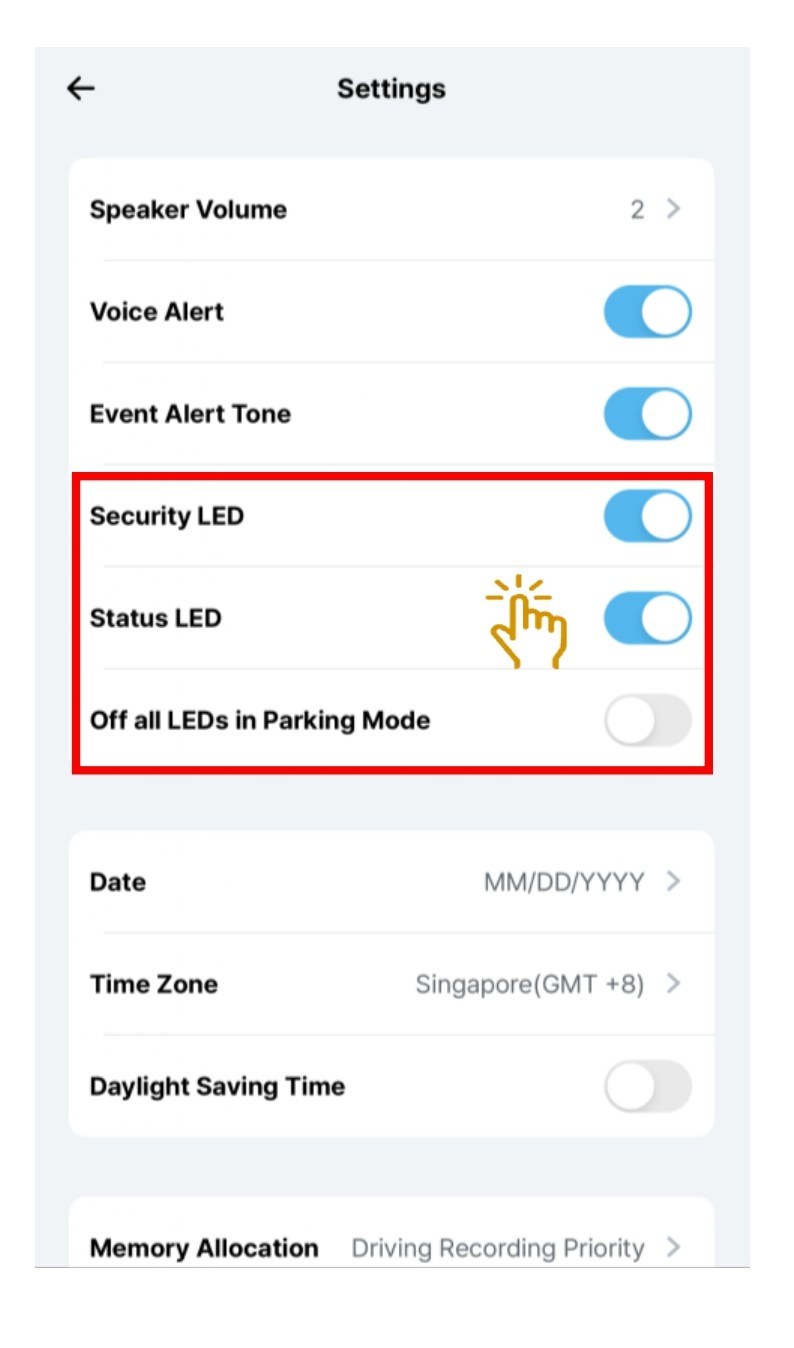
- Choose
※"Security LED" and toggle to turn On/Off.
※"Status LED" and toggle to turn On/Off.
※"Off All LEDs in Parking Mode" and toggle to turn On/Off.
5.3.5 Setting - System - Date & Time.
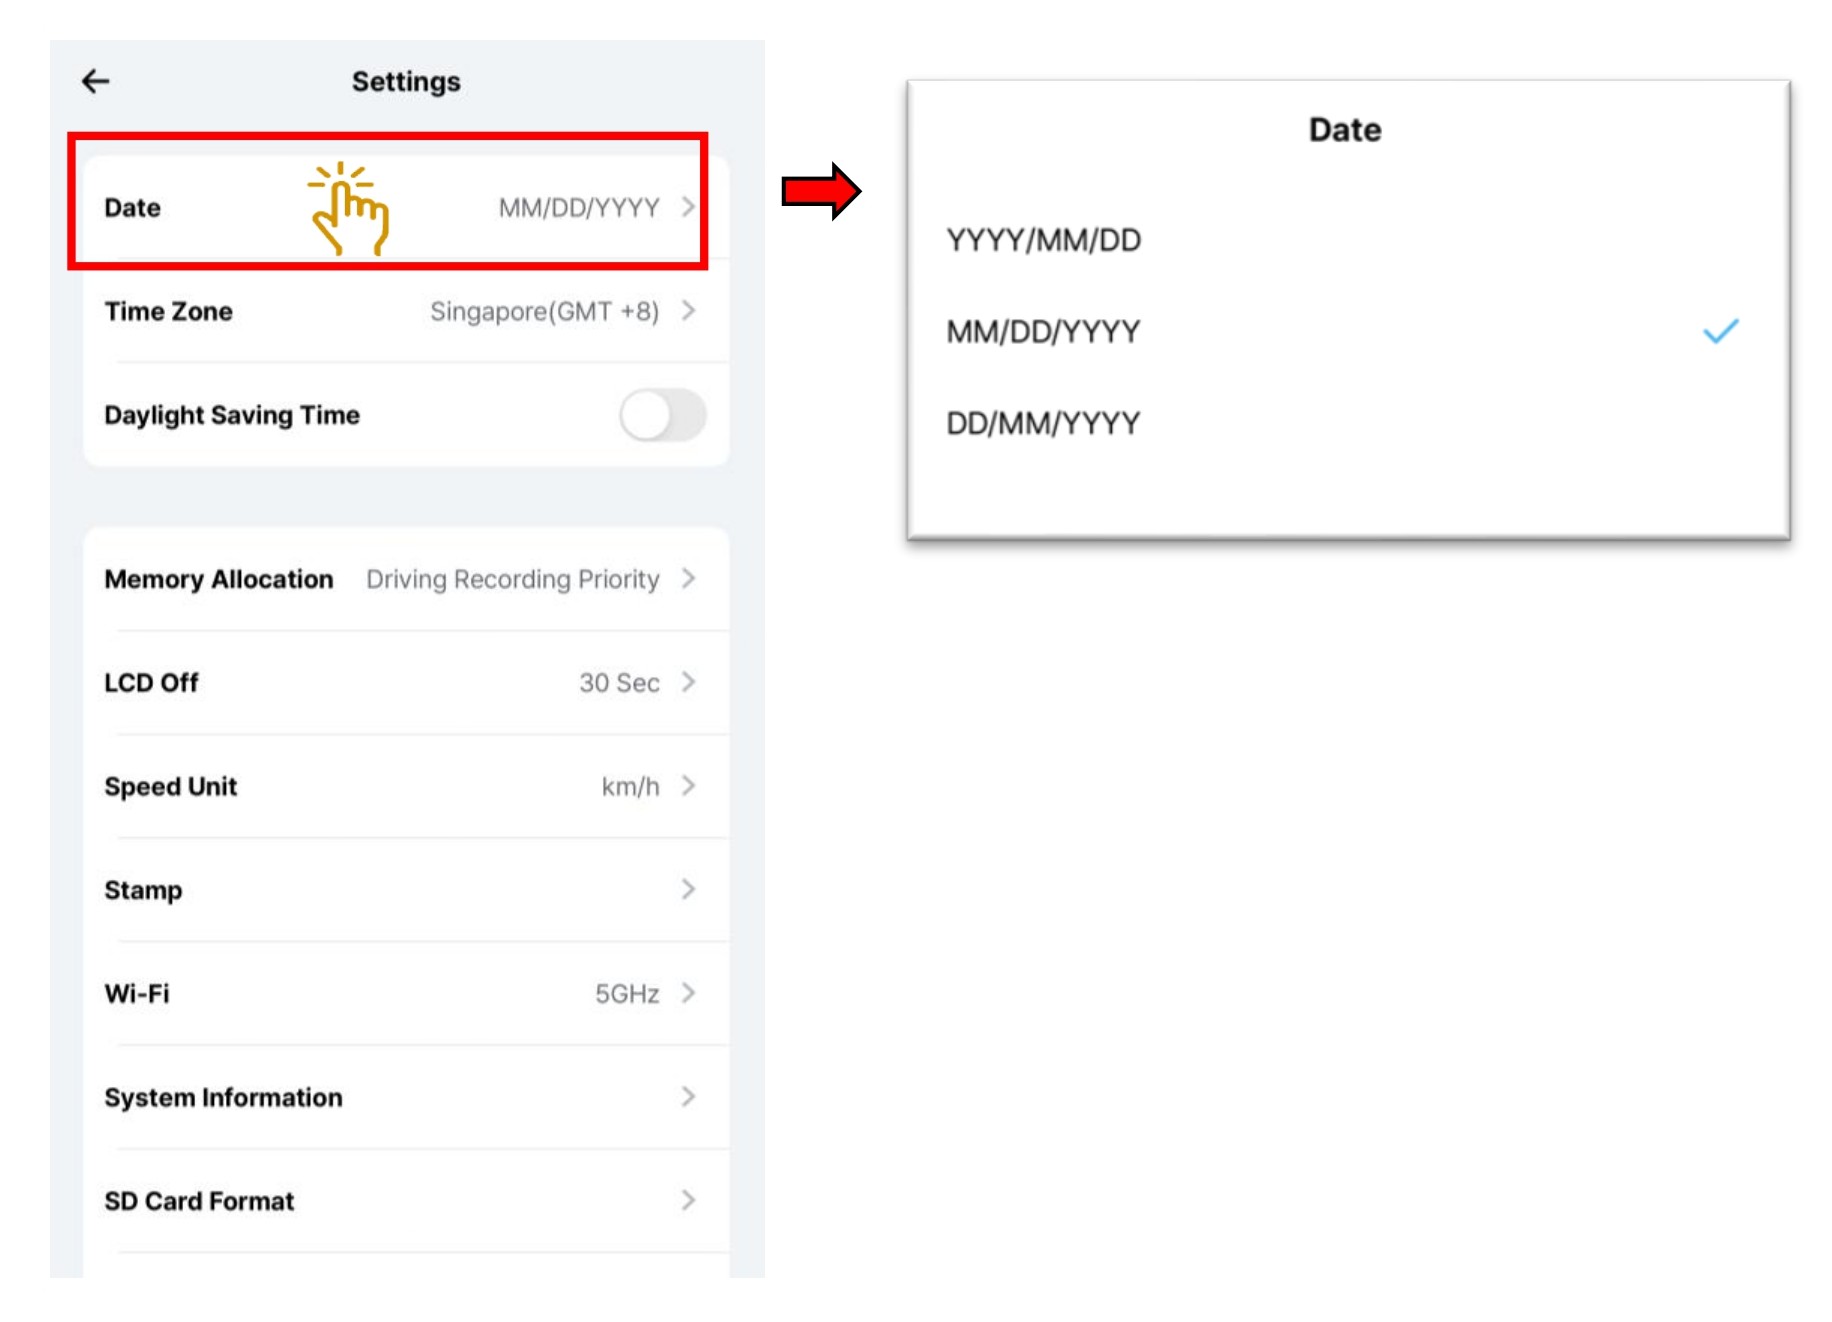
- Select "Date & Time".
- Choose the Date format type of your preferences.
5.3.6 Setting - System - Time Zone
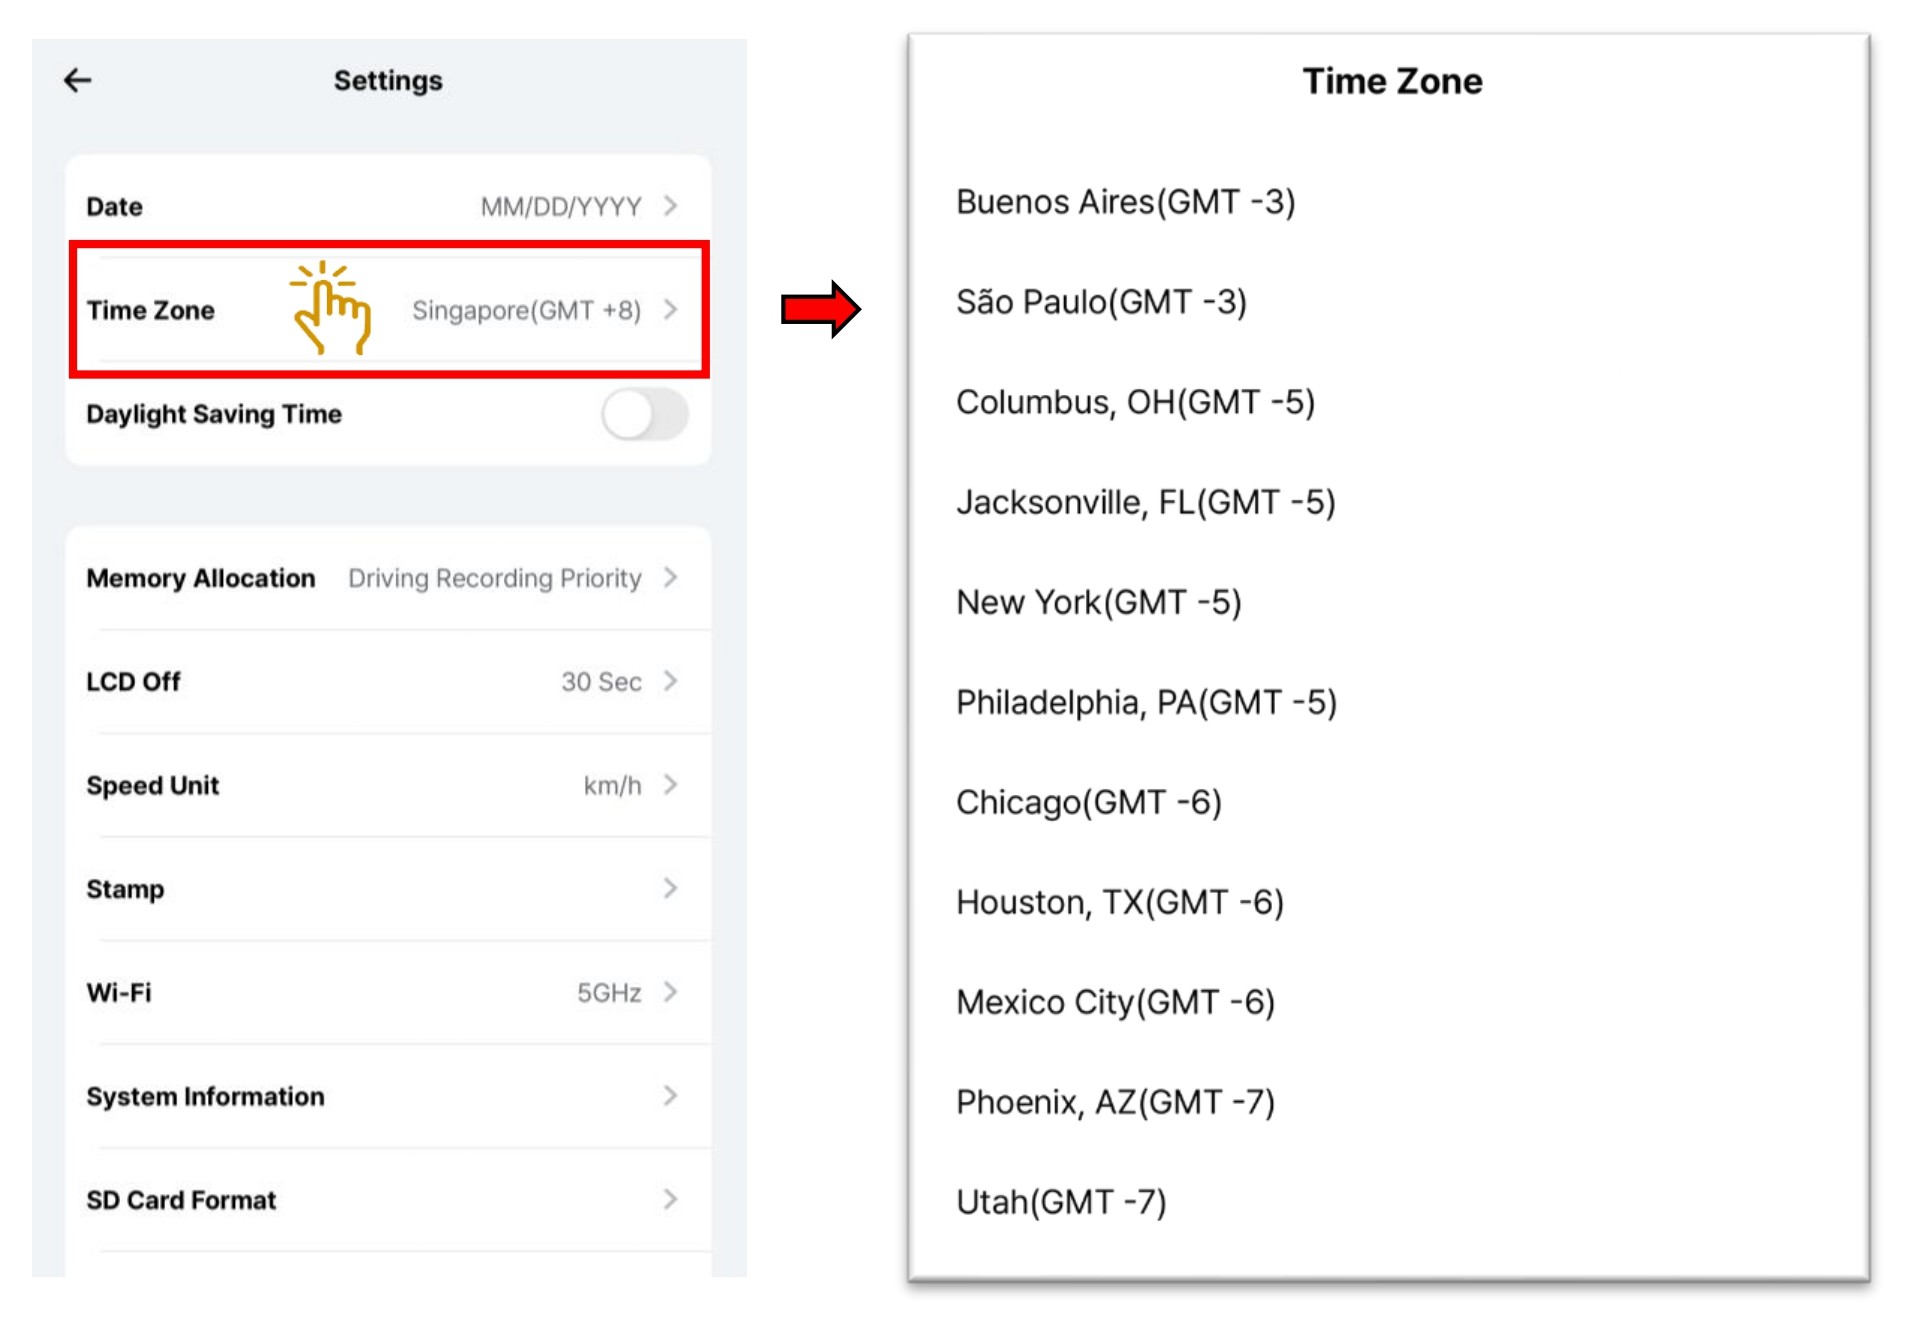
- Select "Date & Time".
- Choose "Time Zone" of your country.
- Select Singapore (GMT +8).
5.3.7 Setting - System - Daylight Saving Time
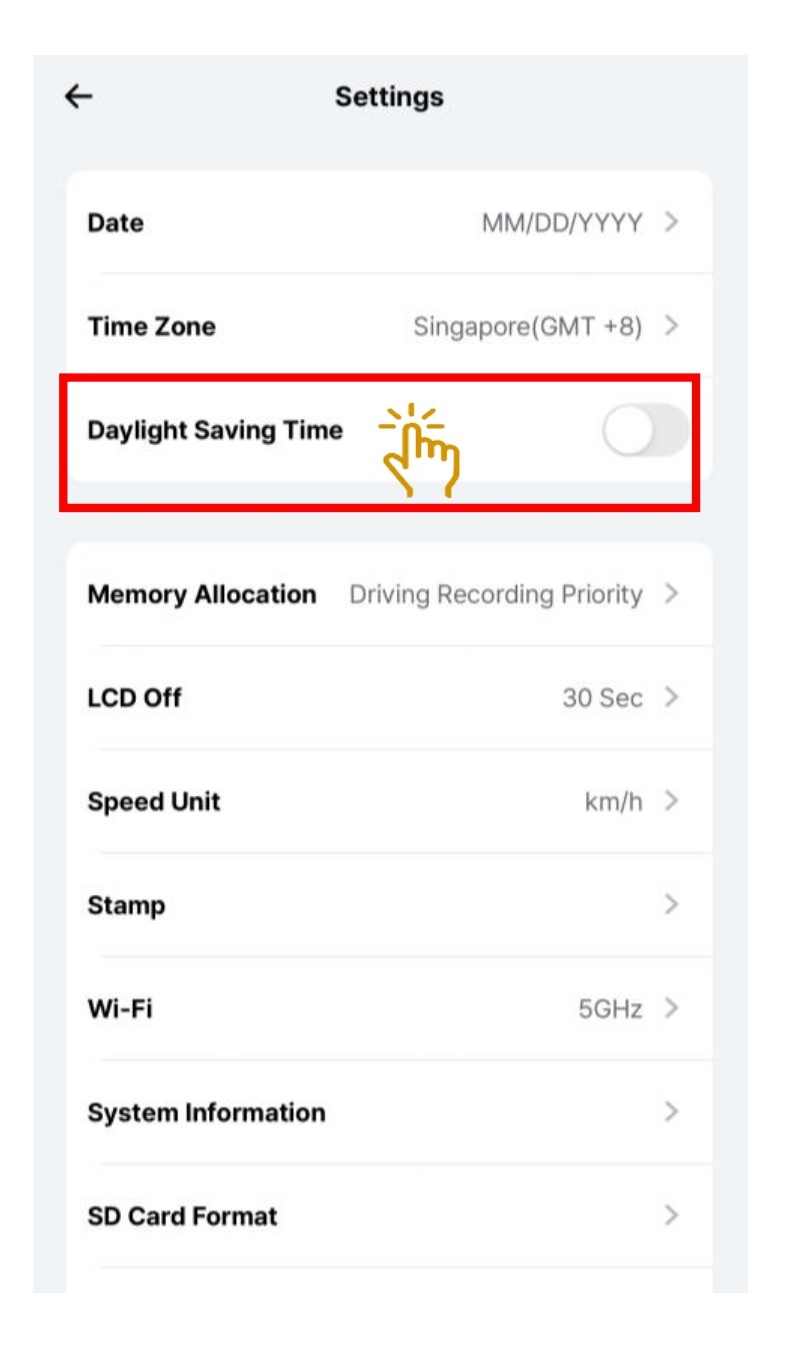
- Select "Daylight Saving Time" .
- Daylight Saving Time option, the time will be set +1 hour based on current time zone. When Daylight Saving Time ended, You must manually disable the Daylight Saving Time option.
- This option is not applicable to Singapore region thus it is turn off by default.
5.3.8 Setting - System - Quality

- Select "Quality" .
- The Live View and Playback can be set either "Standard" or "Low" while viewing
5.3.9 Setting - System - Memory Allocation
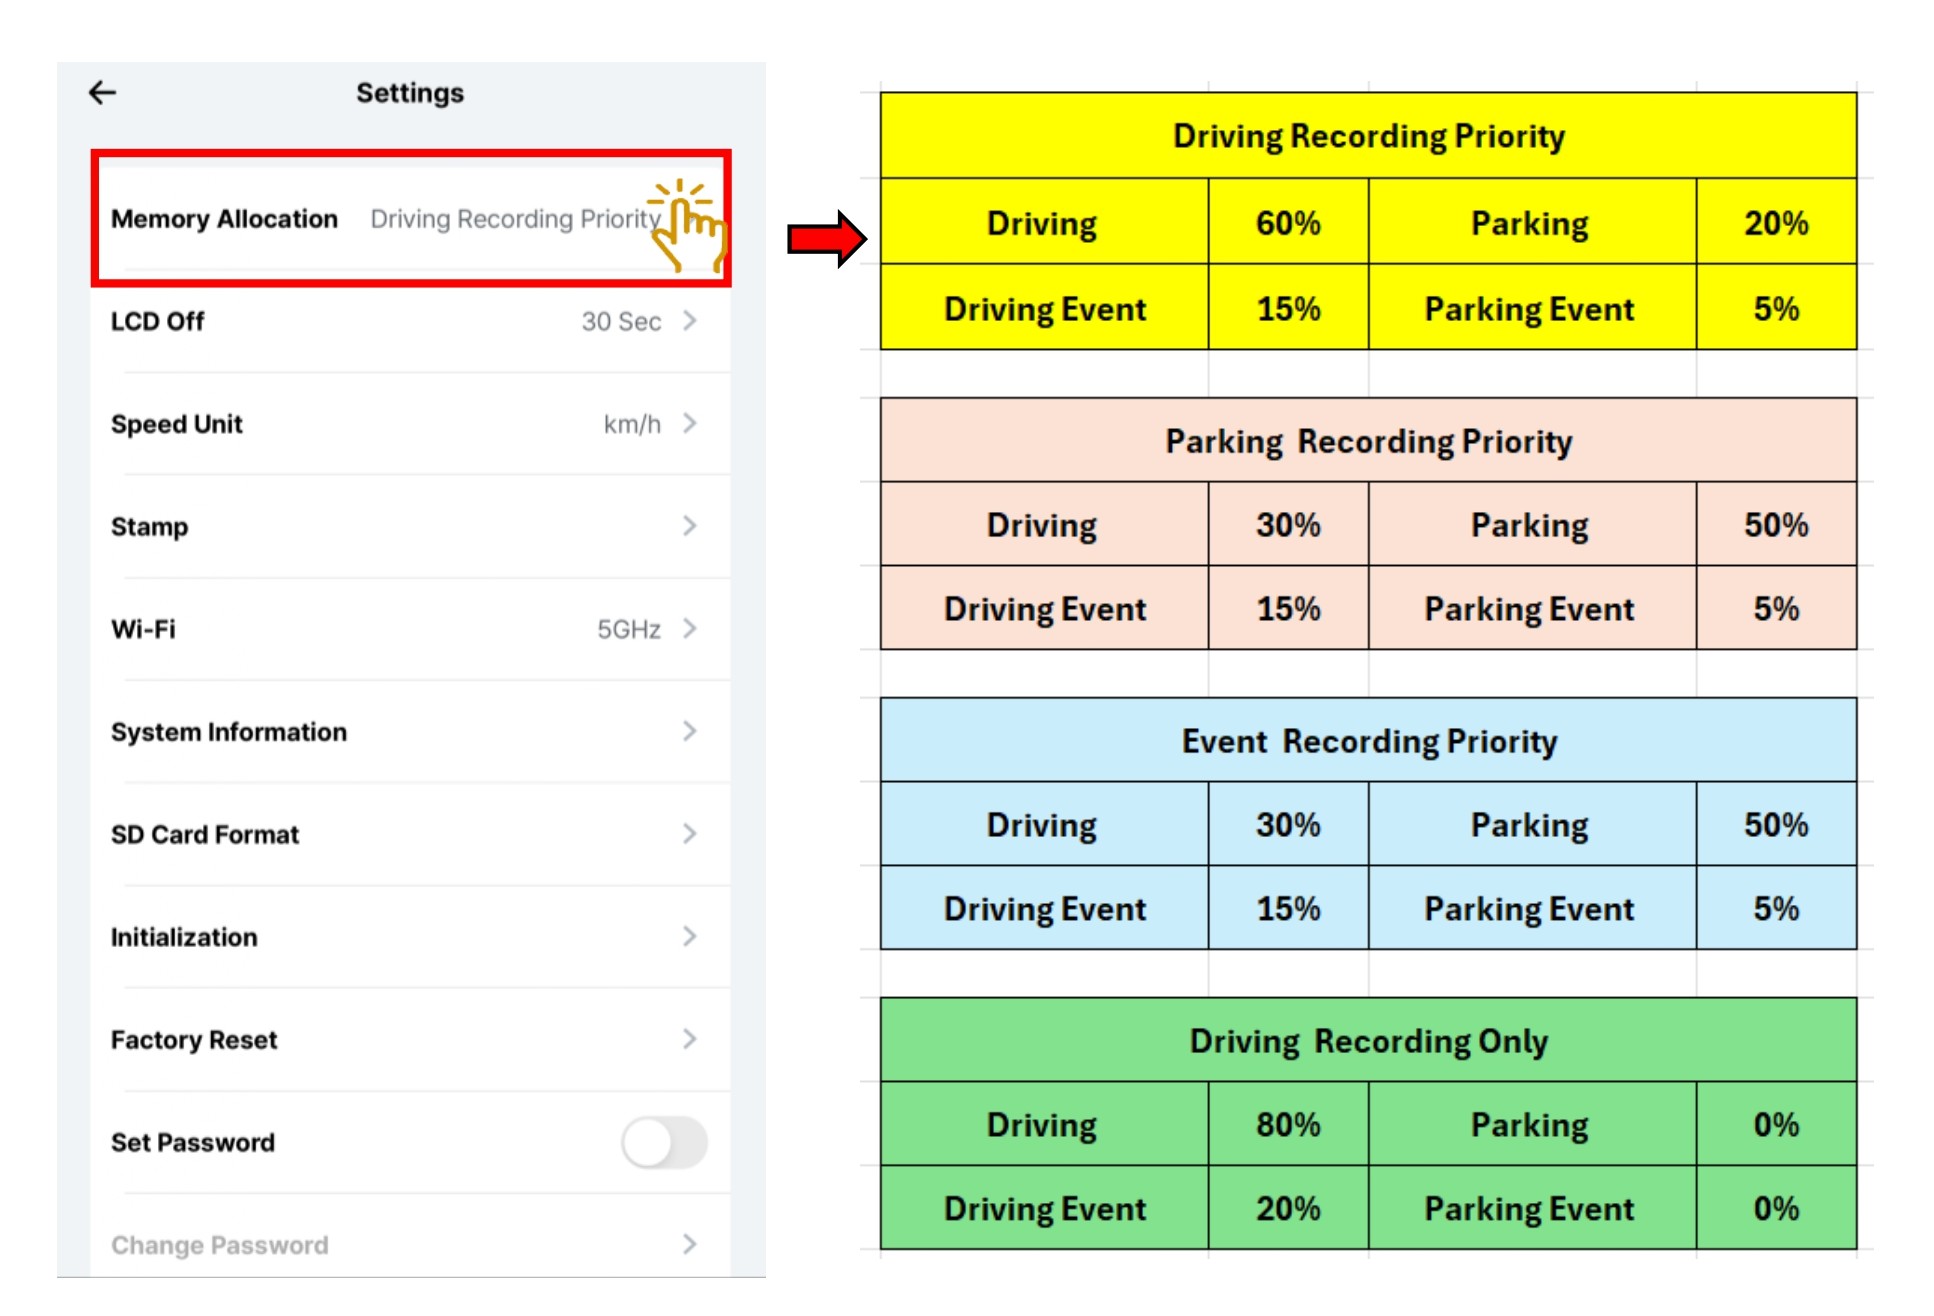
- Select "Memory Allocation" and select the recording preferences allocation.
- The capacity of each folder on the Micro SD Card will be adjusted for saving recorded videos in driving/parking/events or driving only.
Before changing this Memory Allocation setting, please make sure important videos have been downloaded. Once this setting is changed, the SD card will be formatted and erase all the recorded videos inside.
5.3.10 Setting - System - LCD Off
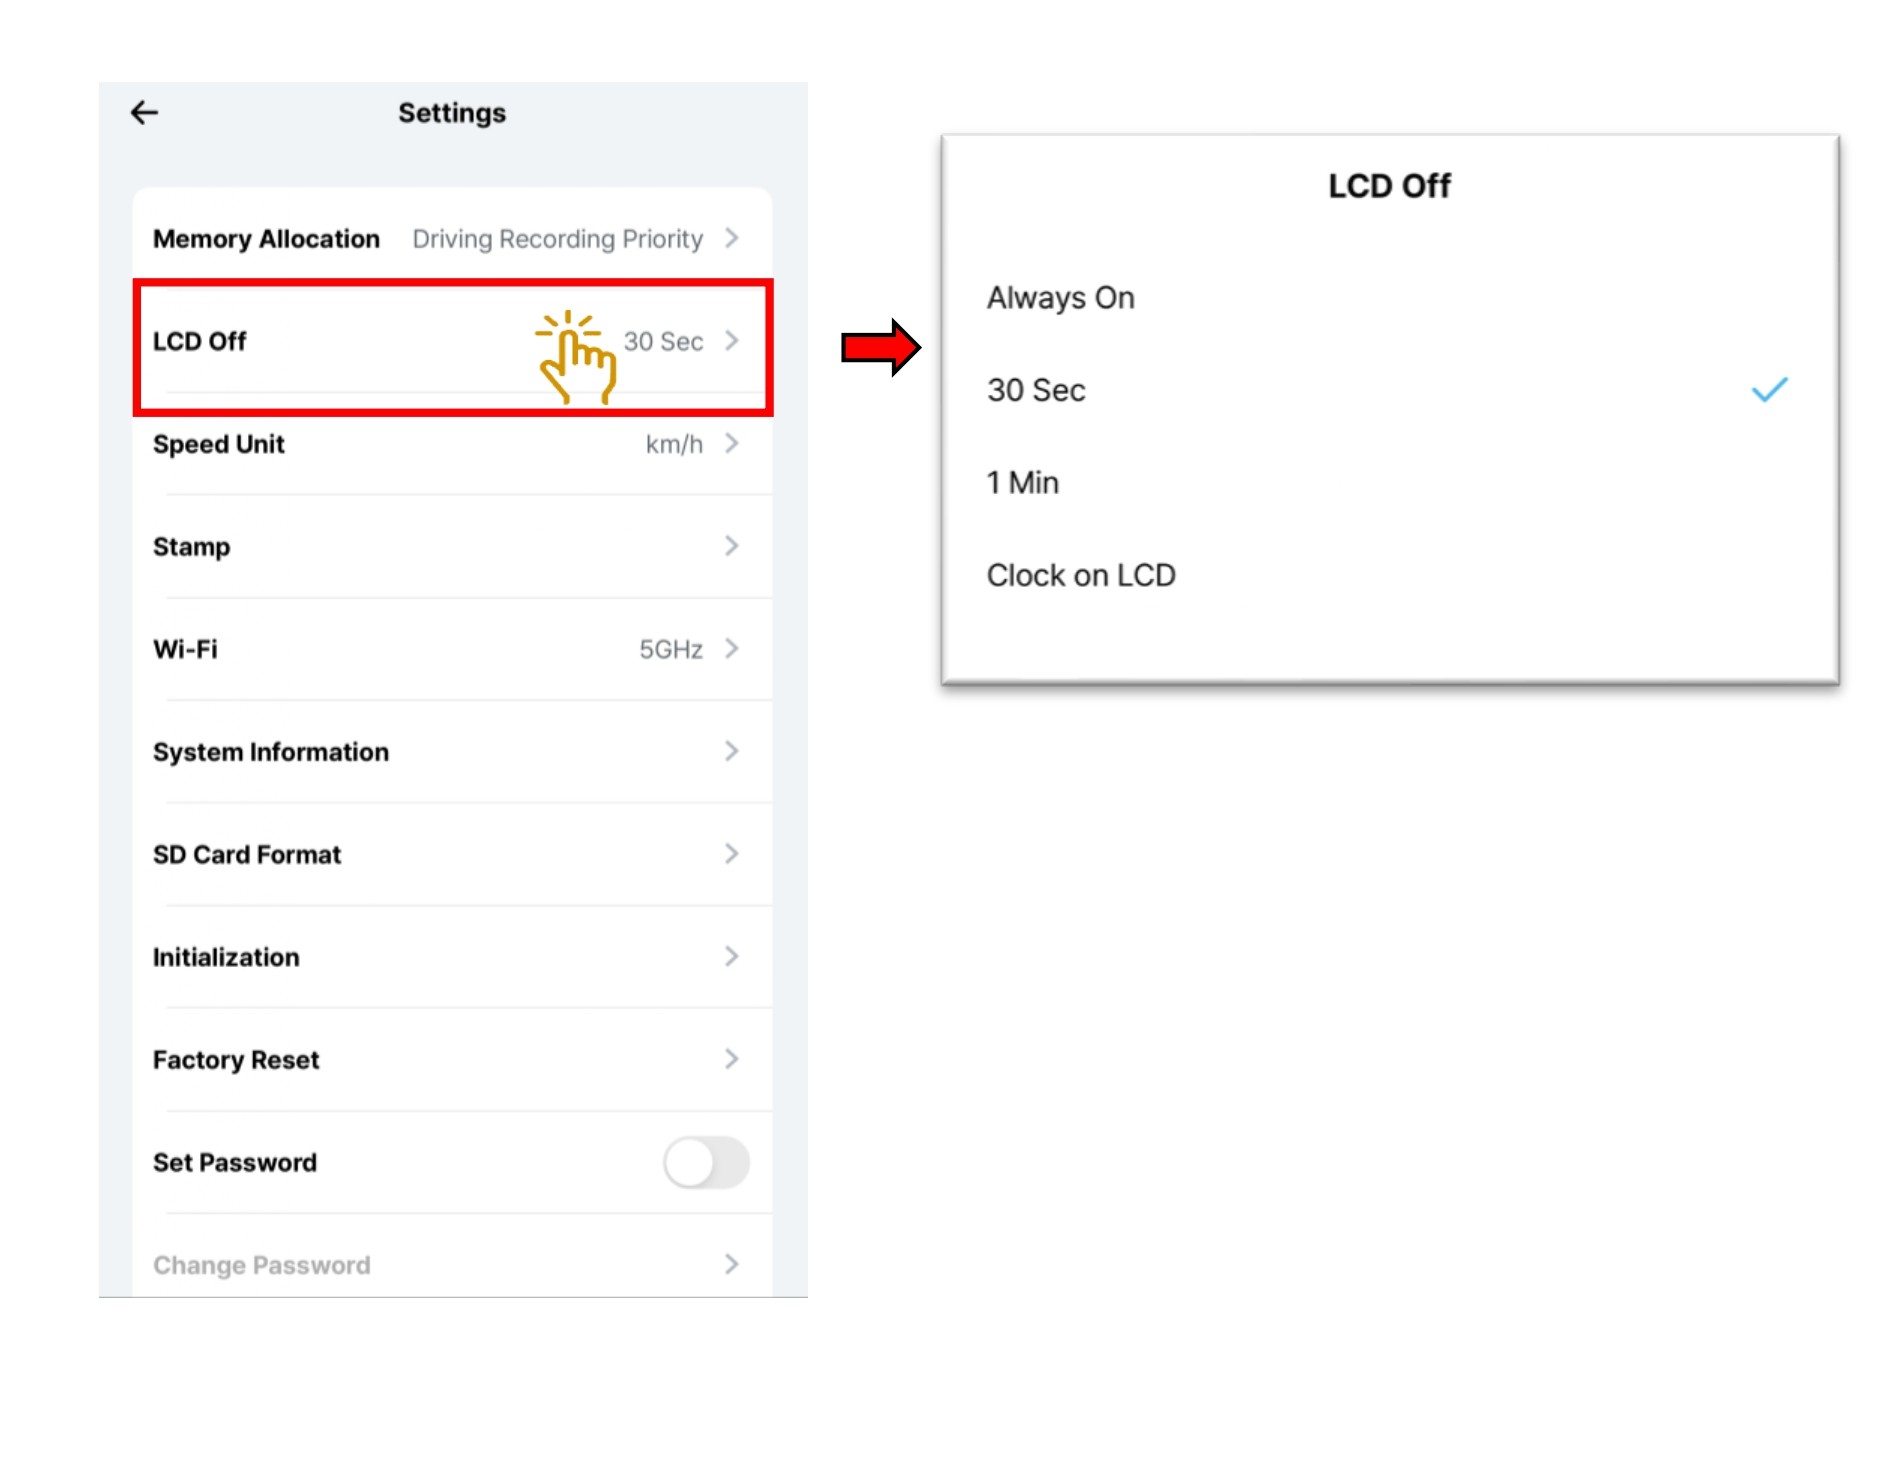
- Select "LCD Off".
- Choose the device’s auto LCD Off time or screen saving mode.
※ Even when ‘Always On’ and ‘Clock on LCD’ settings are enabled, the LCD may automatically turn off if the external temperature is too high.
5.3.11 Setting - System - Speed Unit
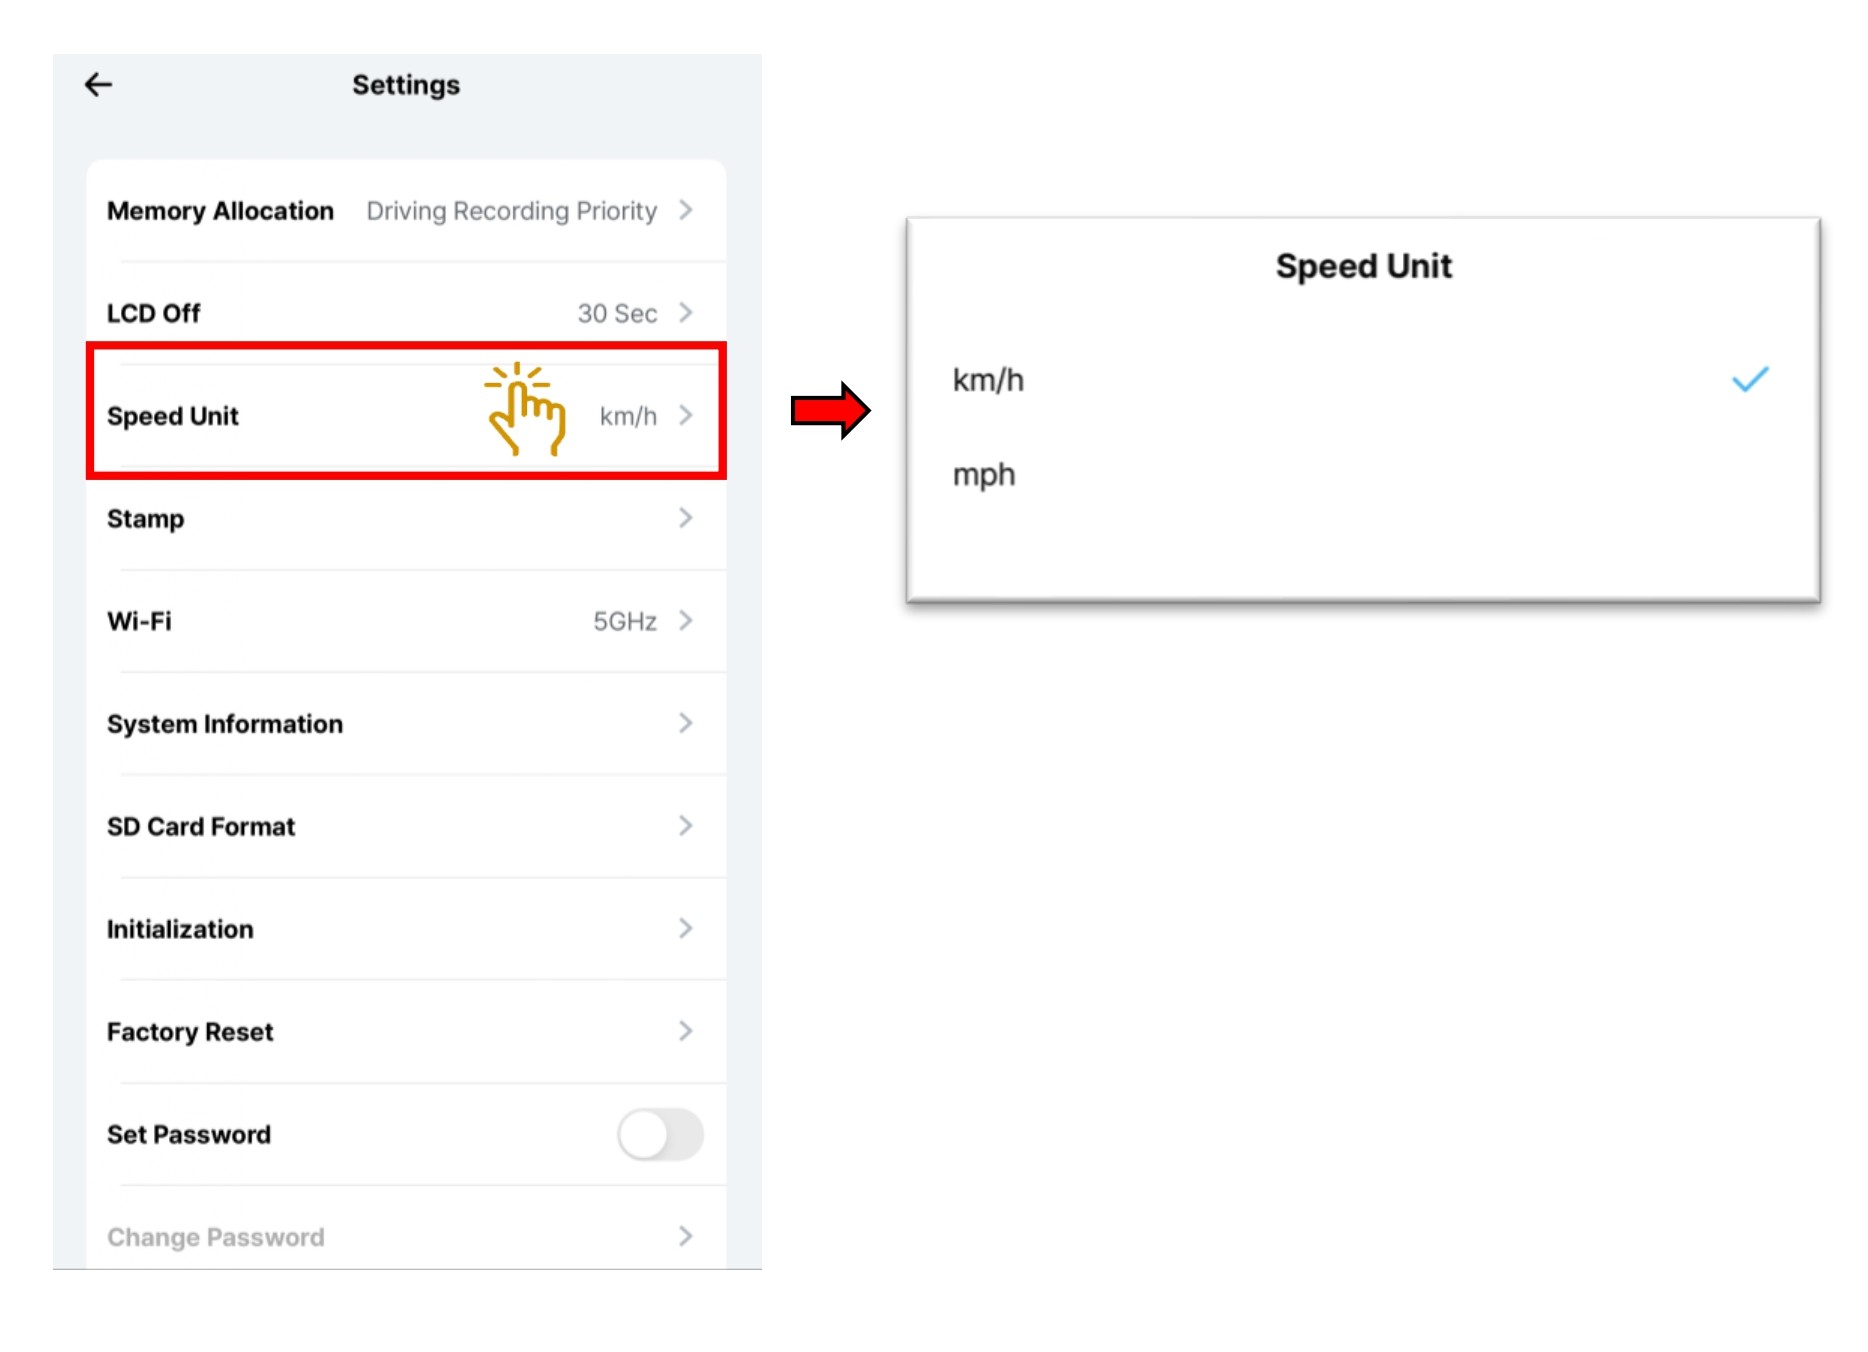
- Select "Speed Unit".
- Choose speed unit of your preferences km/h or mph unit
5.3.12 Setting - System - Stamp
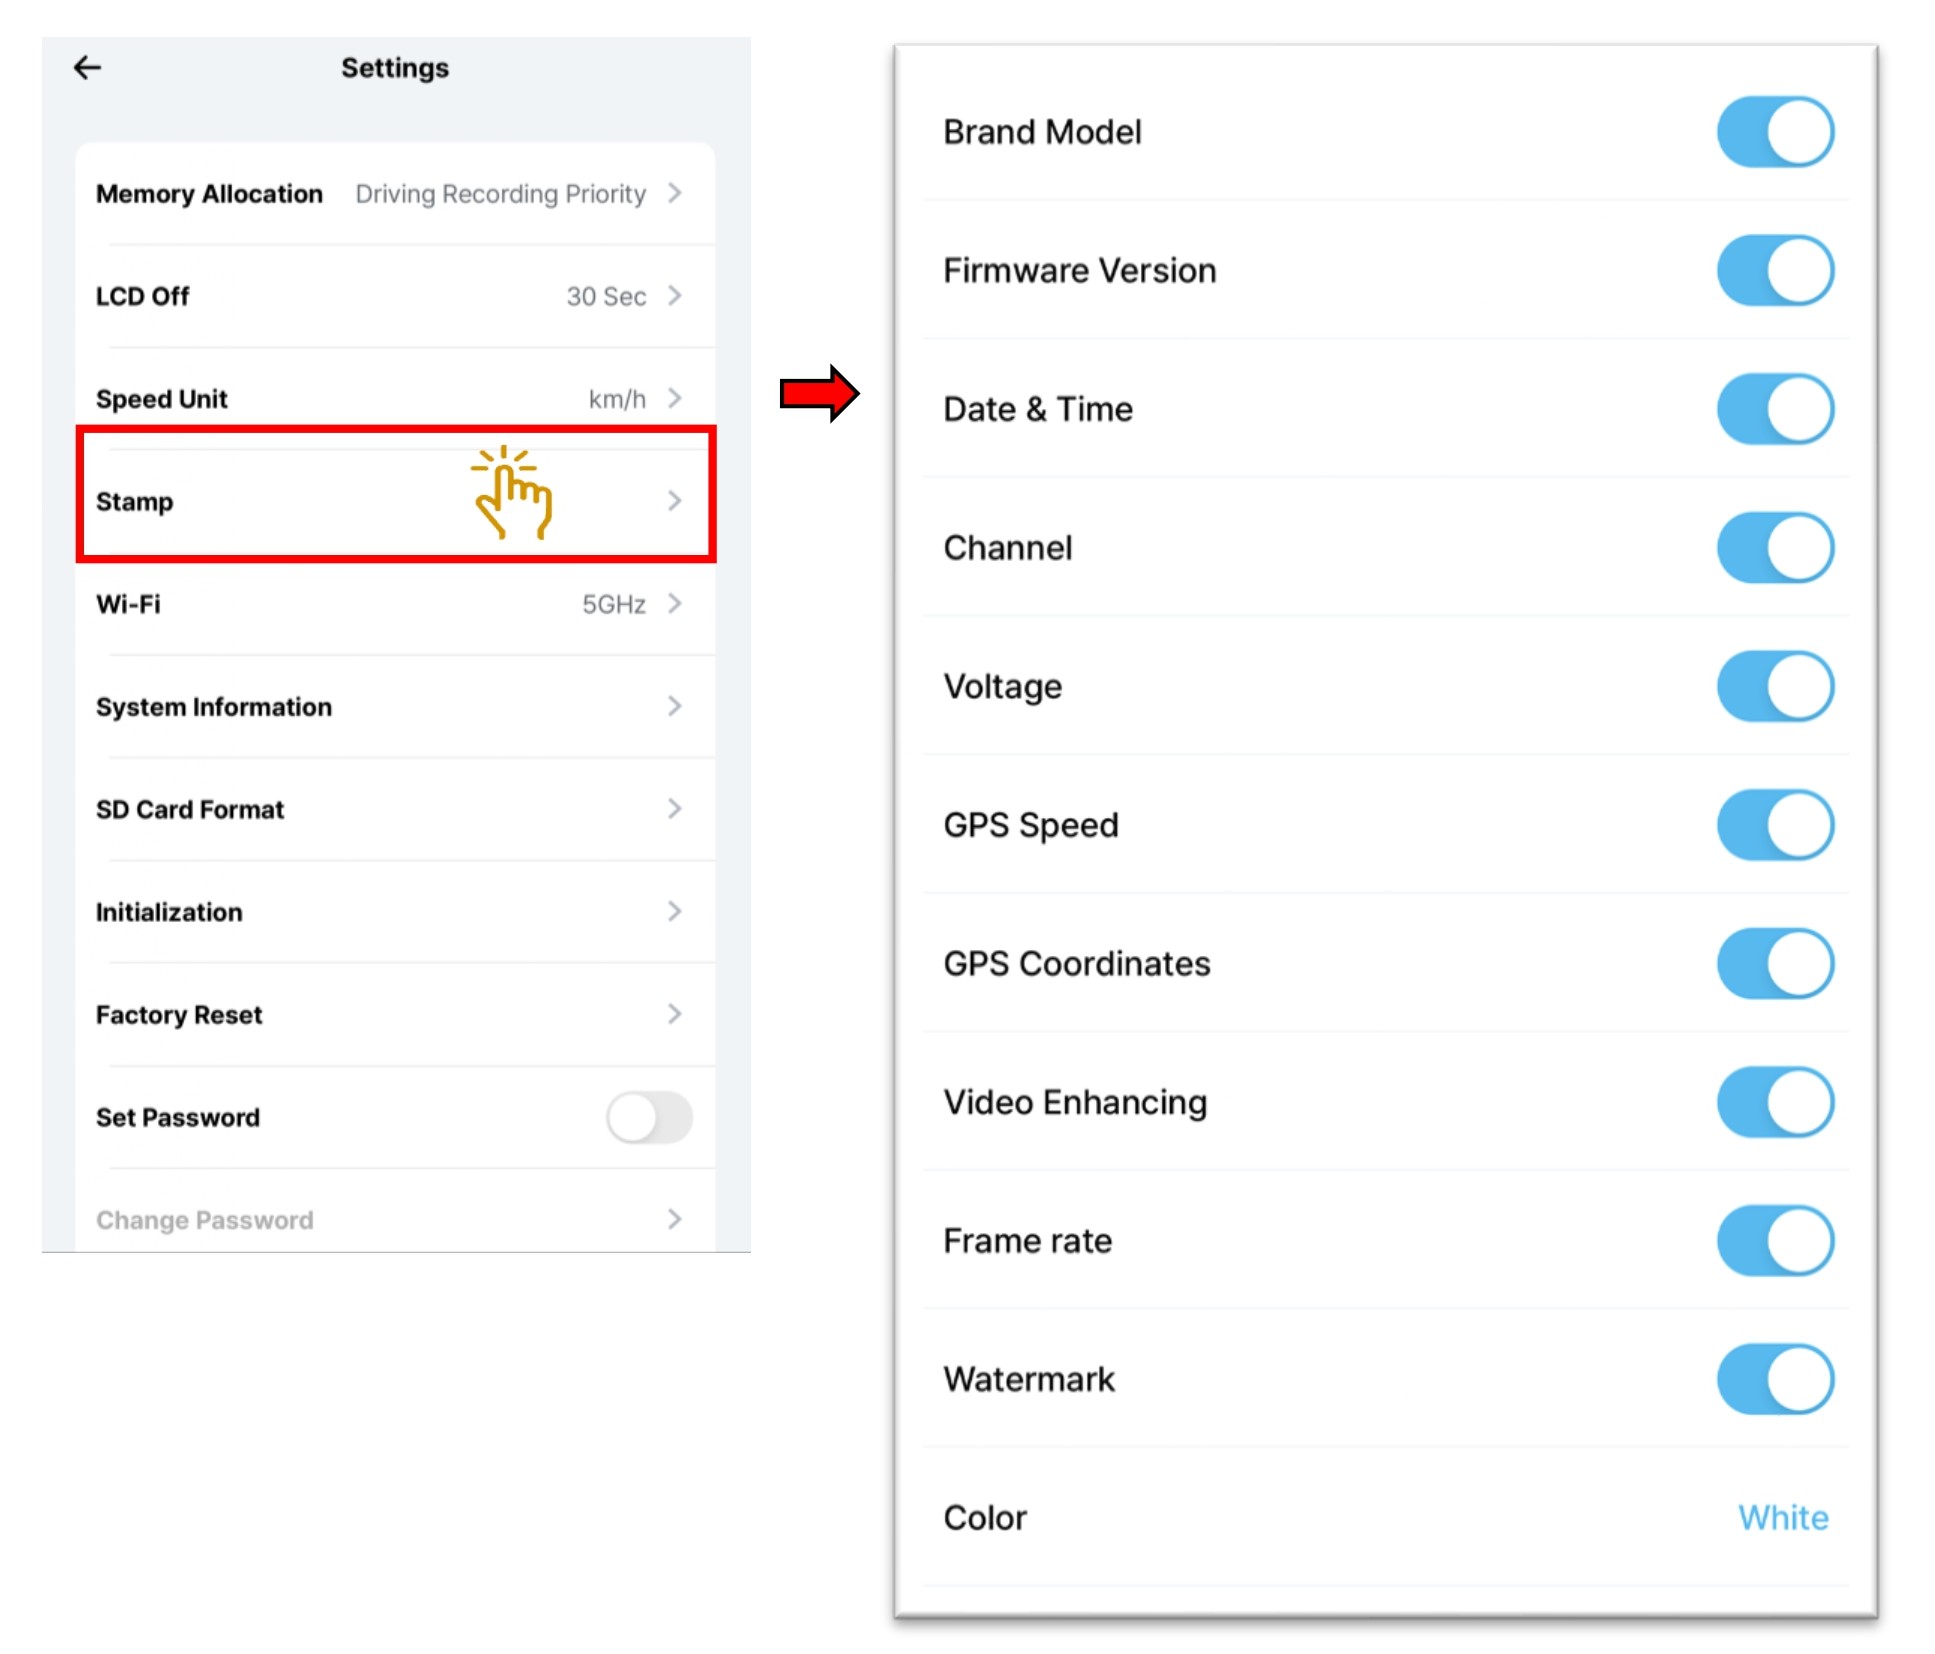
- Select "Stamp".
- Choose the following to turn On/Off display on the recorded videos.
Once turn off, the playback recorded videos will not show the following information
※Brand Model
※Firmware
※Date & Time
※Channel
※Voltage
※GPS Speed
※GPS Coordinates
※Video Enhancing
※Frame rate
※Watermark. The video saved via VUEROID Dashcam will display VUEROID logo in the upper left corner.
※Color. Text color : White, Yellow, Light Blue, Magenta
5.3.13 Setting - System - Wi-Fi
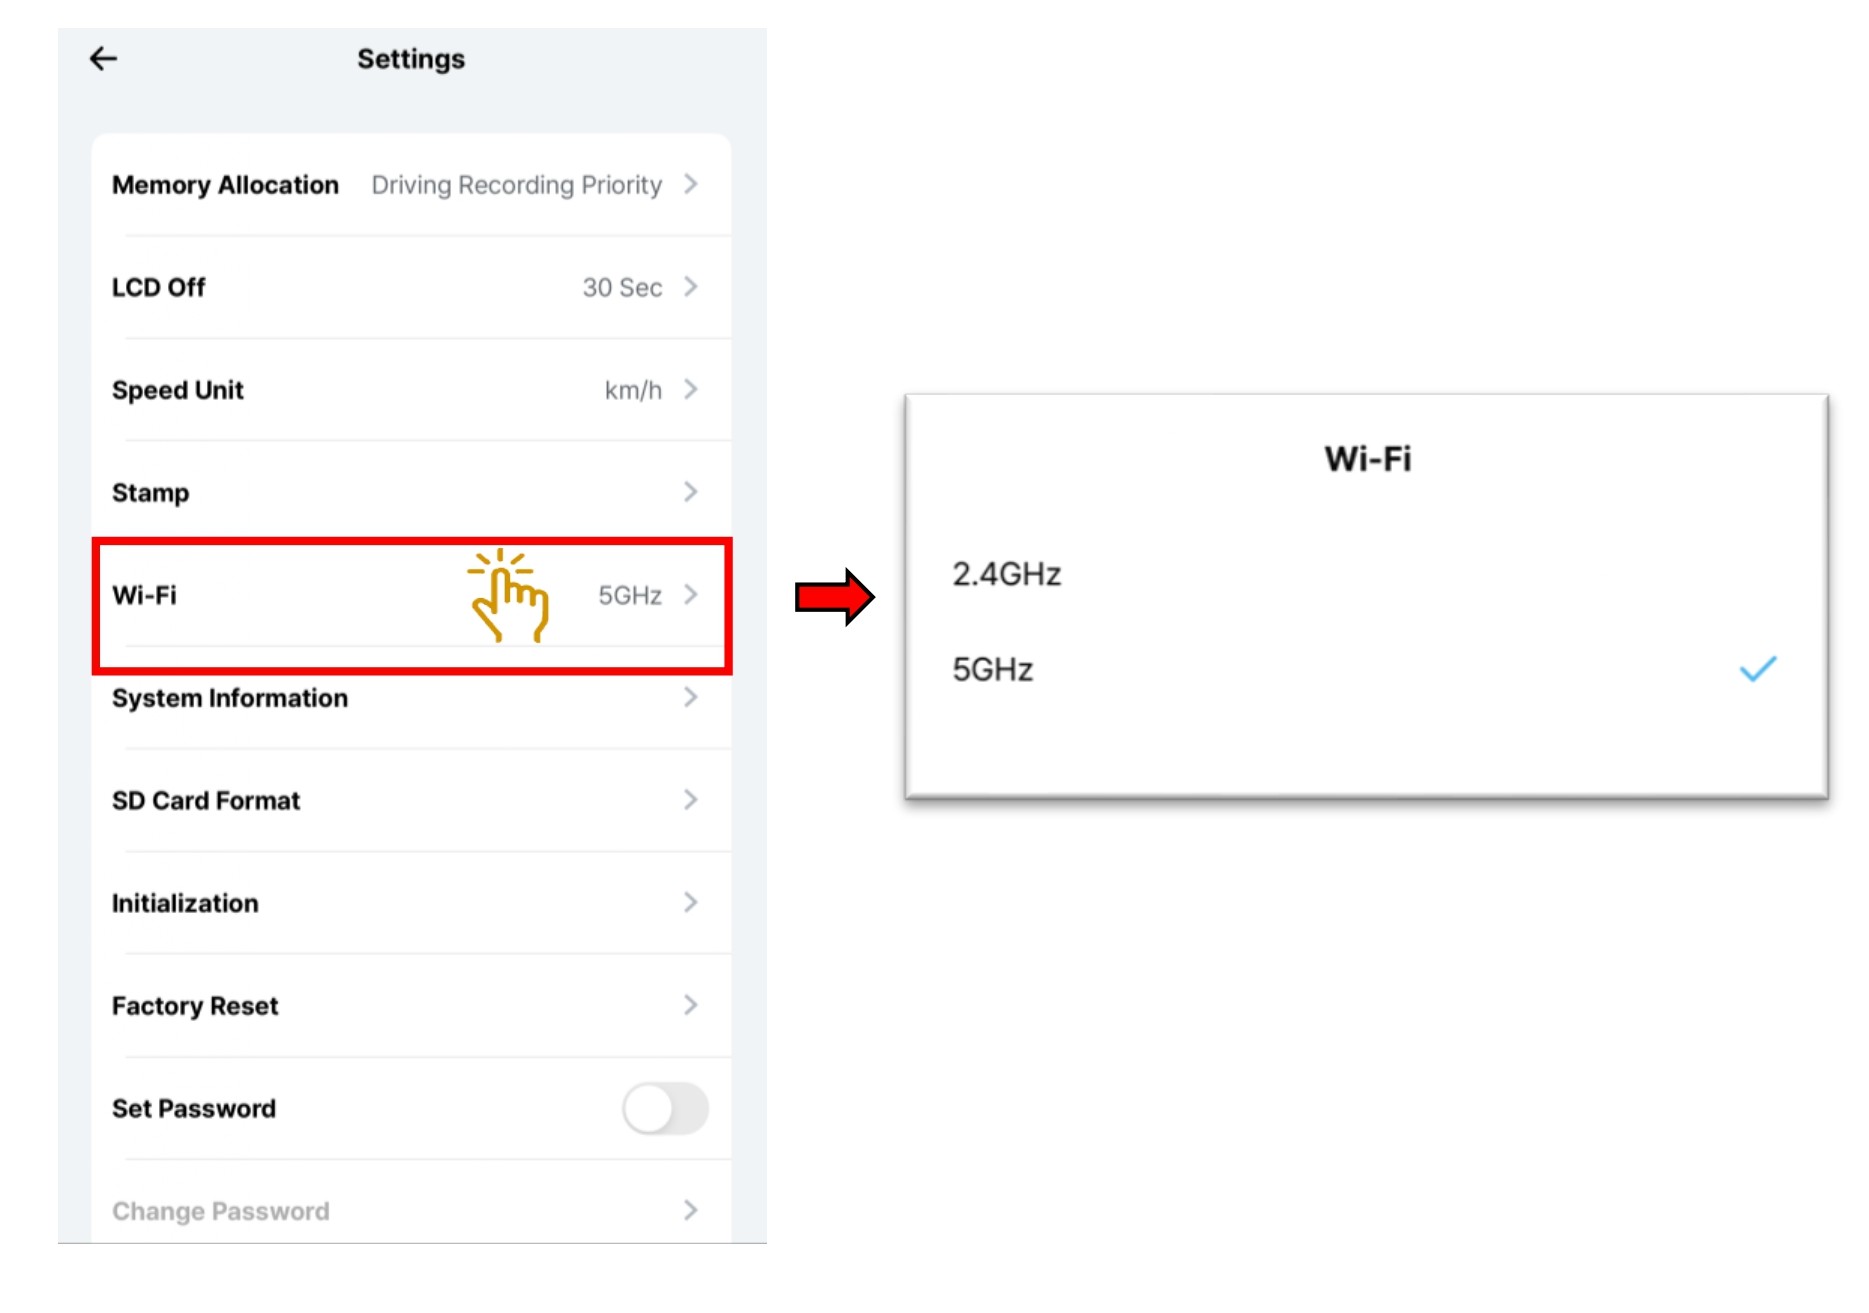
- Select "Wi-Fi" .
- Choose the bandwidth 2.5Ghz or 5Ghz depends on your mobile phone.
5.3.14 Setting - System - System Information
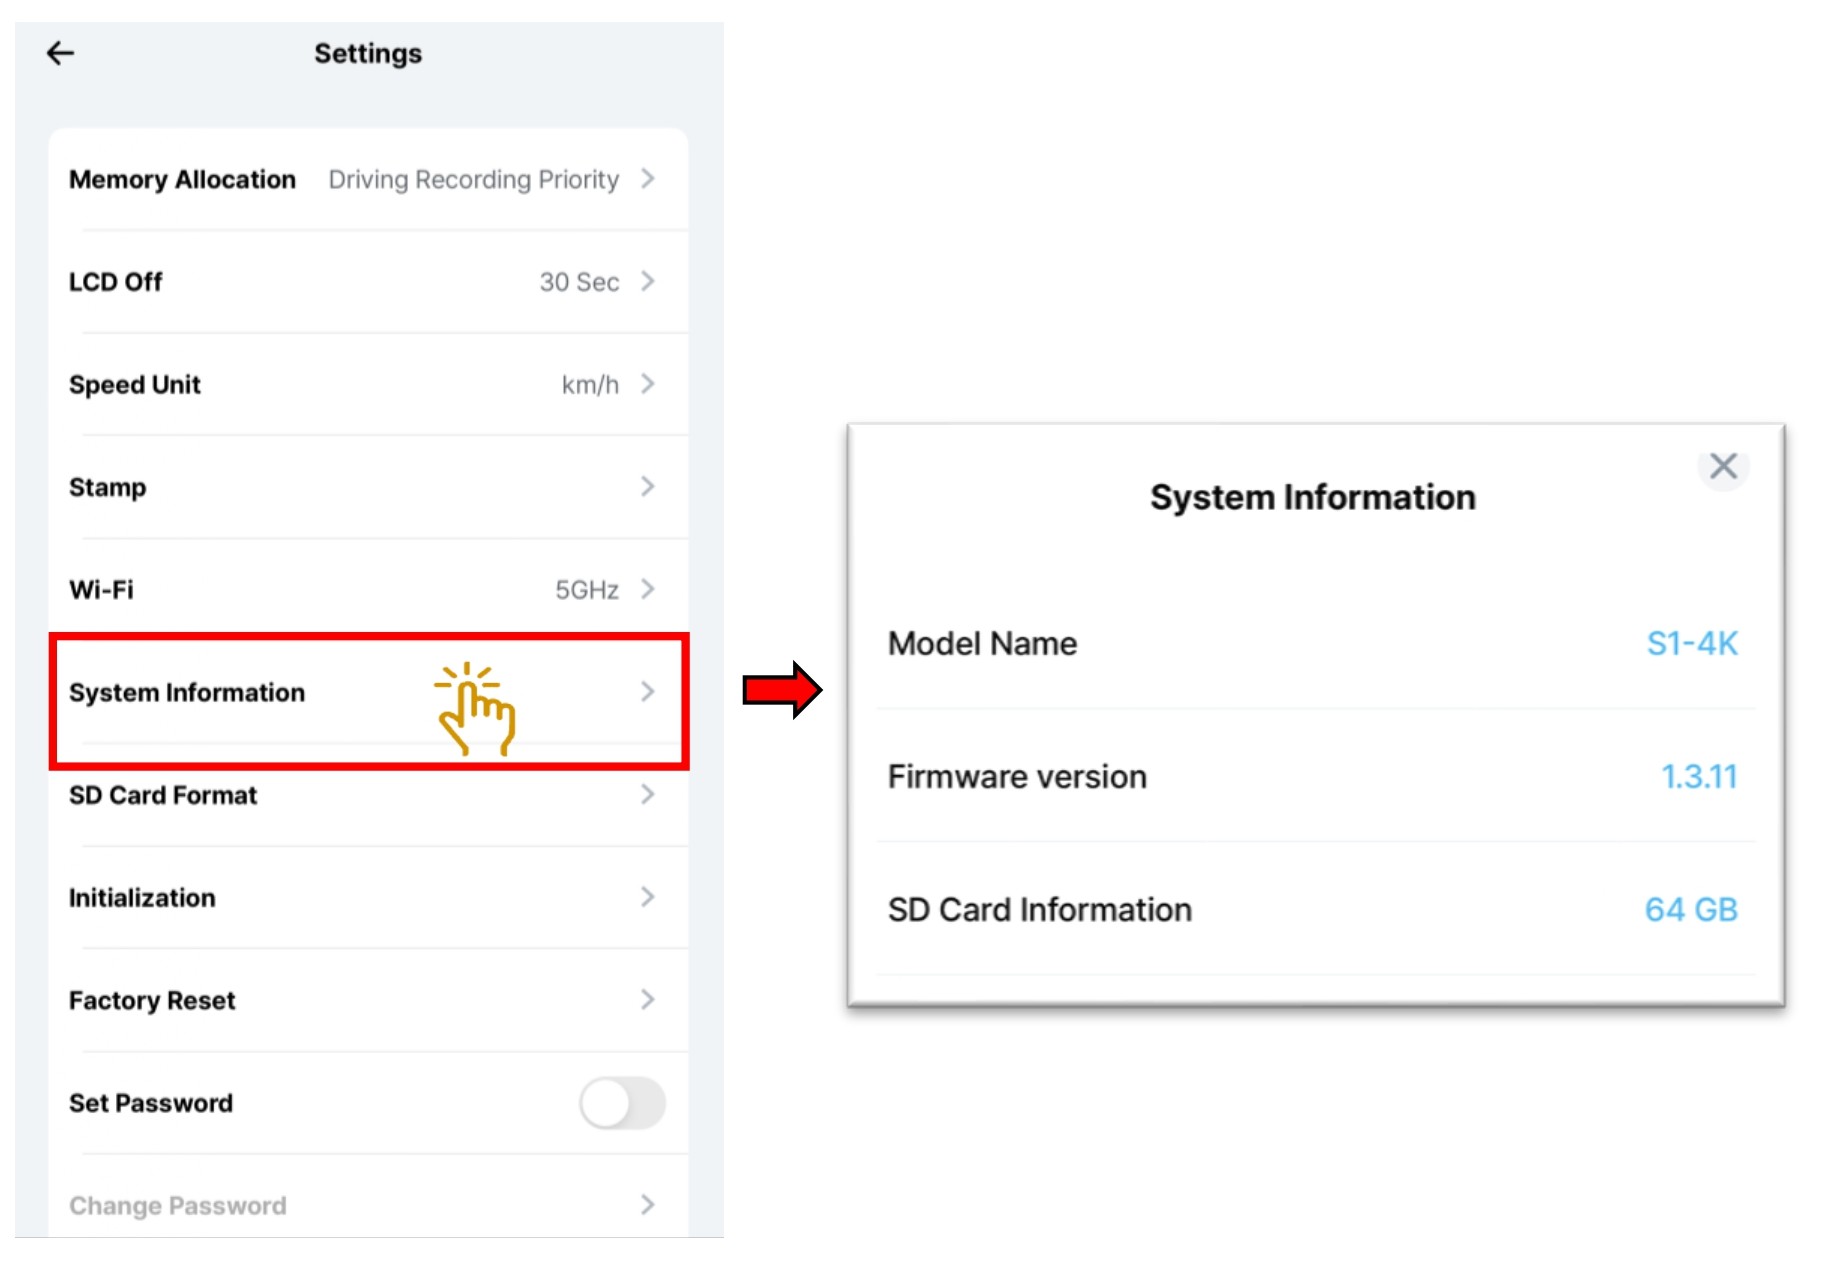
- Select "System Information".
- Showing device’s model name, firmware version, Micro SD Card capacity.
5.3.15 Setting - System - SD Card Format
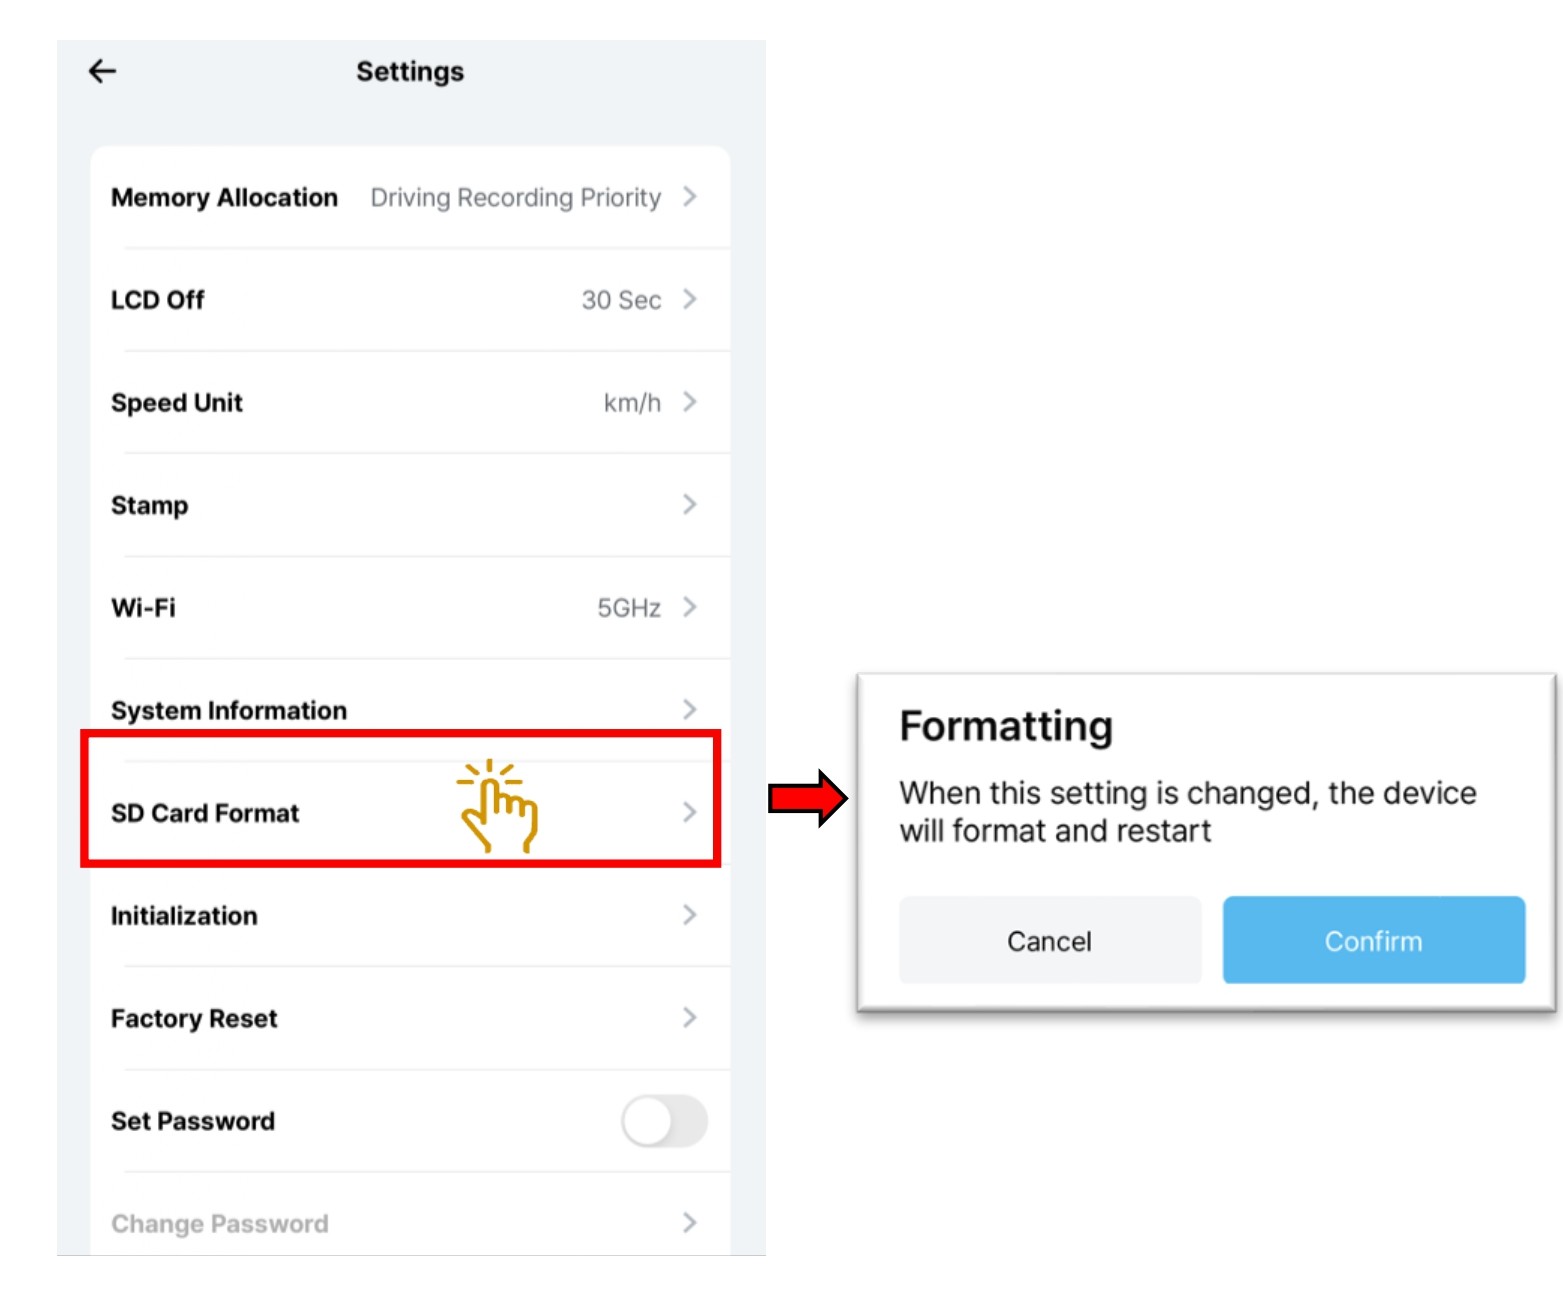
- Select "SD Card Format".
- Choose "Confirm", to format the SD card. All videos will be erased after formatting.
5.3.16 Setting - System - Initialization
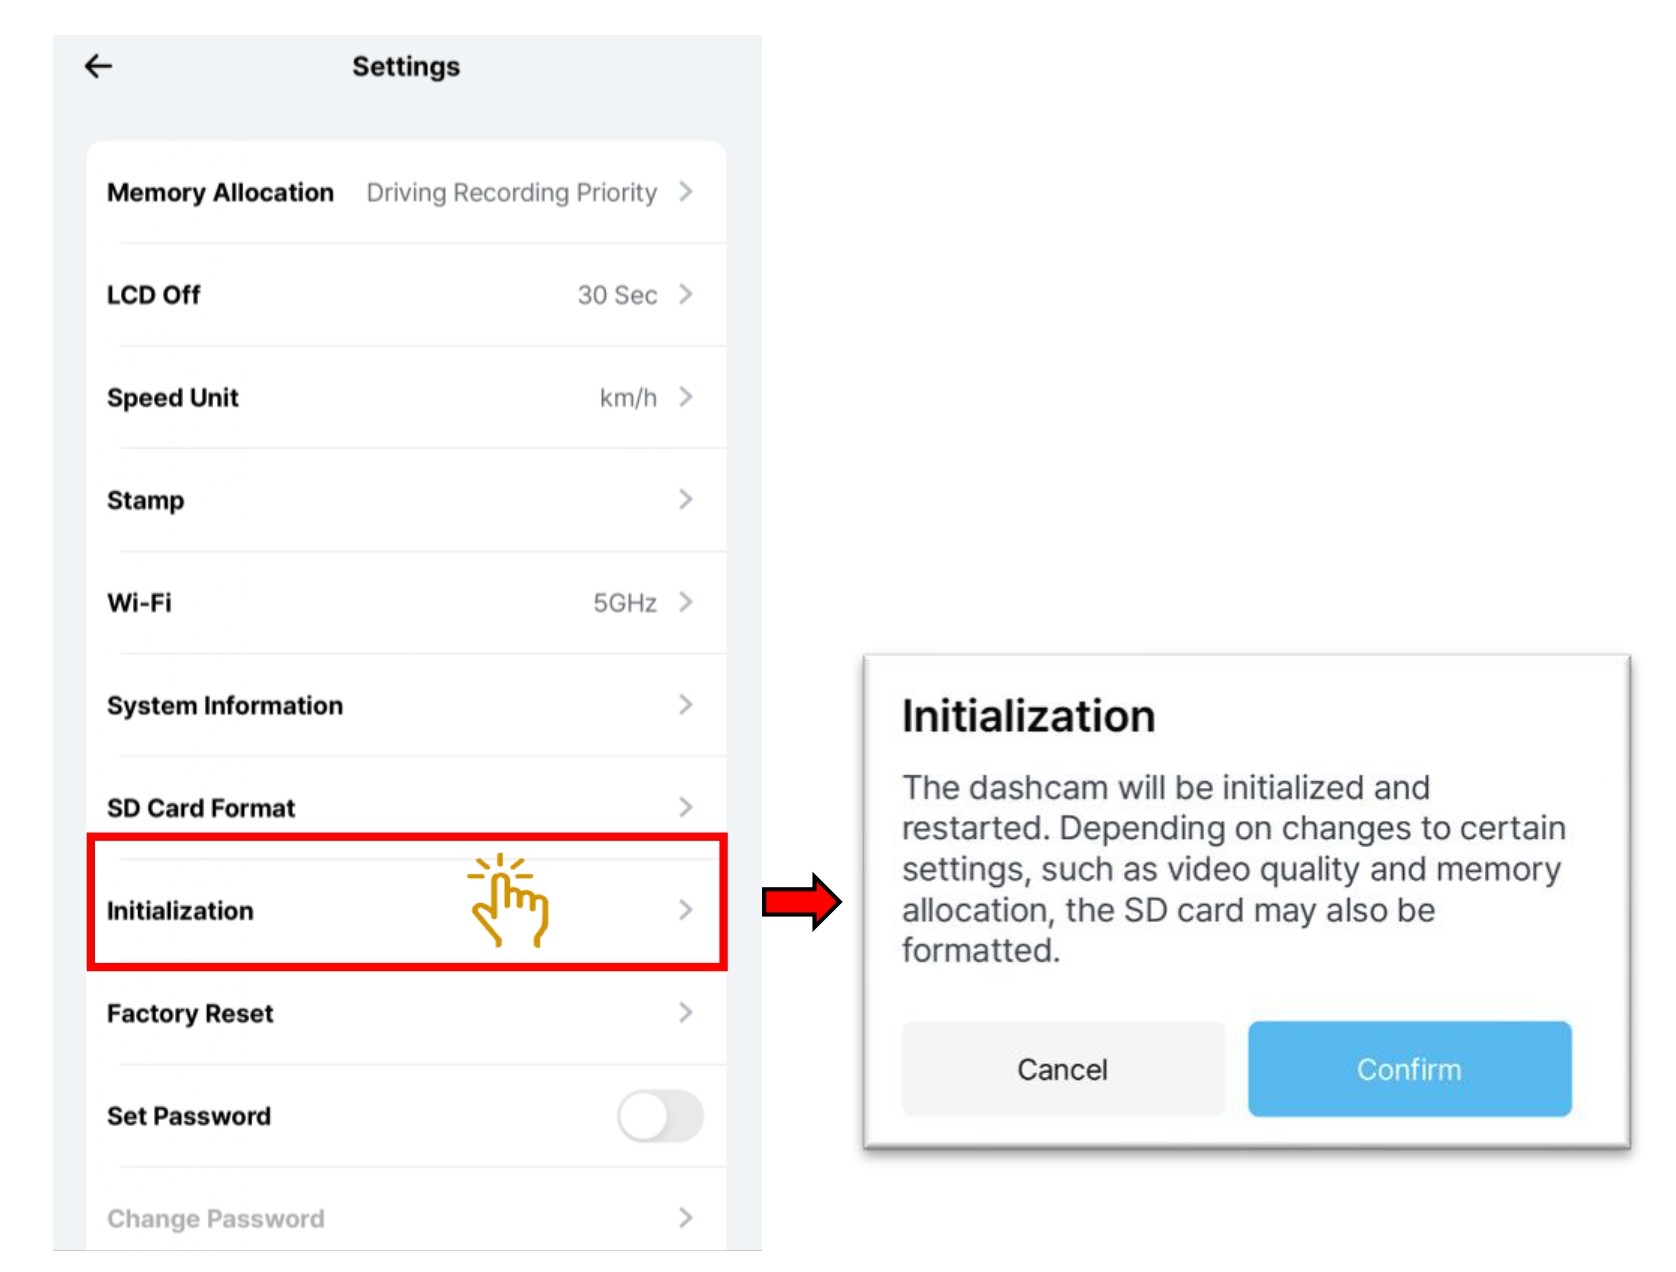
- Select "Initialization".
- Initialize - Restores settings to their default values only. Depending on the current settings, the SD card
may be formatted. (Regional settings, such as date and time zone, may not be reset.).
All videos will be erased.
5.3.17 Setting - System - Factory Reset
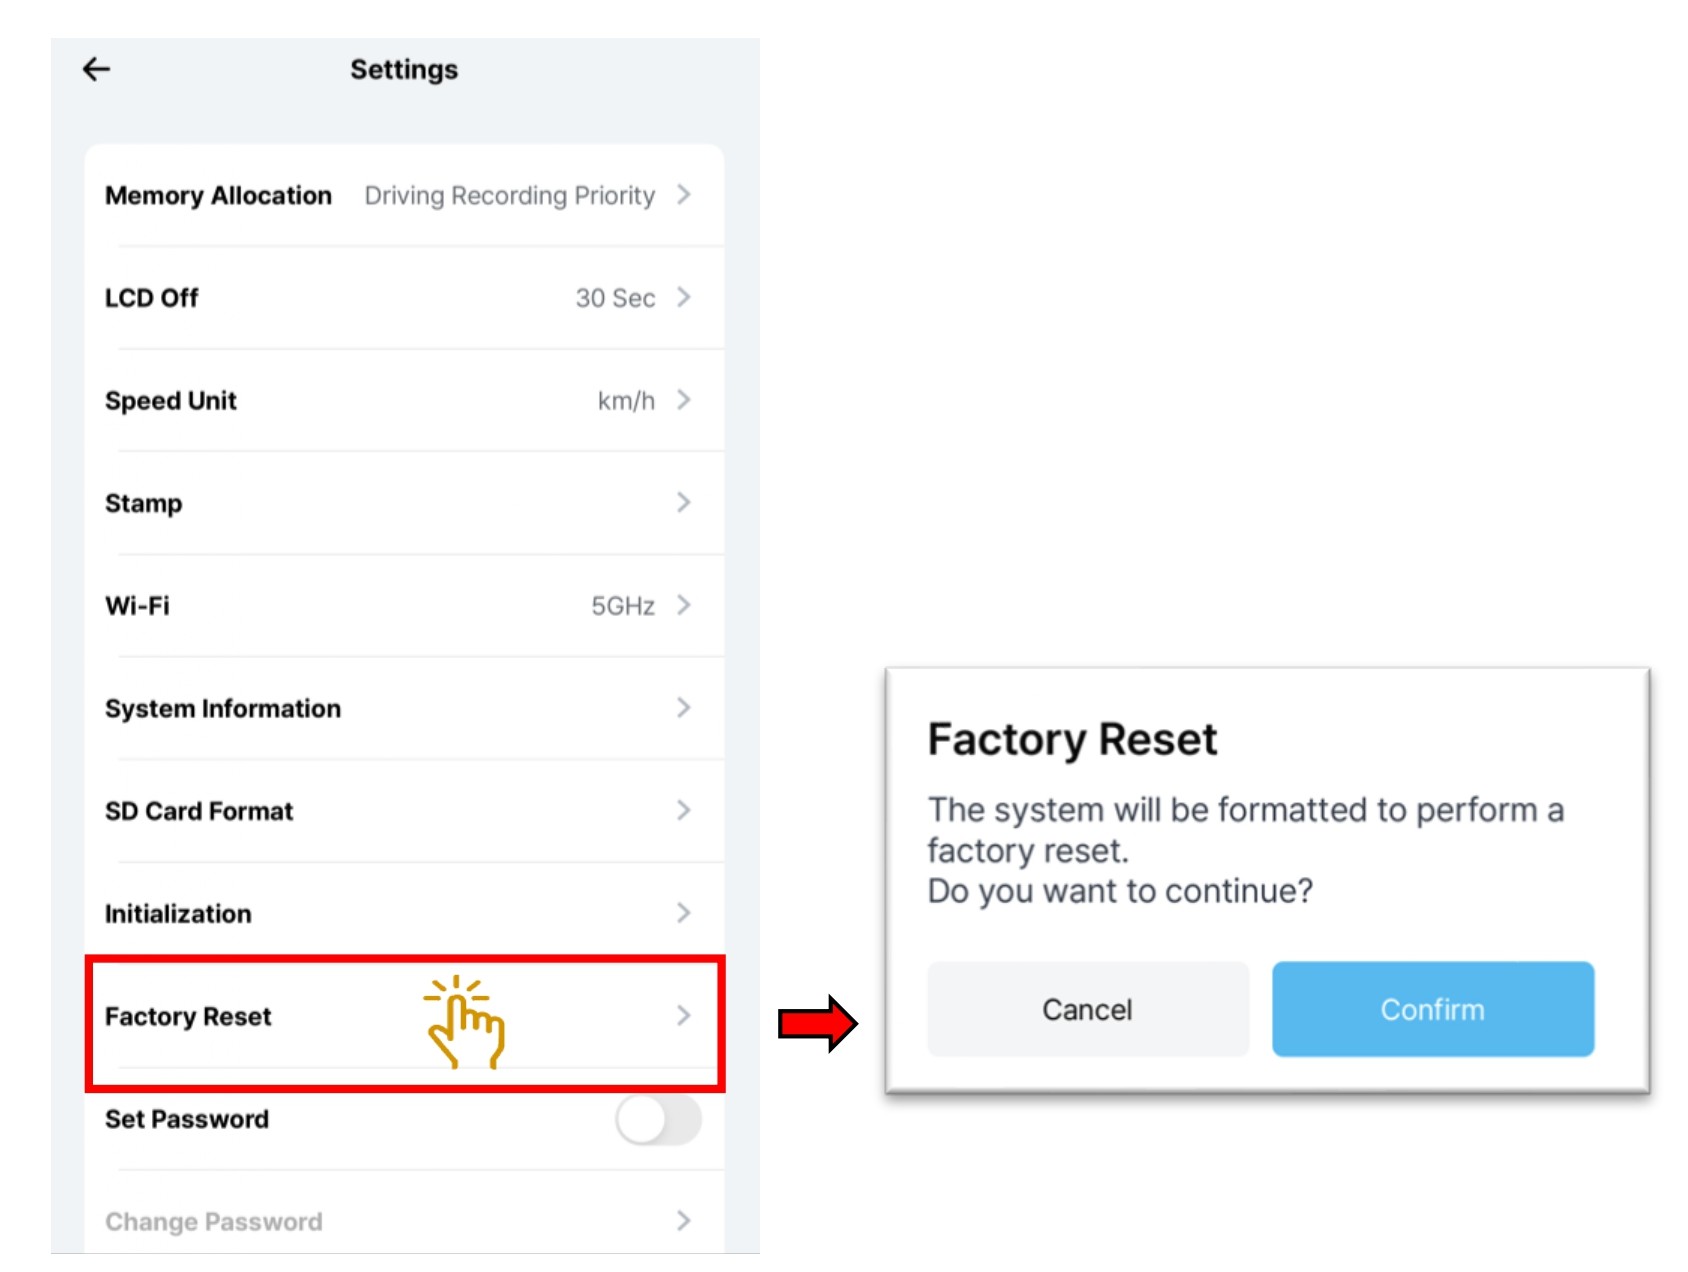
- Select "Factory Reset".
- Factory reset - Formats the SD card and resets all data and settings to factory defaults. The firmware
version remains unchanged. All videos will be erased.
5.3.18 Setting - System - Password.
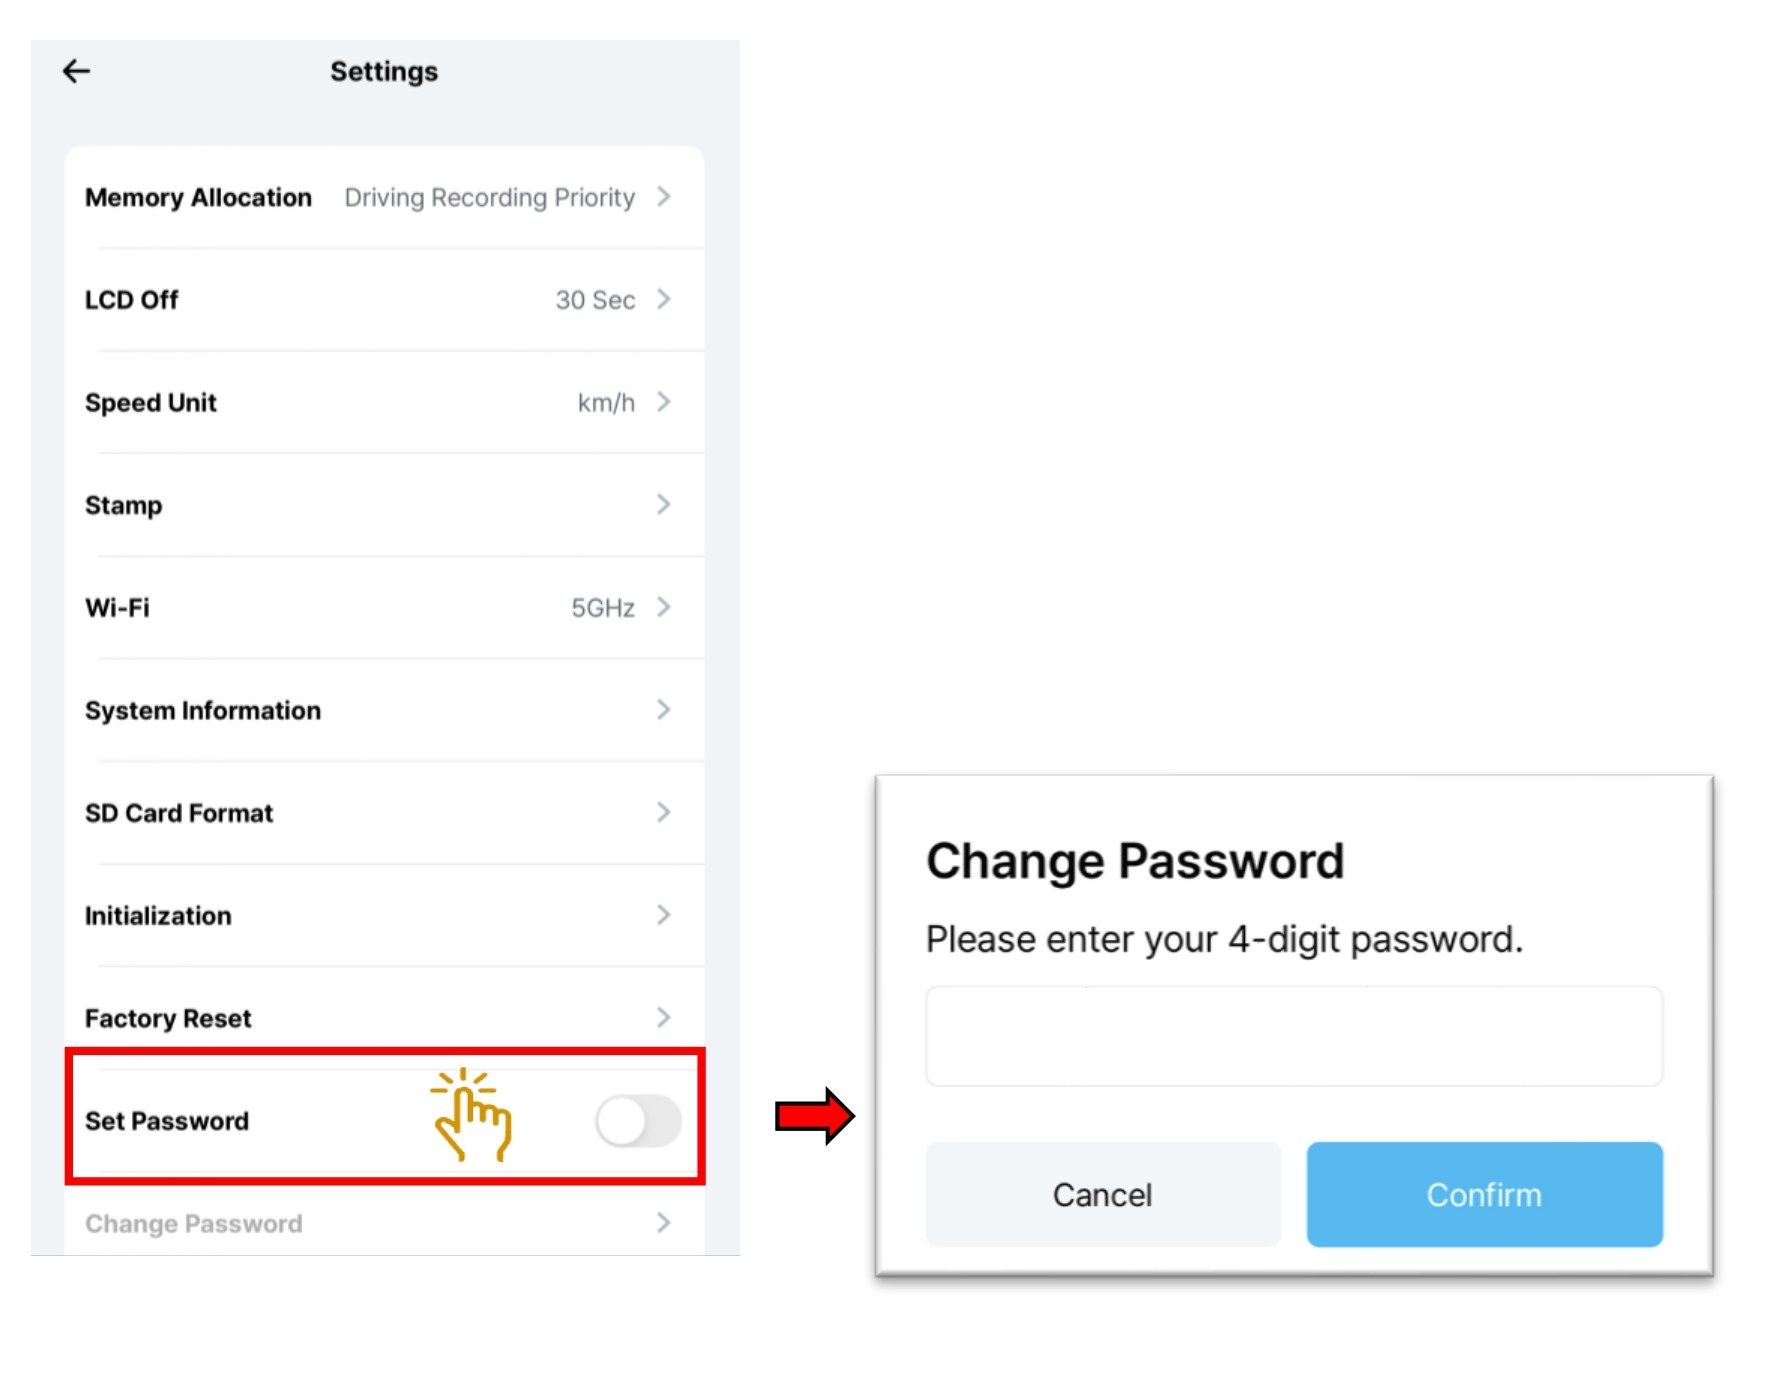
- Select "Set Password".
- Input 4 numerical for the password setting and click "Confirm"
5.3.19 Setting - System - Change Password.
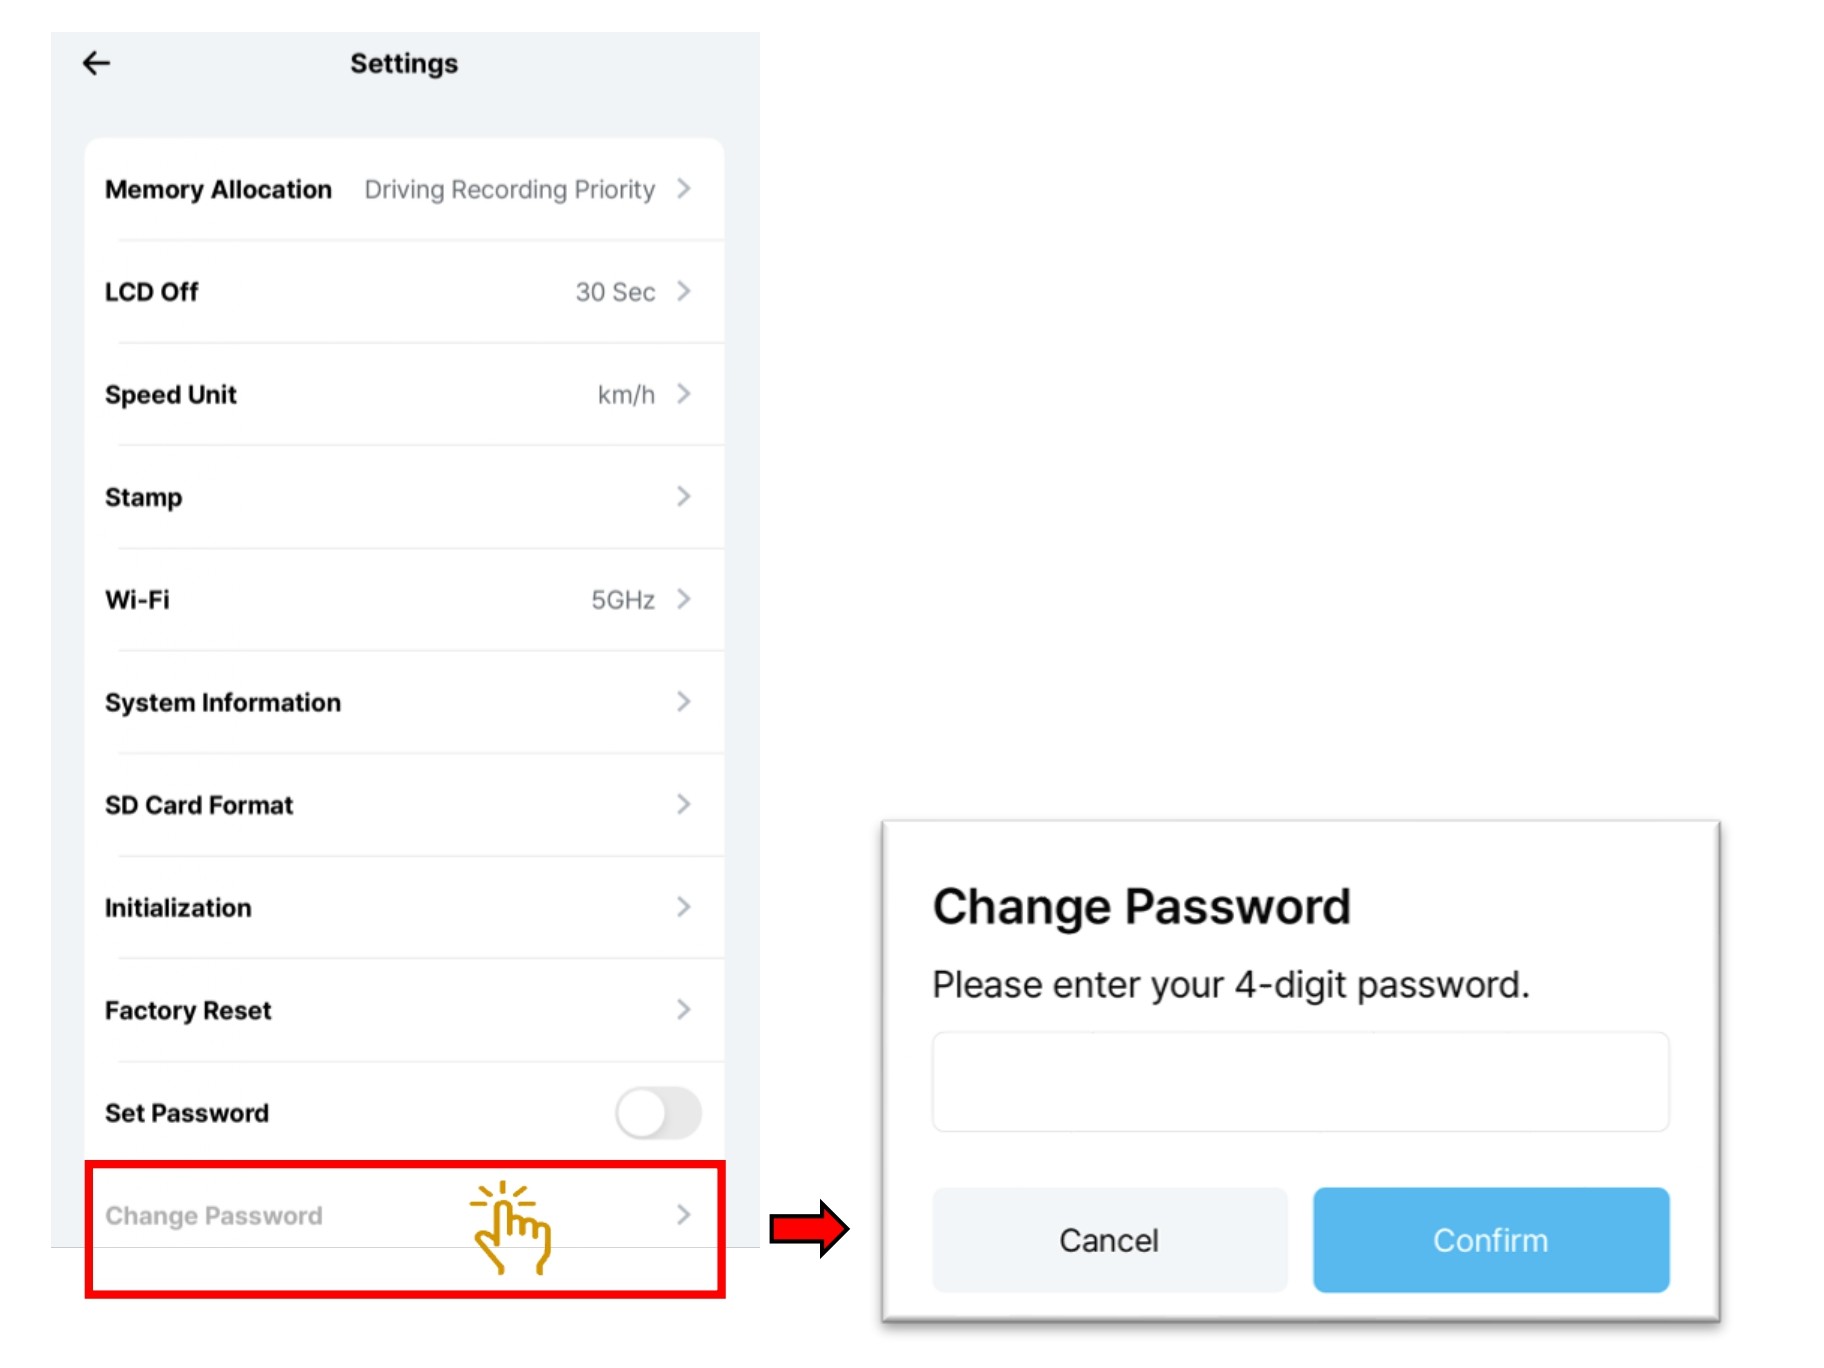
- Select "Change Password".
- Input NEW 4 numerical for the password setting and click "Confirm".
5.3.20 Setting - System - Language
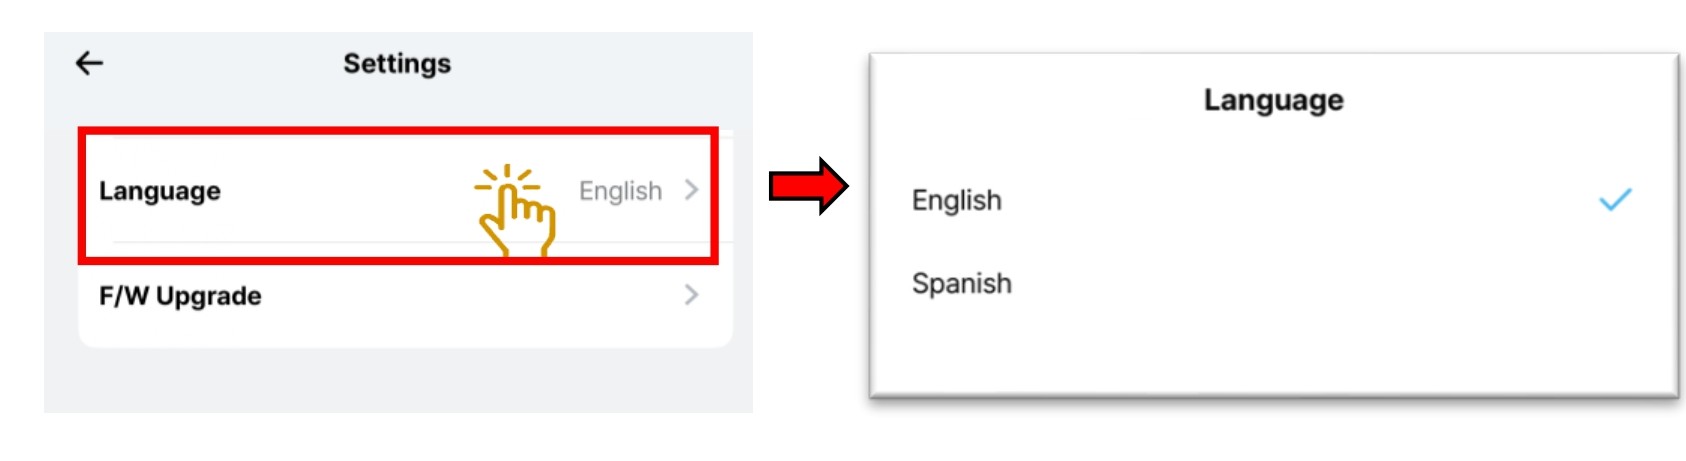
- Choose "Language".
- Select the language preferences.
5.3.21 Setting - System - F/W Upgrade
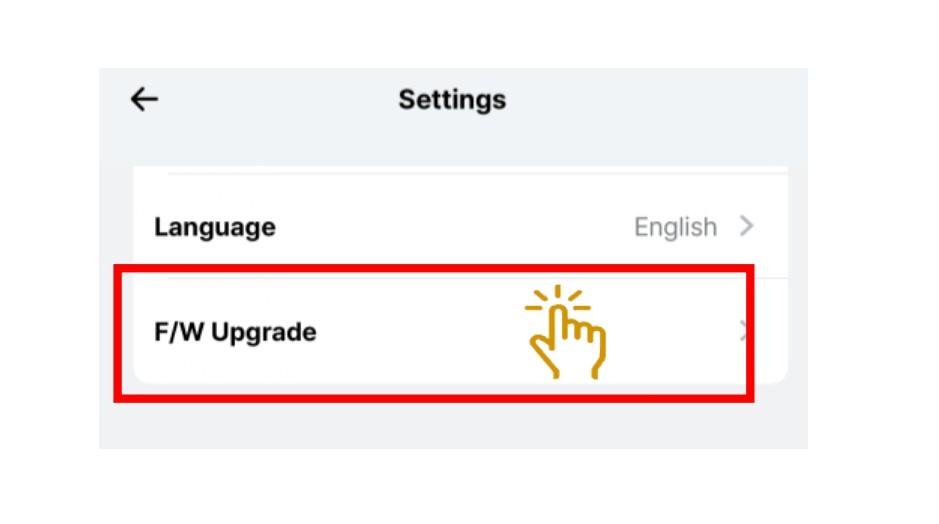
- If there is new firmware released, click on F/W upgrade.
6. CUSTOMER SERVICE
Local Service Centre:
WOW! Gadgets Pte Ltd
8 Boon Lay Way, 04-02 Tradehub 21
Singapore 609964
Tel: (65) 61009691