User Manual Cellink B8
Table of Contents
1.0 Introduction
Thank you for purchasing this Cellink dashcam battery made by Egen Inc.
This instruction manual contains information on how to operate your dashcam battery.
Before using the product, we recommend that you read through this manual to ensure correct usage.
To improve the performance of the product, the contents of this manual are subject to change without prior notice.
The CELLINK B8 Battery is designed to power your dashcam in Parking Mode for extended periods of time without using your vehicle’s battery.
1.1 Safety
For user safety and to avoid property damage, read through this manual and follow these safety instructions to use the product correctly.
- Do not disassemble, repair, or modify the product yourself. Doing so may cause fire, electric shock, or malfunction. For internal inspection and repair, contact the service center.
- Do not use a damaged or modified power cable. Only use the cords provided by the manufacturer. Damaged or modified power cable may cause an explosion, fire, or malfunction.
- Do not install the product in an environment with high humidity, or combustible gases or liquids. Doing so may cause an explosion and/or fire.
- Do not spray water or wax directly onto the product while cleaning the inside of the car. Doing so may cause fire, electric shock, or malfunction.
- Do not install the product in a confined space or cover with material without ventilation. Failure to do may cause excessive heat or fire.
- Do not use cigar jack splitter to power the product as it normally has low power rating. Failure to do may cause excessive heat, fire or malfunction.
- Do not place the battery in microwave oven or a place with high pressure. Failure to do may cause explosion or fire.
- Do not throw or give the battery any types of shocks. Failure to do so may cause malfunction.
- If smoke or an unusual smell is emitted from product, detach the power cord immediately. Contact the service center or your distributor.
- Keep the terminals of the power cable clean. Failure to do so may cause excessive heat and fire.
- Plug in the power cord firmly so that it cannot easily be disconnected. Failure to do so may cause excessive heat or fire.
- Use the correct input voltage. Failure to do so may cause explosion, fire, or malfunction.
- Keep the product away from children or pets. Failure to do so may cause electrical shock or malfunction.
- If you charge the product using the cigar jack cable, make sure the switch is selected to FIX/ LOW for low current current. Failure to do so may cause excessive heat, fire or malfunction.
- Keep out of direct sunlight and high temperature environment when storing the product. Failure to do so may cause fire or malfunction.
- Cellink battery is a consumable item. If the battery is defective, please disposed responsibly and exchange with a new product.
- Do not use the battery in a static environment as it can affect the performance of protection circuit.
- Never use the product for anything else other than the power supply for dashcam.
1.2 Overview
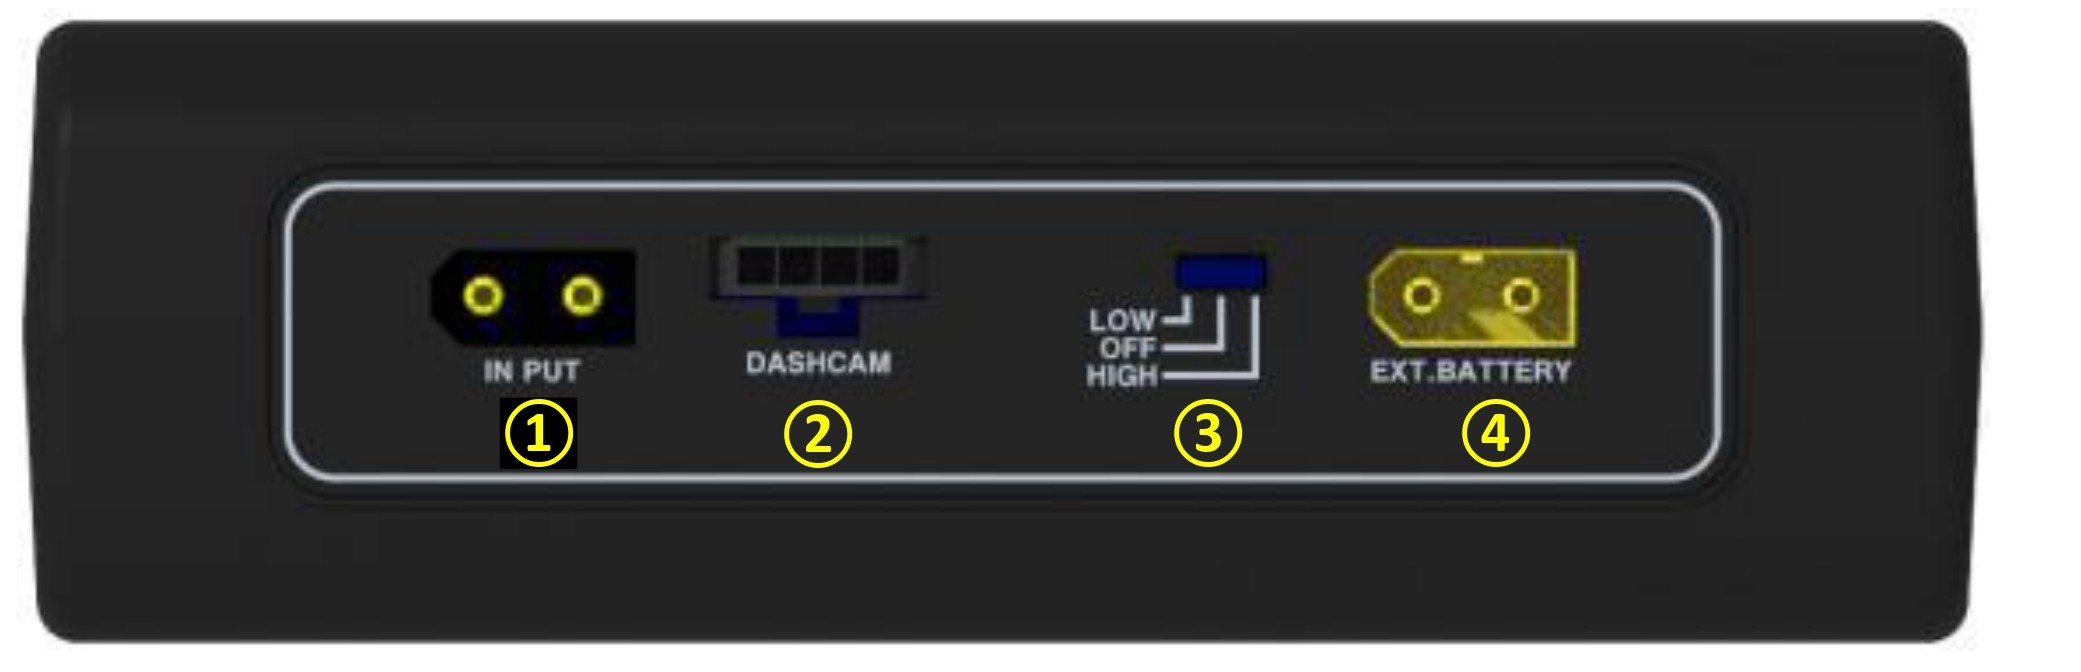
● 1. INPUT : The charging connector for connecting to the Cigar lighter socket and ACC Power in the Fuse box.
▷Cigar-lighter socket : 5Ah charging
▷ACC Power : 7Ah Charging
● 2. OUTPUT : The discharging connector for connecting to the dashcam.
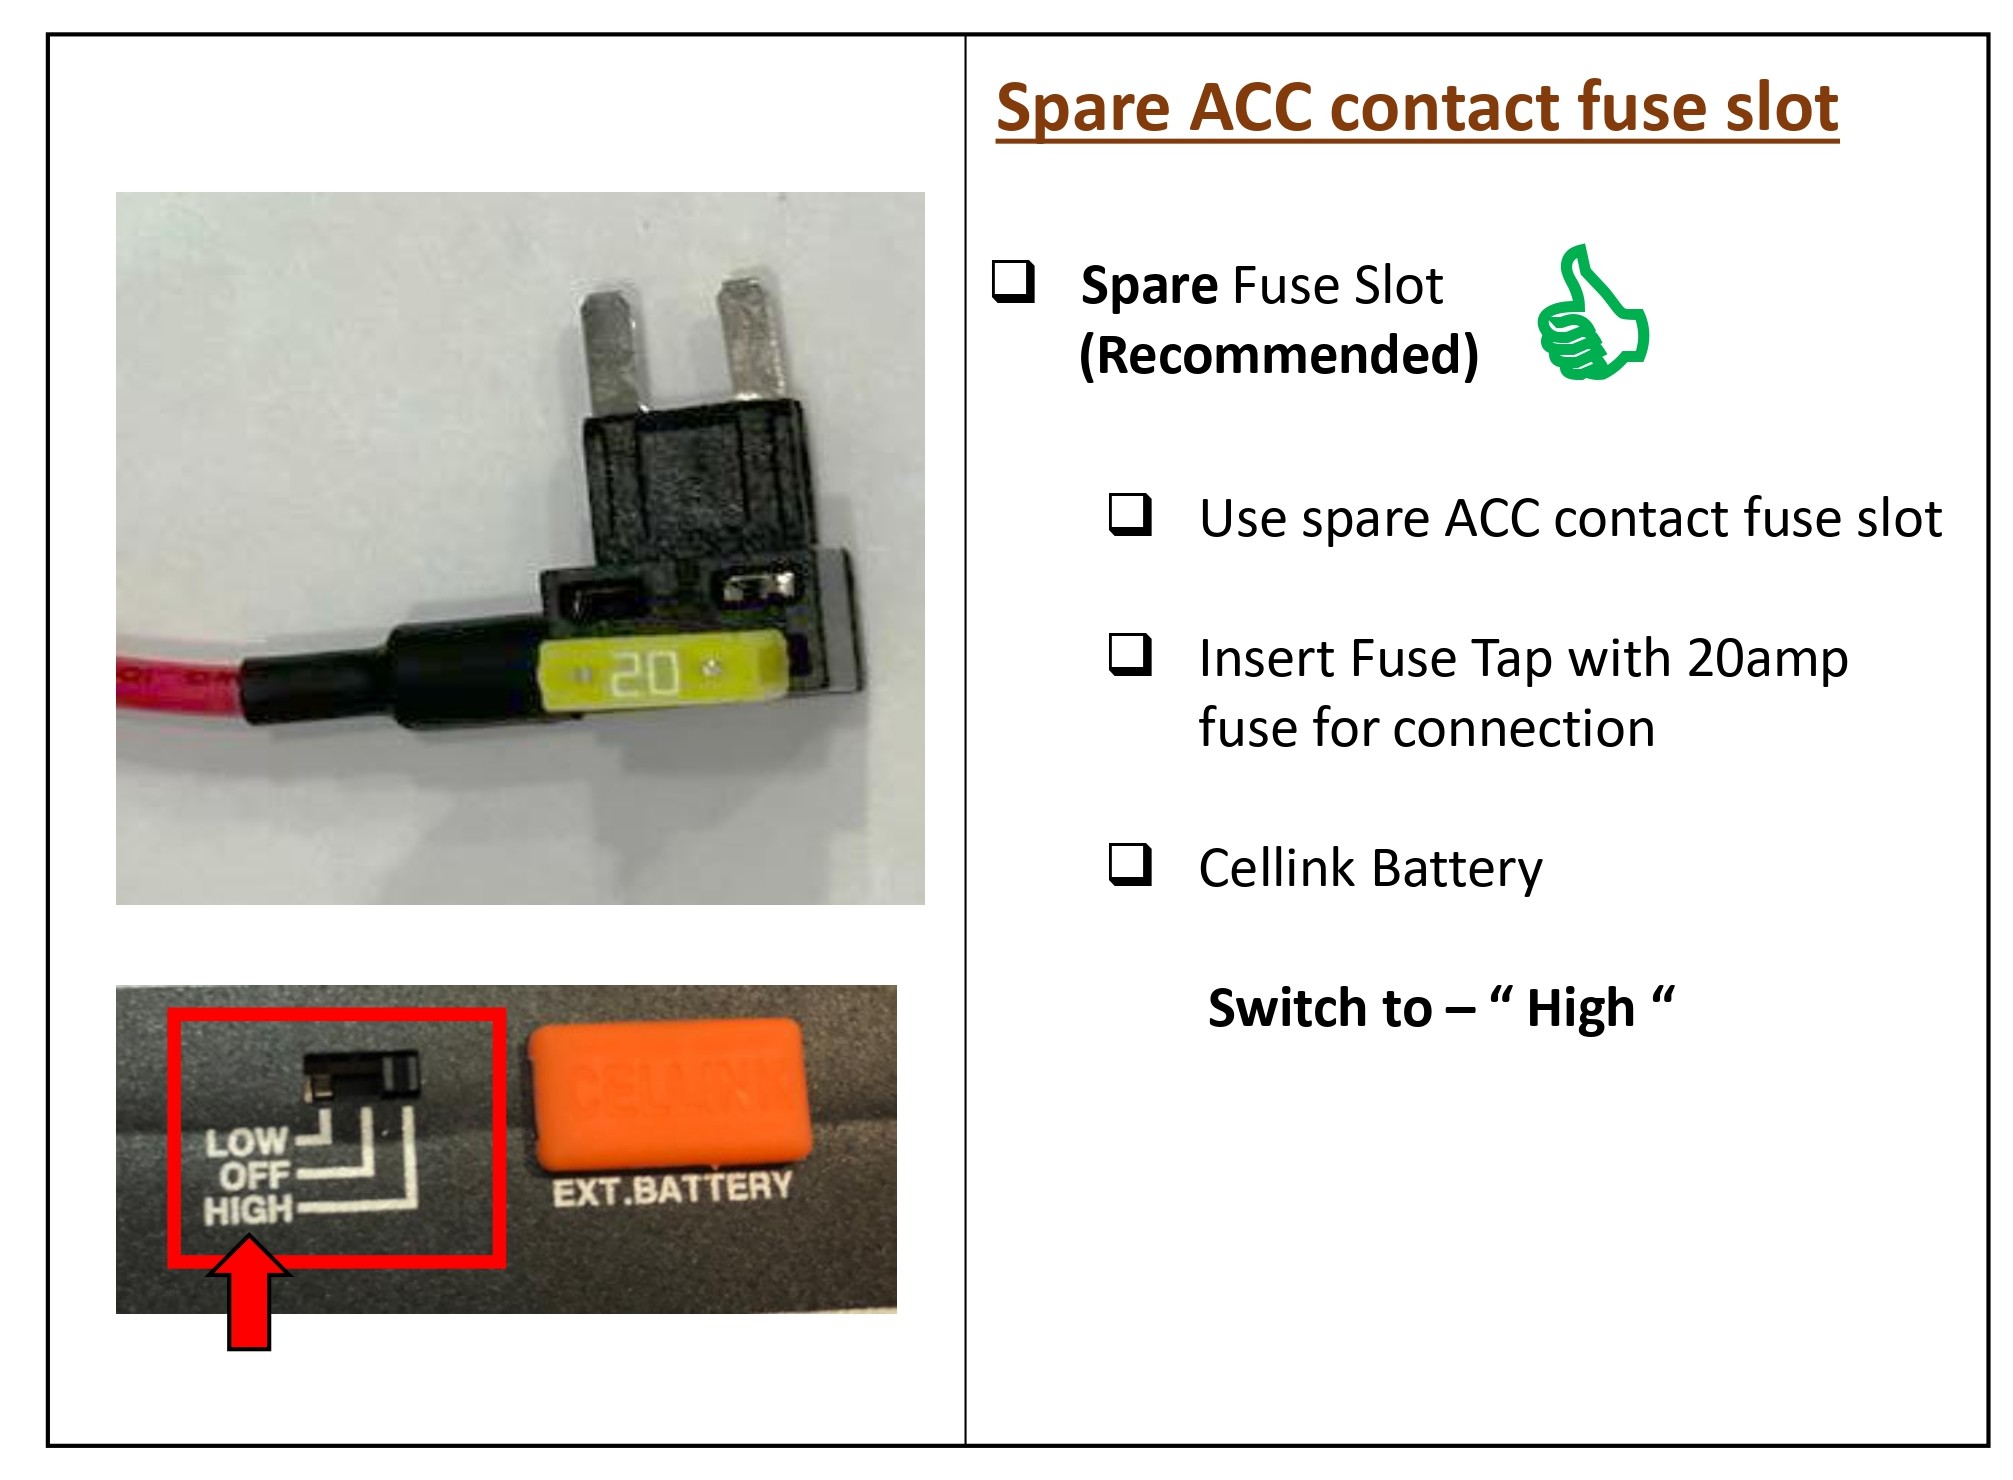
● 3. LOW/OFF/HIGH : The switch for selecting the charge current.
▷LOW : 5Ah charge - select it when connected to the cigar-lighter plug.
▷OFF : Battery power off.
▷HIGH : 7Ah charge - select it when connected to the fuse-box.
● 4. EXT.Battery : The connector for connection to an extra battery such as CELLINK B EXT for adding the capacity
|
LED Display -R : Red -G : Green |
|
Powered on | Red and Green LEDs are turned on simultaneously and then turned off. |
|
|
Pre-charging (after powered on) |
Red LED is on after several times flashed | |
|
|
Fully charged | Green LED is on | |
|
|
Low Input voltage [less than10.5V] |
Red and Green LEDs blink at the same time. | |
|
|
Abnormal High Temperature |
Red and Green LEDs blink alternately and beep sound. |


1.3 Product Properties
1. When connected to ACC power in the fuse box, it can be used for approximately 33 hours (based on power consumption of less than 3Wh) and can be charged in approximately 70 minutes with fast charging (7A charging).
2. It makes possible to install yourself easily using the cigar-lighter socket power cable provided, and save the installation cost.
3. When using the provided Cigar-lighter socket power cable, it automatically detects the Cigar-lighter socket connection and charges only 5A even if the charging currents is set to HIGH.
4. A micro controller unit (MCU) is built in to control the current, voltage and voltage balance of the battery, and the battery protection circuit module is built in for secondary protection to prevent the over-charge, over-discharge and over-current.
5. The output is automatically switched by the Micro Controller (MCU). This system gives to charge and output simultaneously with vehicle's engine start.
6. When the internal temperature of the battery exceeds 70°C, the battery will automatically stop charging to prevent from problems such as overheating, and when the internal temperature of the battery drops to 60°C it will begins charging. Even if charging is stopped, the output remains normal.
7. When the operating switch is set to OFF, the battery’s self-discharging period is more than 1 year because of the leaked current of the battery is cut-off.
8.The battery will be automatically cut off the current when the reverse voltage input or external short-circuit of the product's connectors occur.
9. The cycle life is improved more three times than the general Li-ion battery because of The lithium- phosphate iron(LiFePO4) battery is used, and we guarantee at least 1,500 cycles.
10. Compact design makes possible to install in confined spaces such as vehicle seat below.
1.4 What’s Included
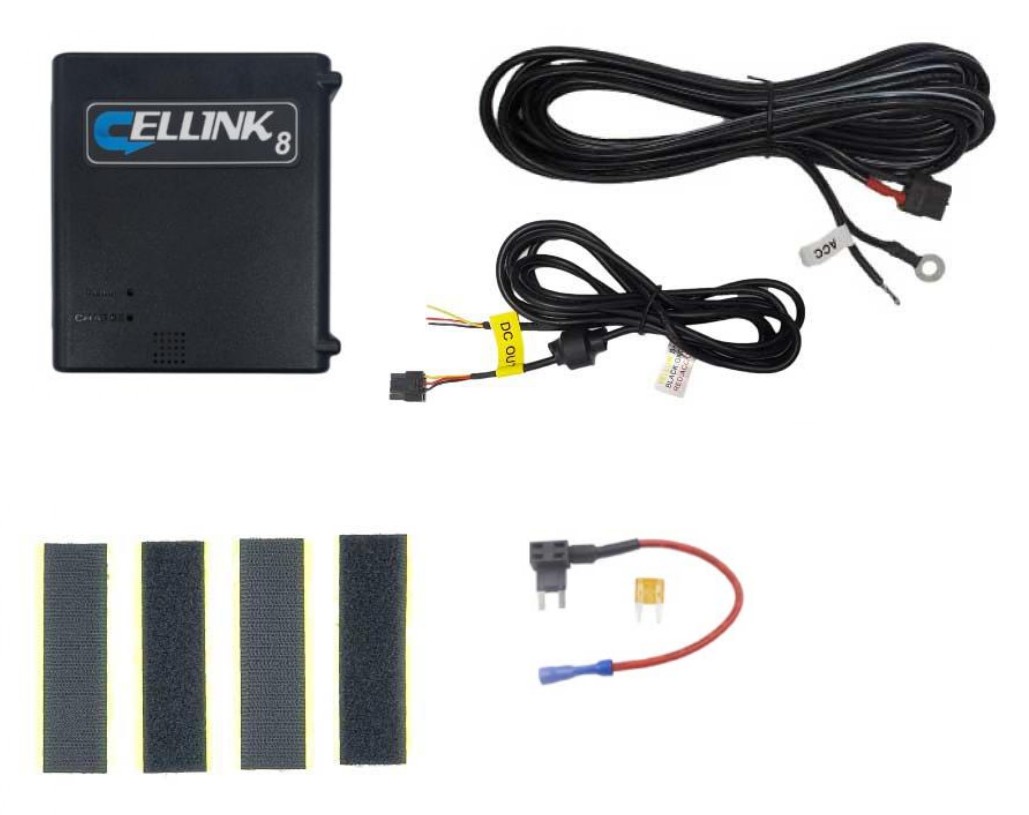
- Cellink B8 Battery x1
- Input Hardwiring Cable x1
- Output Hardwiring Cable (3-wires split) x1
- Fuse Tap Cable with 20A Fuse (Small) x1
- Velcro Tapes x 2 sets
1.5 Specifications
| Input Power | ▷ When connected to the Cigar Lighter Socket | DC12~17V | Max. 6.5A | ||
| ▷ When connected to the Fuse Box ACC power | DC12~17V | Max. 13A | |||
| Output Power | ▷ Dashcam connector | DC 11.0V ~ 14.2V | Max 2A | ||
| Charging Voltage & Current | ▷ When connected to Cigar Lighter Socket | DC 14.5V | Max 5A | ||
| ▷ When connected to Fuse Box ACC power | DC 14.5V | Max 7A | |||
| Charging time |
▷5A Charging - Approx. 100minutes |
|||
|
▷7A Charging - Approx. 70minutes |
||||
| Product Rating | 12.8V | 7,800mAh | 99.84Wh | |||
| Power Duration | About 33 hours* | |||
| Based on 2CH dashcam within 3Wh power consumption. | ||||
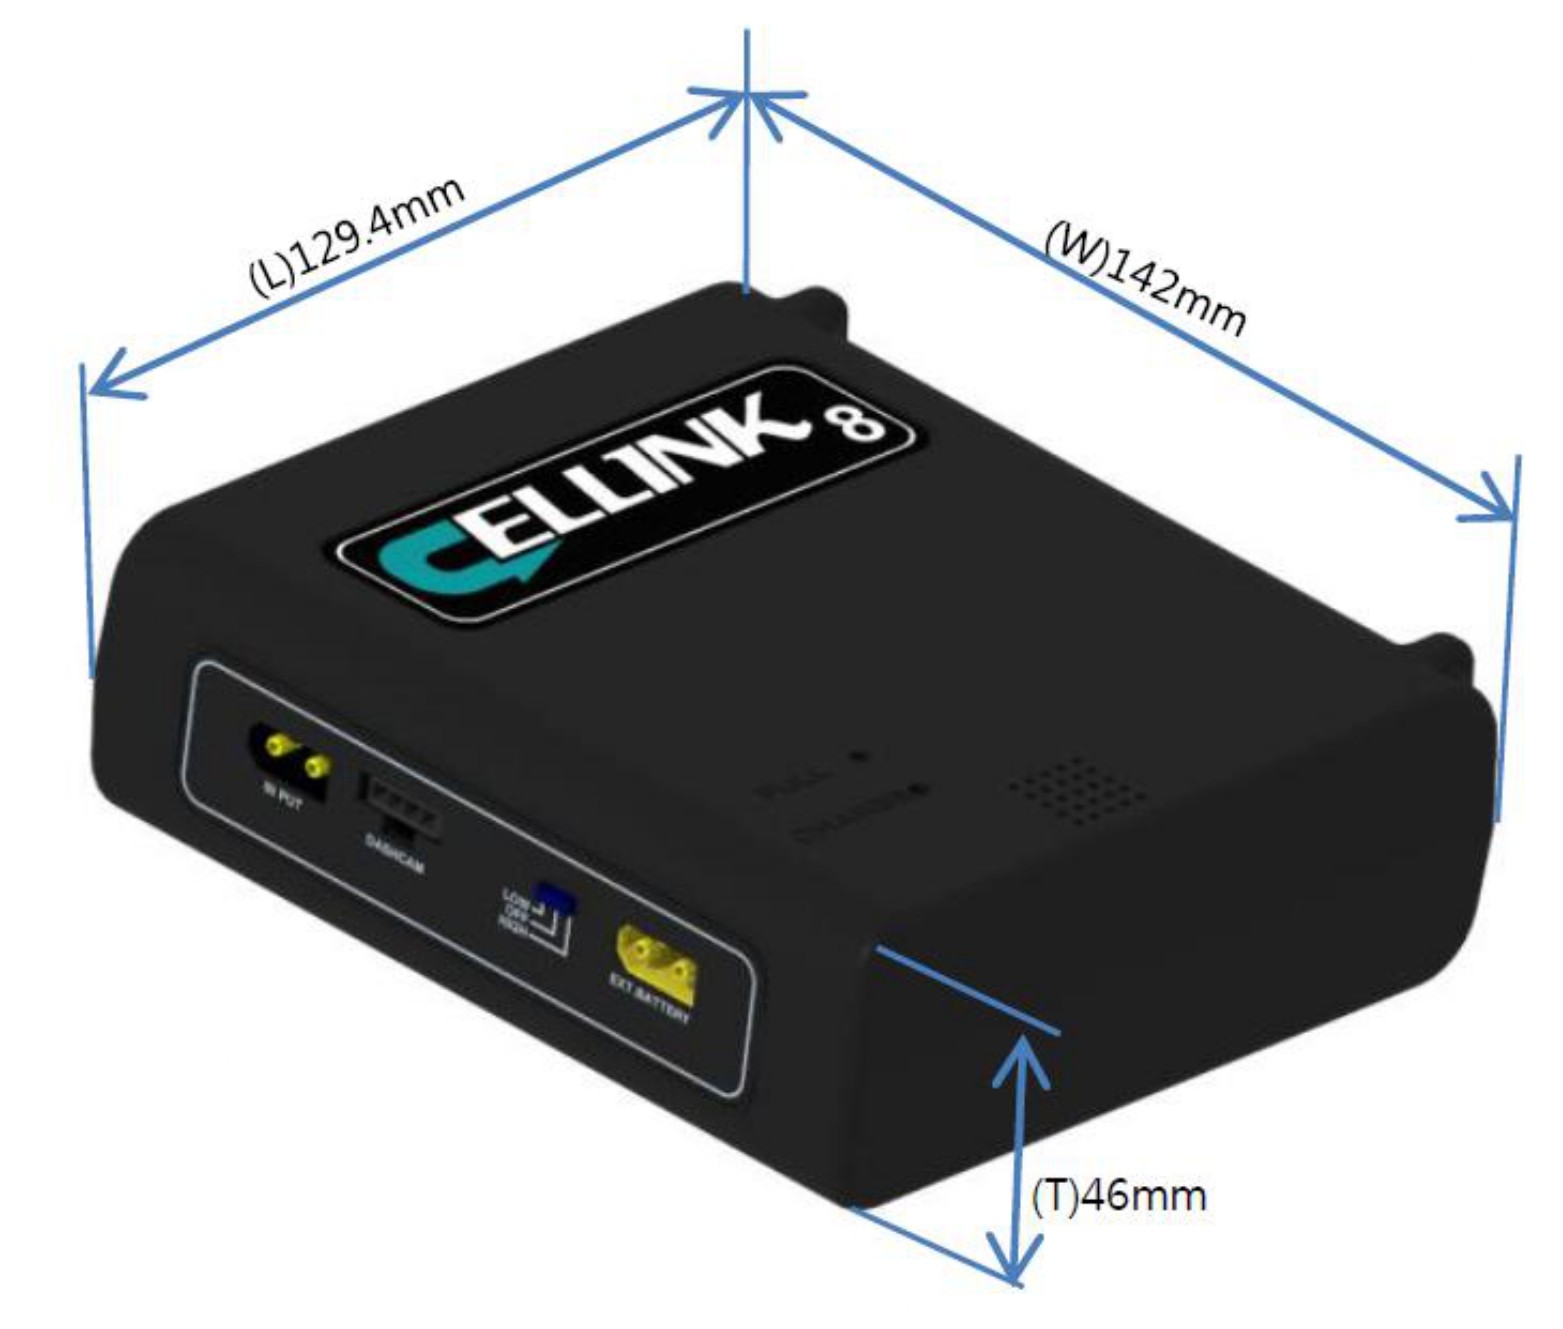
| Dim. and weight | 129.4(W)*142(L)*46(T) / Approx. 998g | |||
| Battery Type | Lithium Iron Phosphate (LifePO4) | |||
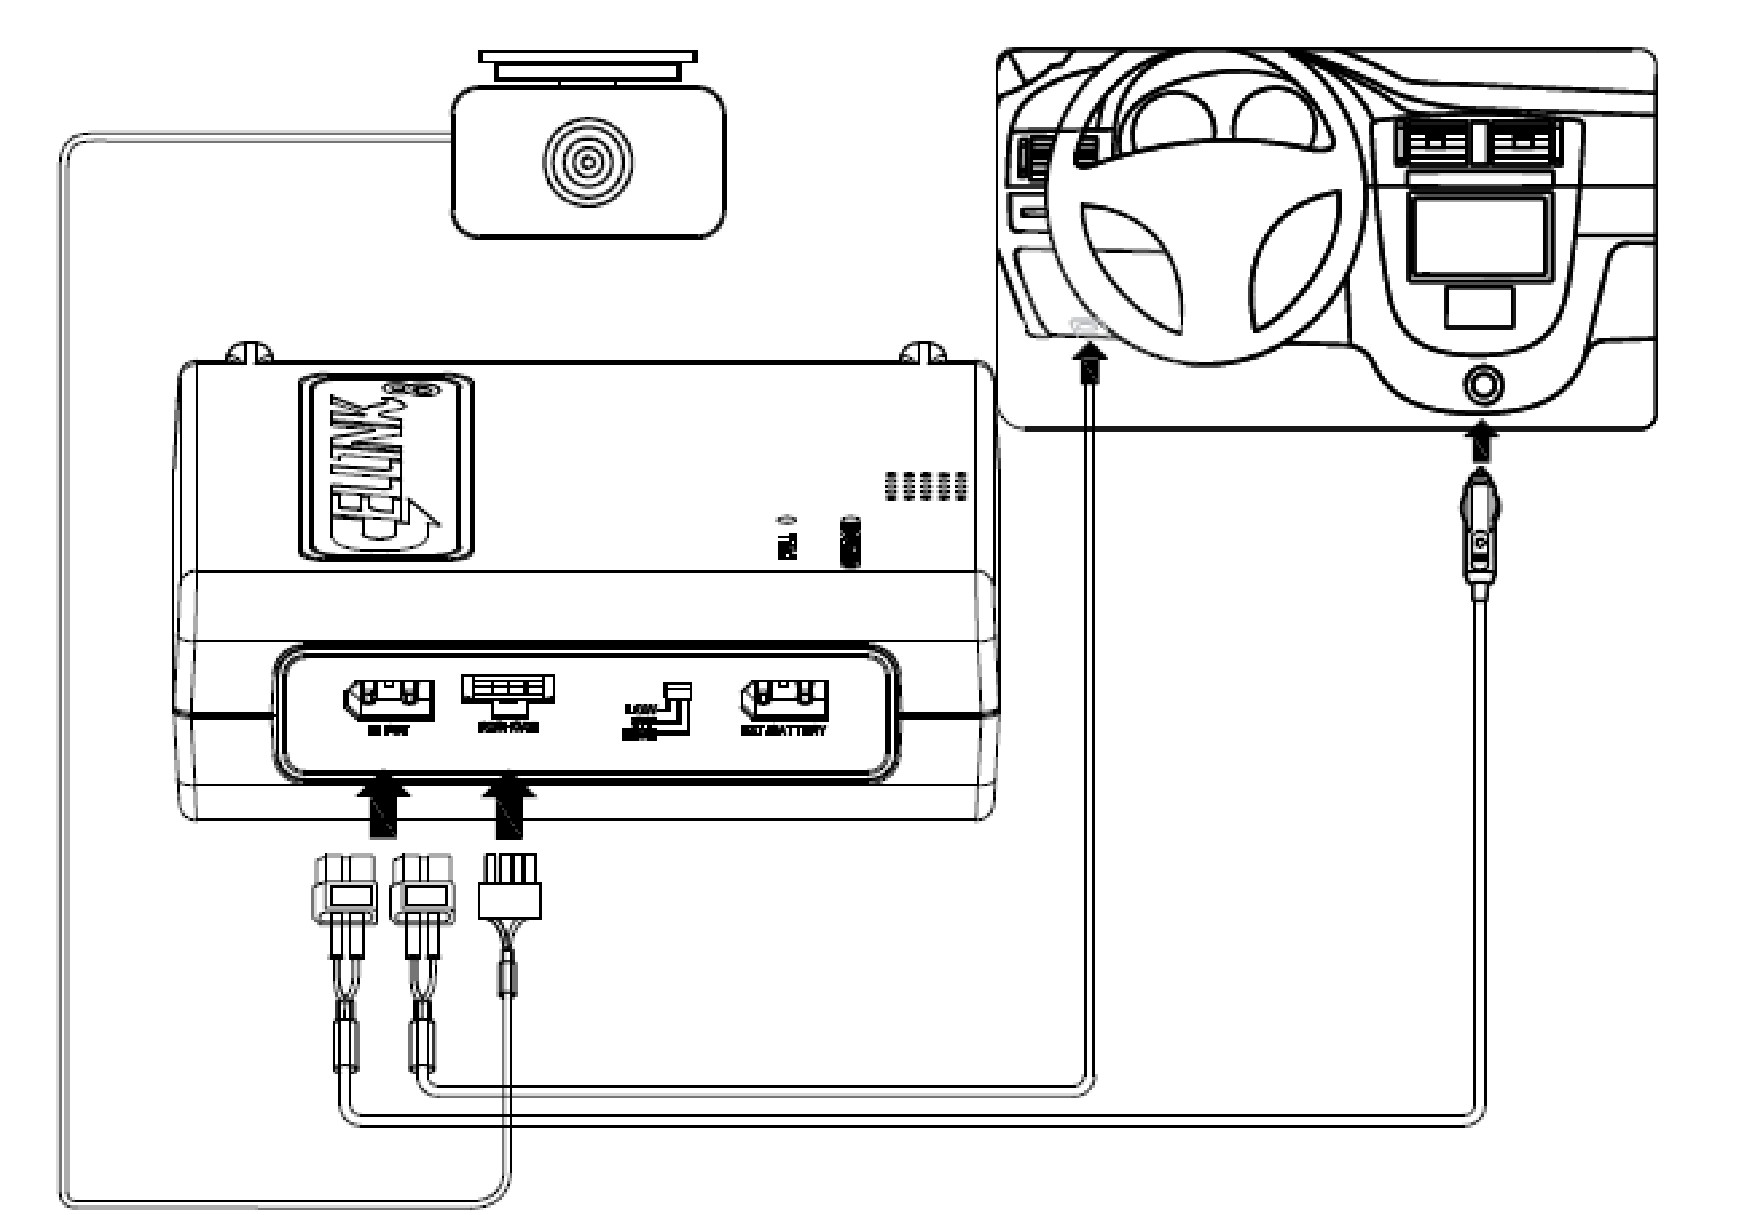
2.0 Installation
※ Please set to the power-off before installation.

Do not install the product in an enclosed space, but install it in a place with good ventilation.
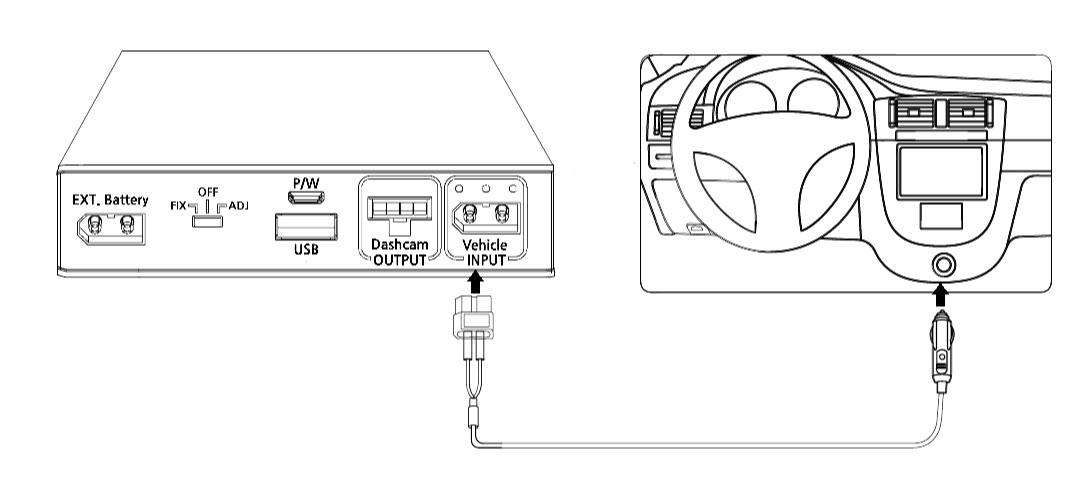
2.1 Cigar-lighter Socket Connection
- When connecting the product using the cigar lighter socket Input cable (5A).
- Connect the Input terminal of the battery and the cigar -lighter socket in the vehicle when using the cigar- lighter
plug power cable provided.

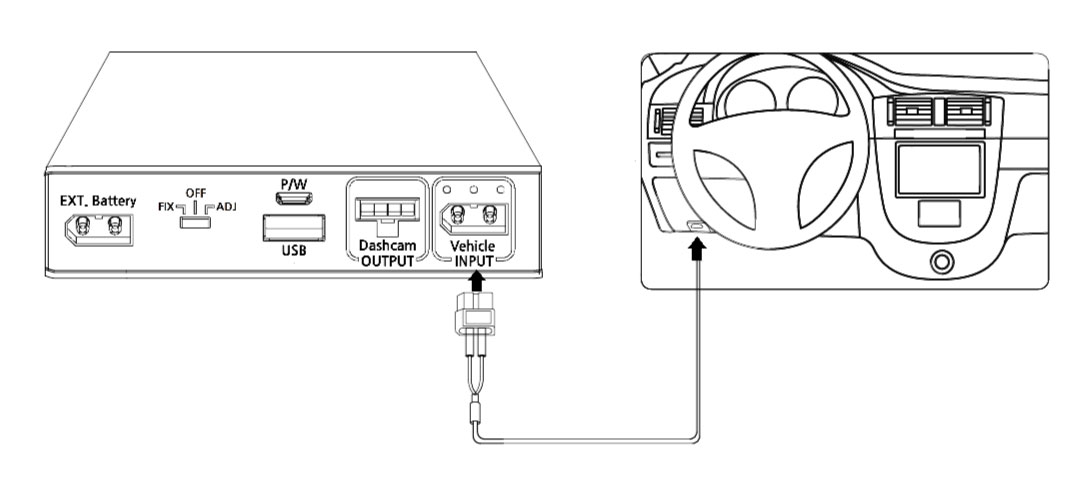
2.2 Fuse-Box Connection
1. When connecting the product using the Fuse-box ACC Input cable (7A).

2.3 Fuse Box
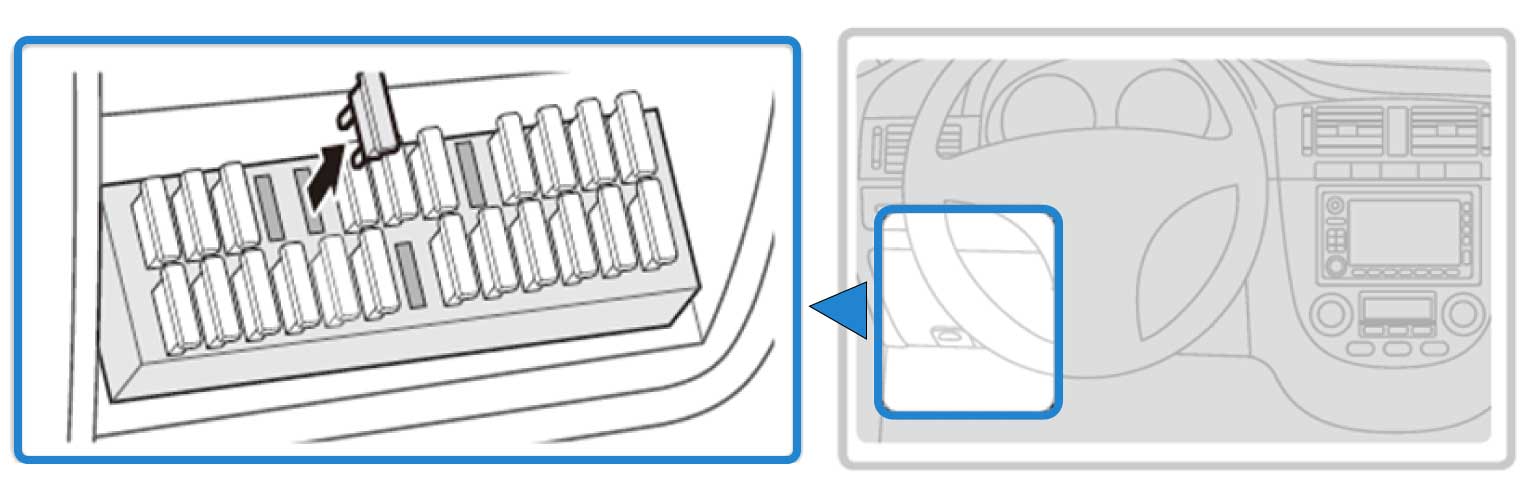
1) With the product’s power switch in the OFF position, connect the Input(charging) cable for the fuse box and output cable to the product’s cable connectors.
2) Open your vehicle’s fuse box, check the fuse standard, and select the correct fuse holder between the included fuse holders.
The fuse box location in the vehicle may vary depending on the manufacturer and model of your vehicle. For more information, refer to your vehicle’s manual.
Inside the fuse box, there's two types of power available, permanent power (BATT) and ACC contact. Since our Cellink battery is charged only when the ACC is on, you must connect only to ACC contact. If you connect to BATT contact with permanent power, the car battery will be drained or cause some error on the dashboard.
2.4 Fuse Connection
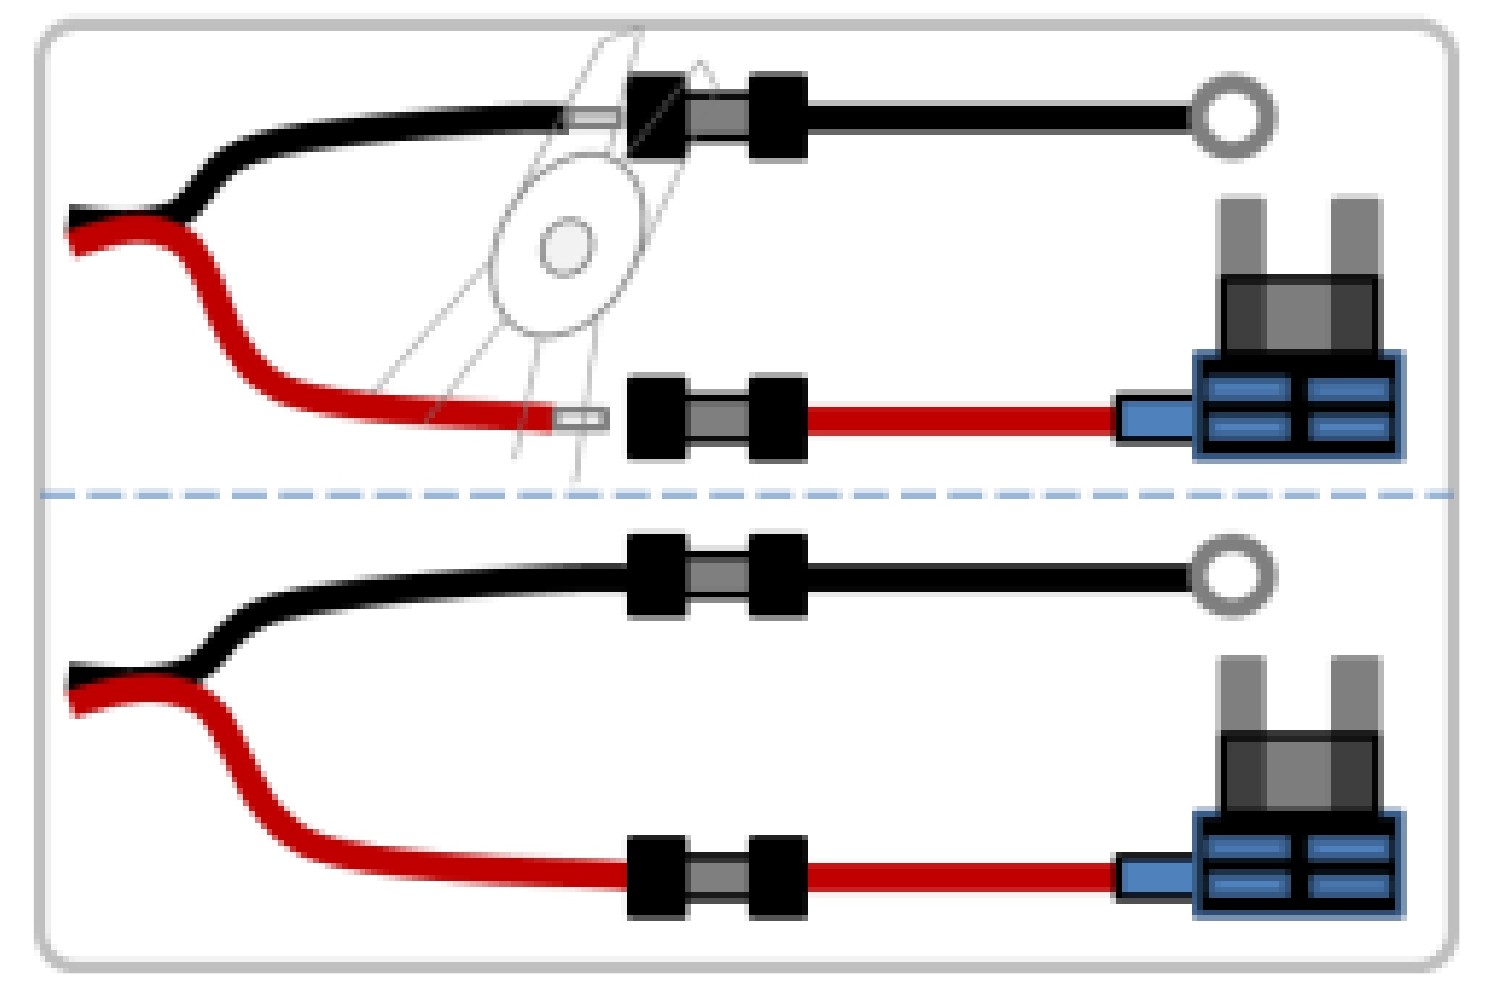
1) Insert the input cable into the sleeve at the end of the fuse holder cable, and then secure it by squeezing on the sleeve securely using appropriate tools, such as pliers.
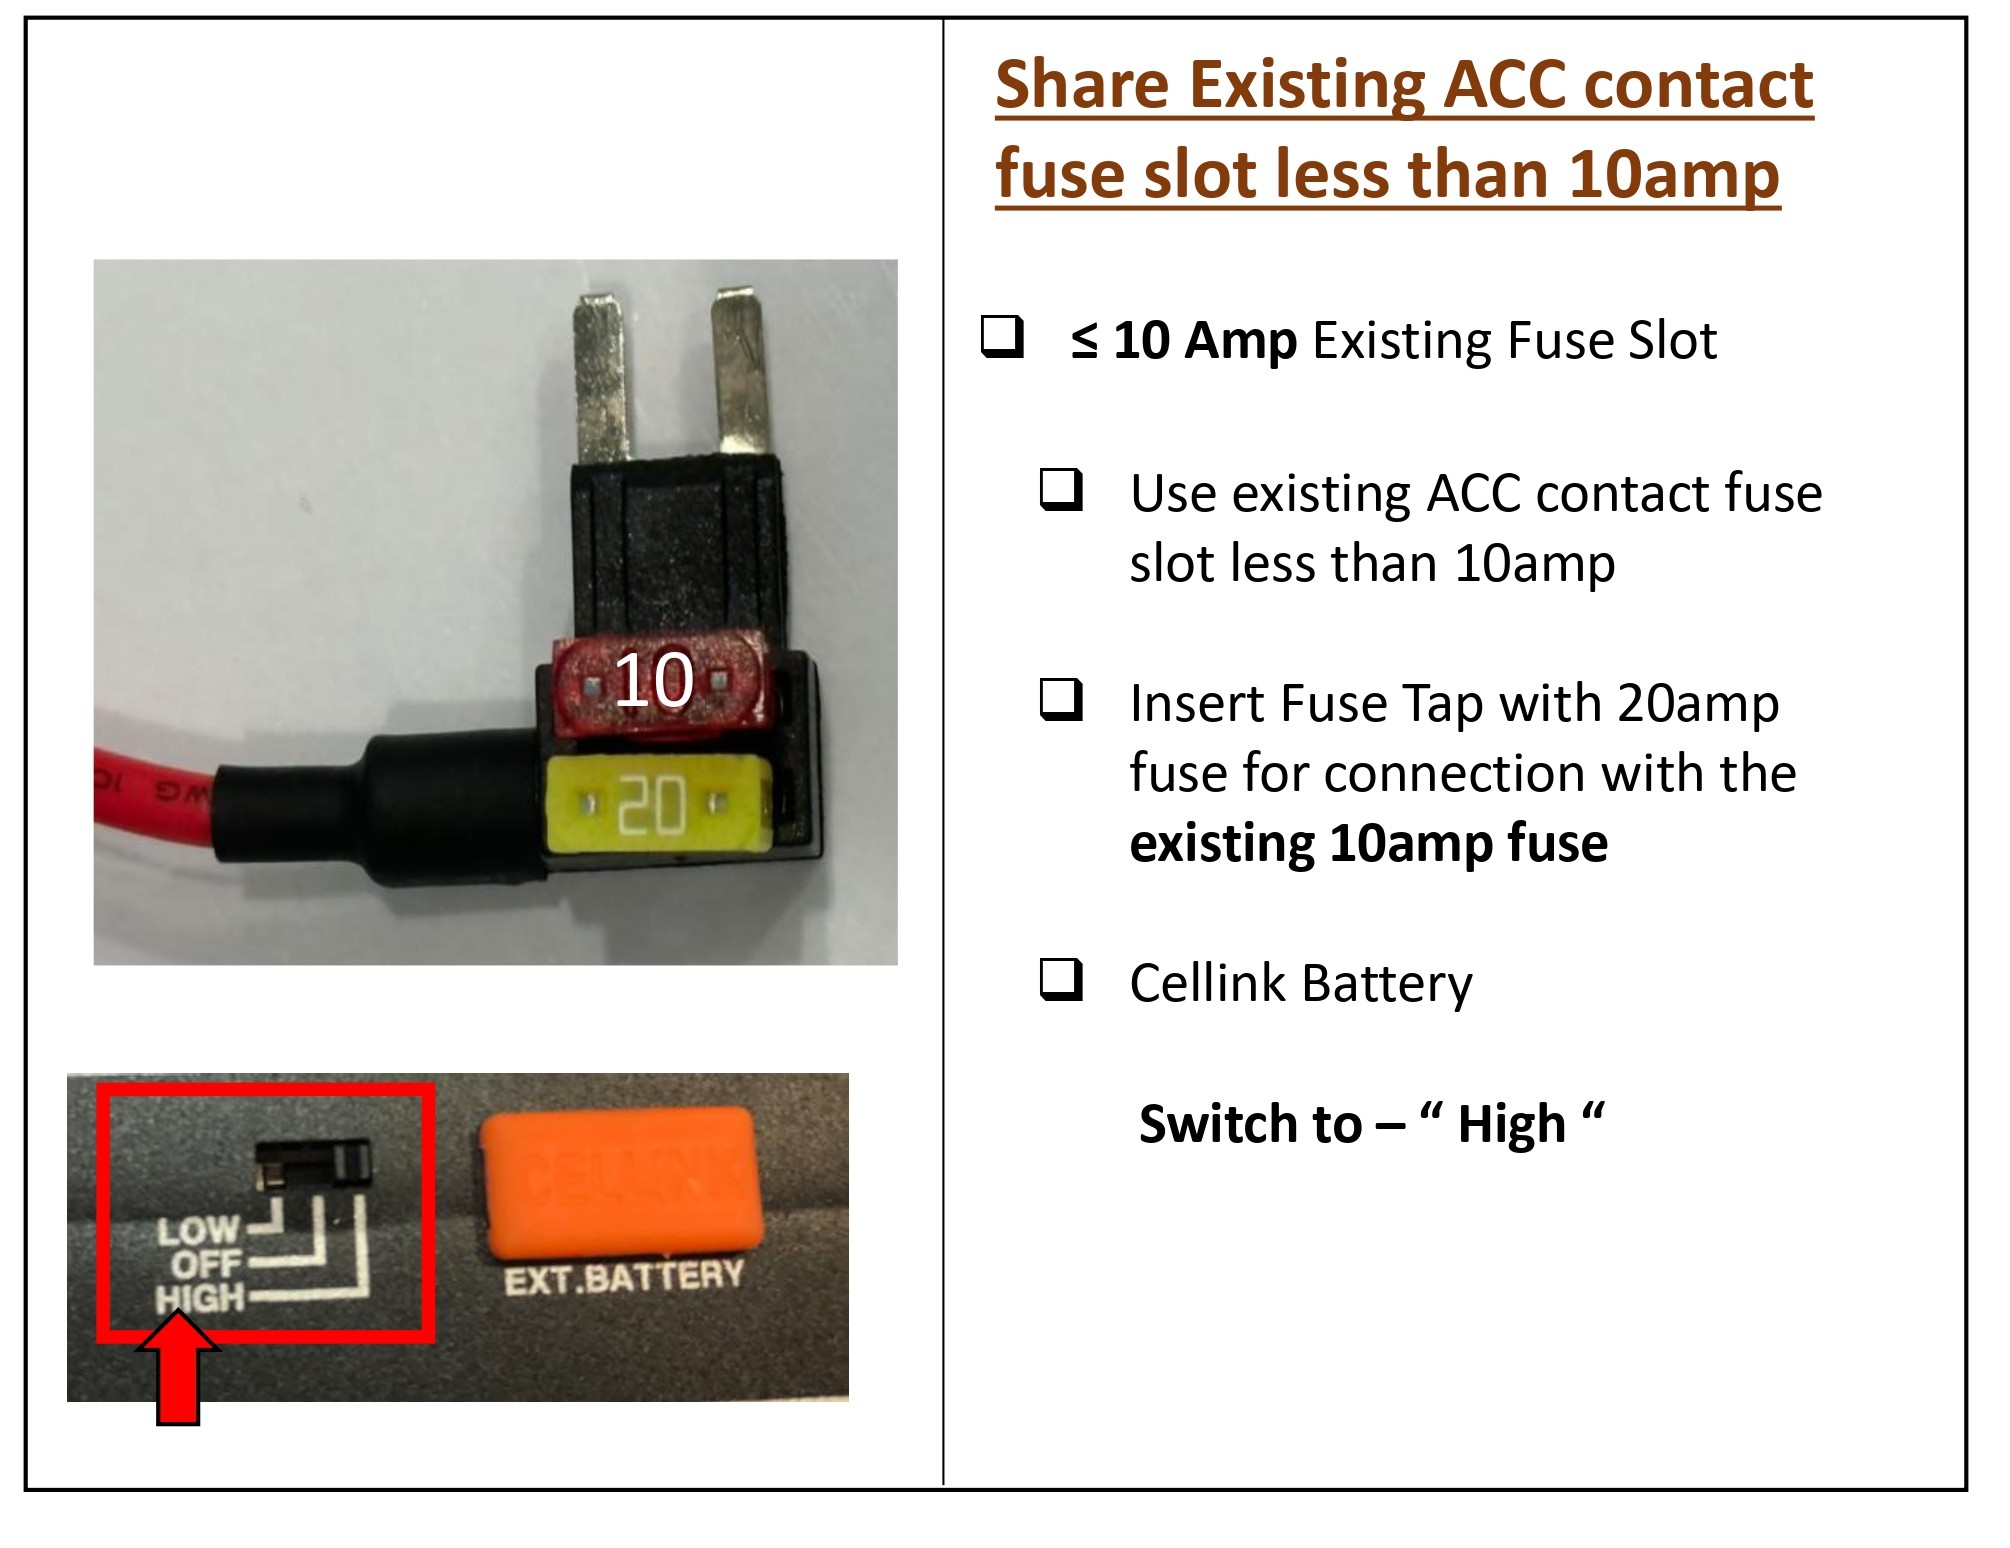
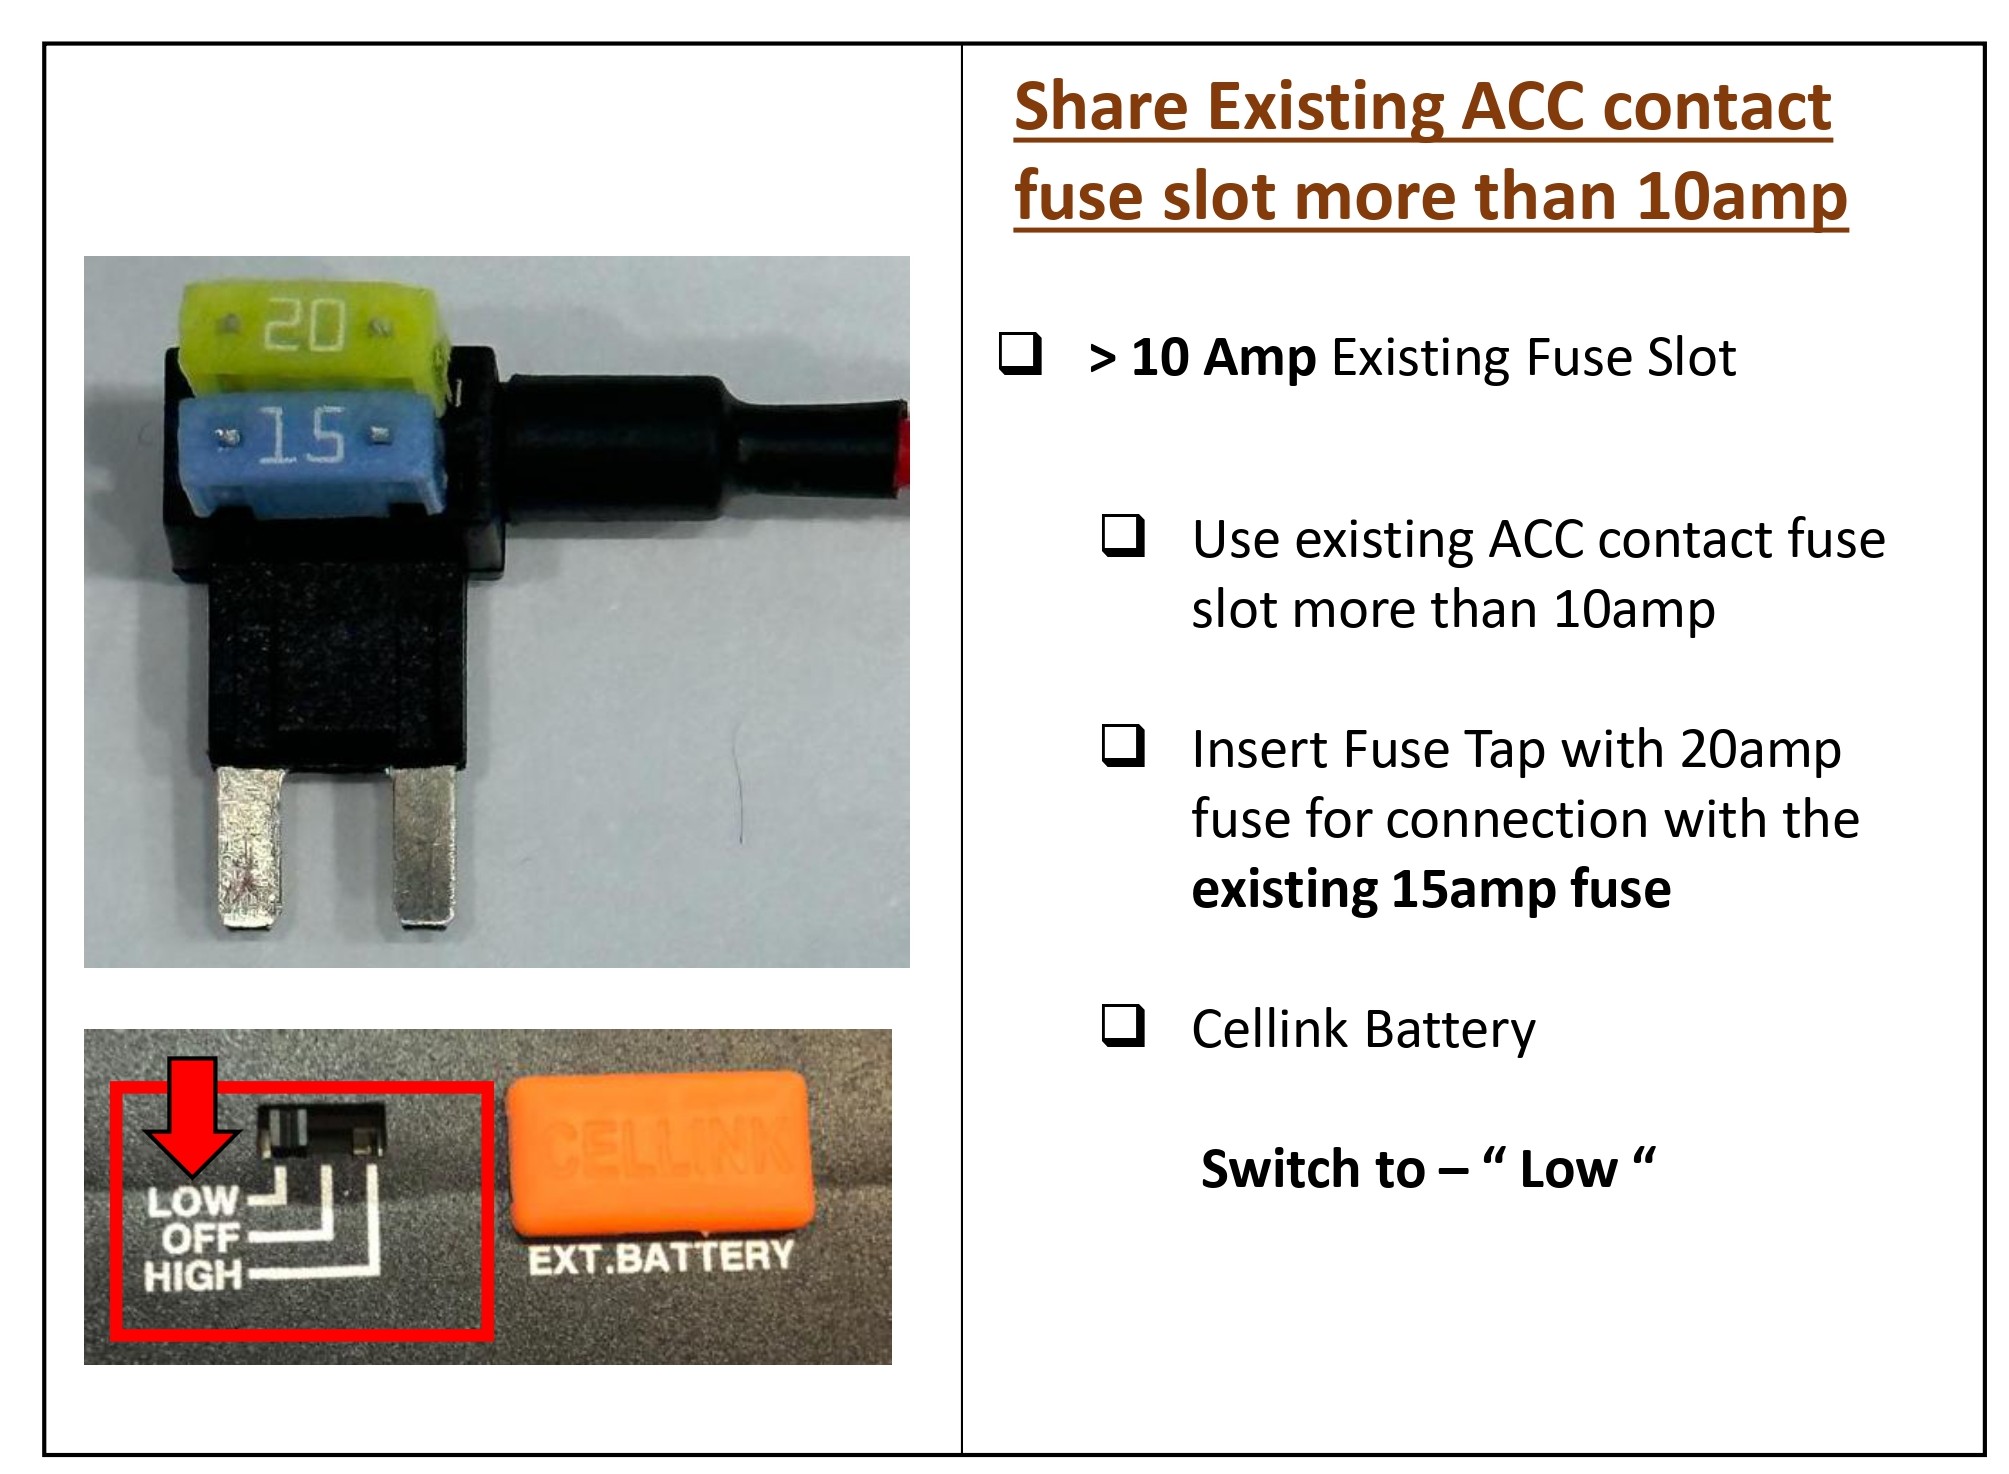
2) Preferably, look for spare ACC contact fuse socket in the fuse box and insert the fuse tap with the included 20A fuse.
3) If you cannot find any spare ACC contact fuse socket, you can look for any existing fuse rated 10A or less with ACC contact. After removing the fuse from the socket, insert it to the fuse tap and plug the fuse tap cable back to the socket.
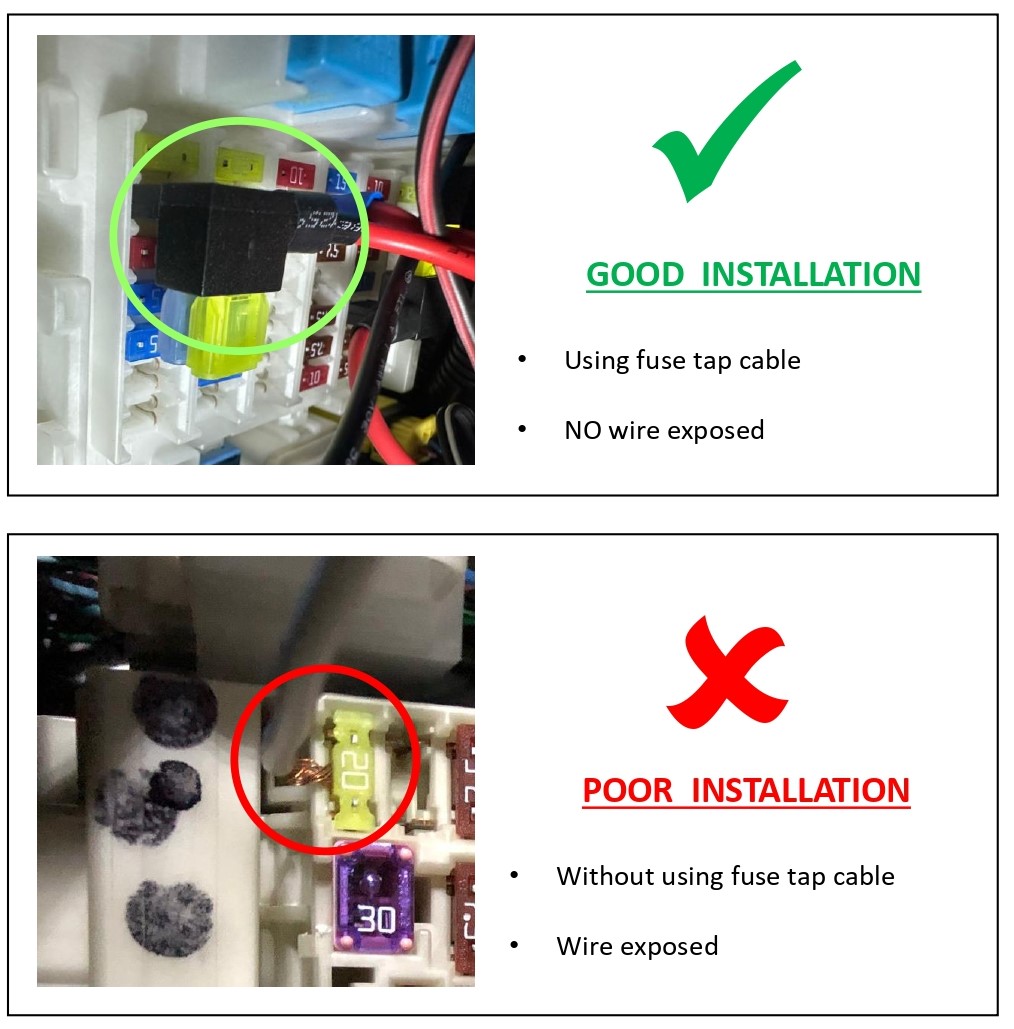
Before connecting the GND-O-ring cable and the Fuse-Holder cable, be sure to cut the main cable to the required length and connect it. If the main cable is long and the remaining amount is tied up, It can cause the cable heating problem from the tied part.
2.5 Fuse Tap
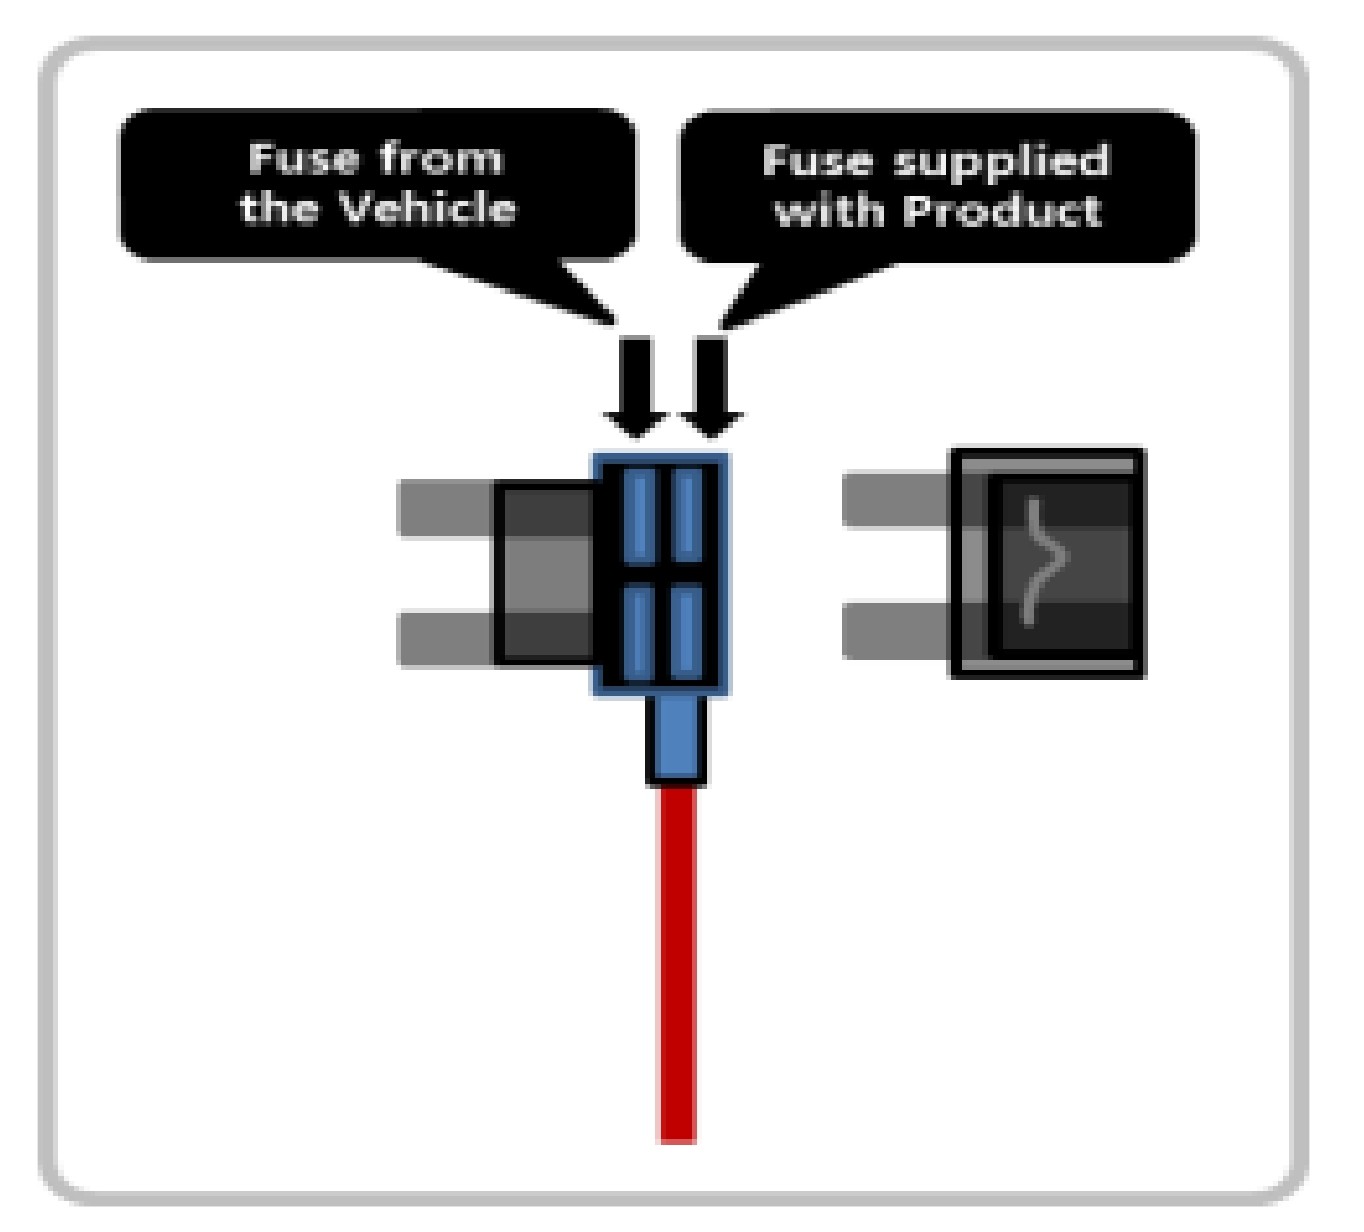
Insure that the fuse tap is plugged with the correct orientation with INPUT pin to the power source of the socket inside the fuse box.
Fuse supplied with the Cellink B8 is rated 20A, please do not change with other ratings.
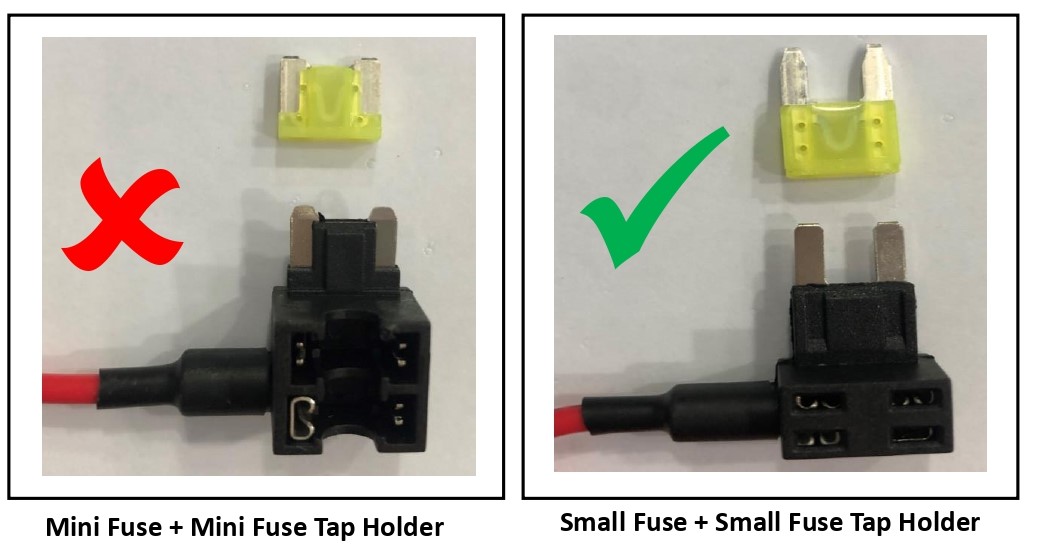
1. Do not use mini fuse and mini fuse tap holder.
If using the existing mini fuse in the vehicle change it to small fuse type
2.6 Ground Connection
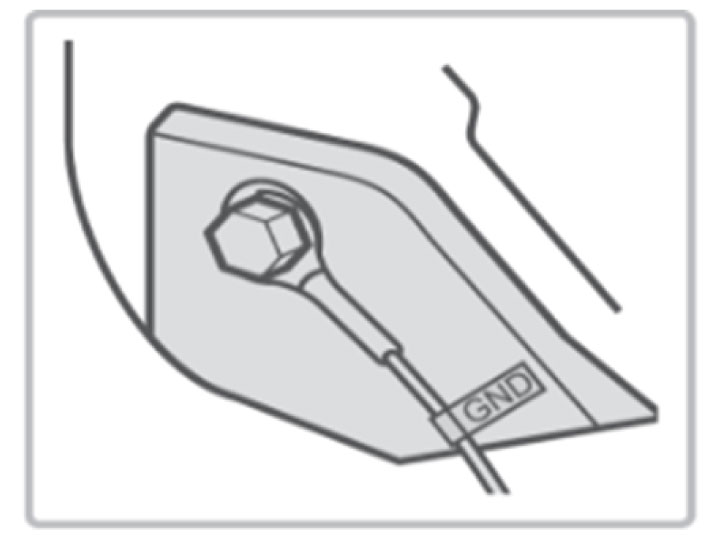
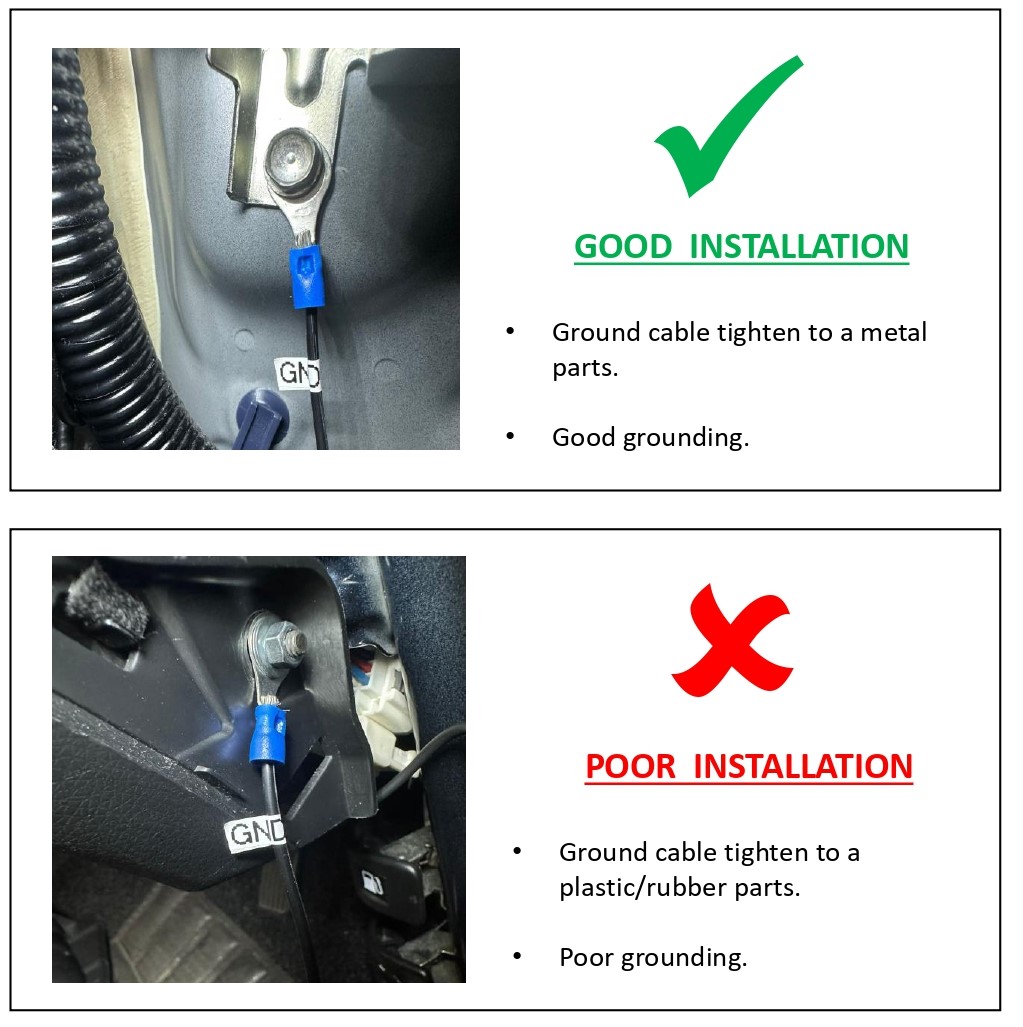
1) Find a bolt fixed on the vehicle’s and connect the ground (GND) cable to the bolt.
If the vehicle’s bolt is coated, remove the coating before connecting the ground (GND) cable. The power may not be supplied correctly due to the coating.
2.7 Proper Connection
1) Make sure that the product is connected properly.
2) Fix the product using the provided Velcro tape on the car floor such as under the car seat.
3) Turn on the switch and check that the LEDs operate properly (Refer to the LED Display table).
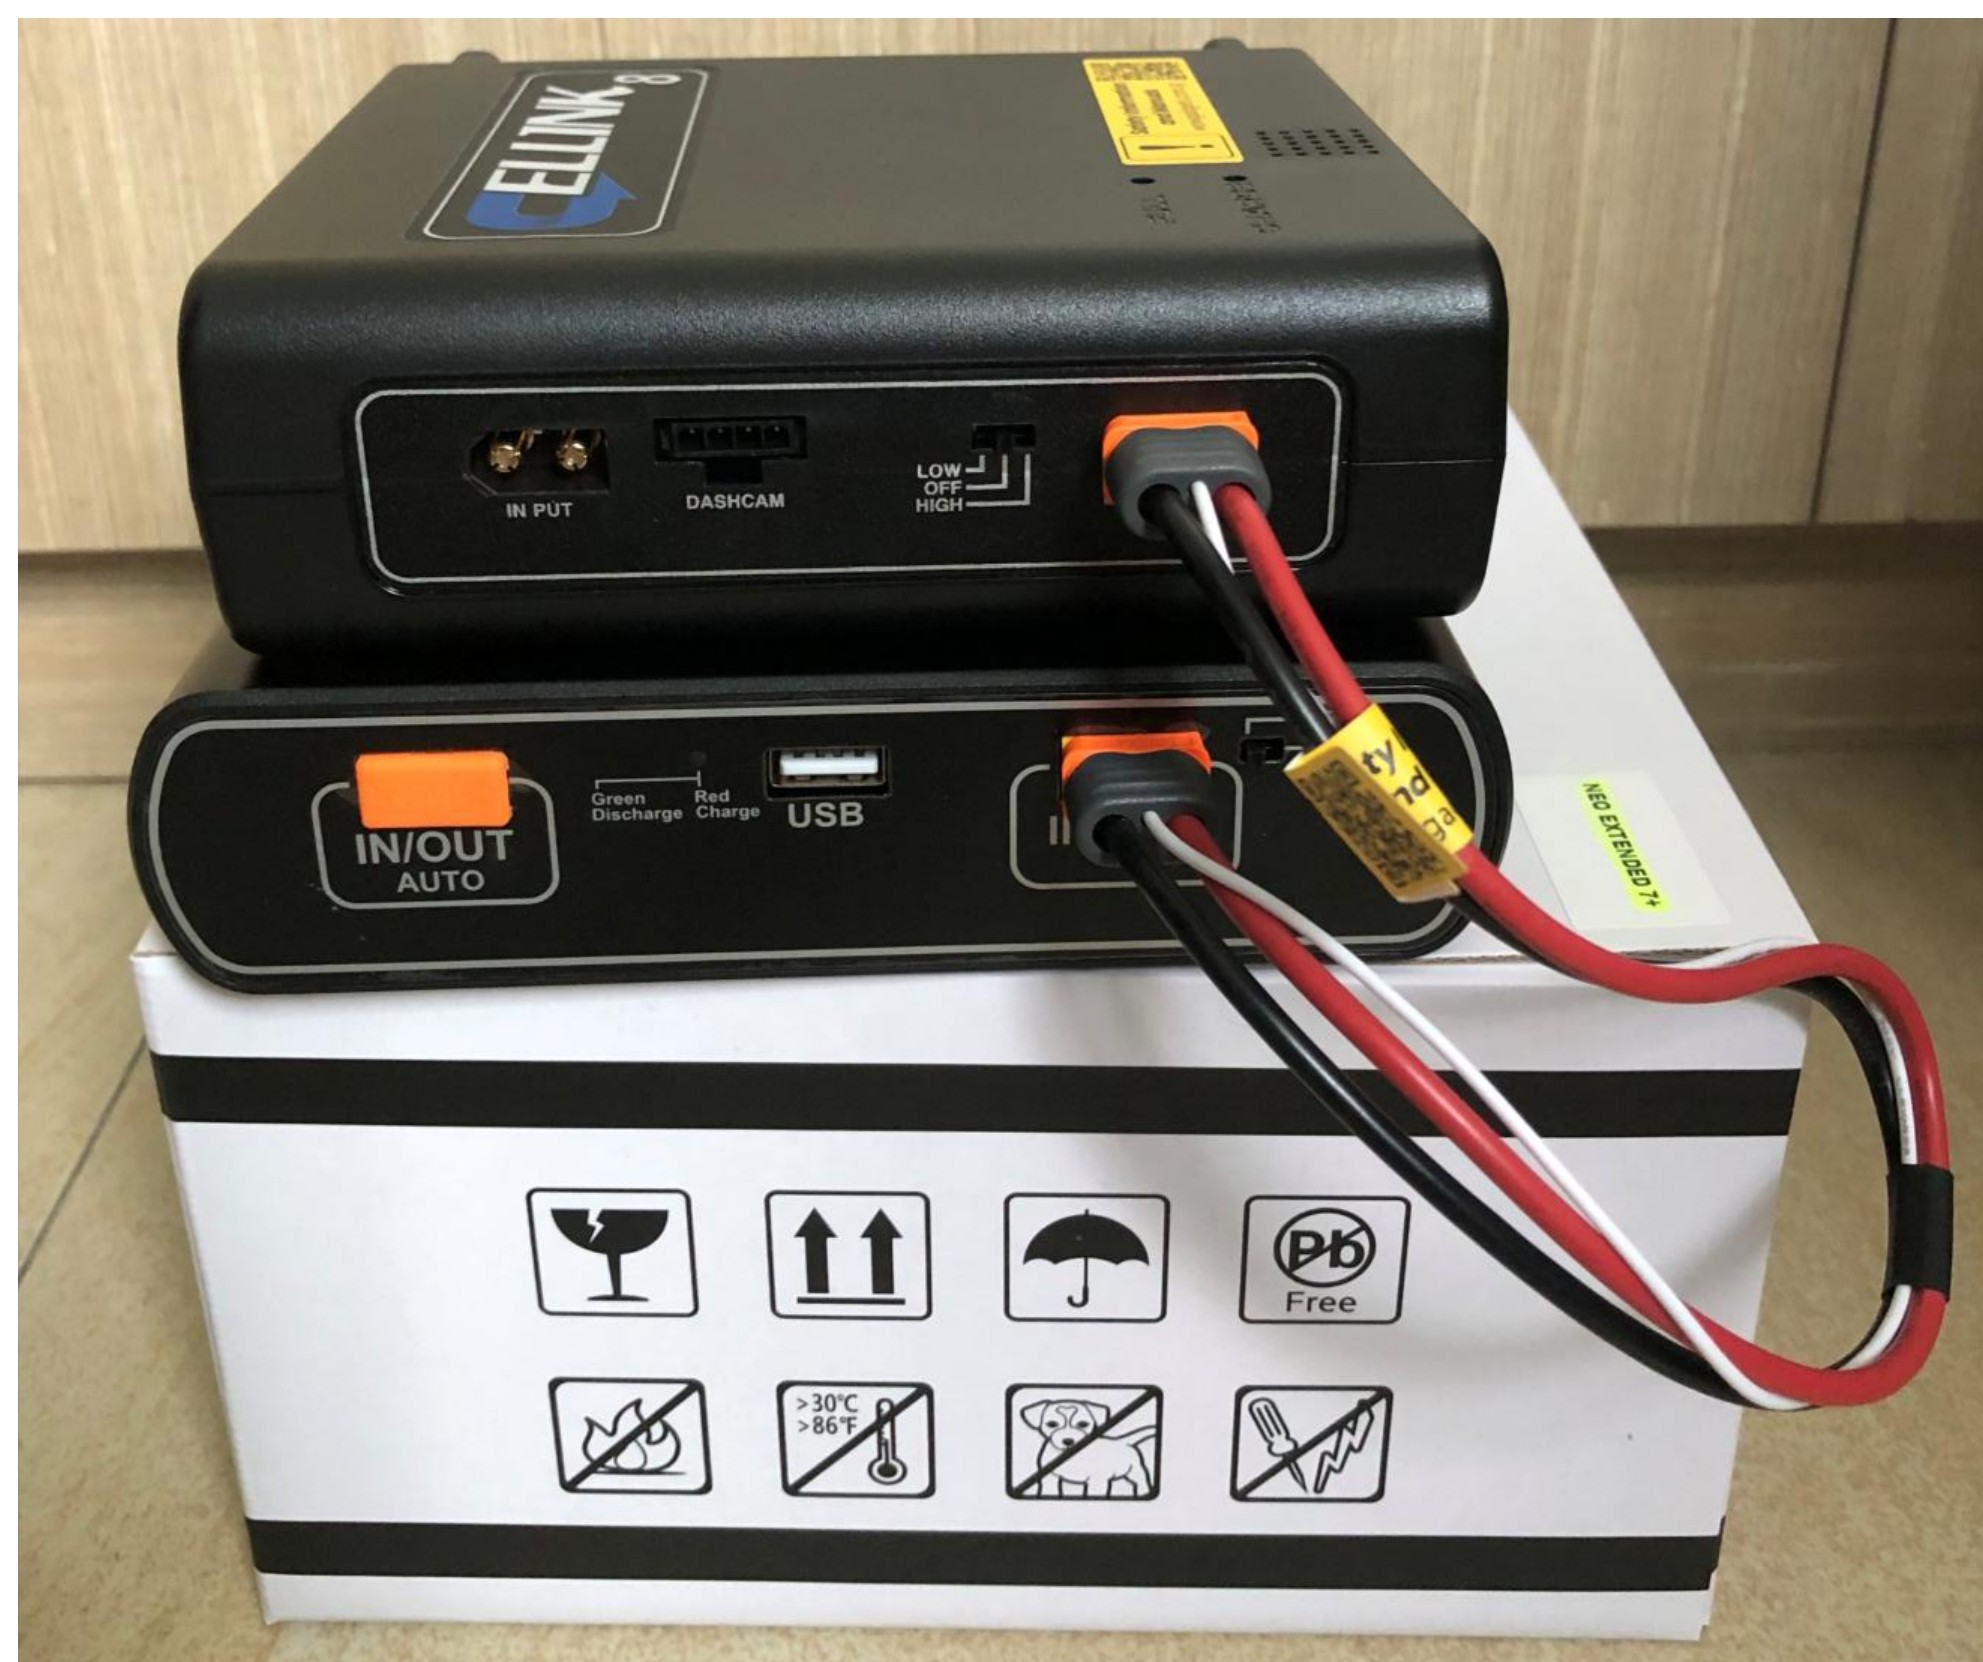
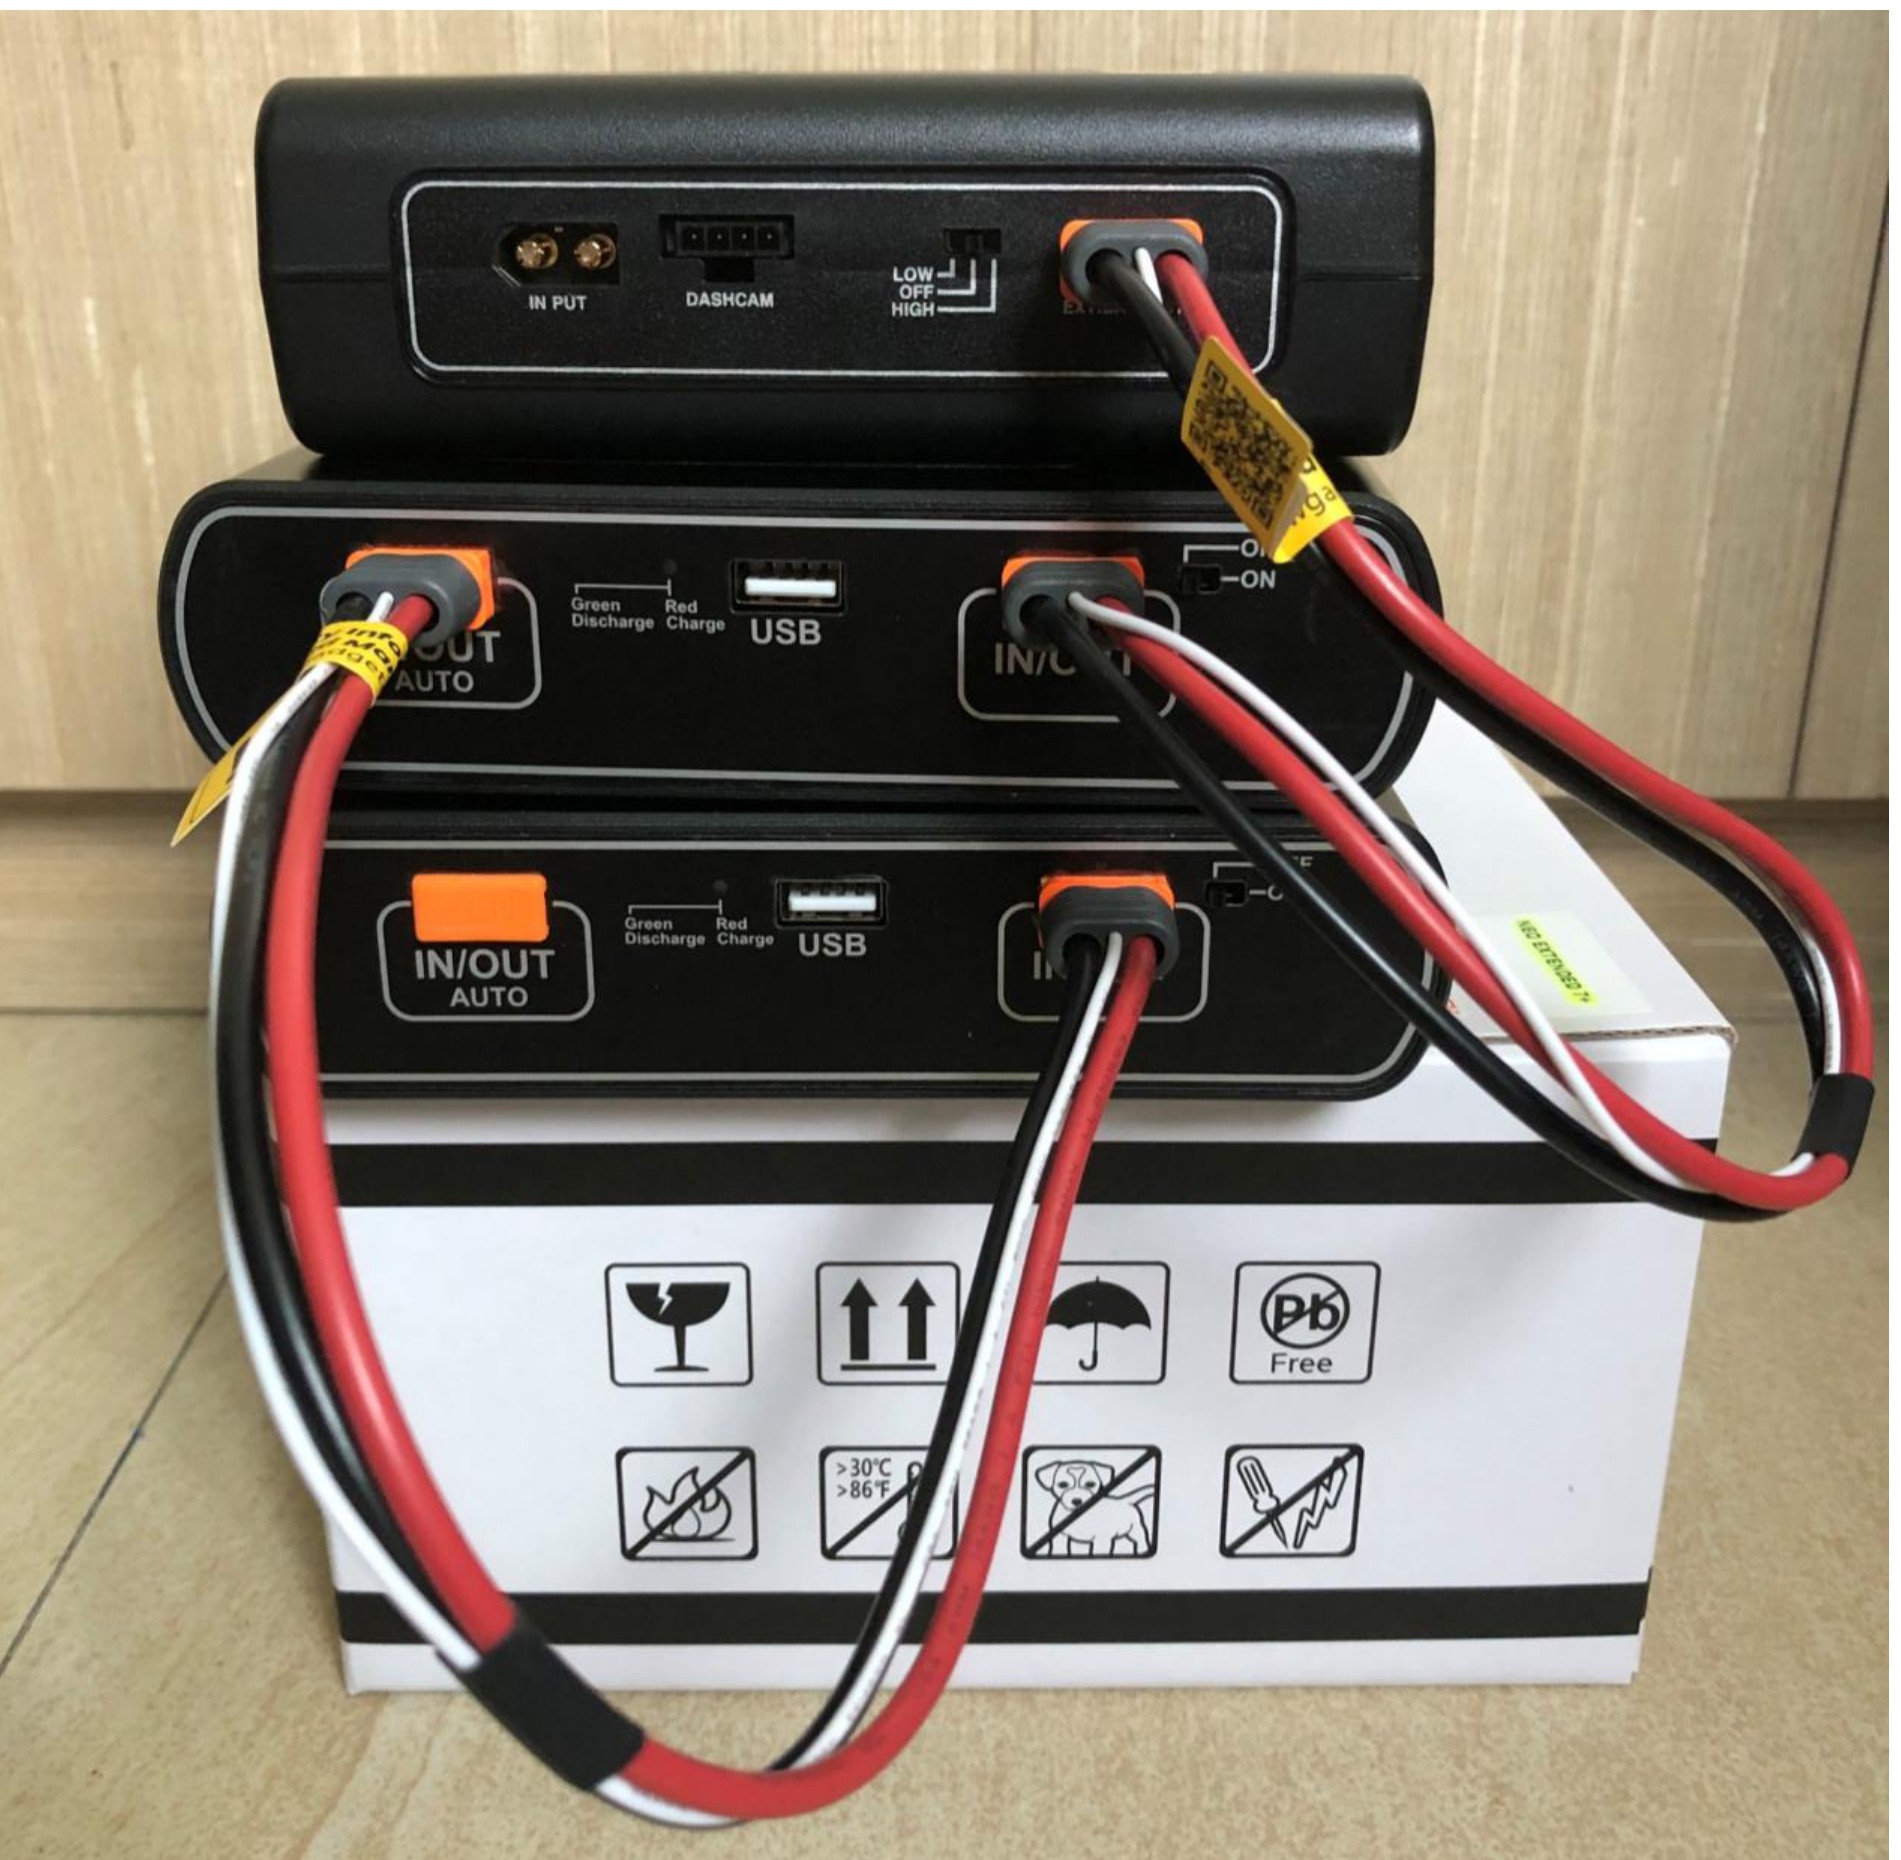
3.0 How to add capacity to CELLINK B8
3.1 Adding 1 unit of NEO7+ Extended to Cellink B8
With the new NEO Extended 7+, it supports auto detection when connecting to the B8. Battery capacity for B8 is 7,800mAh and NEO Extended 7+ is 6,800mAh.
Once you plug the link cable to the IN/OUT port of B8, the system will update the total capacity (7,800 + 6,800 = 14,600 mAh) automatically.
3.2 Adding more than 1 unit of NEO7+ Extended to Cellink B8
Total capacity (7,800 + 13,600 = 21,400 mAh) automatically.
NEO Extended 7+ is also compatible with earlier models, NEO 6 and NEO 8+.
4.0 Reset
- To reset, please click on the below link for the guide lines.
Reset - Cellink
This reset procedure is intended strictly for maintenance purposes and should only be performed when necessary.
Improper use of this reset procedure may damage the battery and may void the product warranty.
If you are unsure whether this procedure is appropriate for your situation, do not proceed. Please contact our support team for assistance before performing the reset.
5.0 Disposal guidance of battery
- Don’t throw away your batteries, separate them with recycled items.
- Do not incinerate battery and put in the fire. Heat may cause explosion and fire.
- Do isolate them each other when disposing the secondary batteries having different electrochemical systems.
- Dispose of the battery in discharged state to prevent heat by short circuiting.
- Please dispose the battery responsibly in accordance with the regulations and requirements of your local authority in your country.
6.0 Product Warranty
- The warranty period of this product is 1 year from the purchase date.
- If the product fails during normal and correct use within the warranty period, our service center will repair the product free of charge.
- Any disassembly, modification or alteration of the product will void the warranty.
- The cost to repair or fix any malfunction or problem caused by incorrect usage during the warranty period may be charged to the consumer.
- The manufacturer shall not be responsible or liable for any loss or damage caused by incorrectly using the product.
7.0 Customer Service
- Manufacturer: EGEN Inc., Republic of Korea.
- Local Service Centre: Wow! Gadgets Pte Ltd, 8 Boon Lay Way 04-02 Tradehub 21 Singapore 609964 | Tel: (65) 61009691 | support@wowgadgets.com.sg