Vueroid ZERO FHD - Wi-Fi Application Manual_Updated29Aug26
VUEROID WI-FI APPLICATION APPS
Table of Contents
- VUEROID WI-FI APPLICATION APPS
- VUEROID APP INITIAL SETUP TUTORIAL
- 1.0 APP DOWNLOAD AND INSTALLING
- 2.0 SETTING
- 2.1 Live Viewer
- 2.2 Vueroid Dashcam Setting - Recording
- 2.2.1 Recording - Recording Quality
- 2.2.2 Recording - Discharge Cut-Off Voltage
- 2.2.3 Recording - Discharge Cut-Off Time
- 2.2.4 Recording - Auto Parking
- 2.2.5 Recording - Parking Mode Event Alert
- 2.2.6 Recording - Parking Record
- 2.2.7 Recording - Smart Low Power Mode
- 2.2.8 Recording - HDR
- 2.2.9 Recording - Rear Record in Parking
- 2.2.10 Recording - Parking Recording Delay
- 2.3 Vueroid Dashcam Setting - Event
- 2.4 Vueroid Dashcam Setting - Sound
- 2.5 Vueroid Dashcam Setting - Time
- 2.6 Vueroid Dashcam Setting - Memory
- 2.7 Vueroid Dashcam Setting - System
- 3.0 VIEW THE RECORDING (FILE VIEWER)
- 4.0 DOWNLOADING VIDEOS
VUEROID APP INITIAL SETUP TUTORIAL
1.0 APP DOWNLOAD AND INSTALLING
1.1 App Store Download

-
Search for "Vueroid" and download the app.
-
For Android users, please download the app from "Google Play".
-
For IOS users, please download the app from "App Store"
1.2 Wi-Fi Application Connection
-
Turn "ON" the Wi-Fi button on the dashcam.
-
Open Vueroid App.
-
Tap on "OK" once the pop-up screen is shown and it says "Connect to device".
-
In the Wi-Fi network listing, click on the VUEROID dashcam SSID in the form of "VUEROID_ZERO_FHD_XXXXXX"
-
Key in the password. Default password is "12345678"
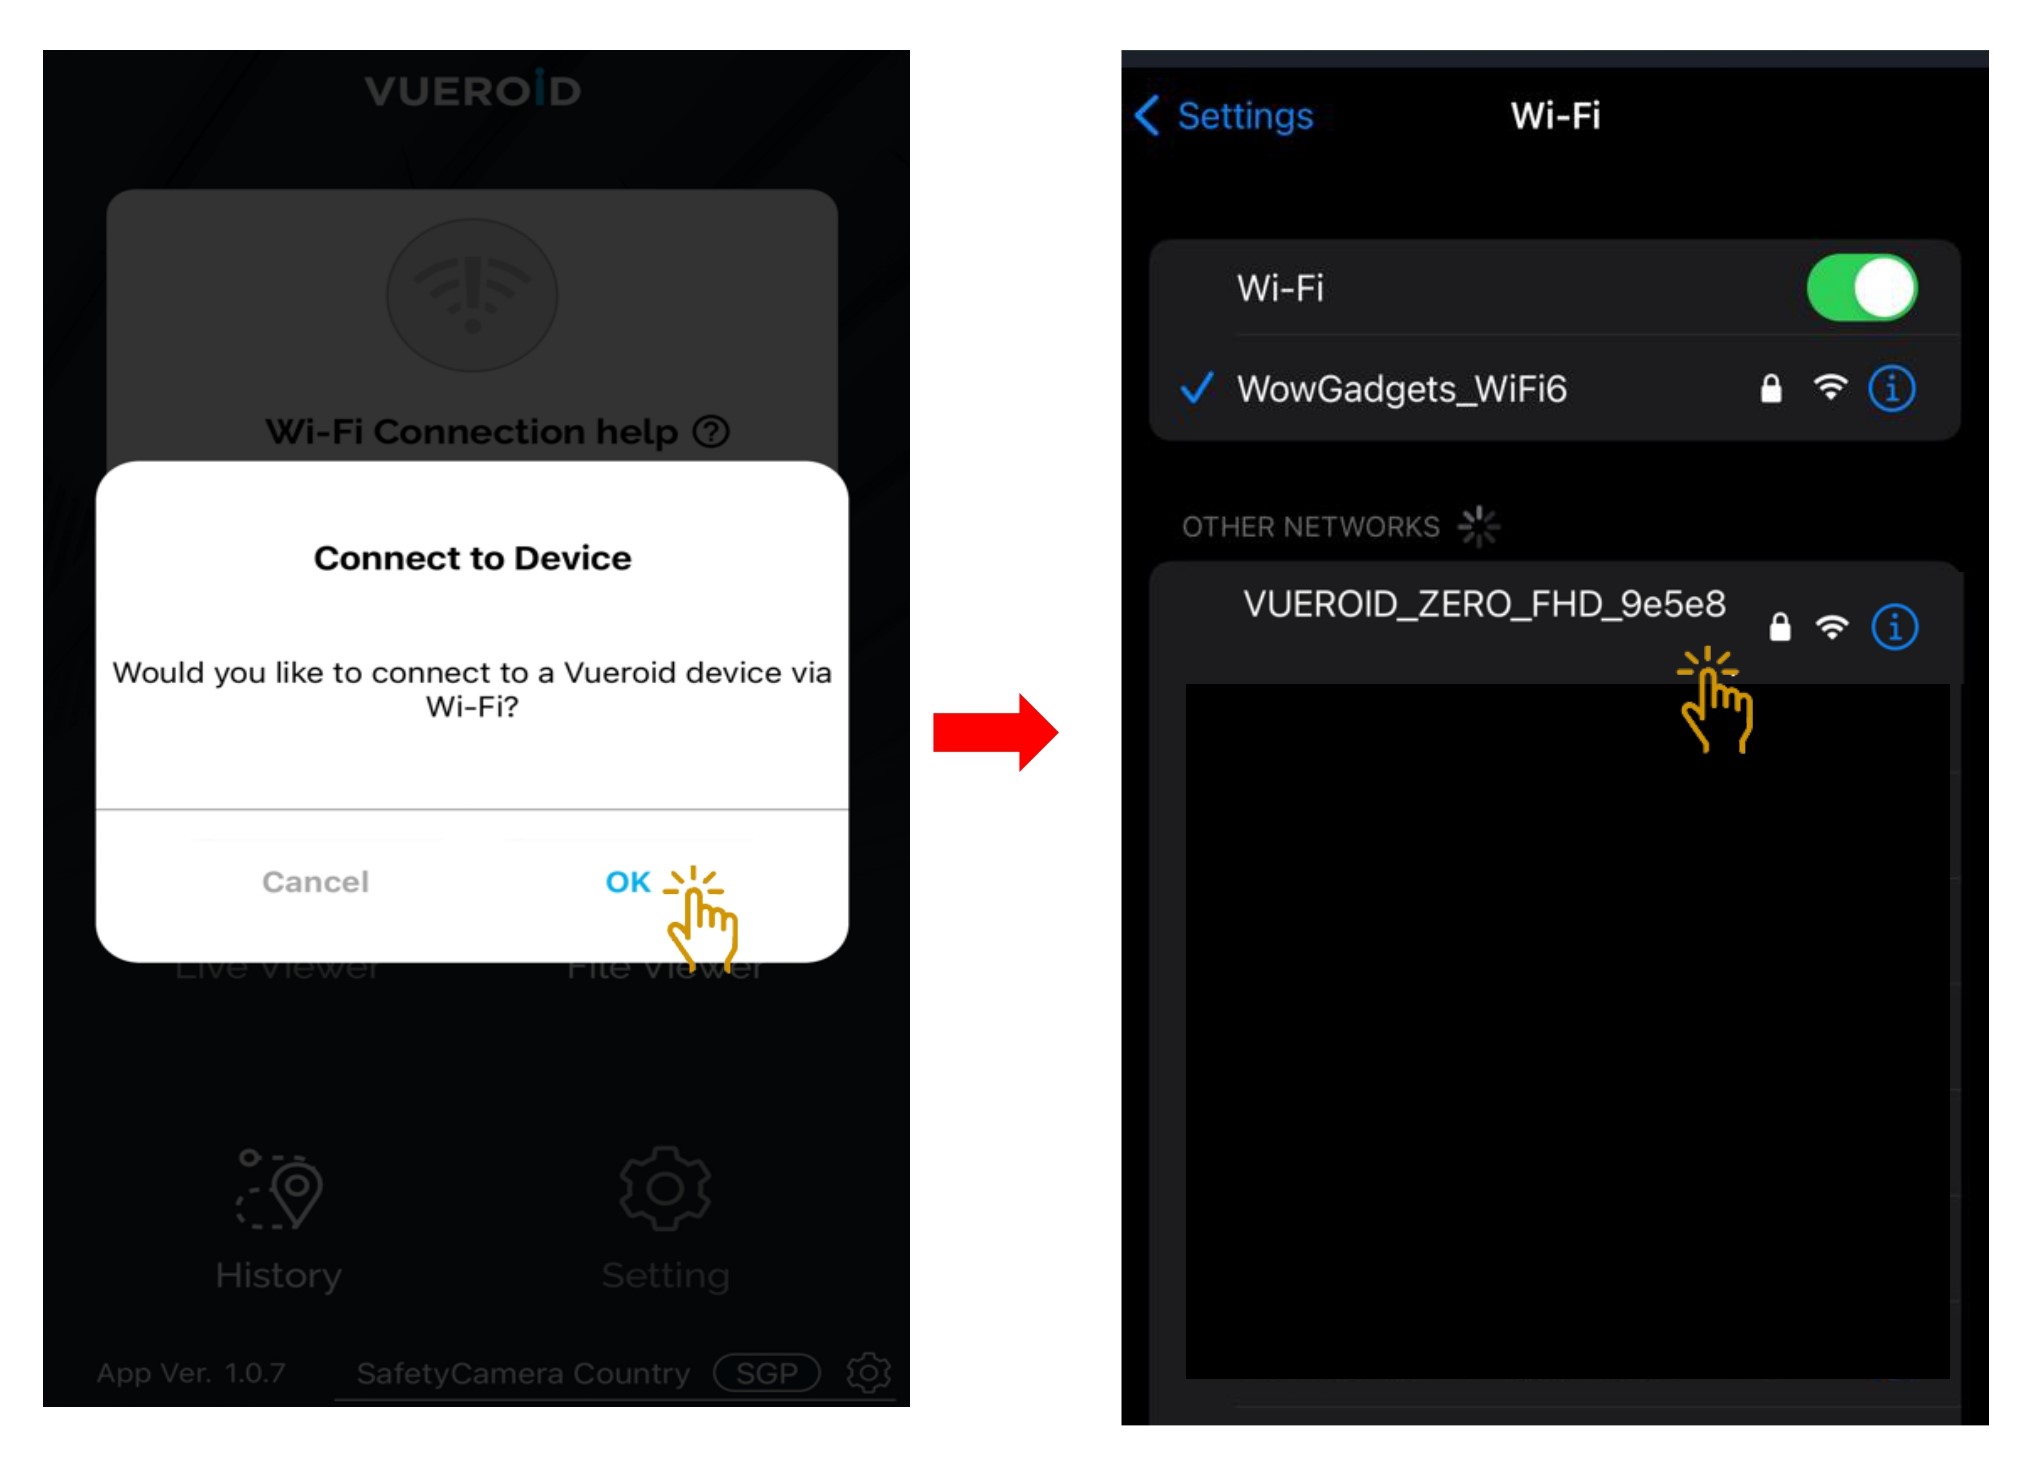
In the event unable to connect to Wi-Fi Apps, please turn off mobile data plan network or switch on airplane mode.
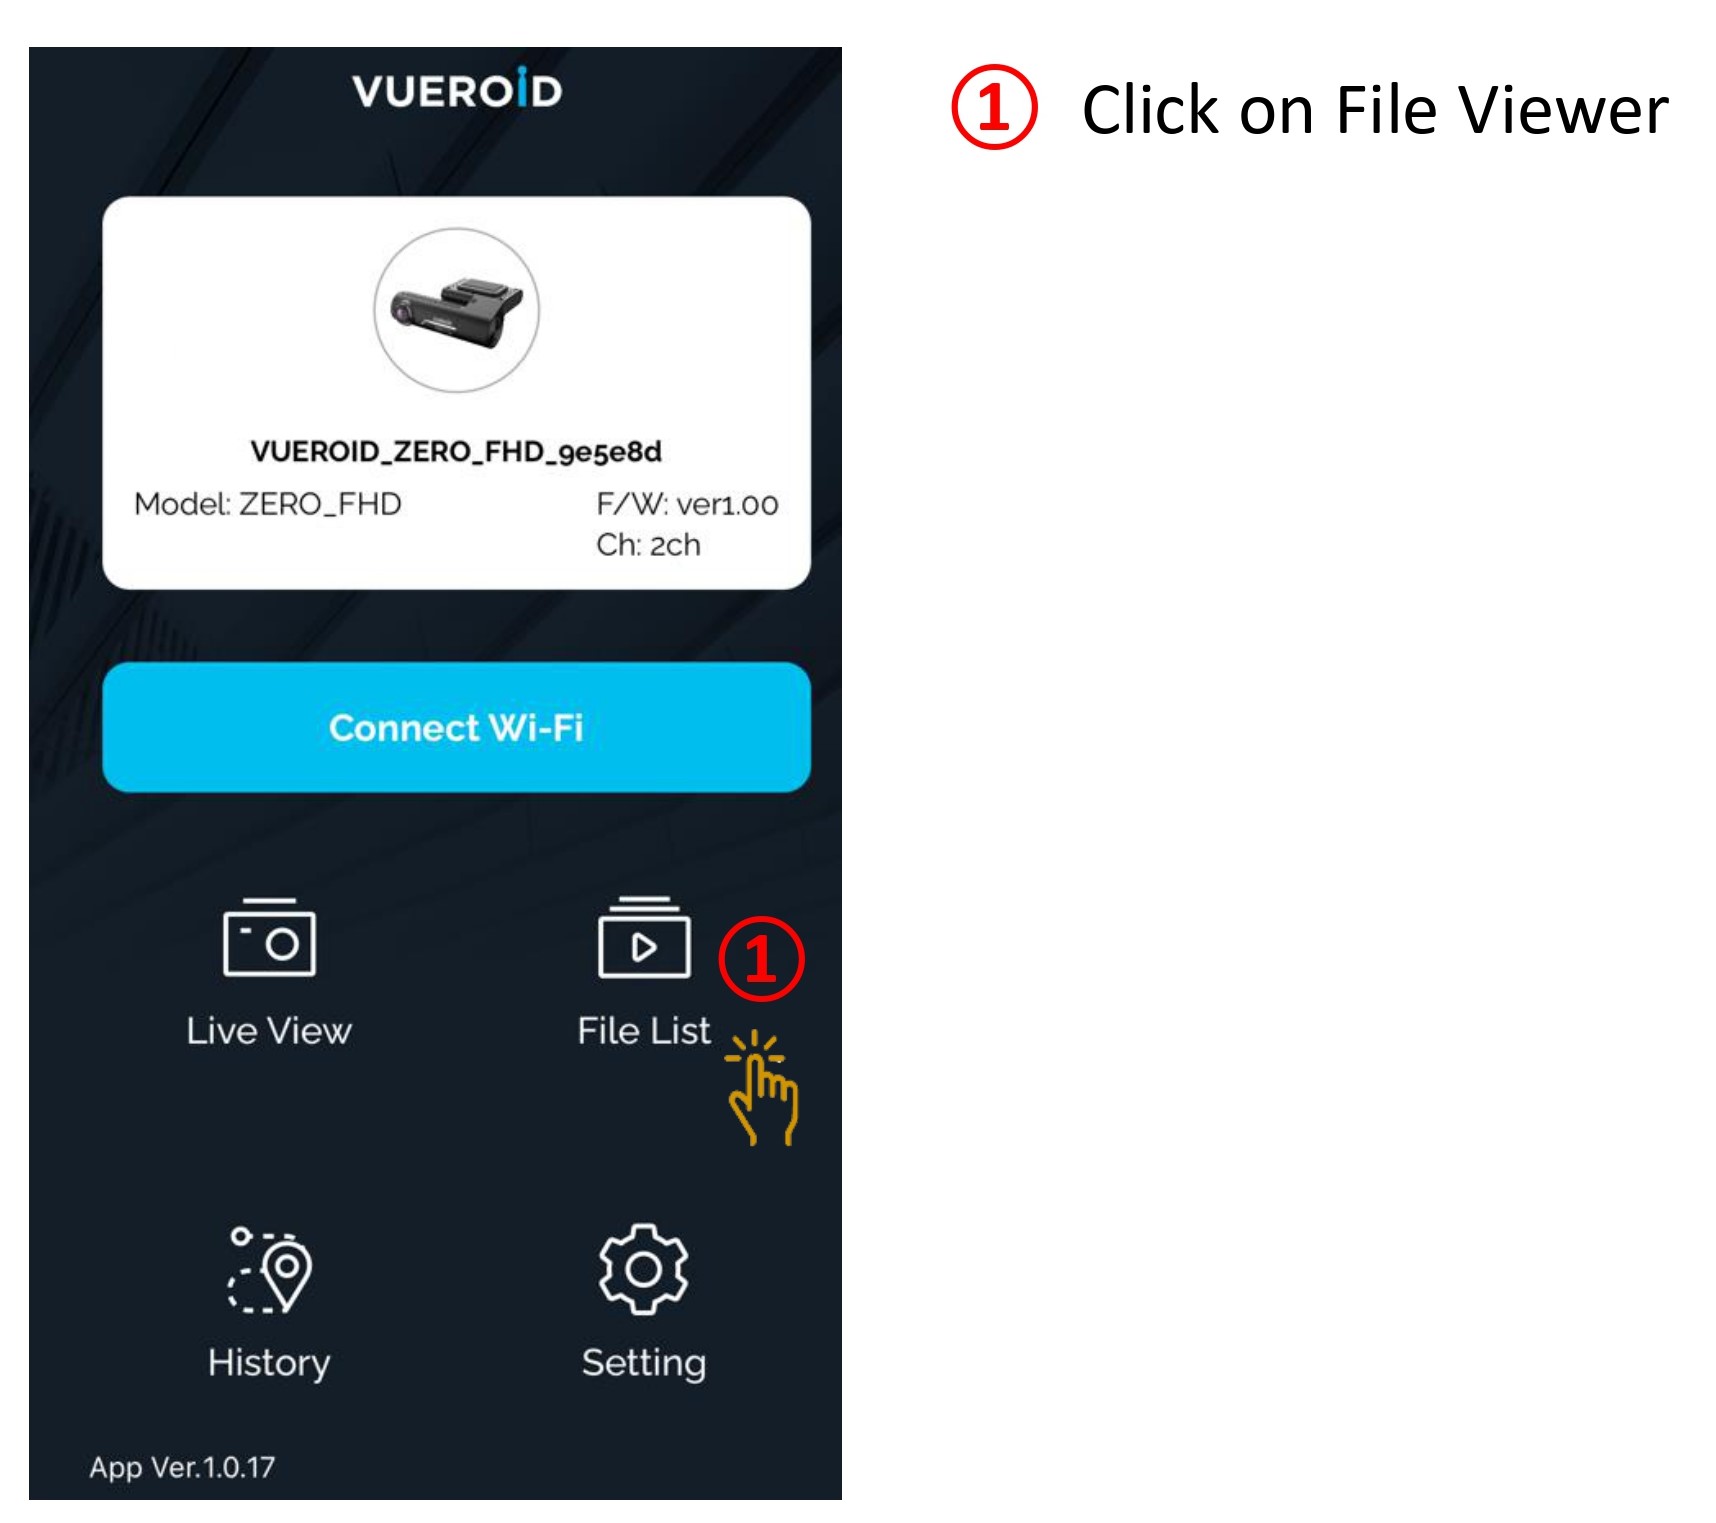
1.3 Wi-Fi Application Start-up Screen
-
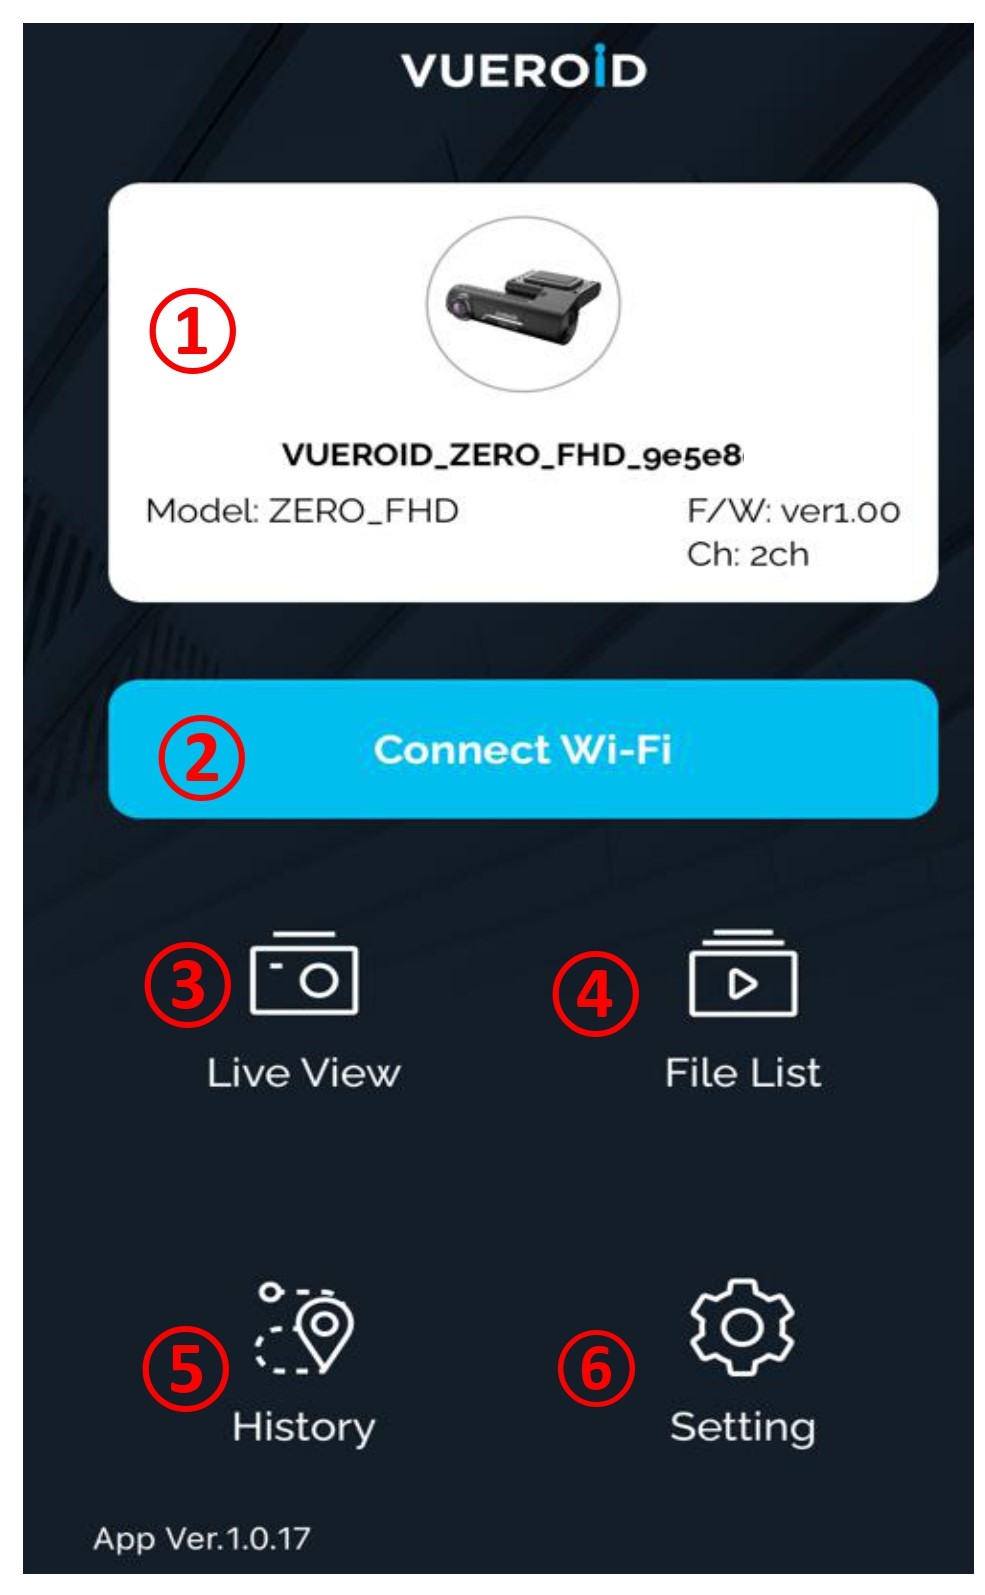
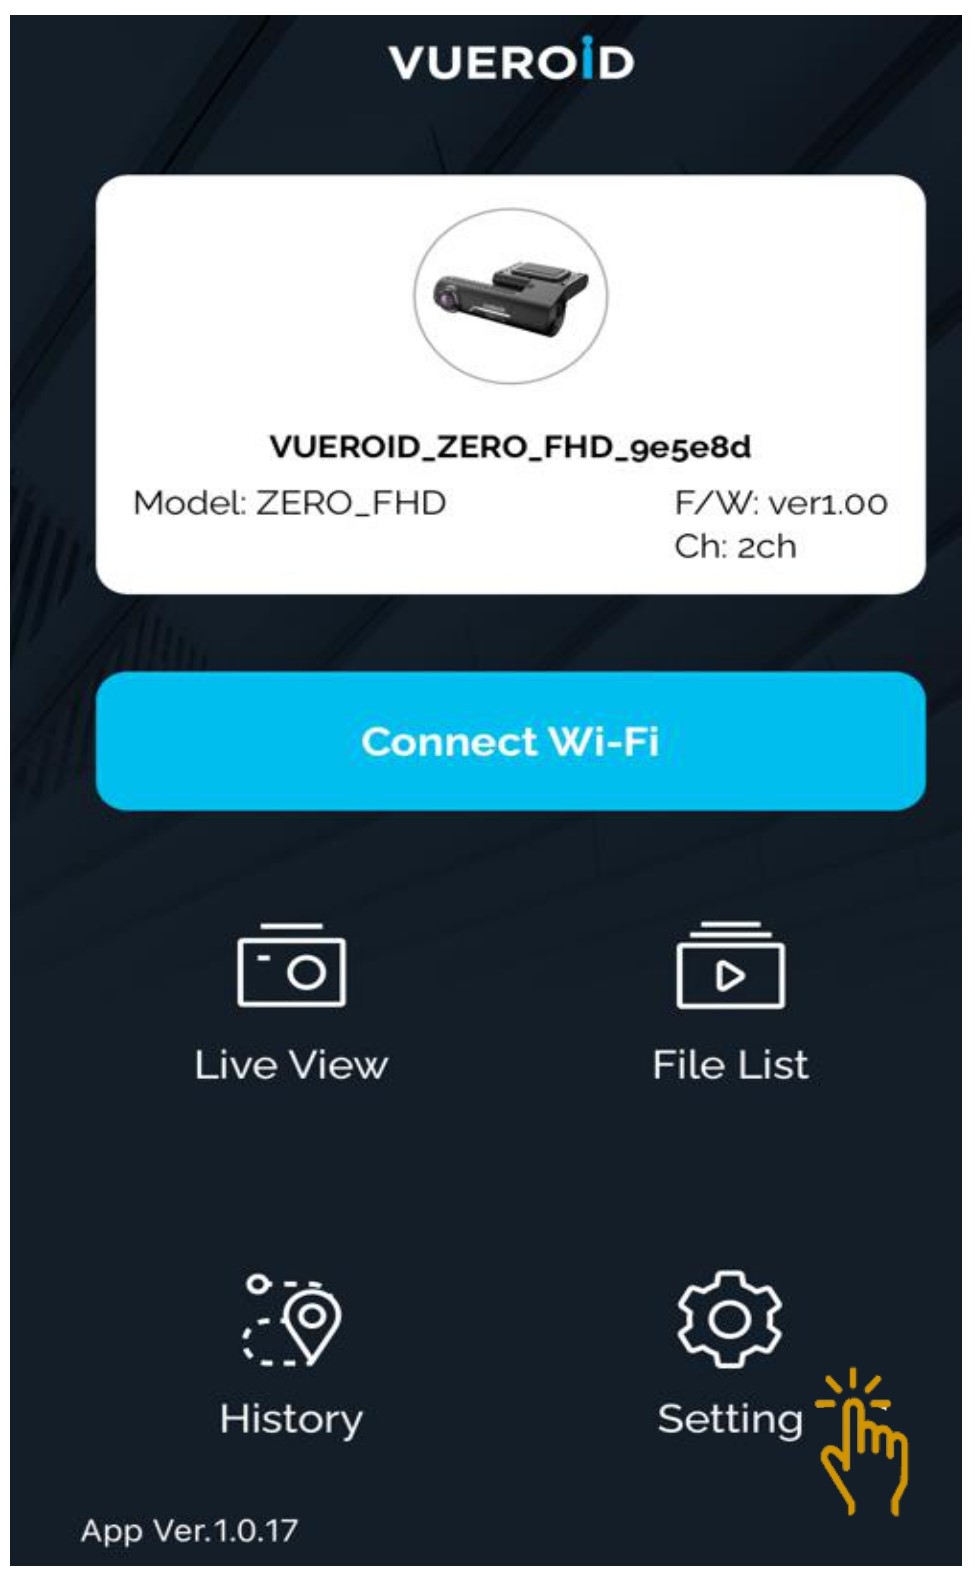
Wi-Fi Status : Display Wi-Fi status and the name of the connected device.
-
Wi-Fi Connect : Enable or Disable Wi-Fi connection.
-
Live Viewer : View the front / rear live stream
-
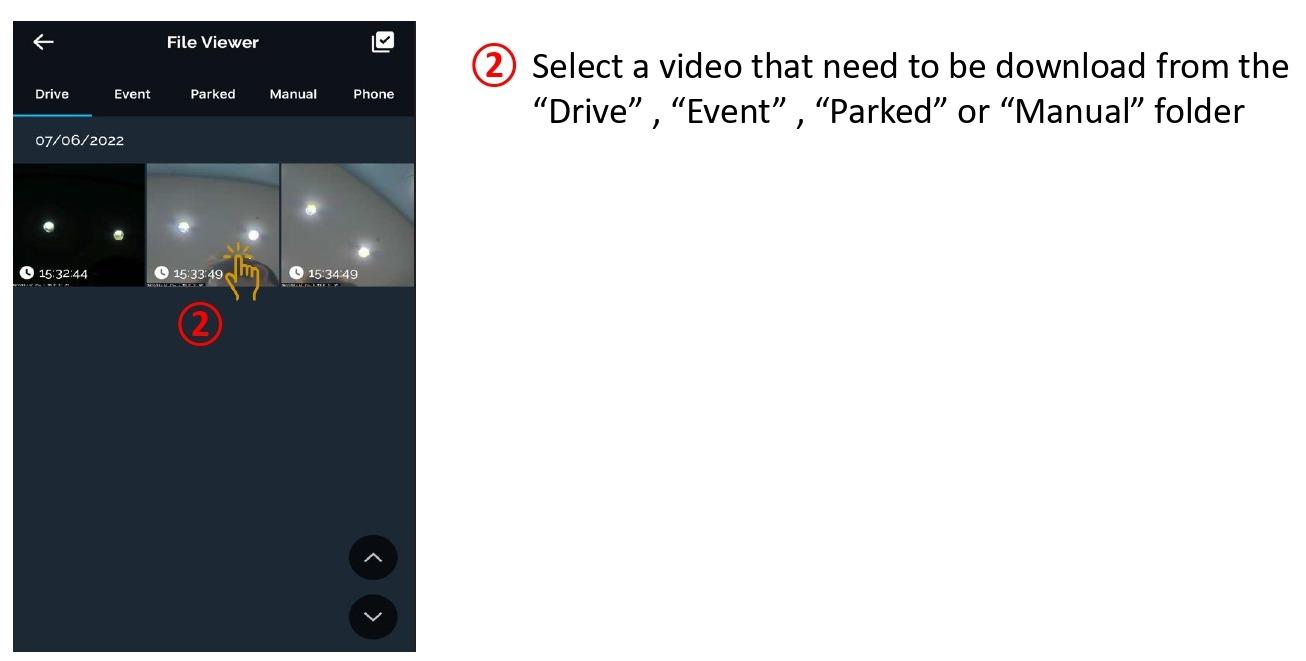
File Viewer : Find the recording files in different folders
-
History : Not Applicable for model ZERO-FHD
-
Setting : Allow user to get unit's settings switched.
2.0 SETTING
2.1 Live Viewer
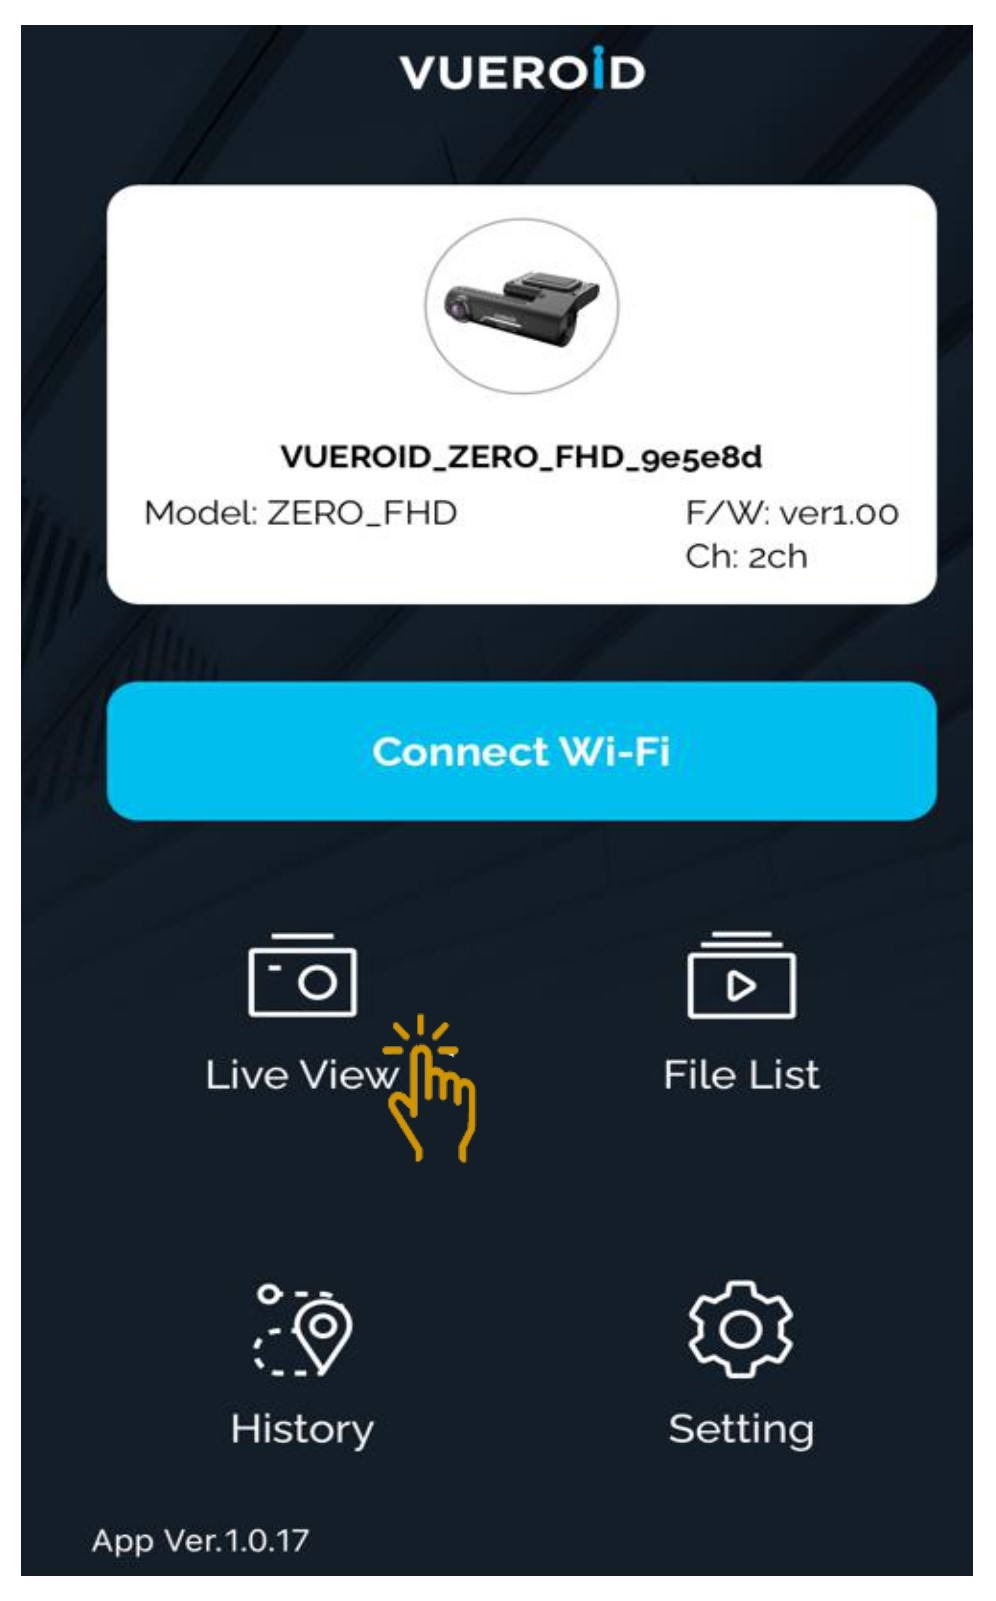
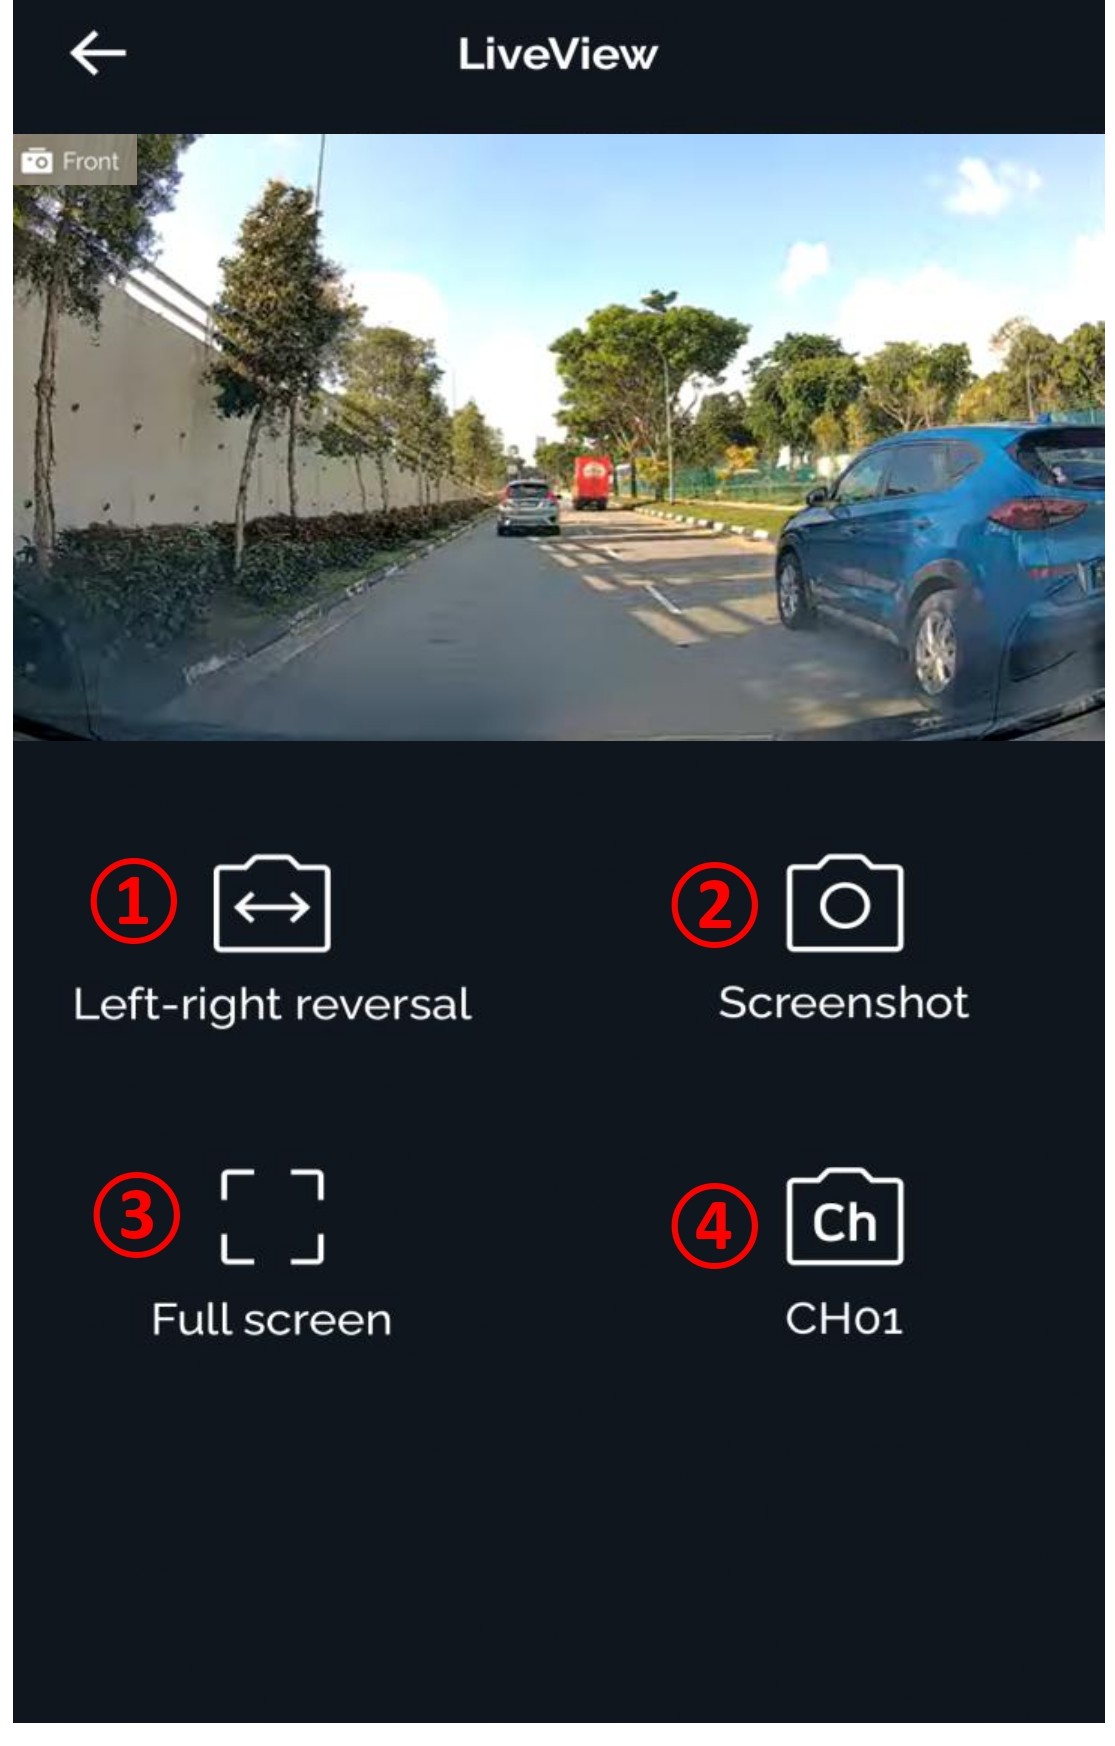
1. Left/Right Reversal : Switch to Left / Right viewing image.
2. Screenshot : Capture the display image.
3. Full Screen : Display the full screen
4. CH ( CH01 / CH02 ) : Switch to Front (CH01) / Rear (CH02) camera image.
2.2 Vueroid Dashcam Setting - Recording
To change the dashcam setting , click on "Setting" icon.
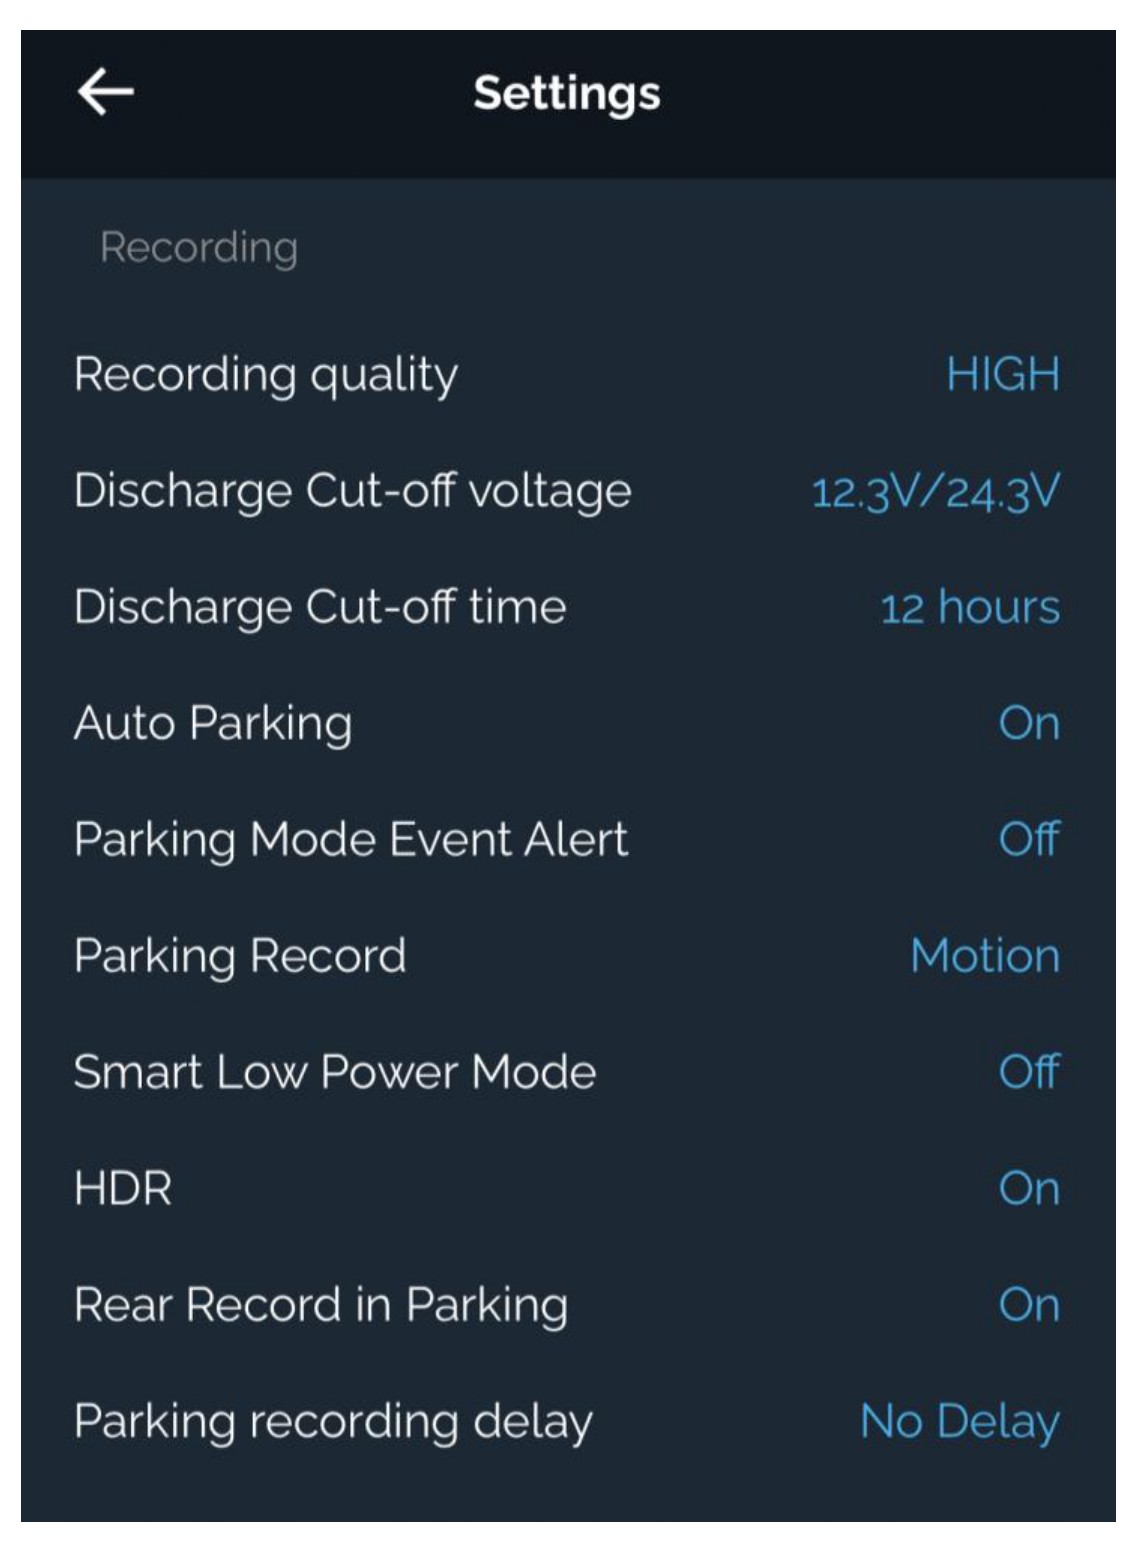
2.2.1 Recording - Recording Quality
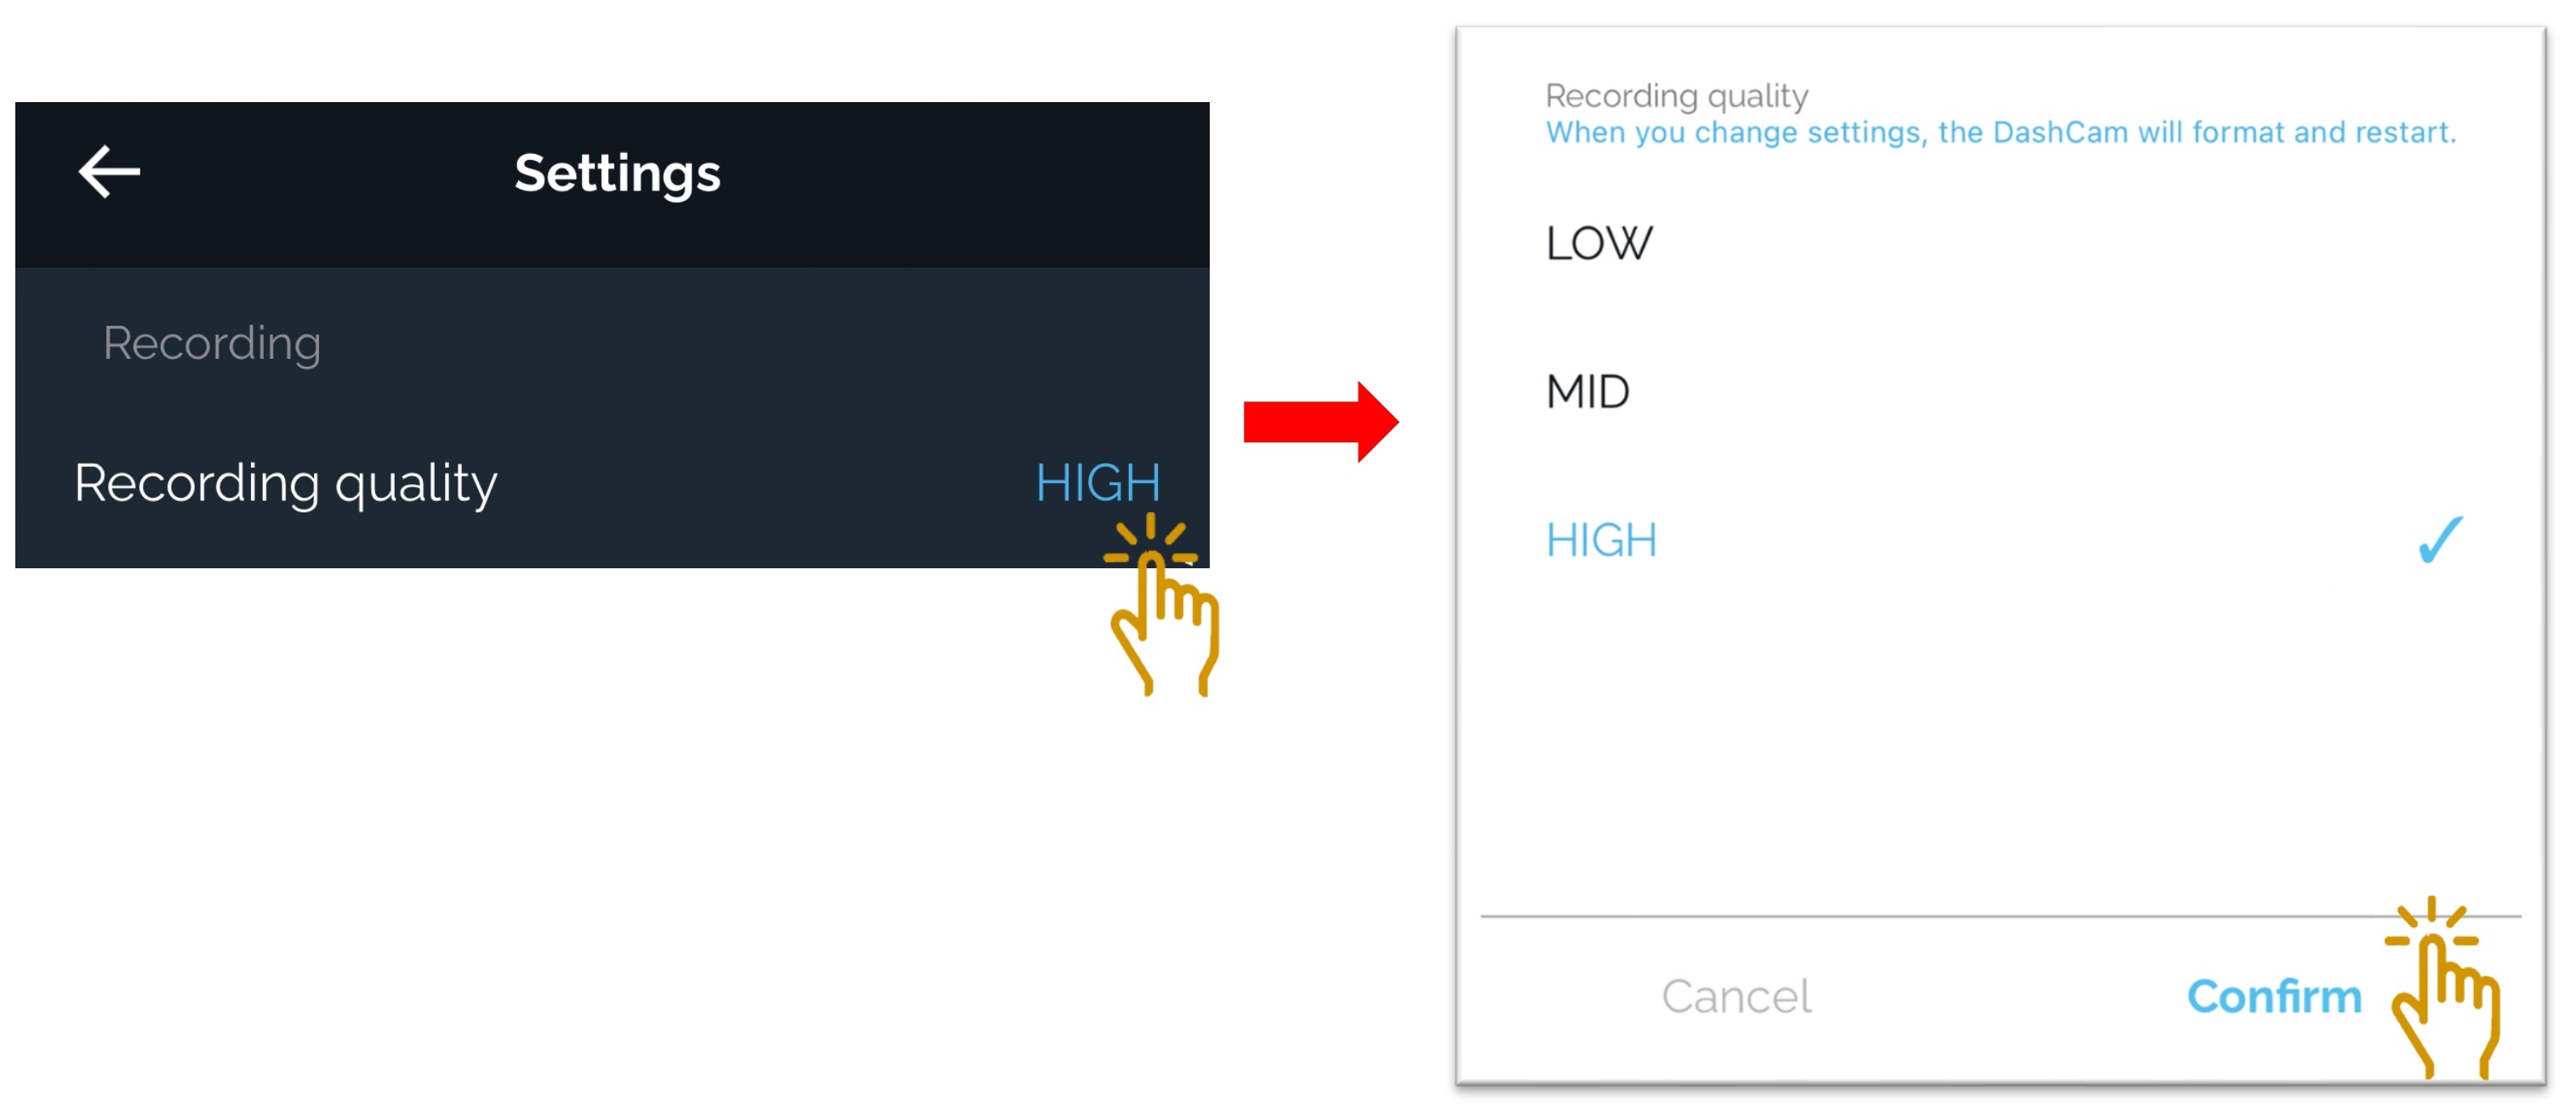
- Choose the type of "Recording Quality" to be set.
- Select "HIGH" or "MID" or "LOW".
- Click "Confirm" once selected.
- Once saved, the dashcam will restart itself.
- Please note all the videos will be erased once is formatted after this setting has been changed.
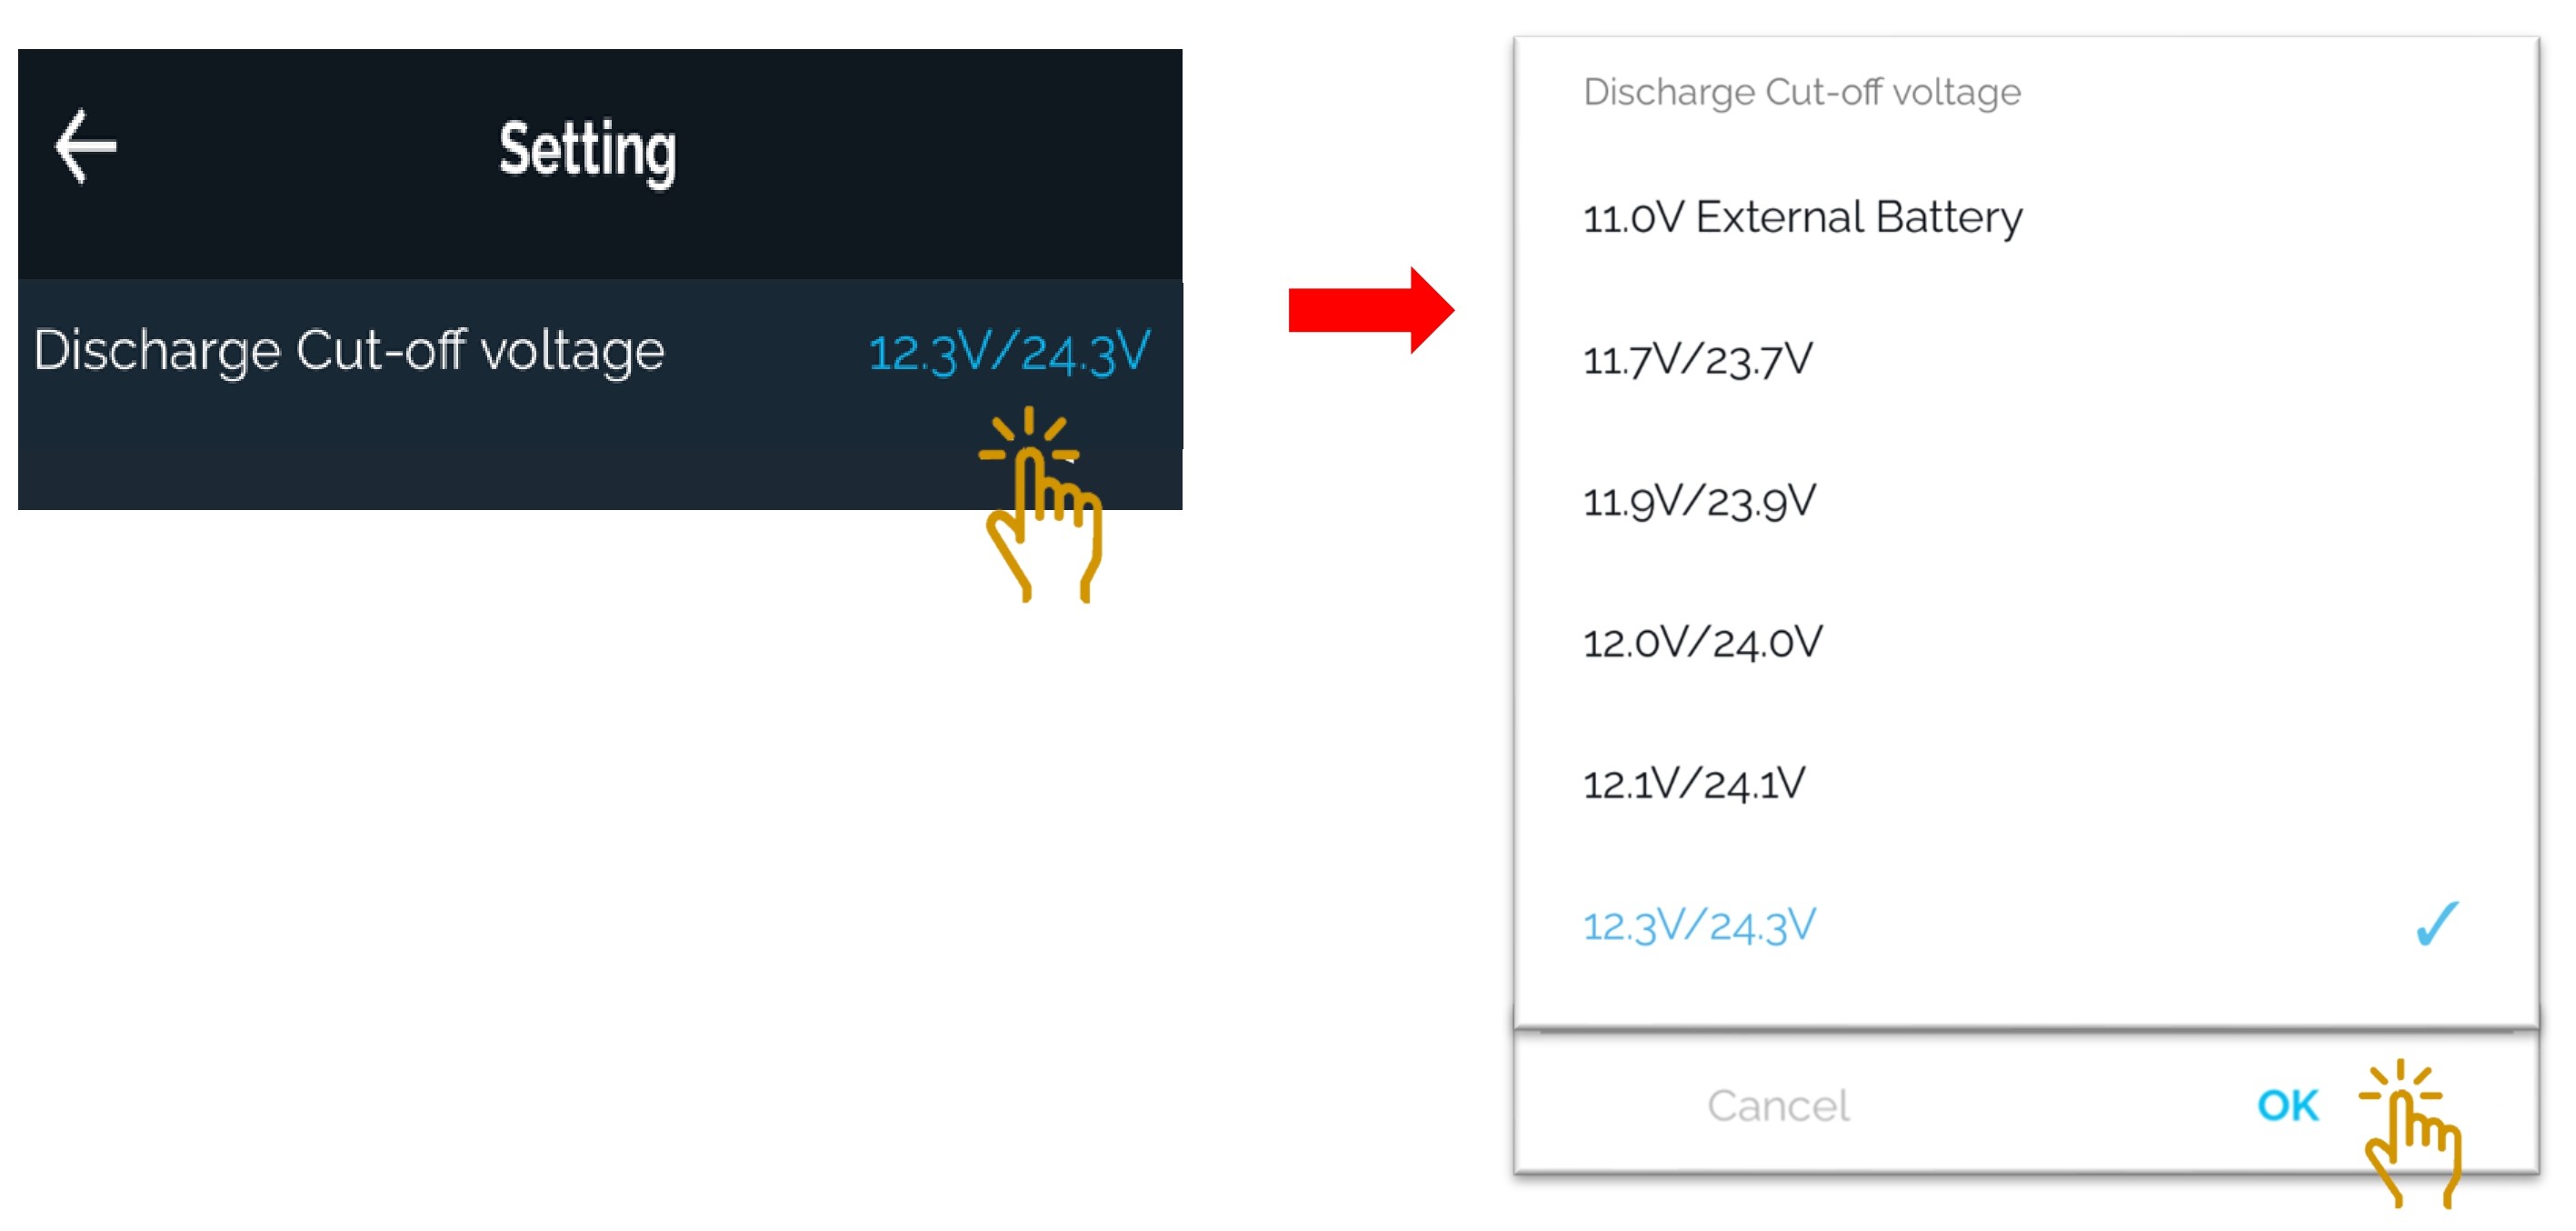
2.2.2 Recording - Discharge Cut-Off Voltage
Discharge Cut-Off Voltage allows user to choose a few pre set voltage cut off options.
The dashcam will stop recording once detected the pre set low voltage or cut-off time (whichever comes first) during the parking mode recording.
- Click on "Discharge Cut-Off voltage" to be set.
- Select the voltage value to be set.
- Click "OK" once selected.
2.2.3 Recording - Discharge Cut-Off Time
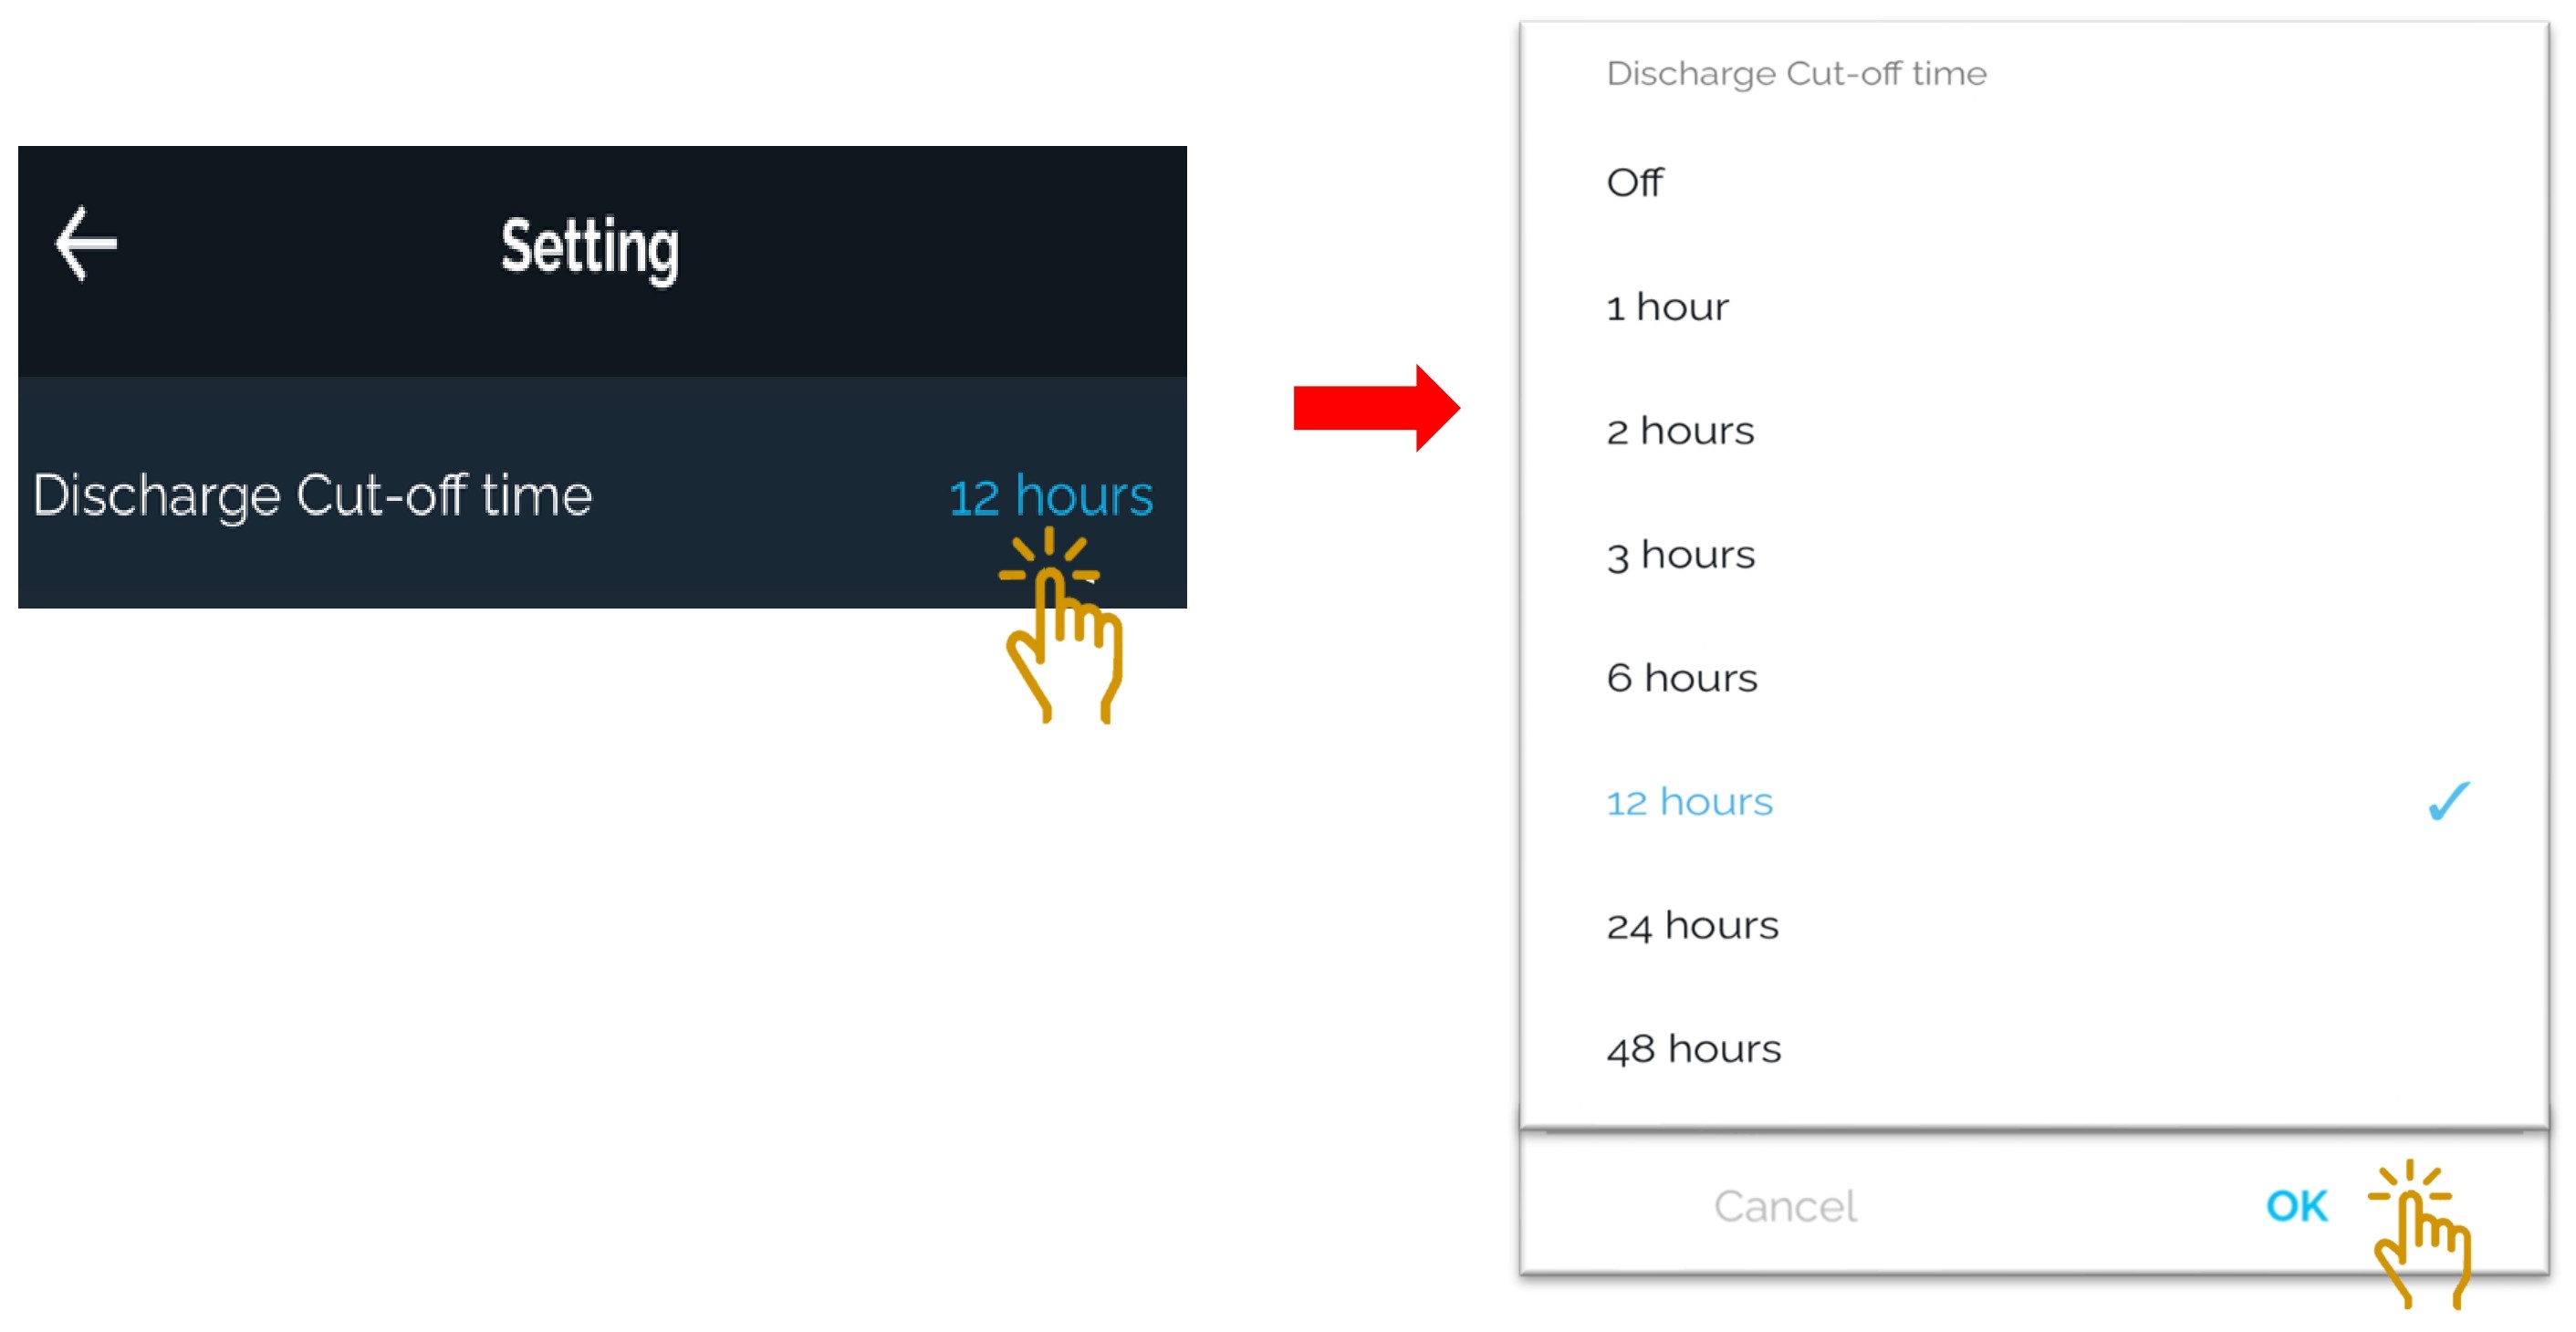
Discharge Cut-Off Time allows user to choose a few pre set timer cut off options or disable the timer cut off.
The dashcam will stop recording once detected the pre set low voltage or cut-off time (whichever comes first) during the parking mode recording.
- Click on "Discharge Cut-Off Time" to be set.
- Select the cut time to be set.
- Click "OK" once selected.
2.2.4 Recording - Auto Parking
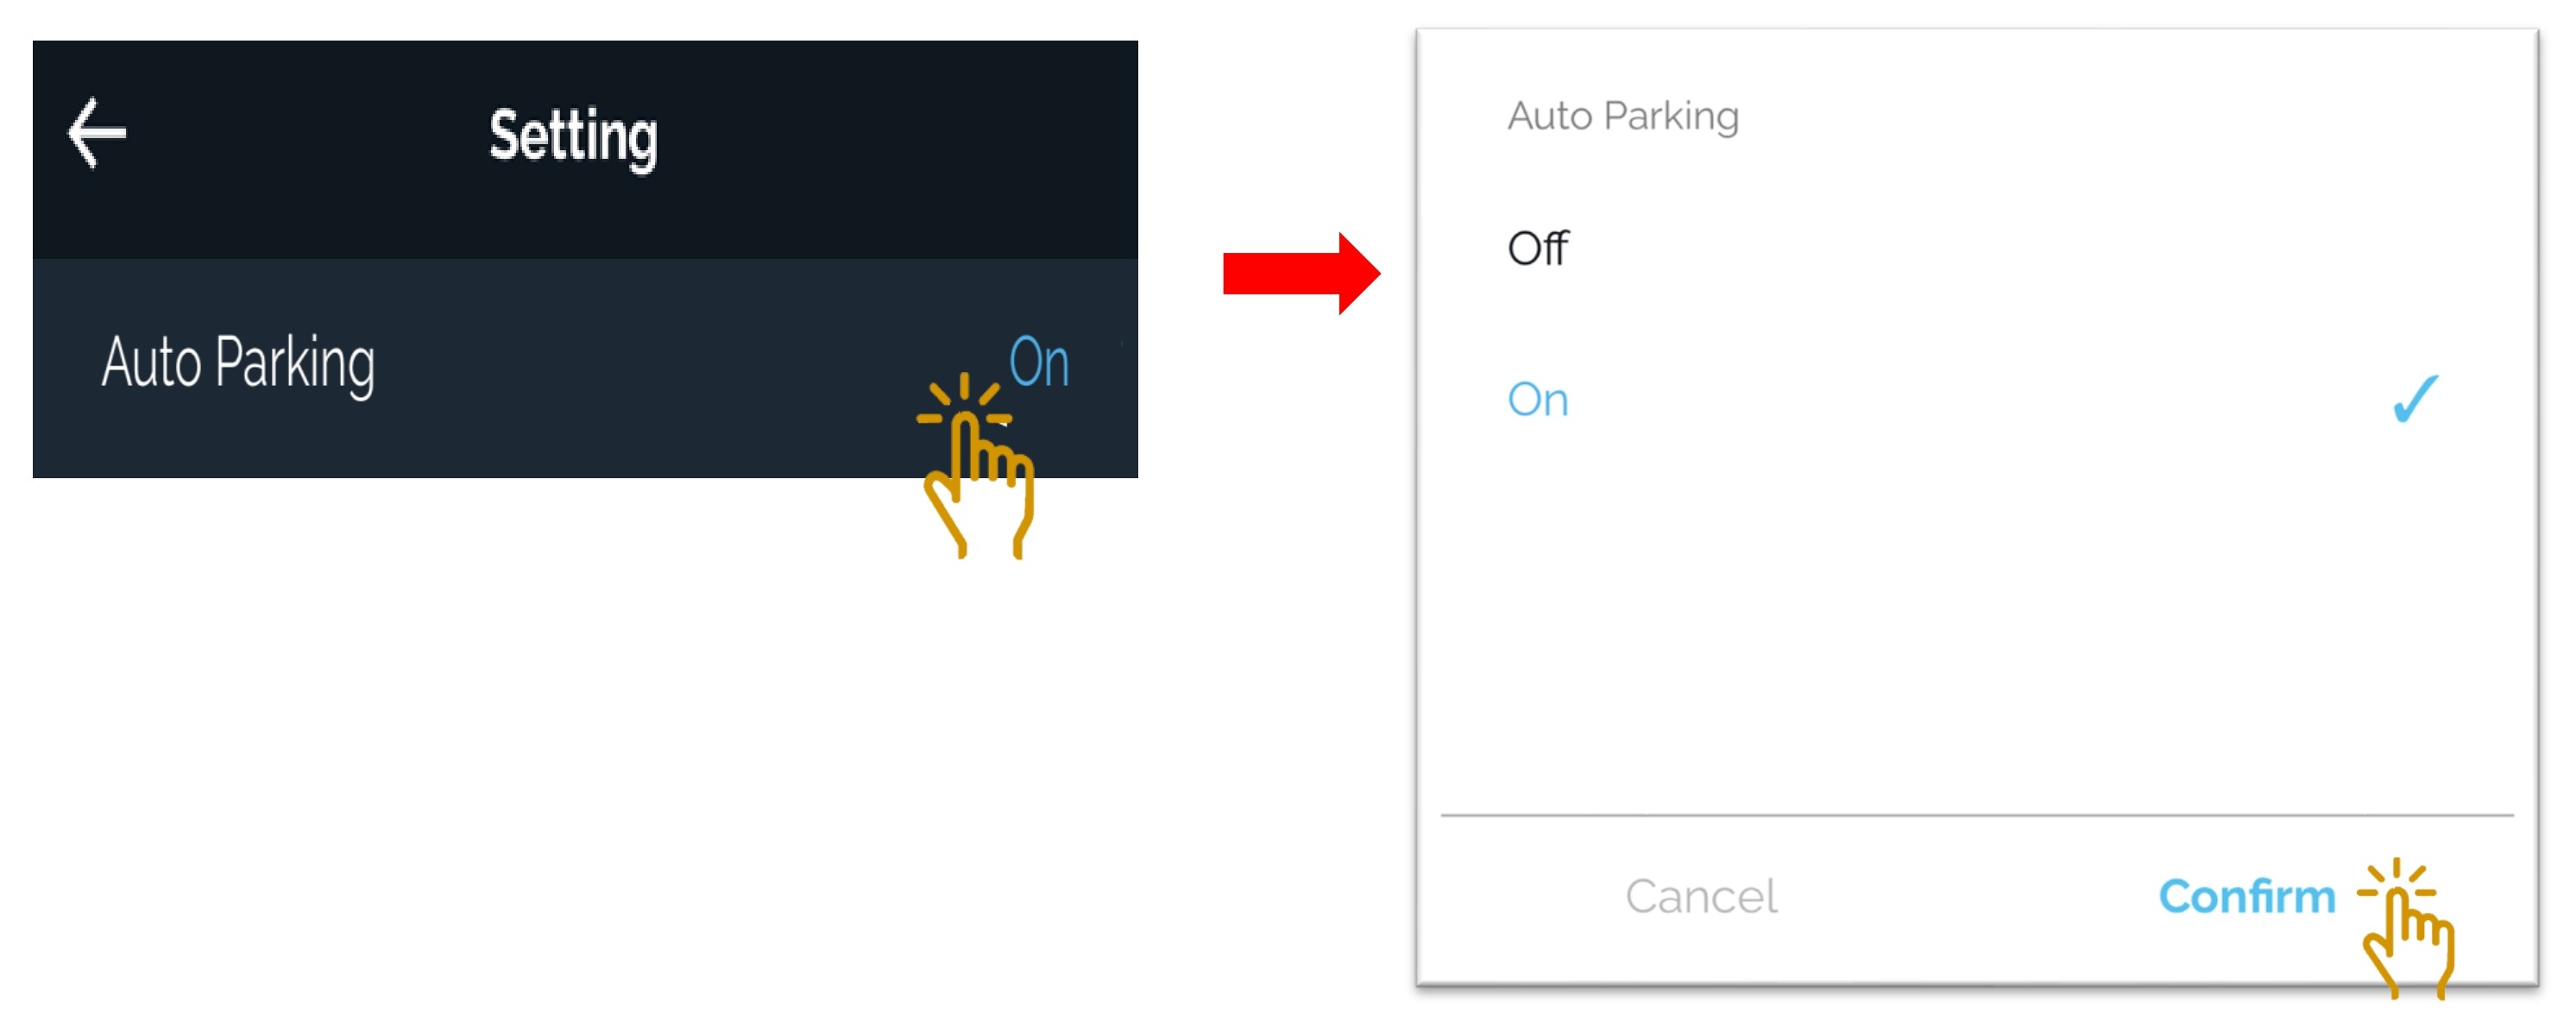
To enable or disable parking mode recording
Parking mode recording only able to activate if the dashcam power supply cable is hard wired.
NOTE: There is no parking mode is using 12V power cigarette connection.
- Click on "Auto Parking" to be set.
- Select "ON" or "OFF".
- Click "Confirm" once selected.
2.2.5 Recording - Parking Mode Event Alert
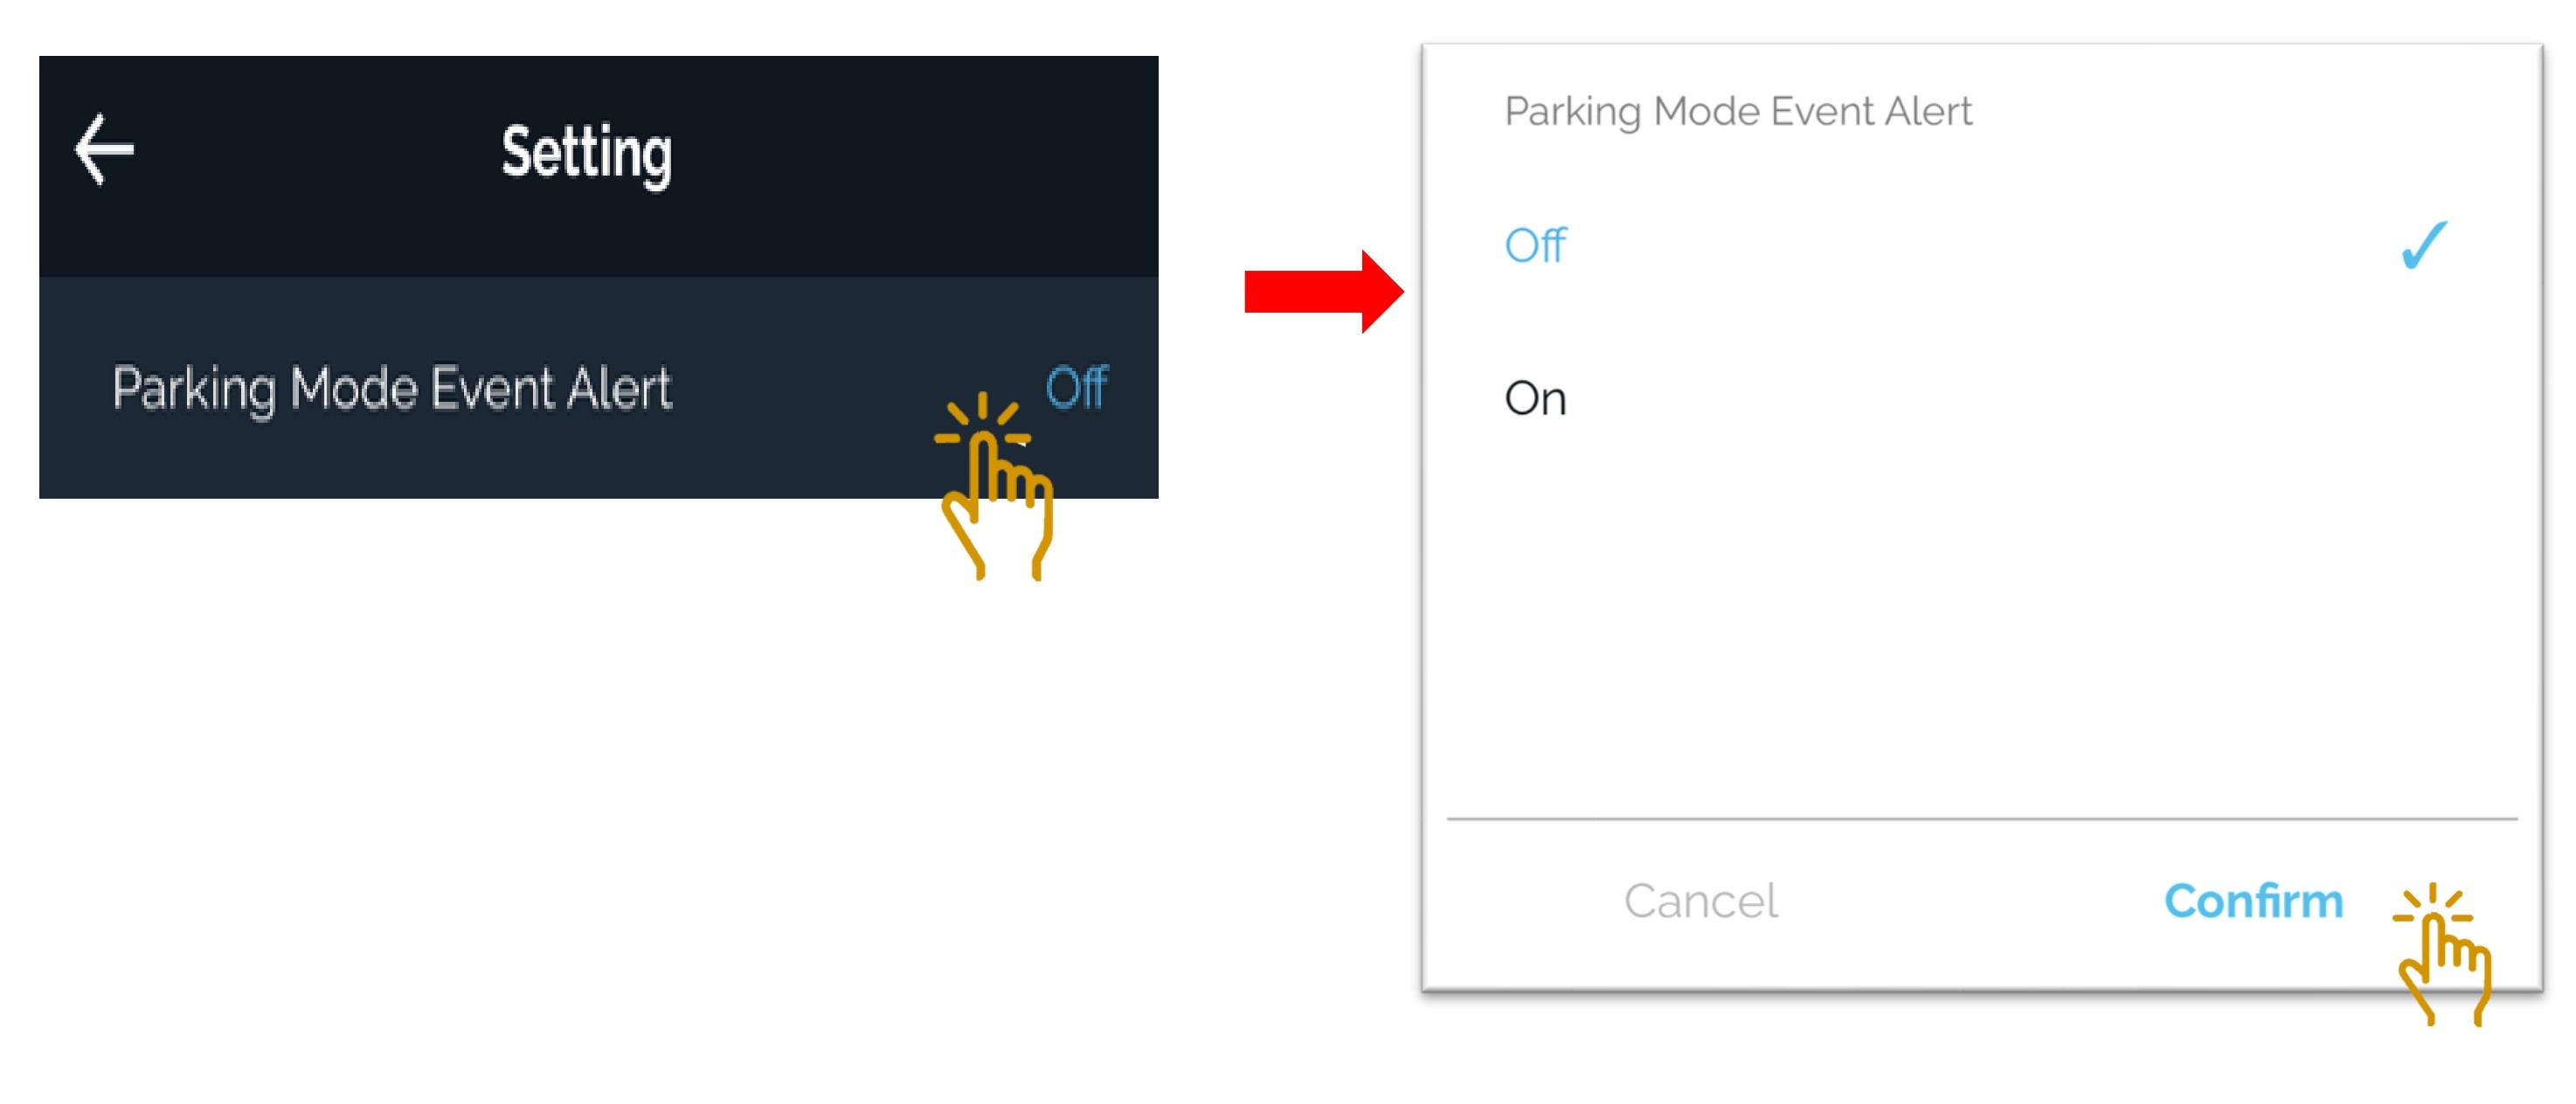
Notification event alert can be turn on or turn off when there is an impact detected during parking mode.
- Click on "Parking Mode Event Alert" to be set.
- Select "ON" or "OFF".
- Click "Confirm" once selected.
2.2.6 Recording - Parking Record
During the parking mode recording, user can choose either based on time lapse recording or recording after motion detected.
- Click on "Parking Record" to be set.
- Select "Time Lapse" or "Motion".
- Click "OK" once selected.
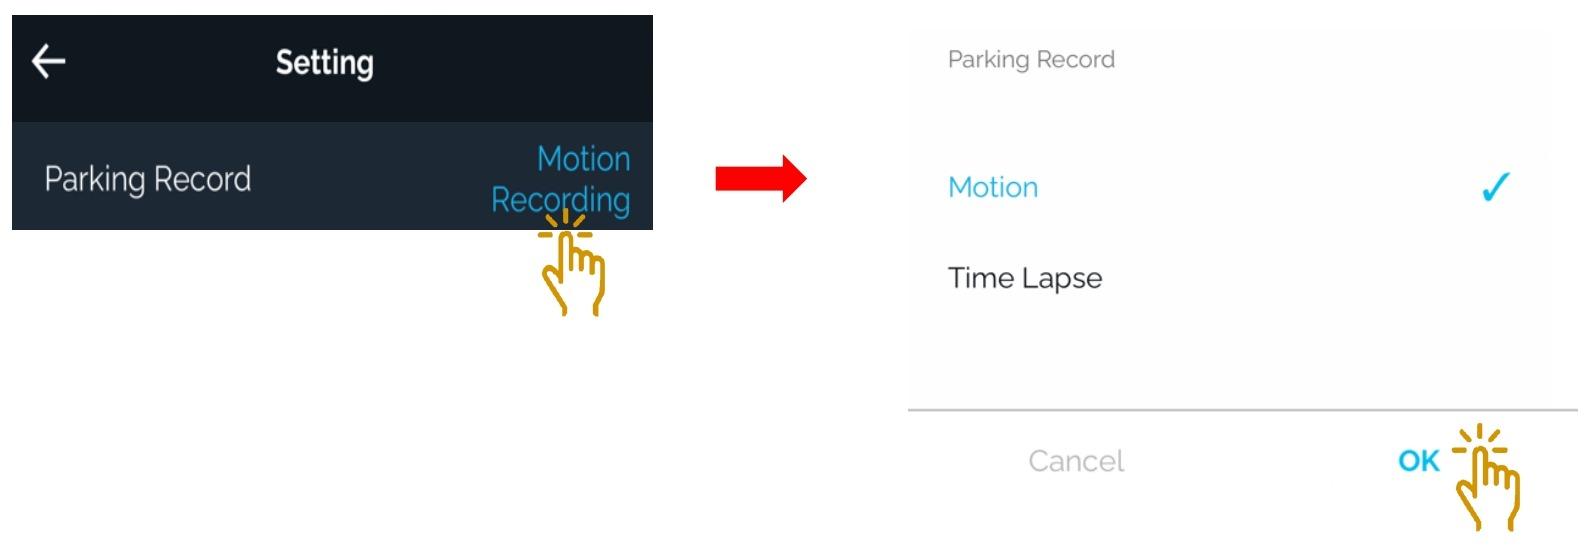
Time Lapse - 7 seconds per video file. Each video file contains 100 seconds recorded video.
Motion - 30 seconds per video file.
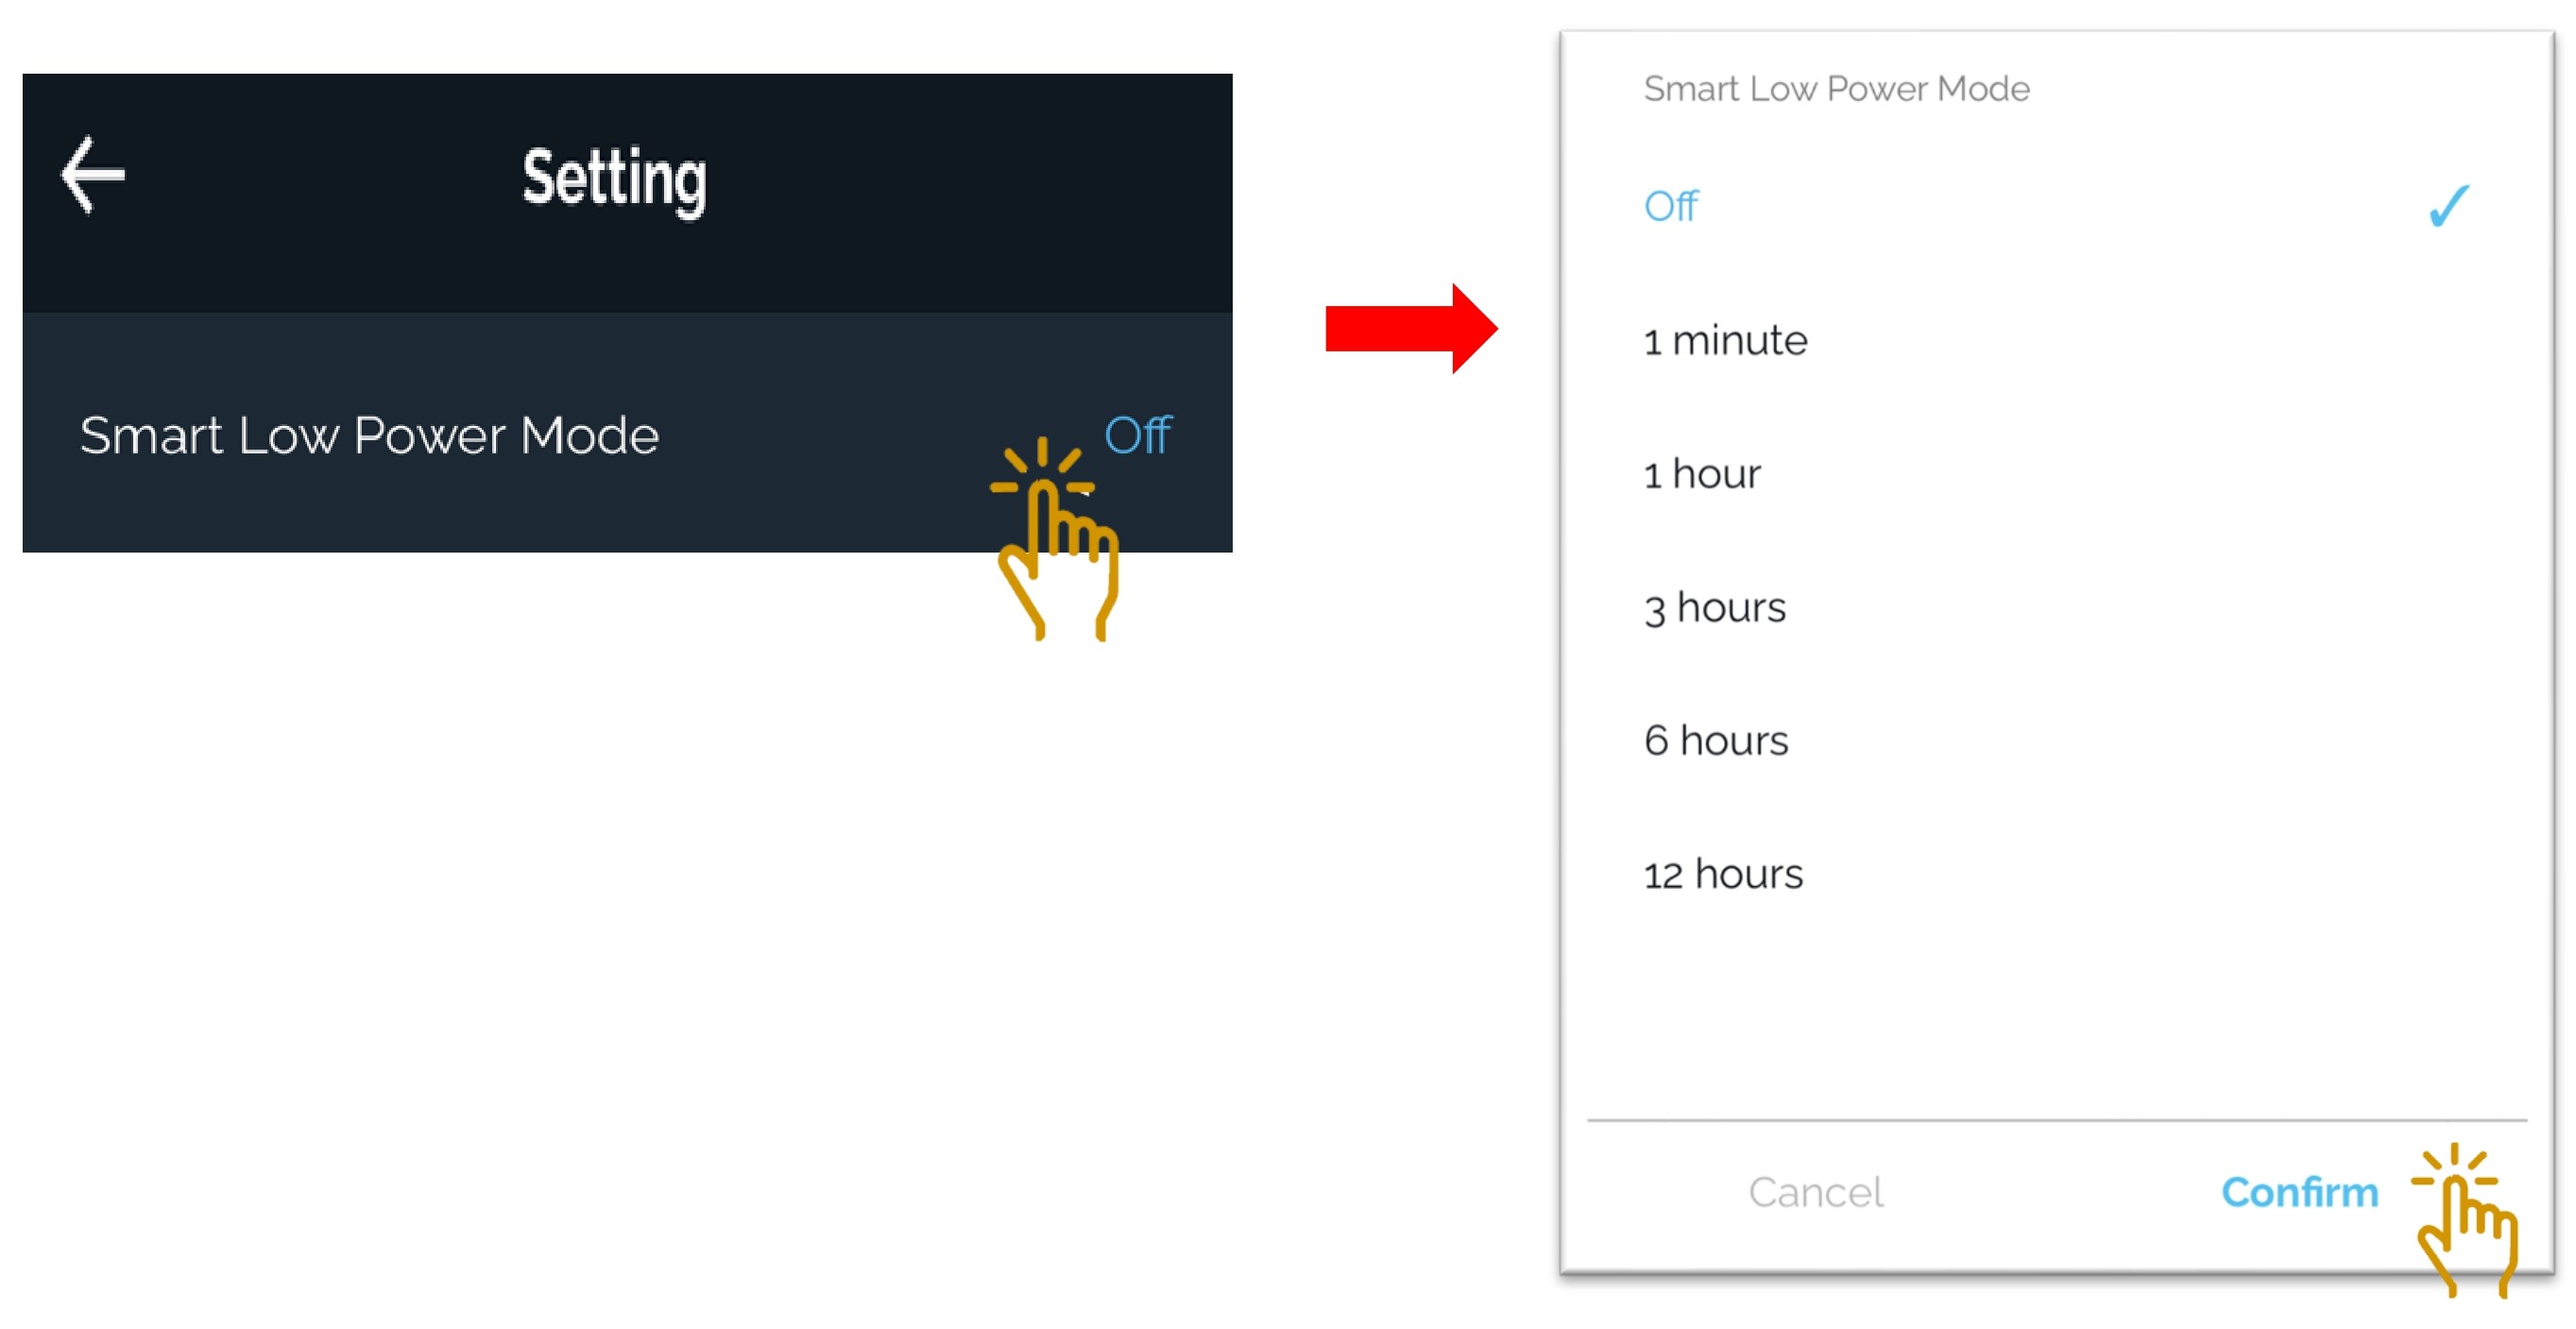
2.2.7 Recording - Smart Low Power Mode
Smart Low Power Mode enhances the dash cam’s energy saving in parking mode.
Once the Smart Low Power Mode option is activated, the dashcam will consume very low power while on standby and will only start to record upon an impact.
This will help to conserve the power especially when you will be away from your car for a longer period of time.
Dashcam will not record upon any motion but only starts to record upon a strong impact.
- Click on "Smart Low Power Mode" to be set.
- Select the pre-set timer to activate Smart Low Power Mode.
- Click "Confirm" once selected.
2.2.8 Recording - HDR
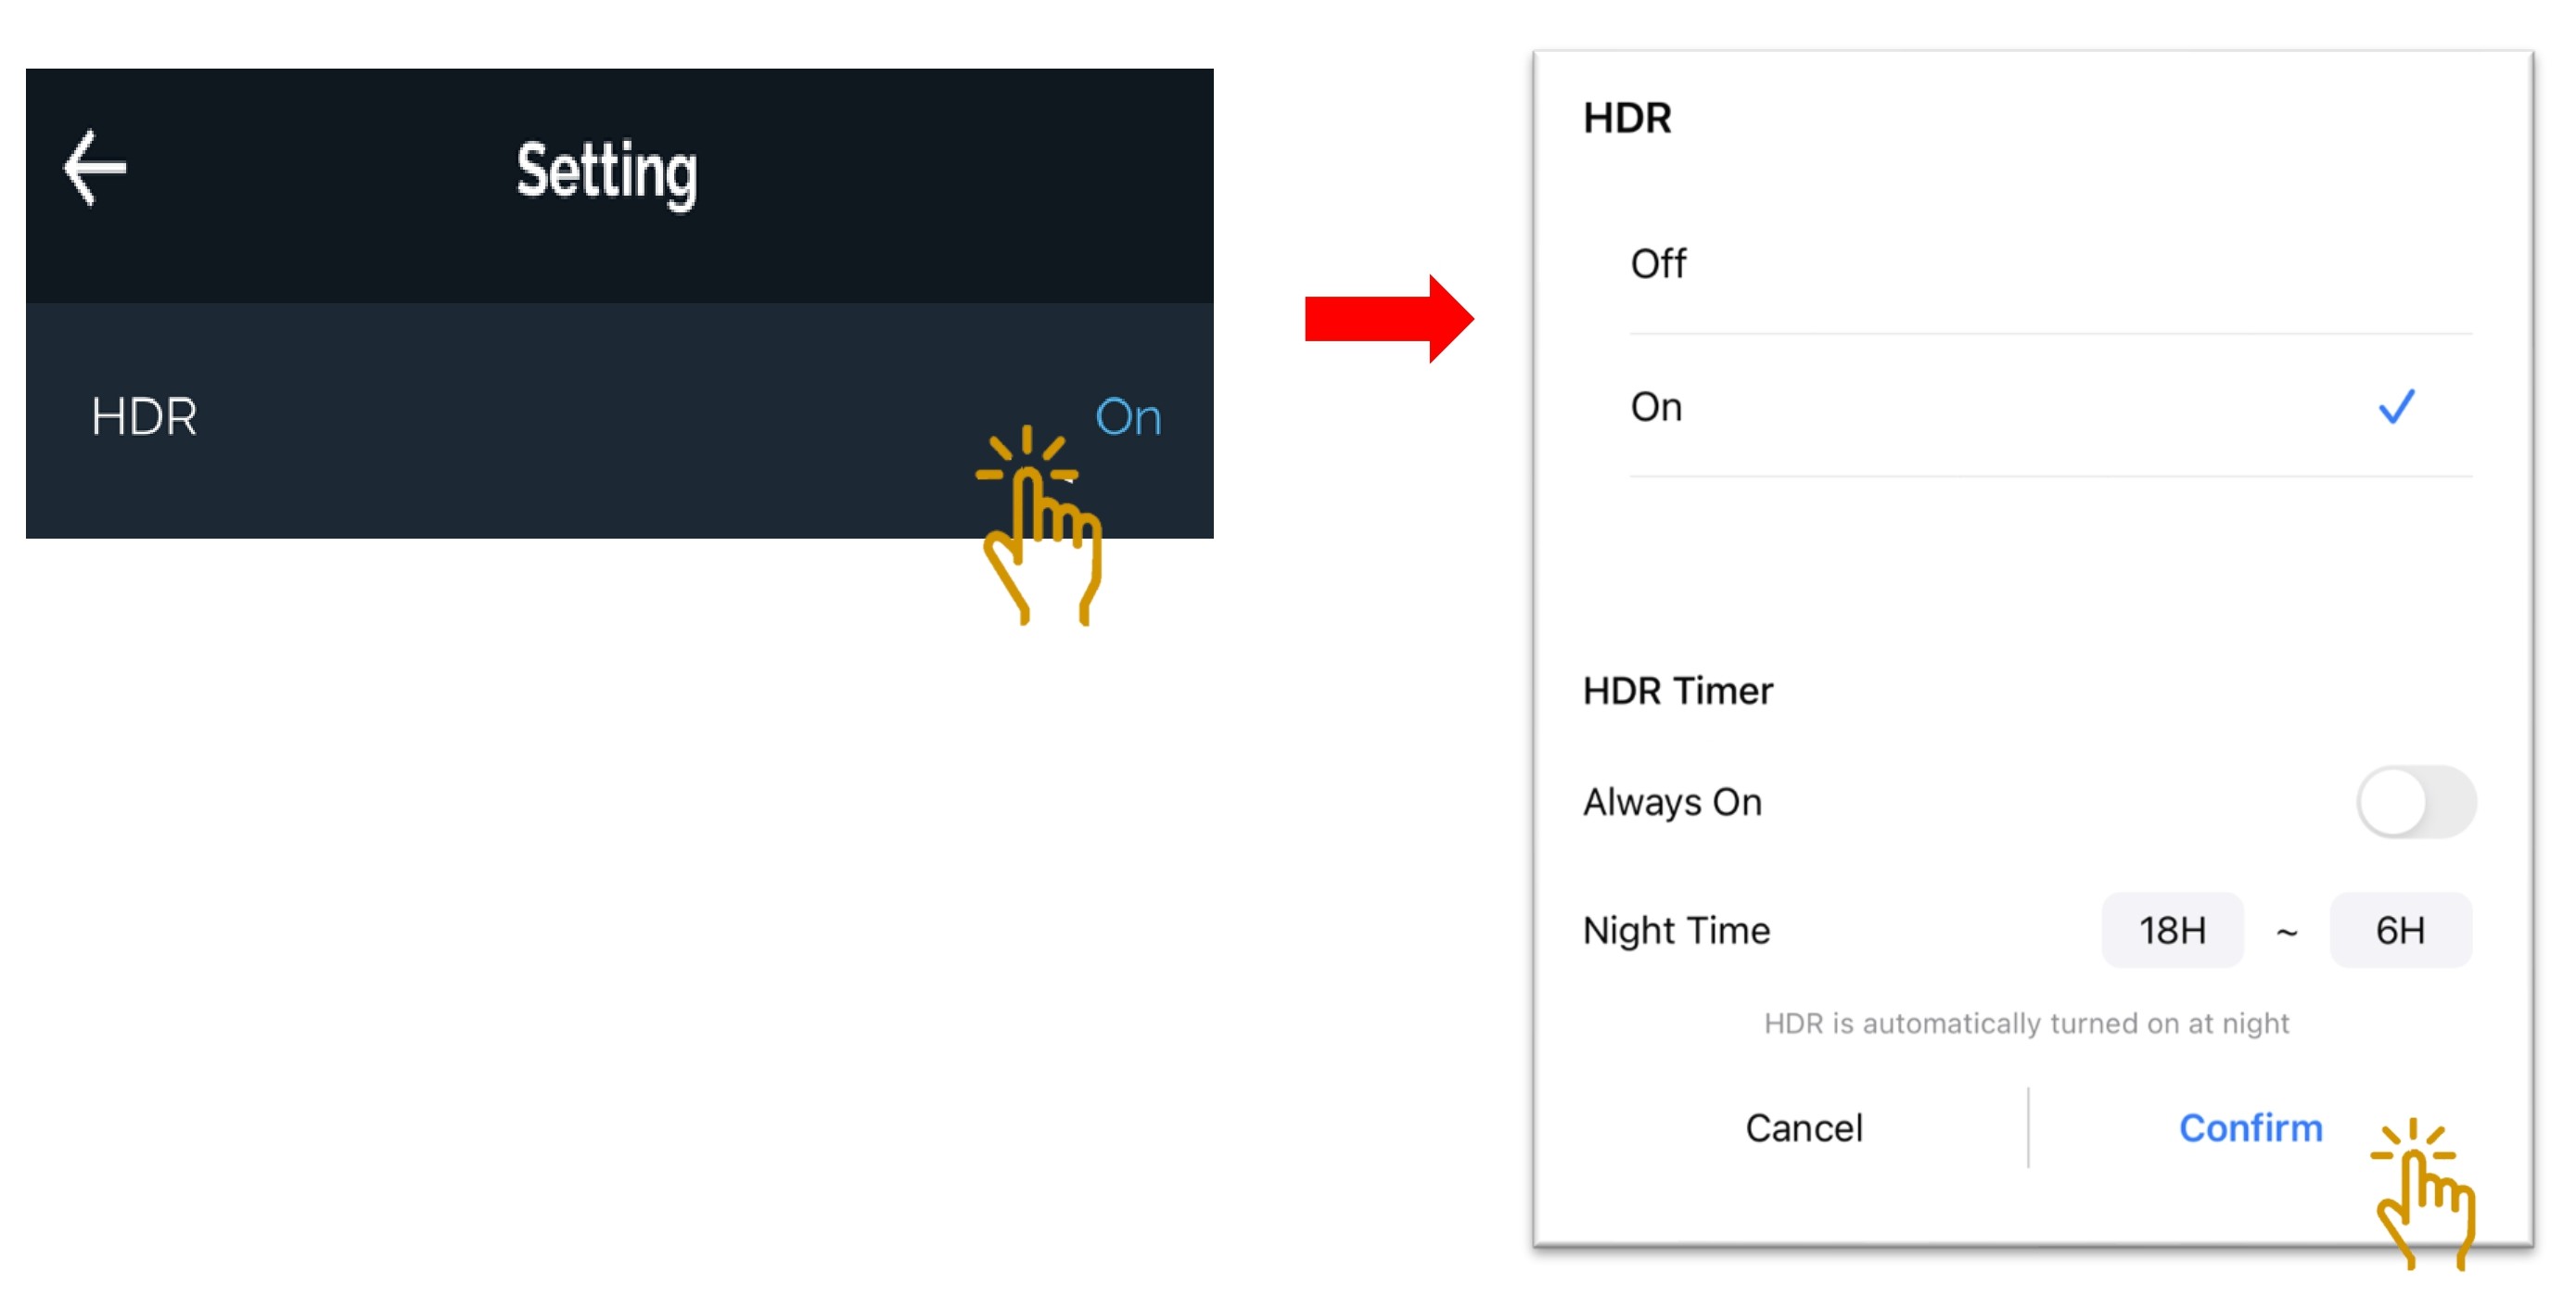
High Dynamic Range (HDR) improves the contrast in a video while maintaining clarity in high contrast or low-light conditions. This means the whole scene looks more like how your eyes see it.
- Click on "HDR" to be set.
- Select "ON" or "OFF"
- If selected "ON", user can choose to set "Always On" all the time or set to a preferred timing.
- Click "Confirm" once selected.
- Once saved, the dashcam will restart itself.
2.2.9 Recording - Rear Record in Parking
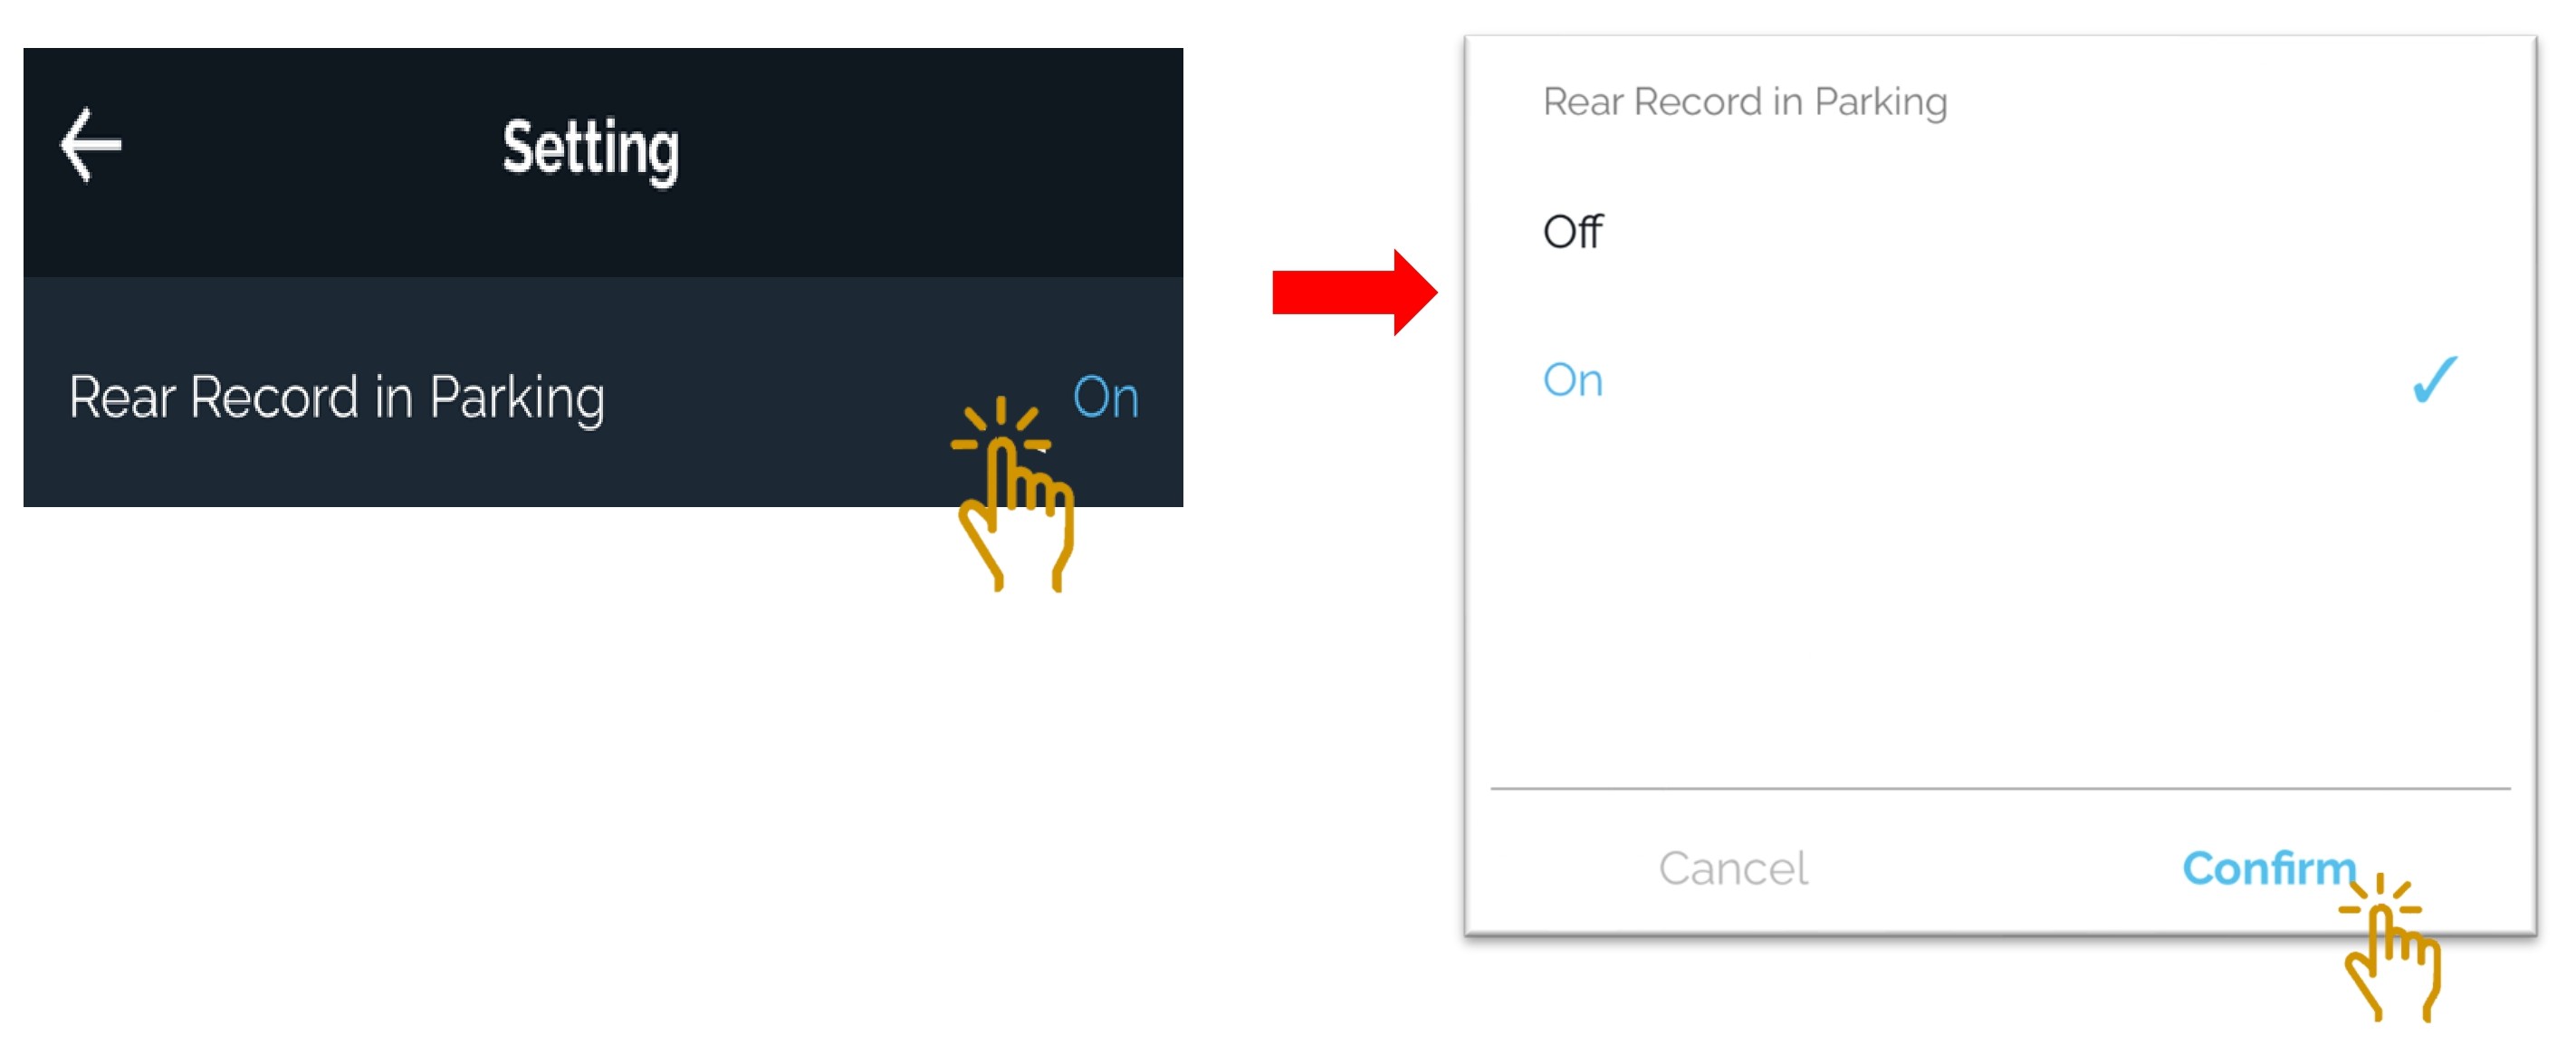
This function allows user to choose the Rear camera whether to record or not during parking mode.
- Click on "Rear Record in Parking " to be set.
- Select "ON" or "OFF"
- Click "Confirm" once selected.
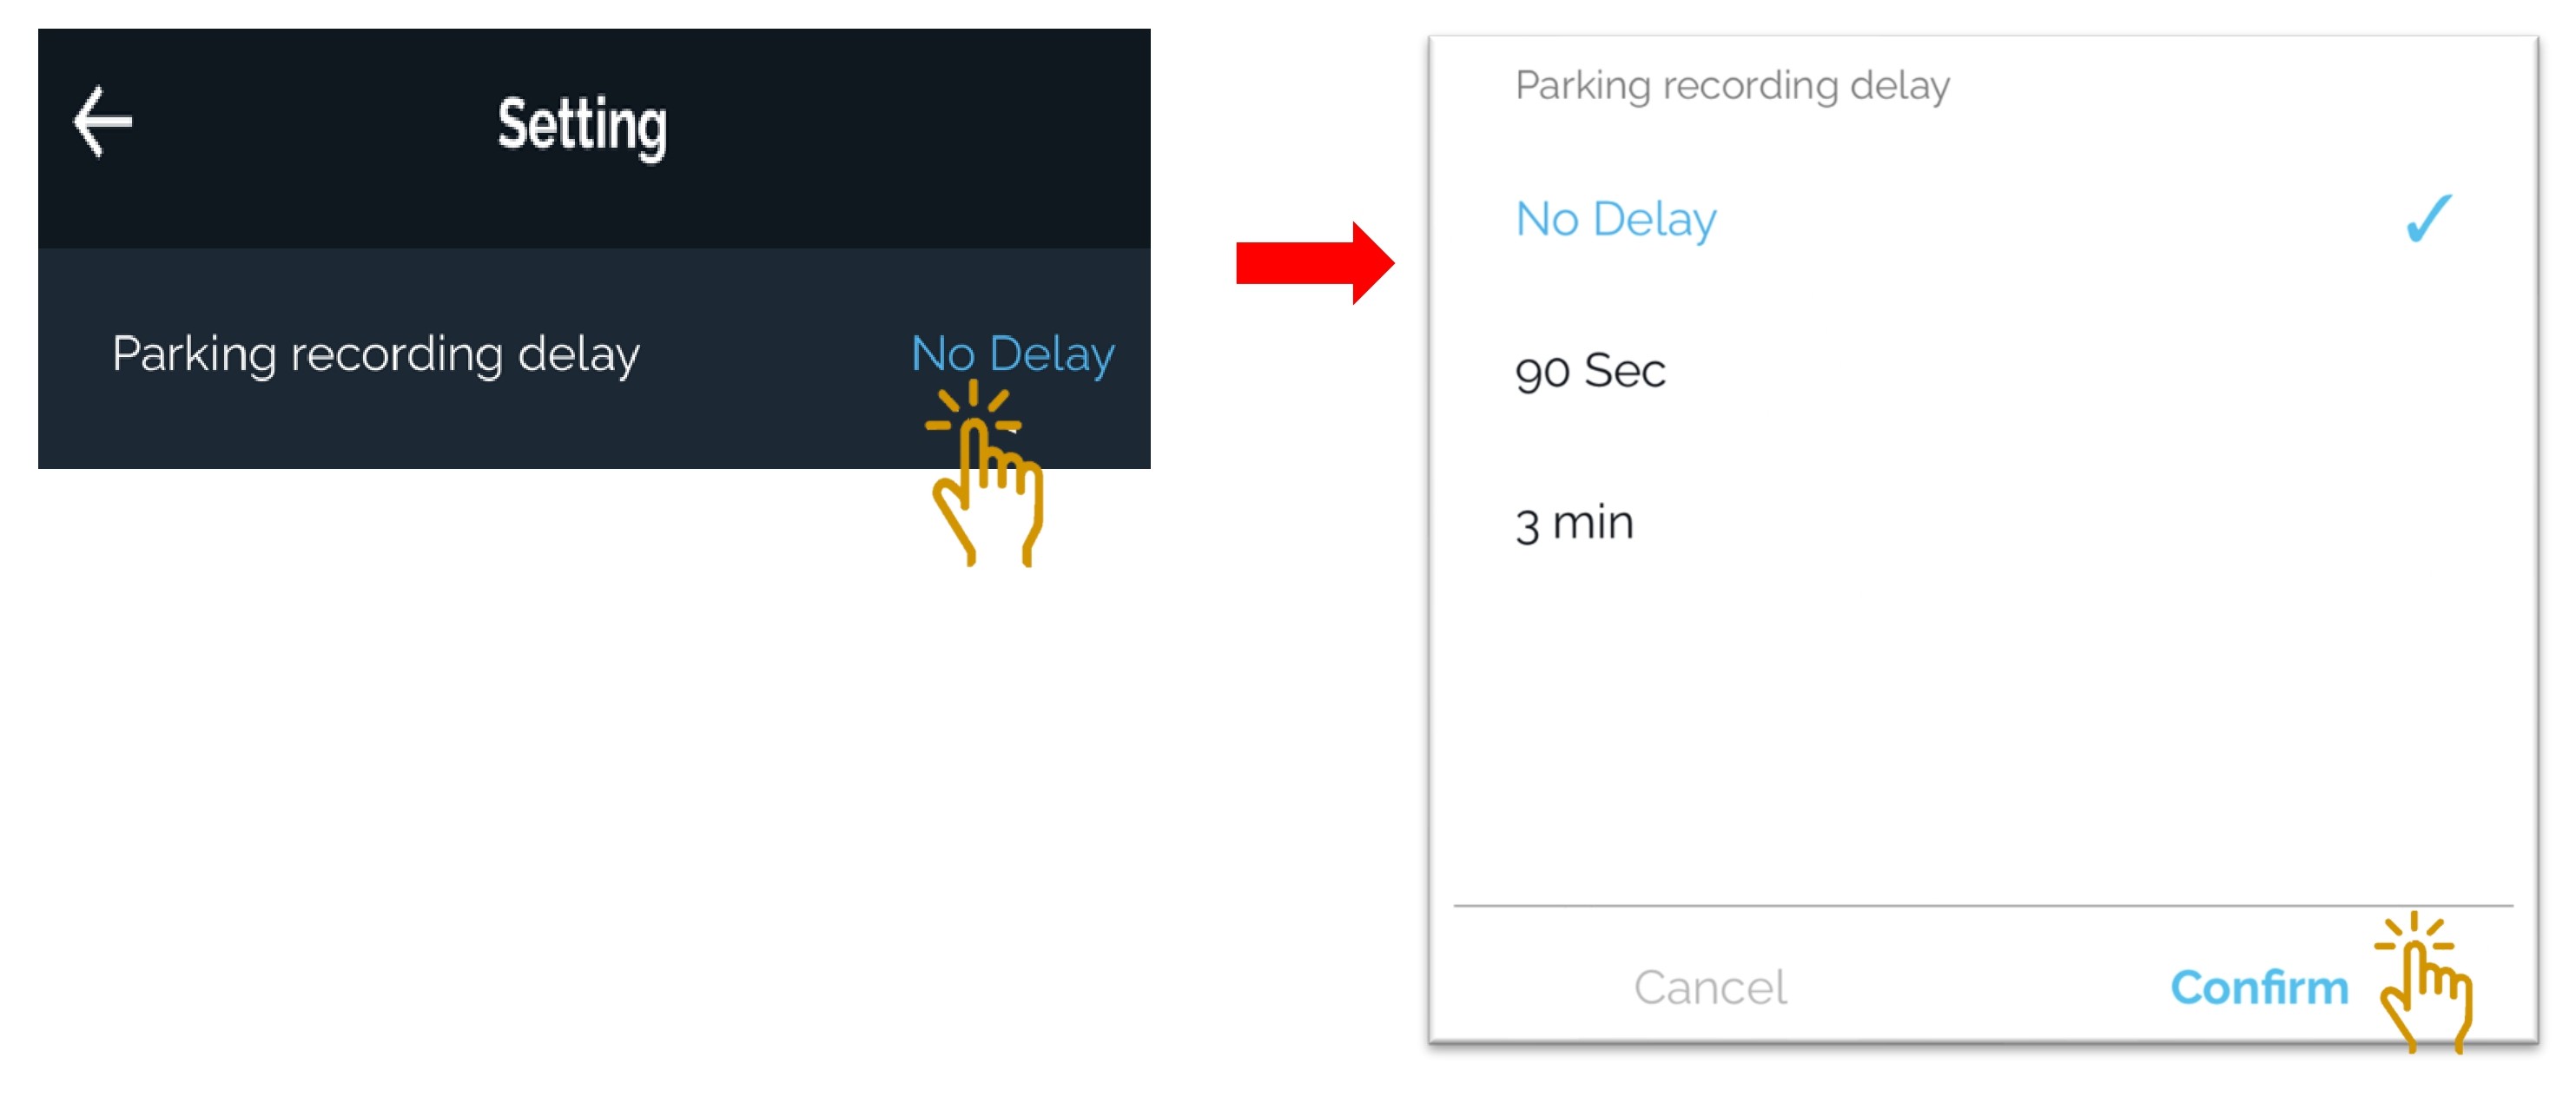
2.2.10 Recording - Parking Recording Delay
This function allows user to delay the parking mode activation based on the pre-set timer.
- Click on "Parking Recording Delay " to be set.
- Select the pre-set delay timer or no delay.
- Click "Confirm" once selected.
2.3 Vueroid Dashcam Setting - Event
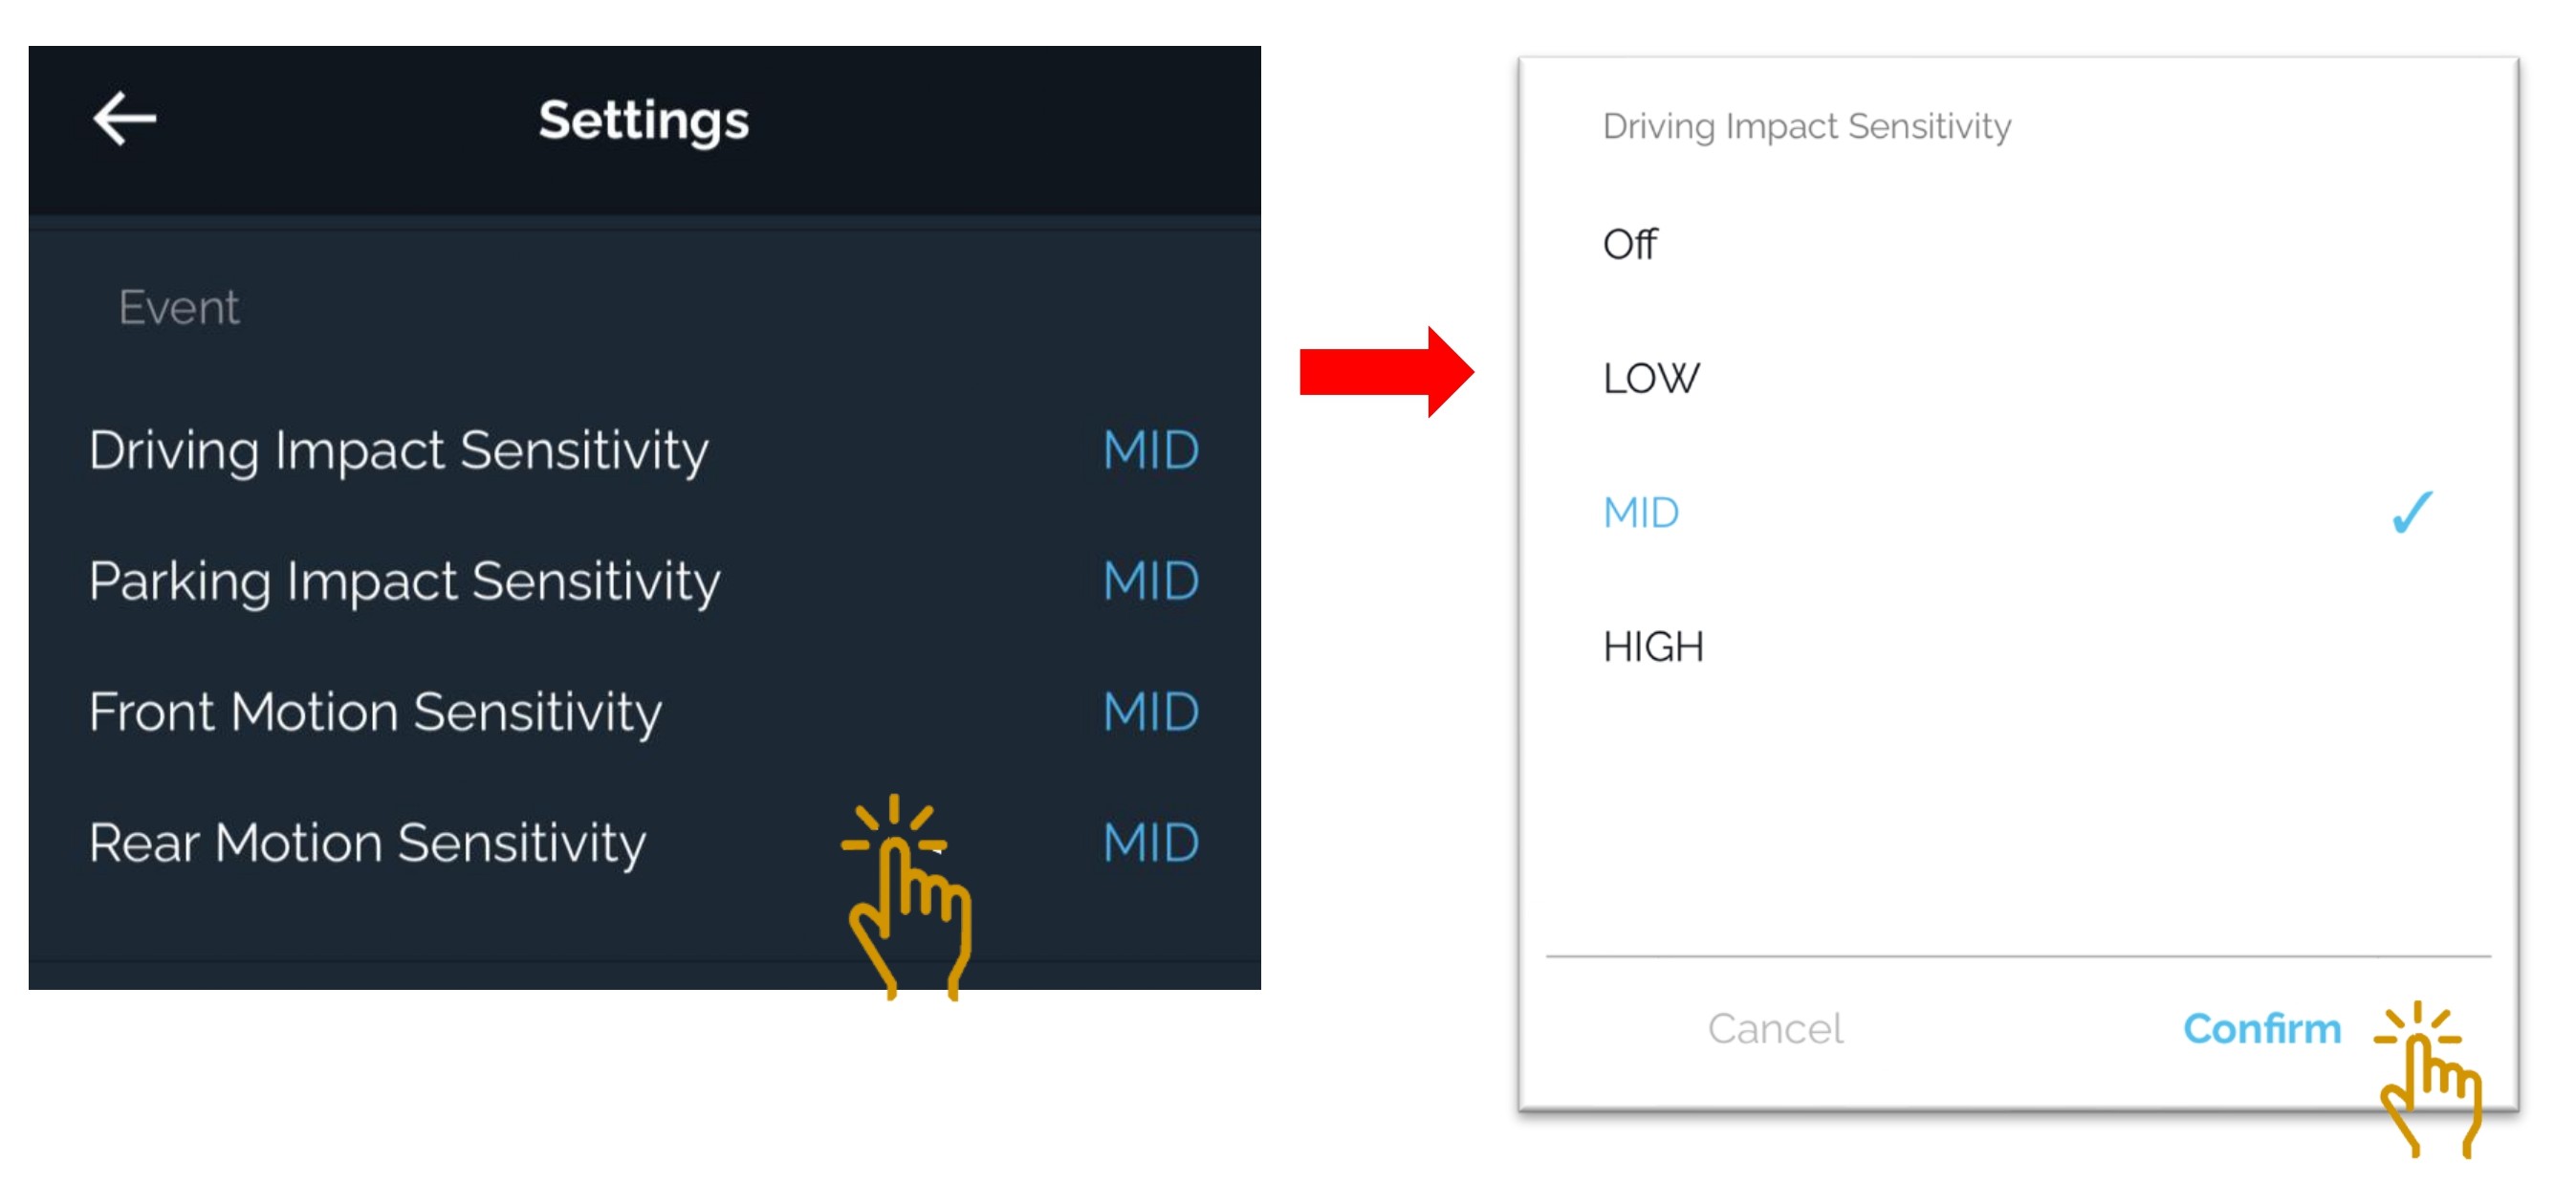
Settings for impact and motion event sensitivity while driving and parking.
- Driving Impact Sensitivity
- Parking Impact Sensitivity
- Front Camera Motion Sensitivity
- Rear Camera Motion Sensitivity
2.4 Vueroid Dashcam Setting - Sound
-
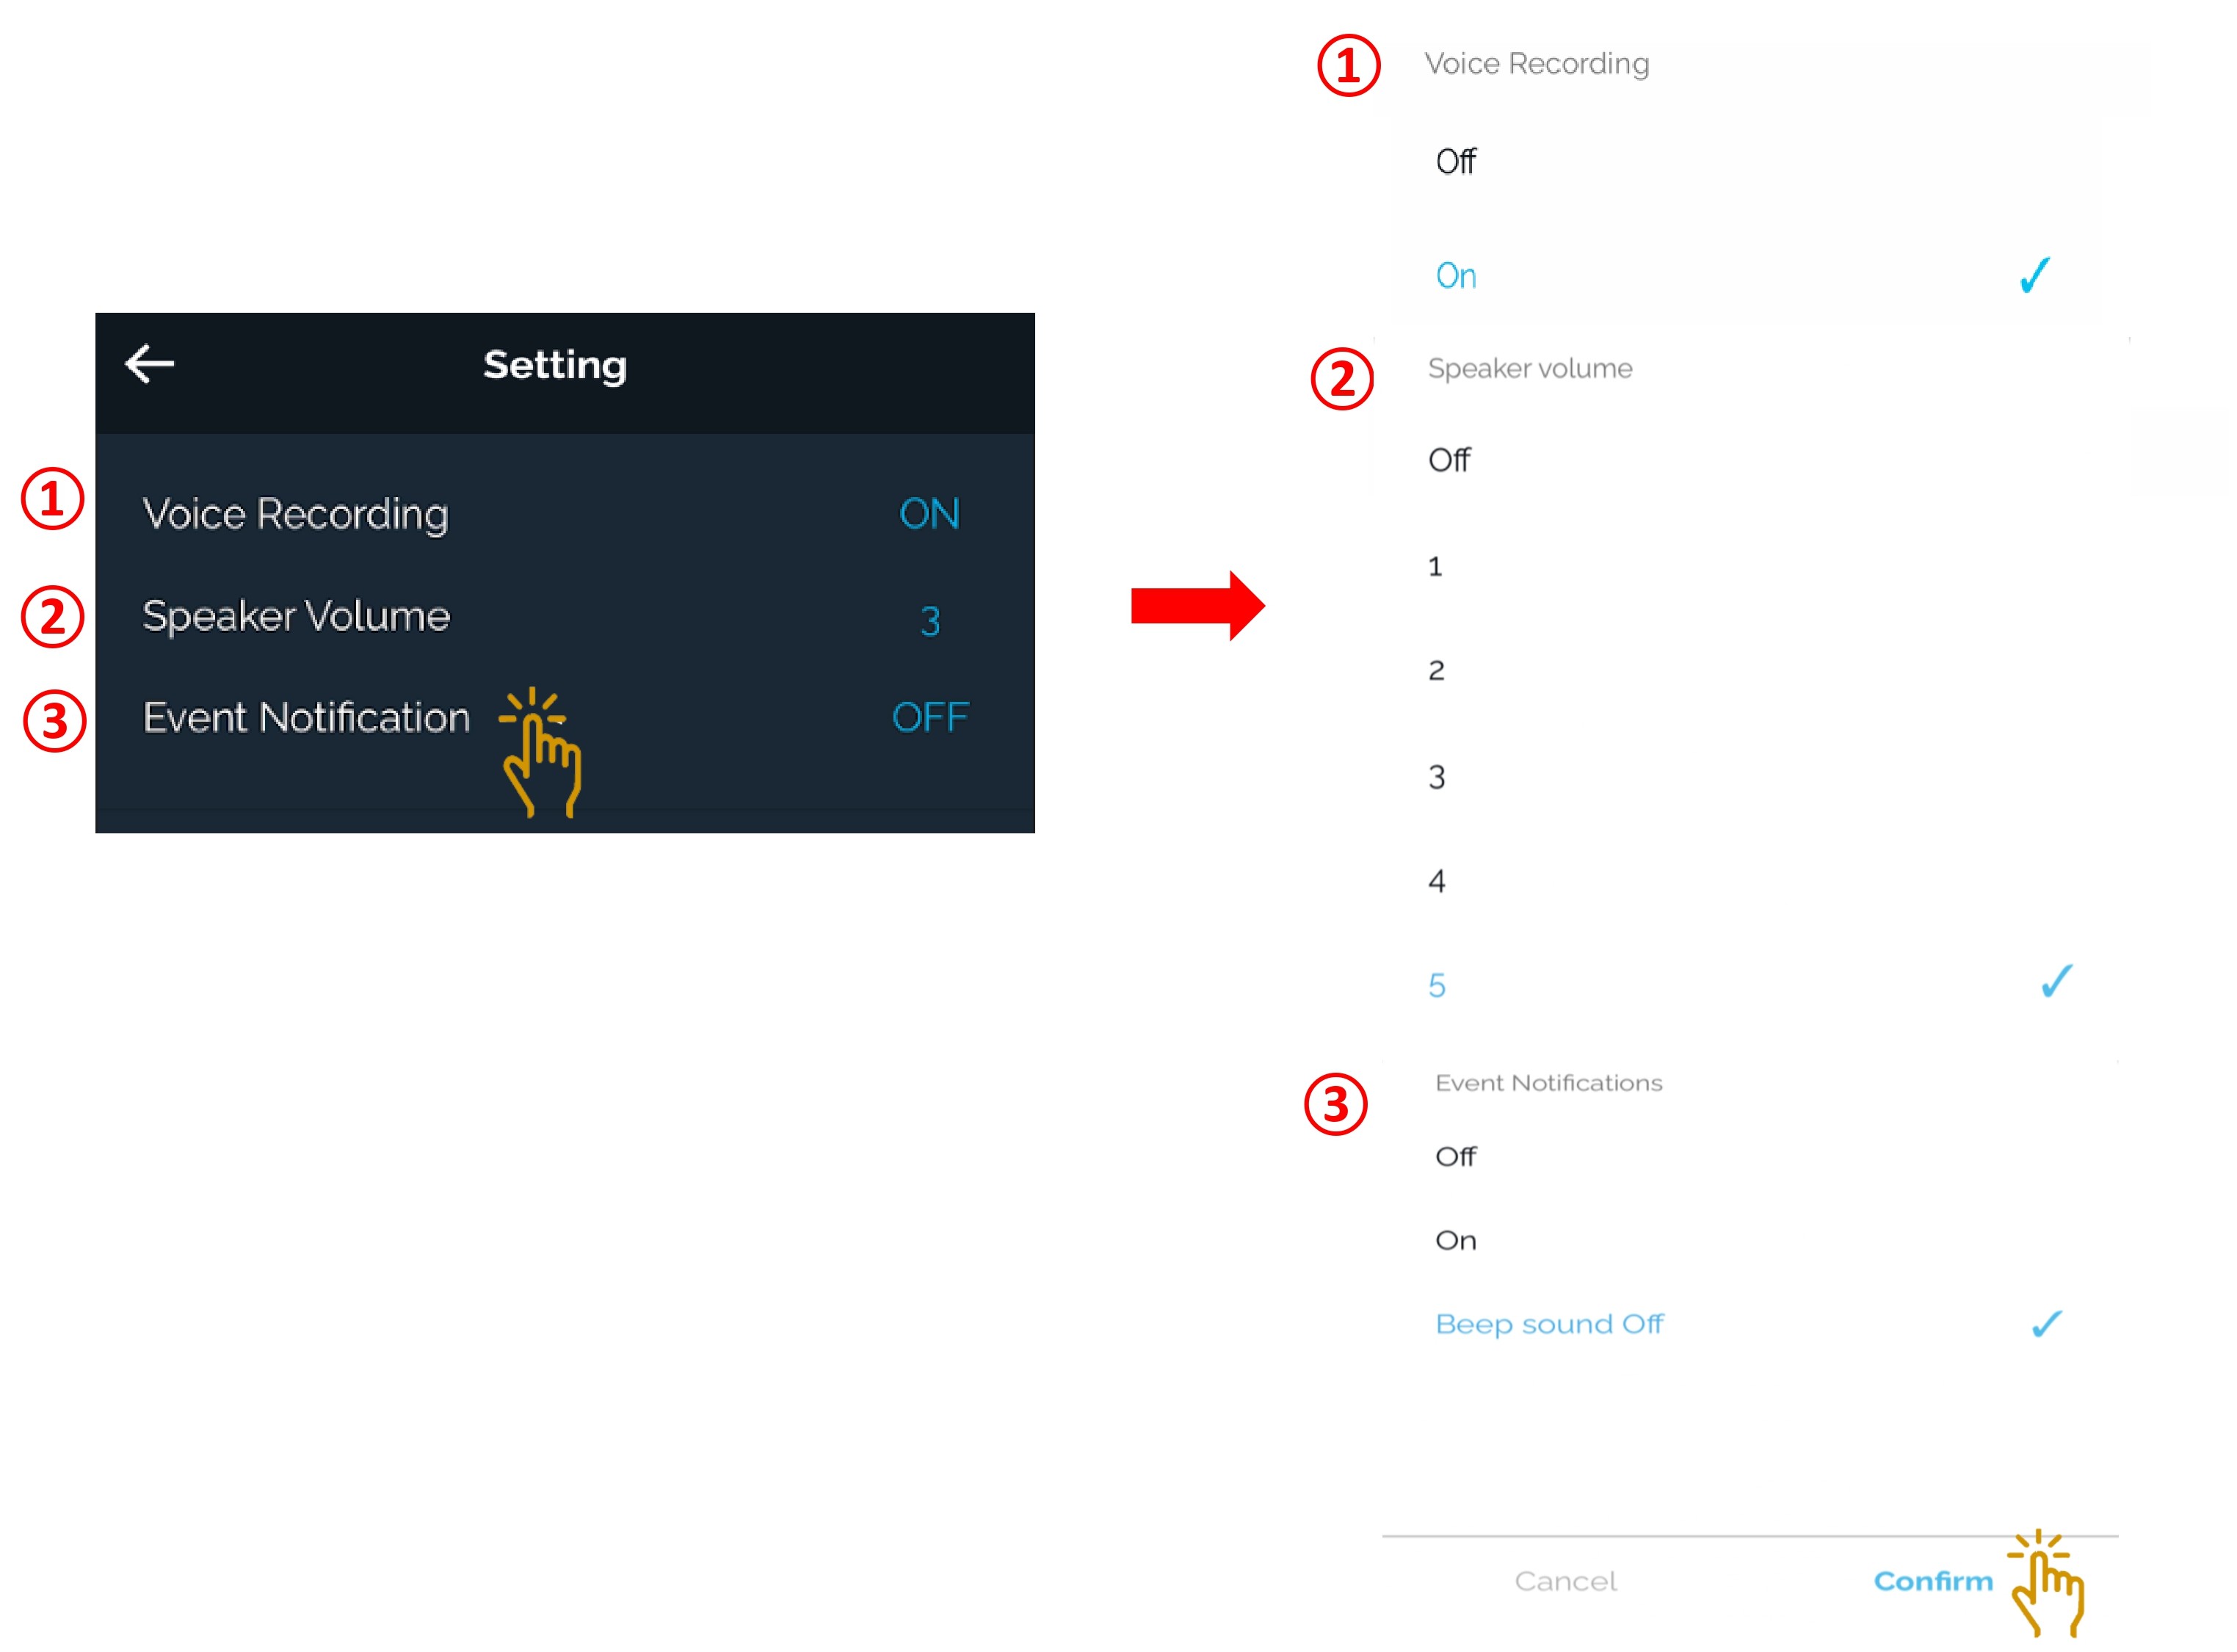
Voice recording - It can be turn on or turn off.
-
Speaker Volume - Speaker volume can be adjusted accordingly or to be turn on or turn off.
-
Event Notification - Notification event alert can be turn on or turn off when there is an impact detected.
-
Click "Confirm" once selected.
2.5 Vueroid Dashcam Setting - Time
-
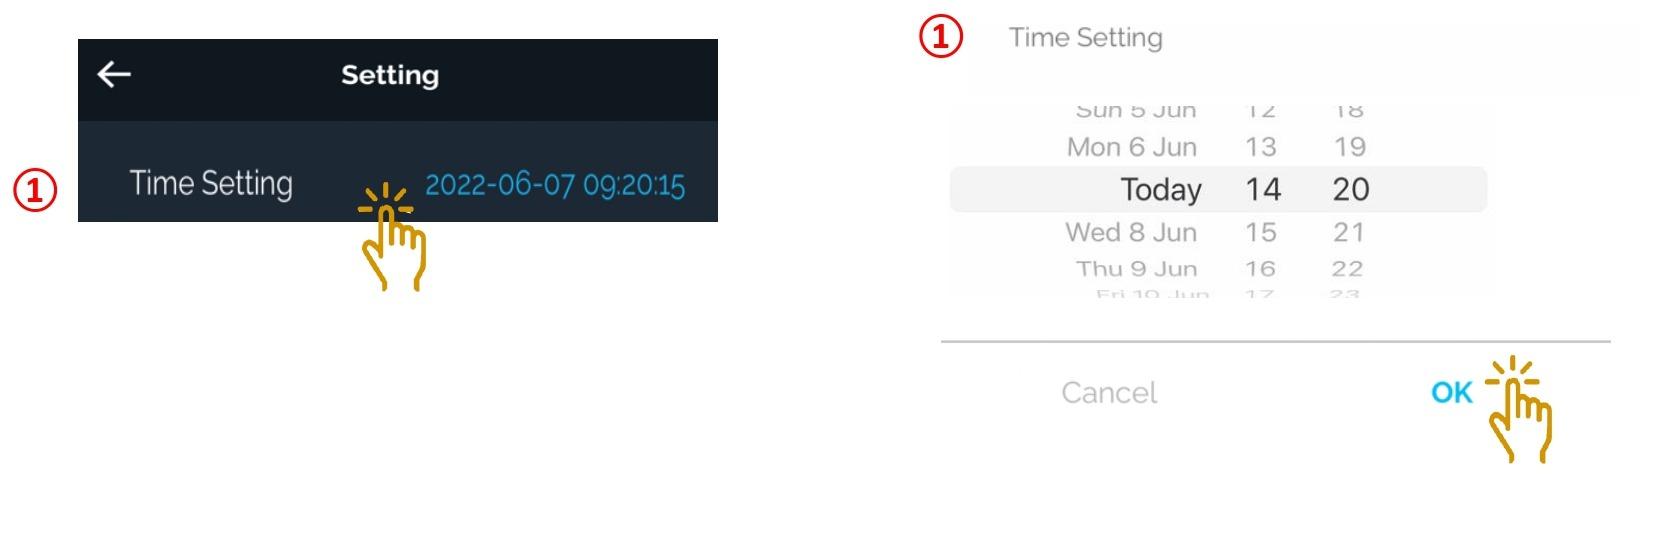
Time Setting - Manual time setting
-
Click "OK" once selected.
2.6 Vueroid Dashcam Setting - Memory
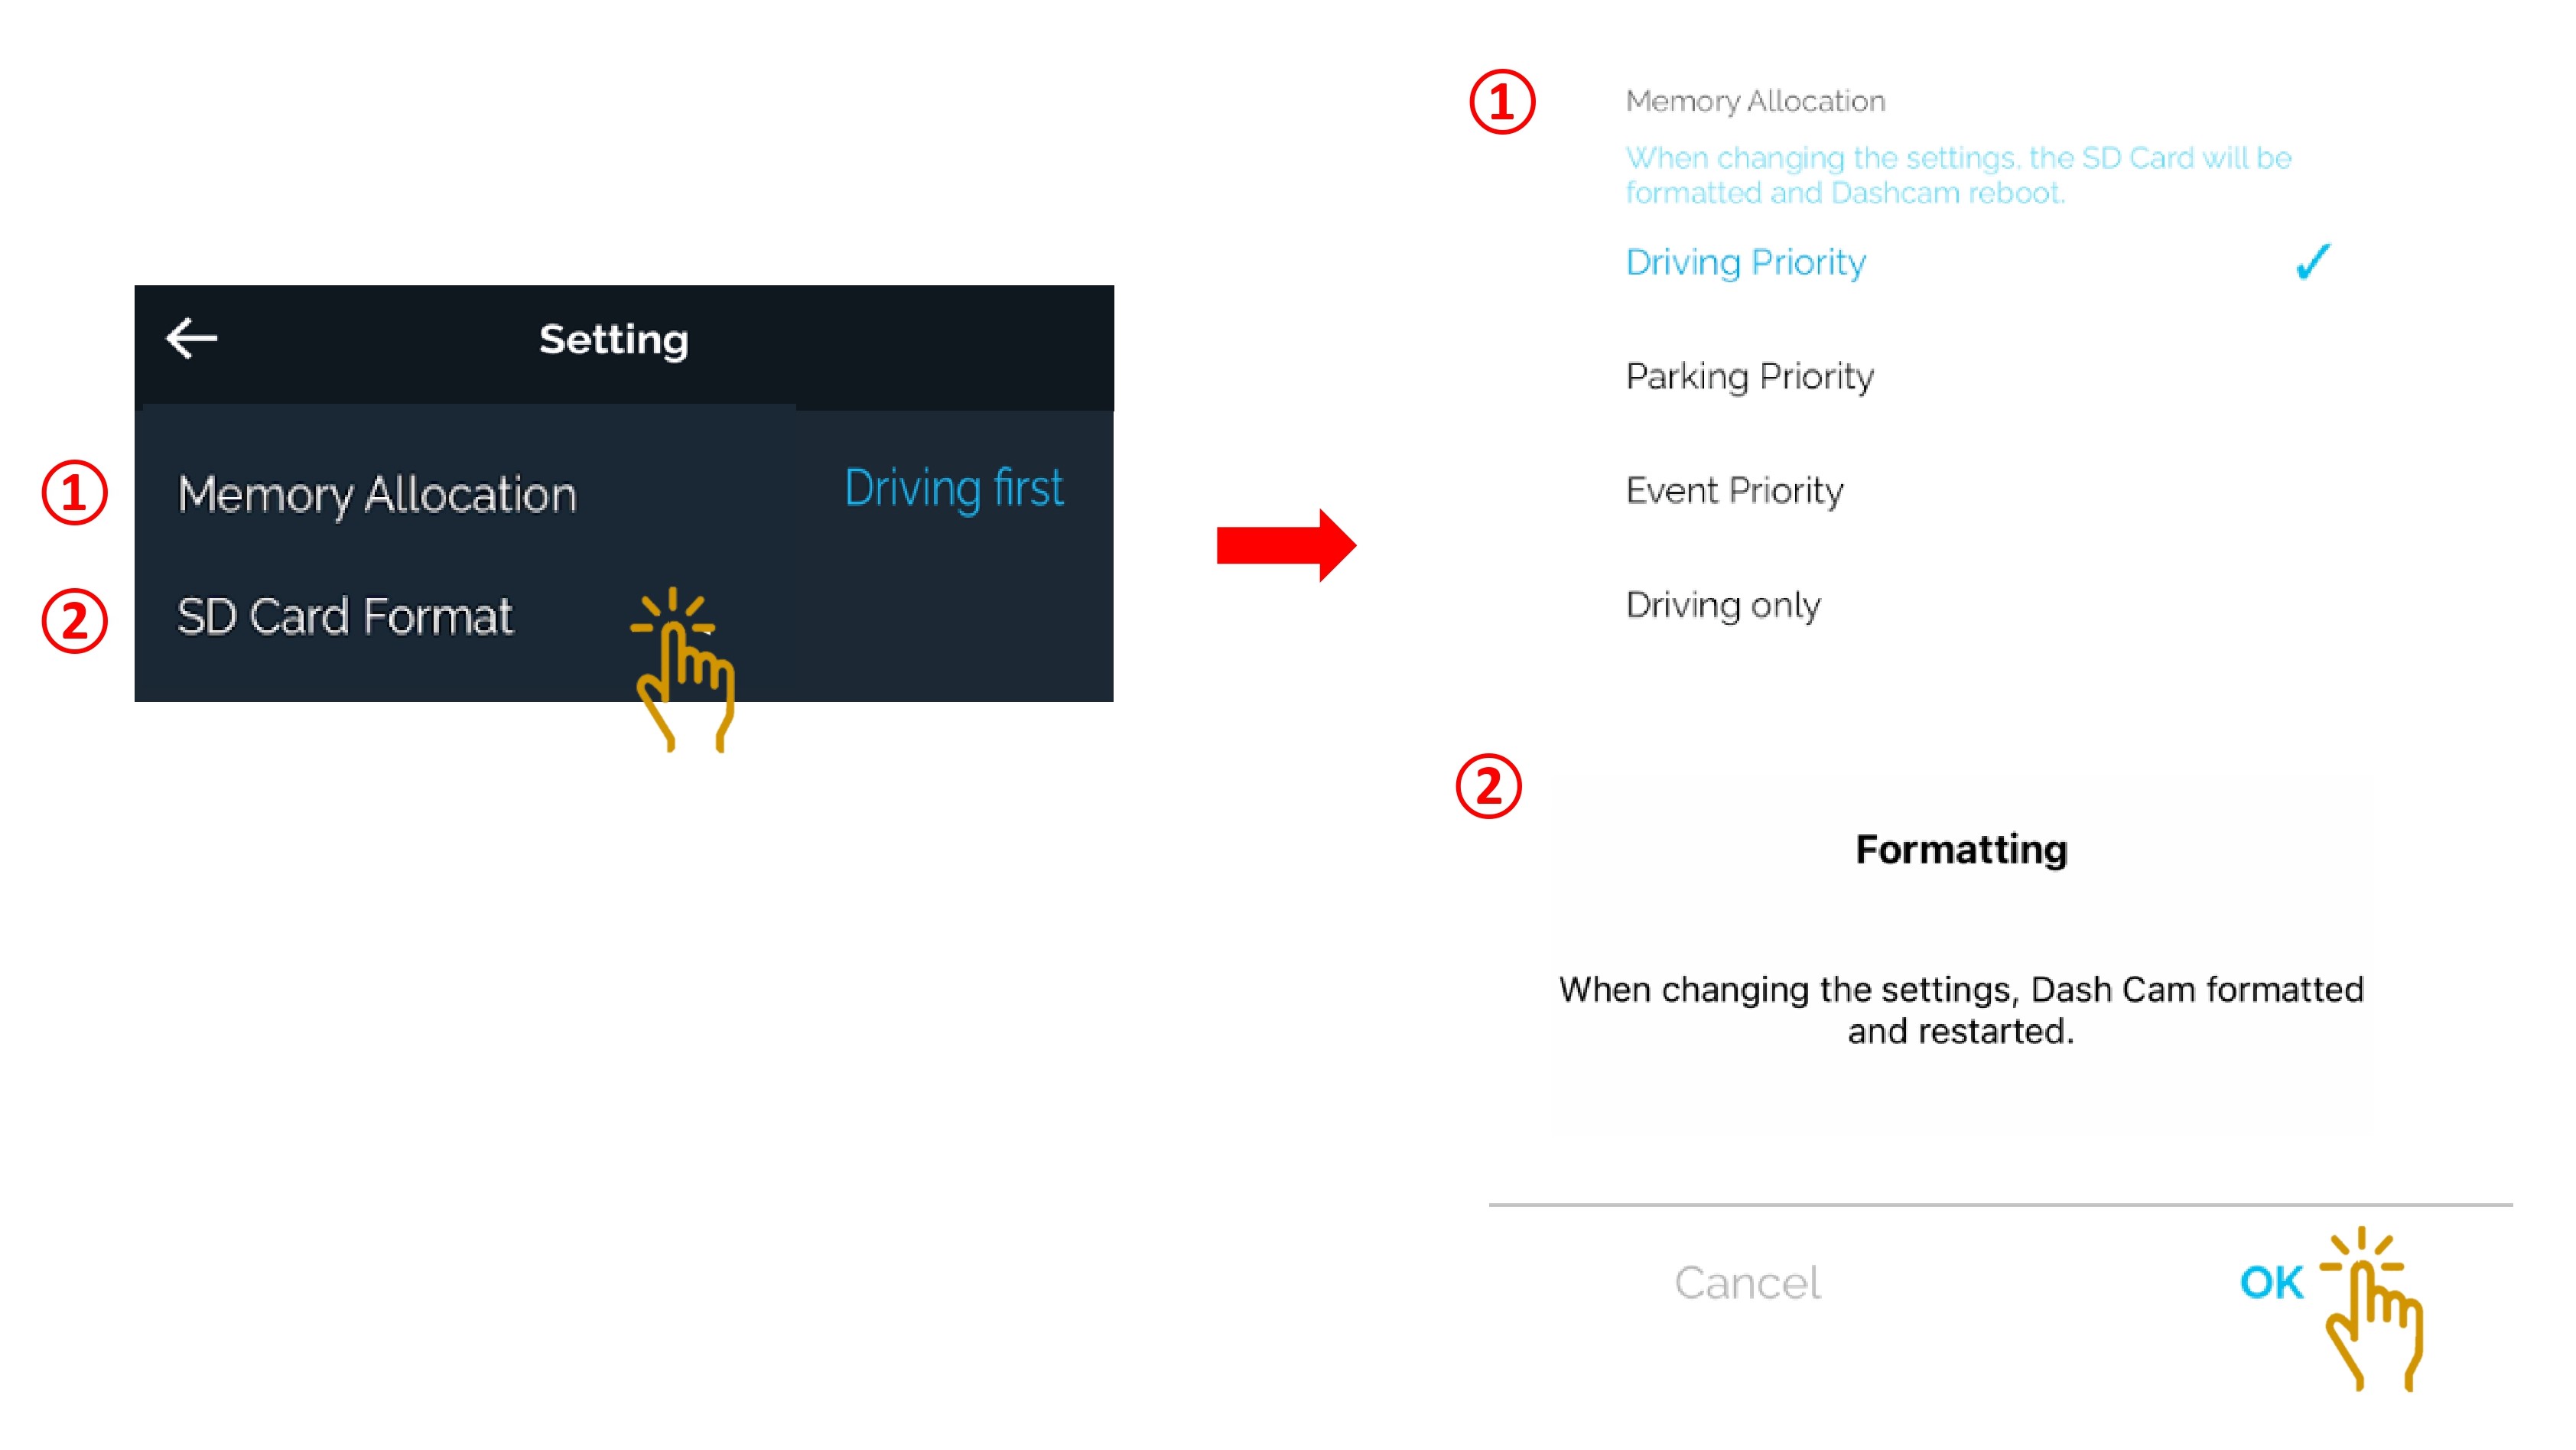
1. Memory Allocation - This function allows user to choose to prioritize the recorded videos in the memory card allocation.
| MEMORY ASSIGN |
Memory SD Card Capacity (32GB, 64GB, 128GB, 256GB) |
||
| Driving Memory Allocation | Parking Memory Allocation | Event Memory Allocation | |
| Driving First | 60% | 20% | 20% |
| Parking First | 30% | 50% | 20% |
| Event First | 30% | 20% | 50% |
| Driving Only | 80% | 0% | 20% |
2. SD Card Format - To format the SD Memory card.
Please note that once formatted, all the videos inside the SD card will be erased.
3. Once saved, the dashcam will restart itself.
2.7 Vueroid Dashcam Setting - System
-
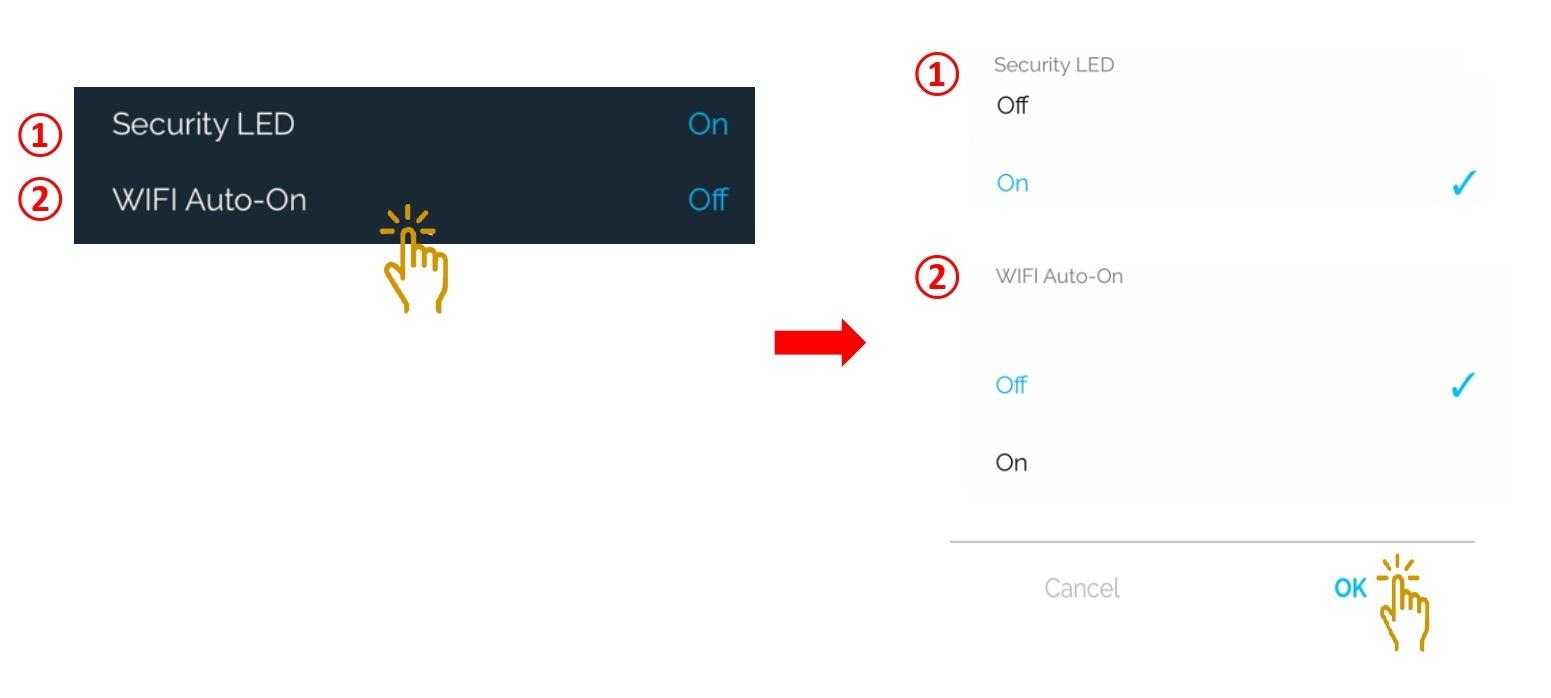
Security LED - It can be set to turn "ON or "OFF"
-
WI-FI Auto-On - Once the Wi-Fi is set to Auto ON, whenever the dashcam starts, the Wi-Fi will be set to turn on.
-
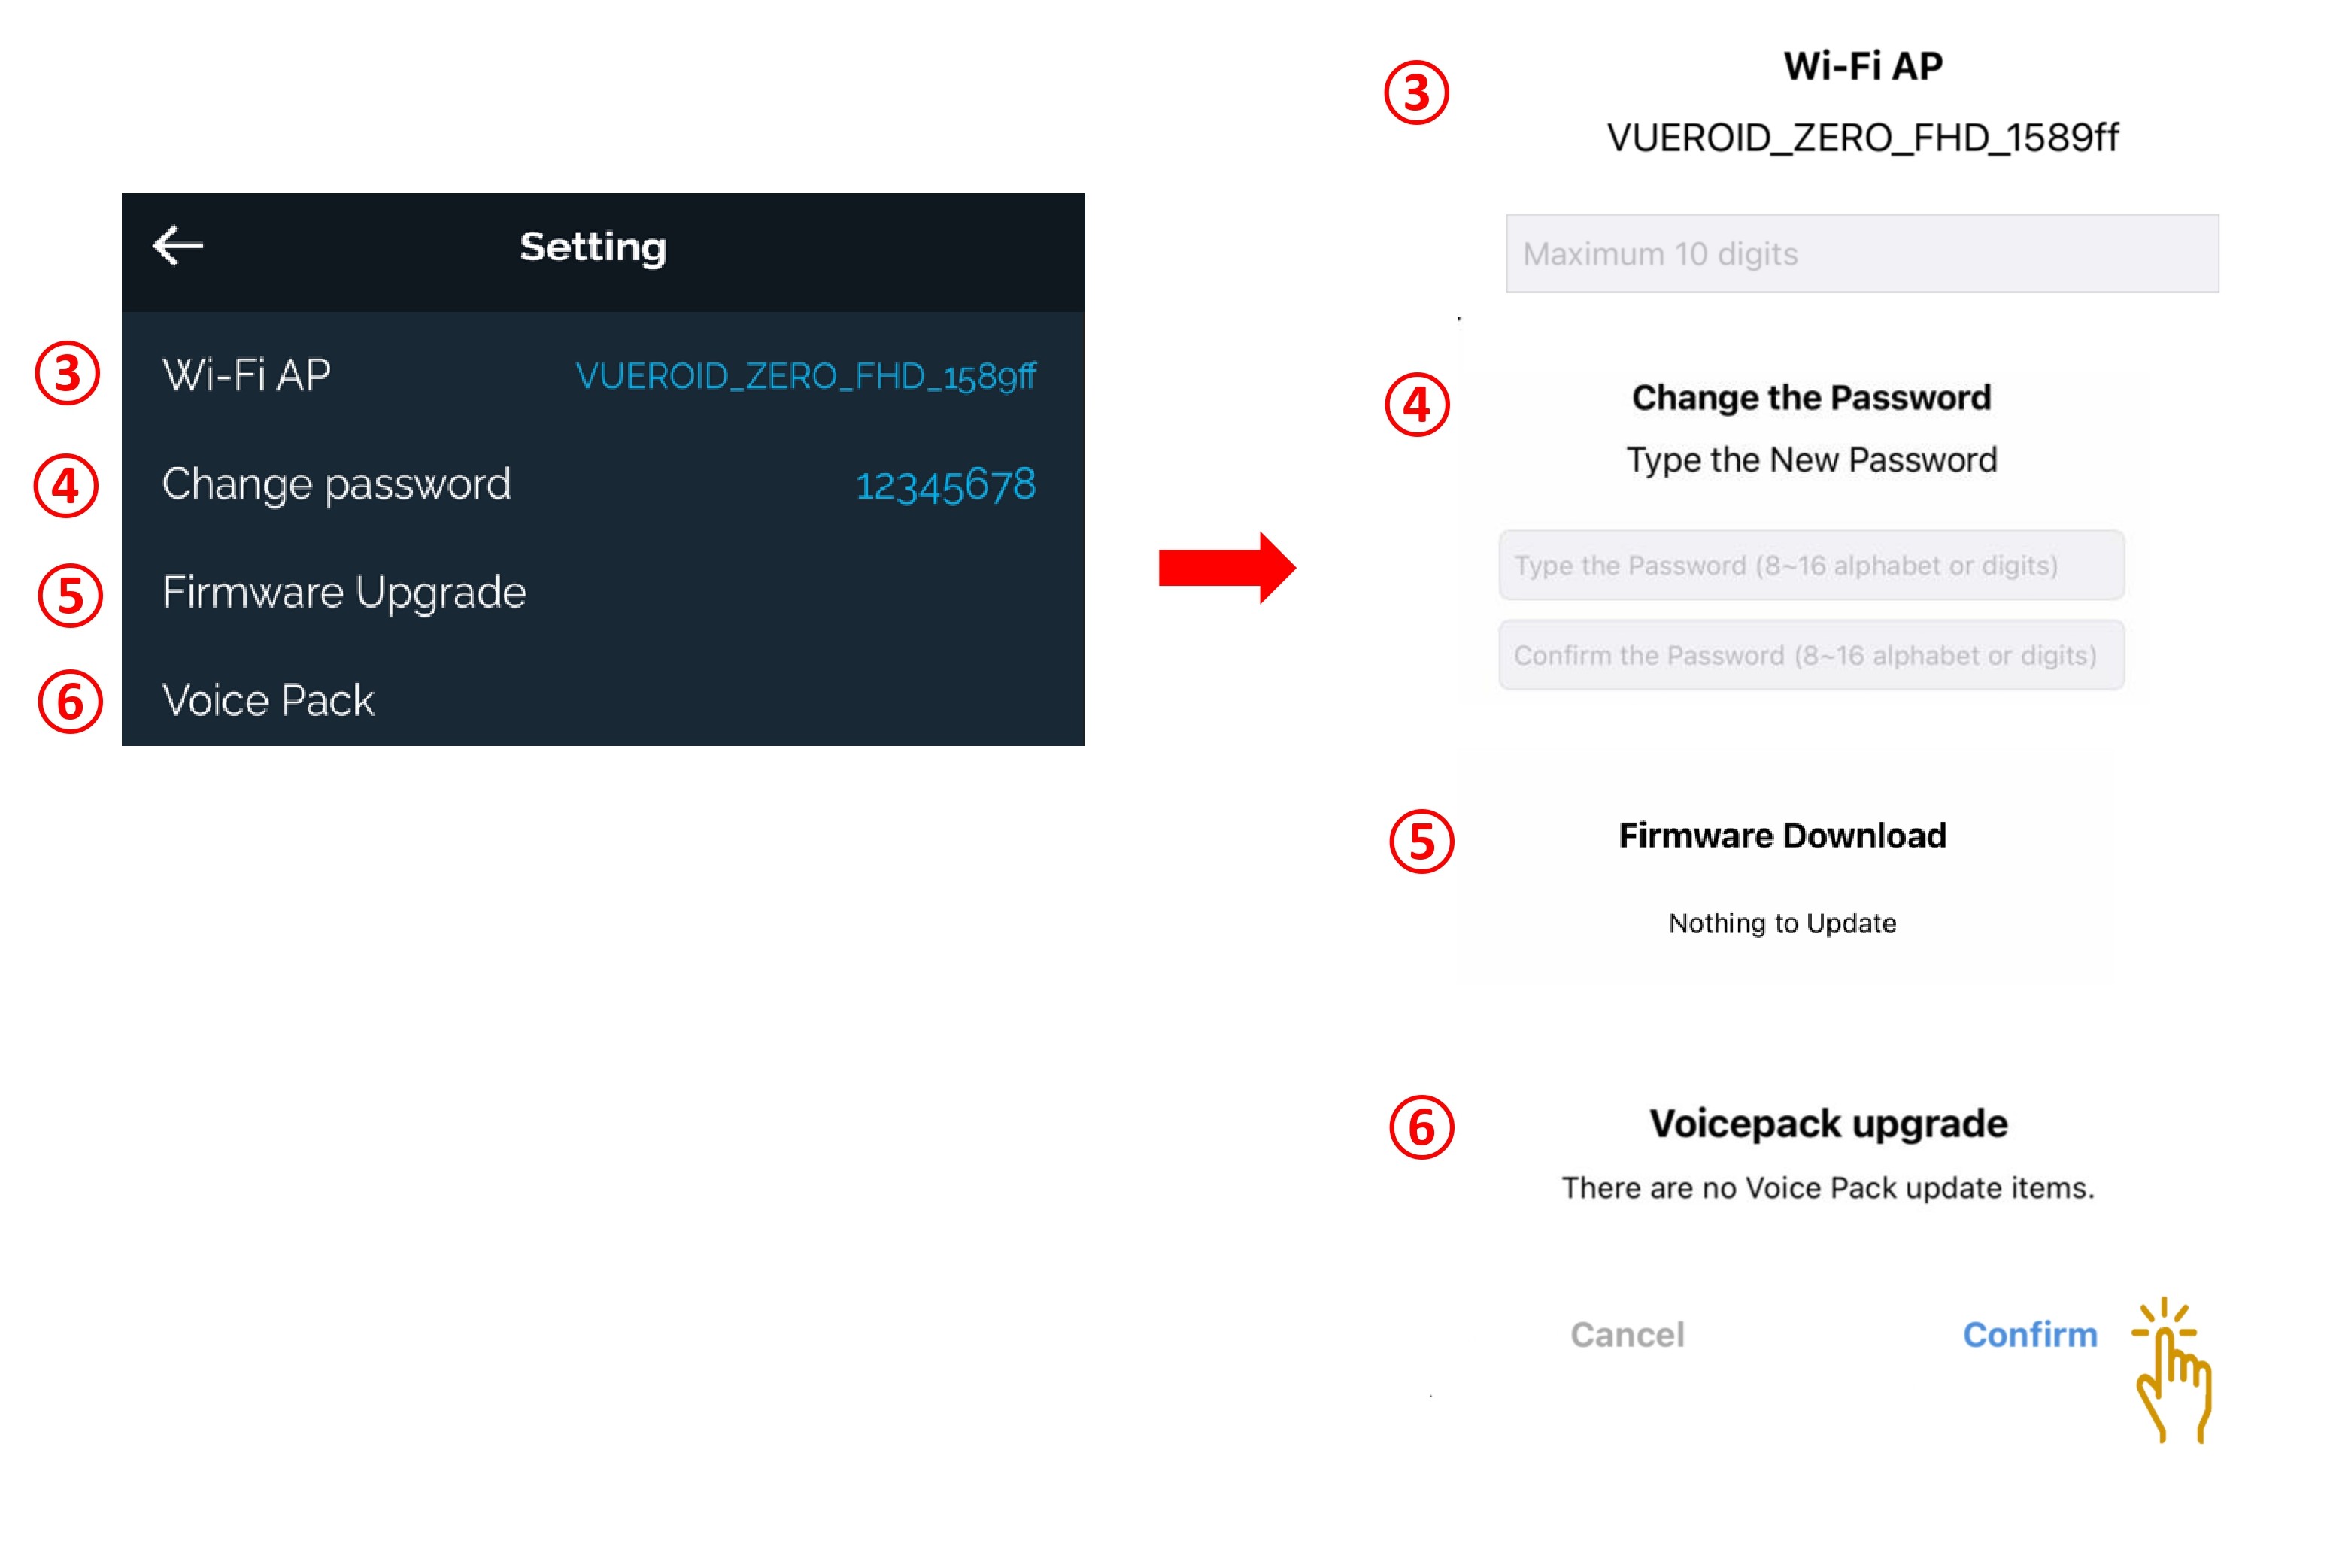
WI-FI AP - In the Wi-Fi network listing, click on the VUEROID dashcam SSID in the form of "VUEROID_XXXX_FHD_1589ff". Allow user to change the SSID naming.
-
Change Password - Password can be change with 8-16 alphabet or digits. Default password is "12345678"
-
Firmware Upgrade - Any latest firmware will be notified and can be update.
-
Voice Pack - Any latest voice pack will be notified and can be update.
-
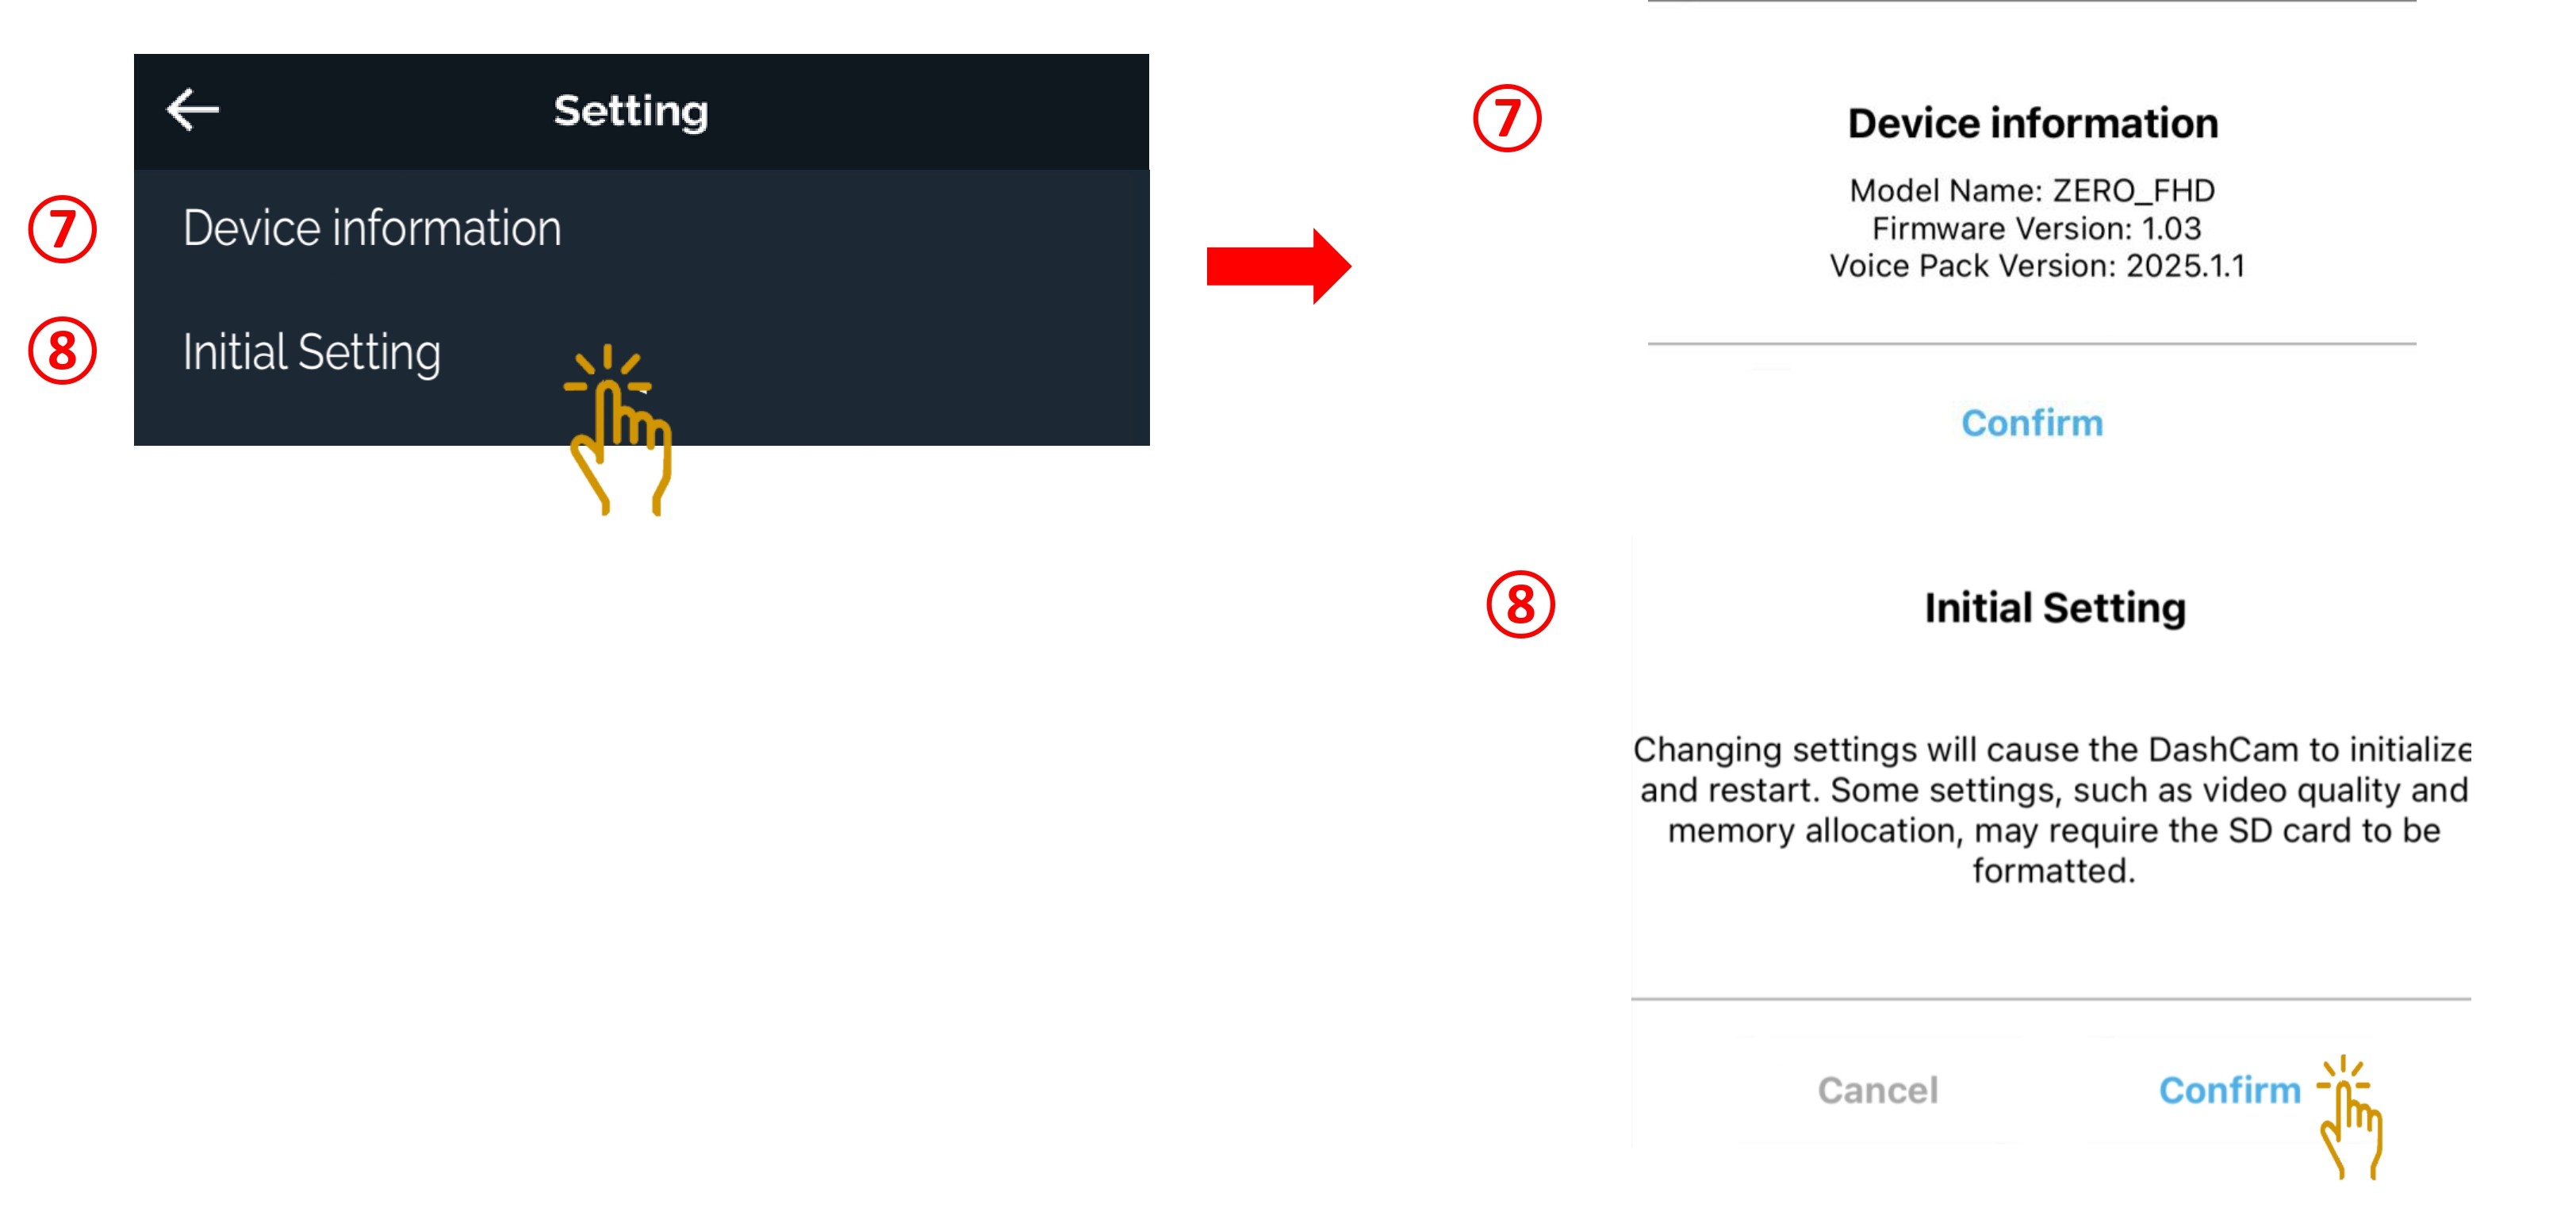
Device Information - Dashcam model and firmware version will be shown in the information
-
Initial Setting - To reboot the dashcam back to factory default setting. All videos will be erased inside the SD card.
3.0 VIEW THE RECORDING (FILE VIEWER)
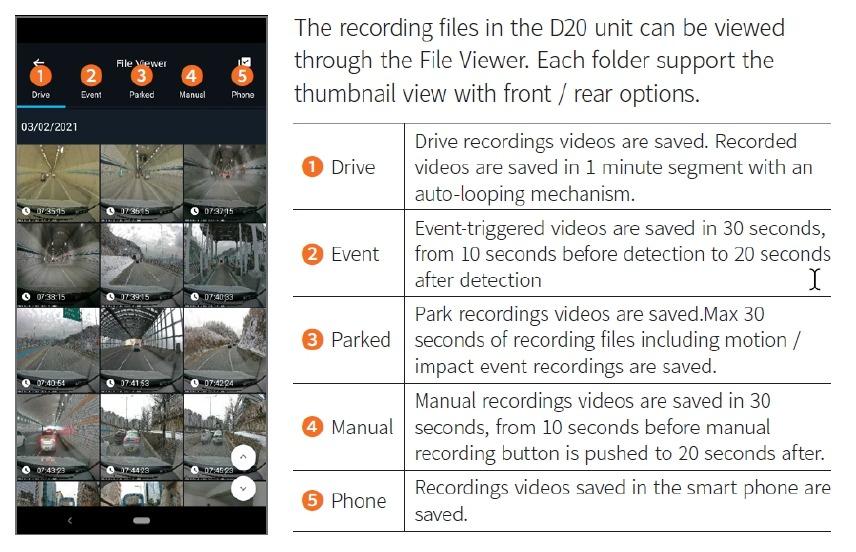
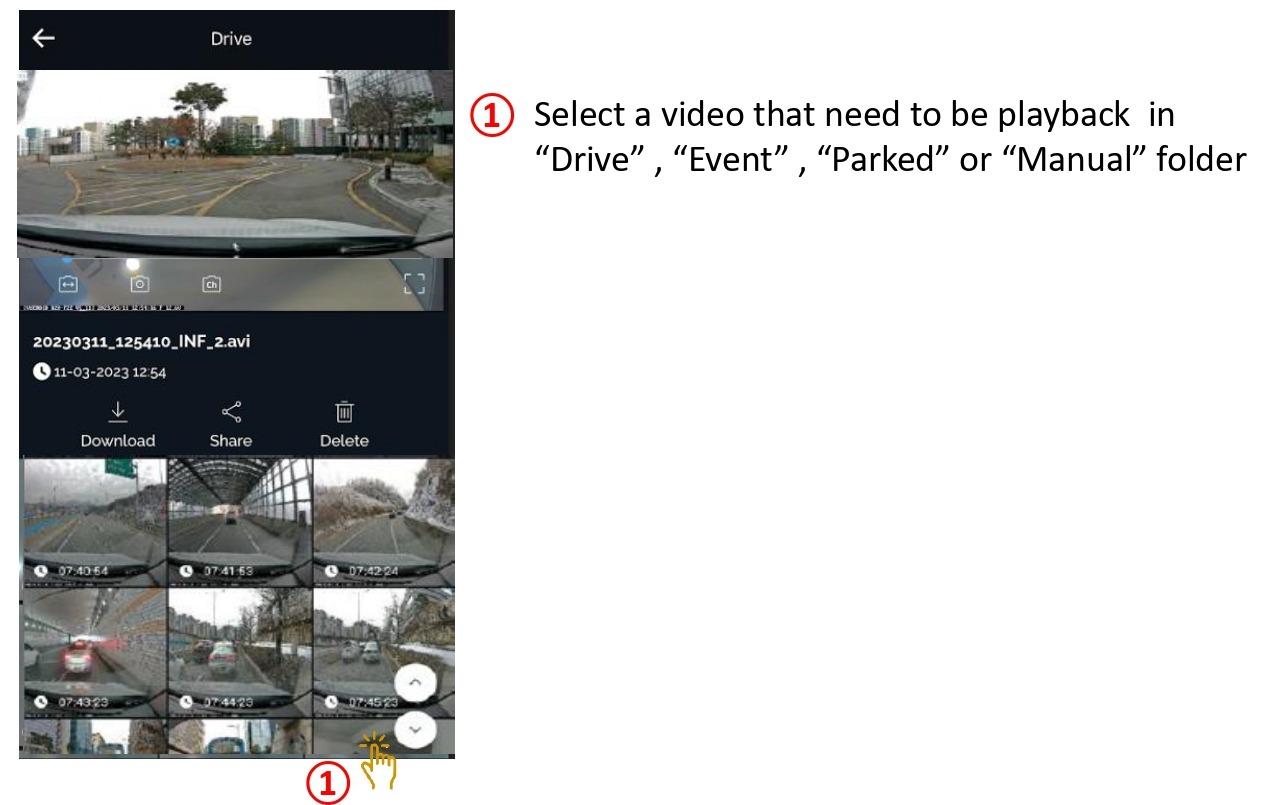
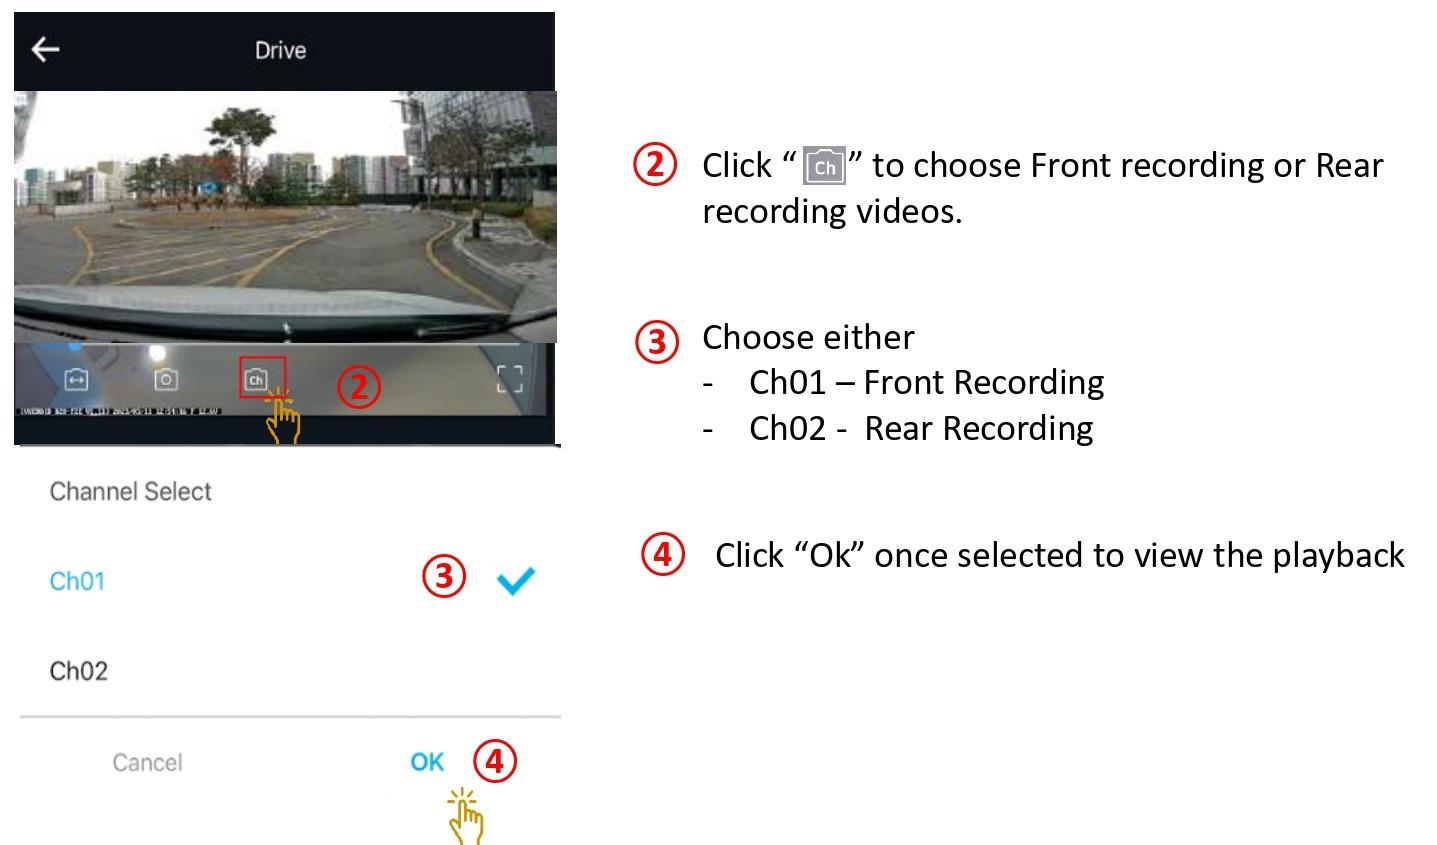
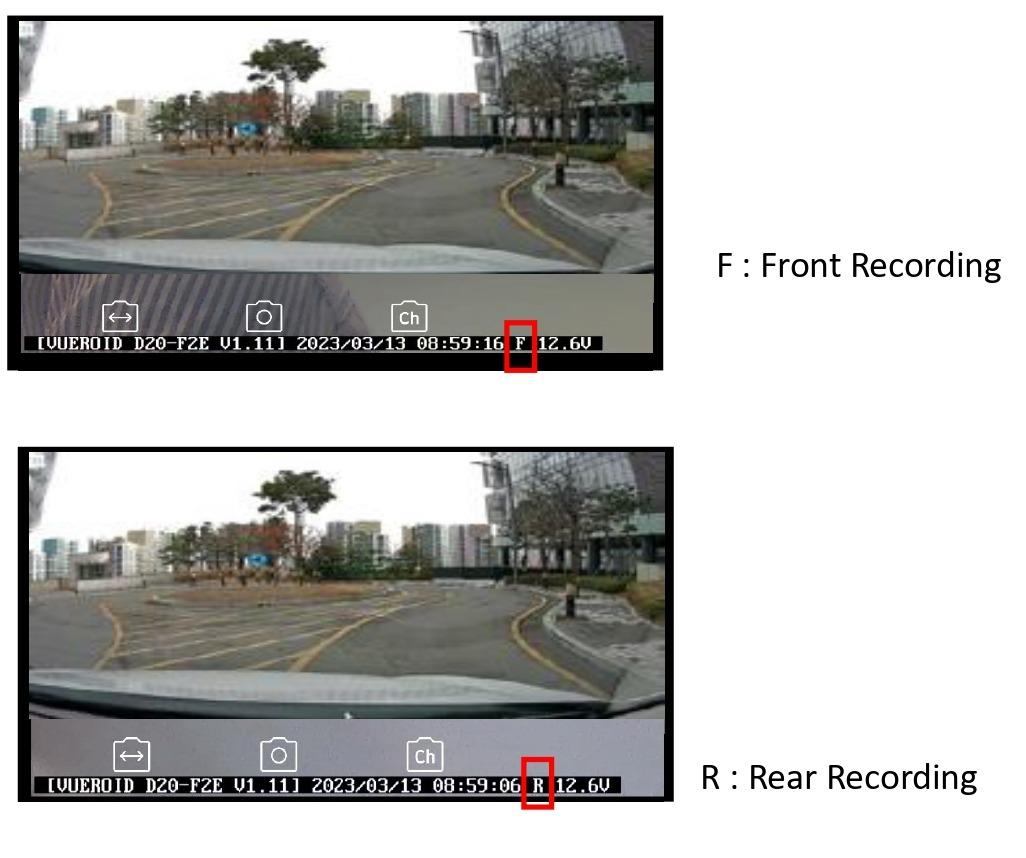
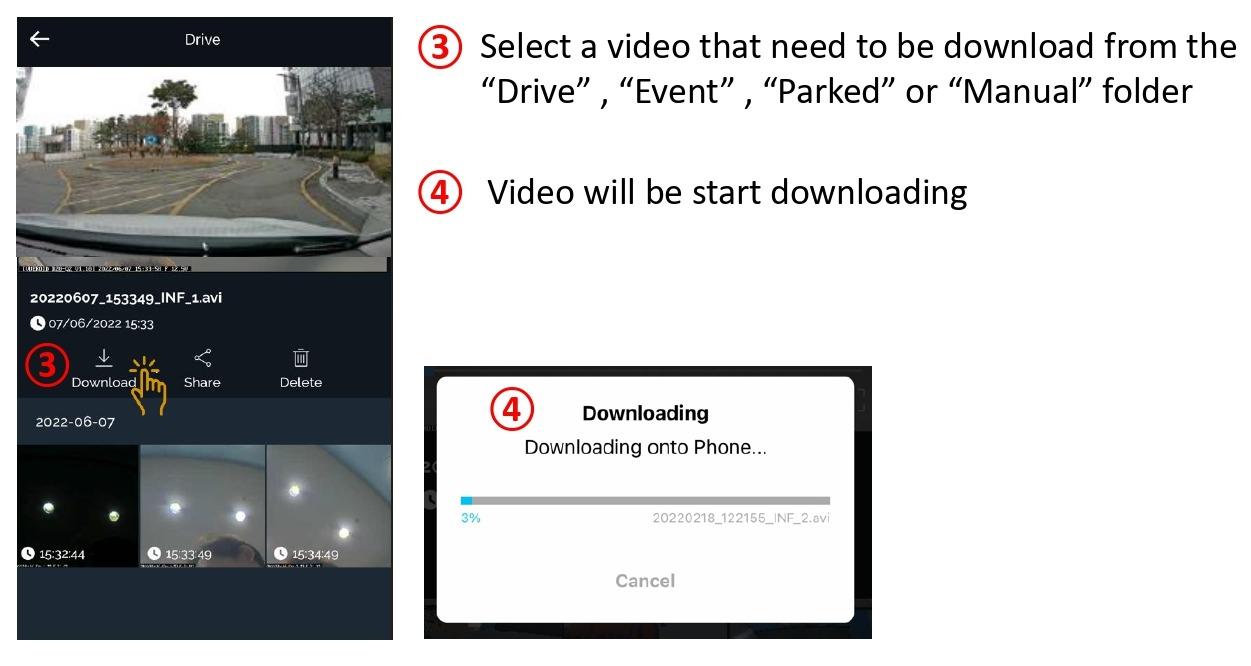
4.0 DOWNLOADING VIDEOS
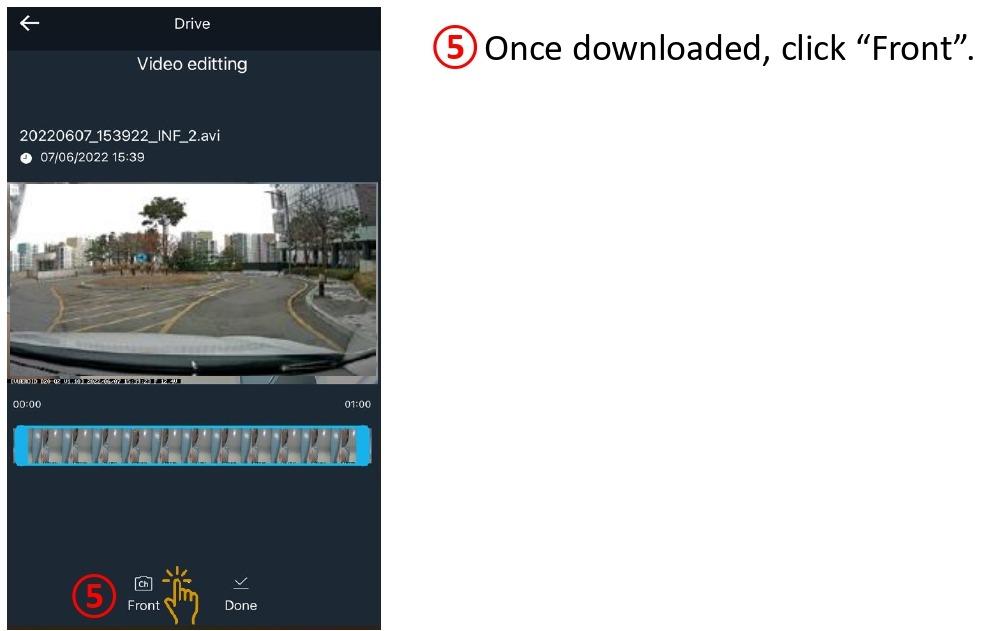
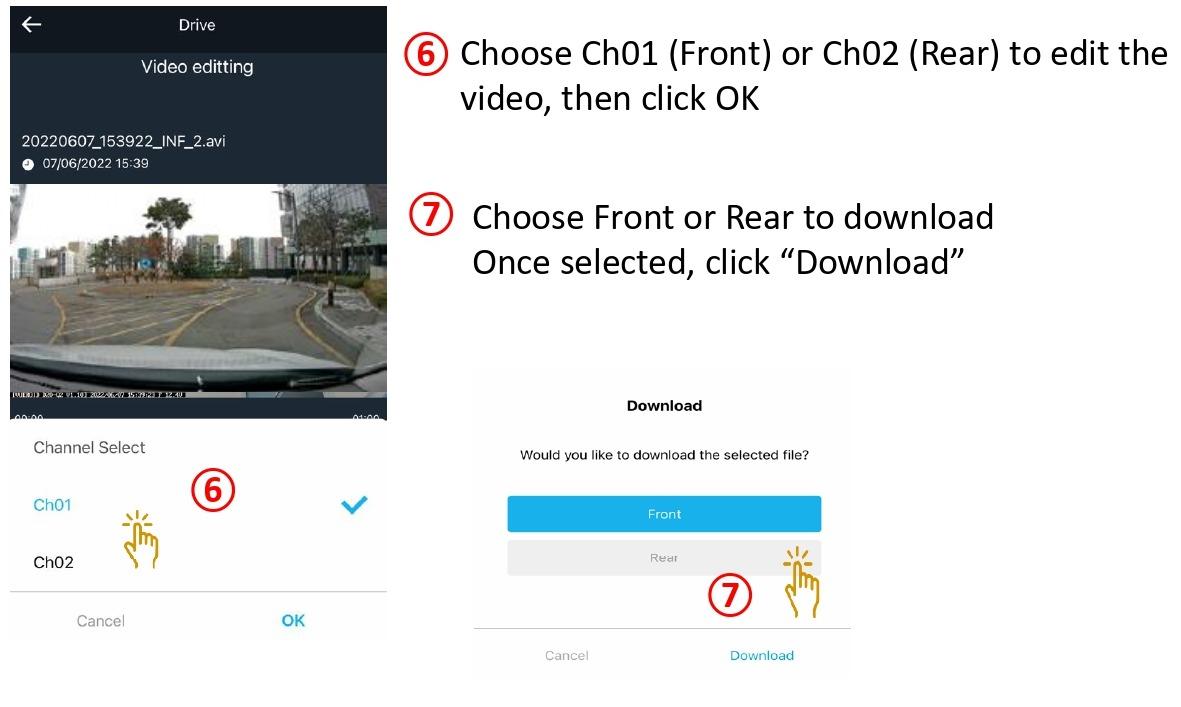
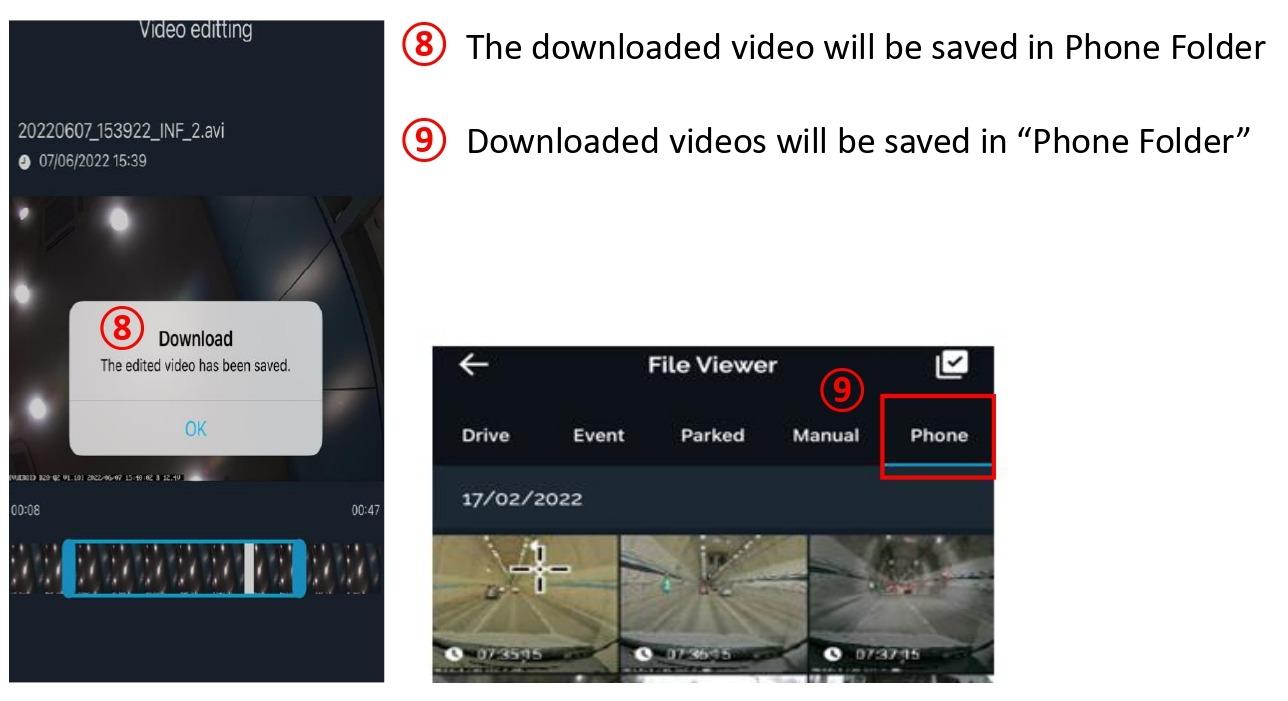
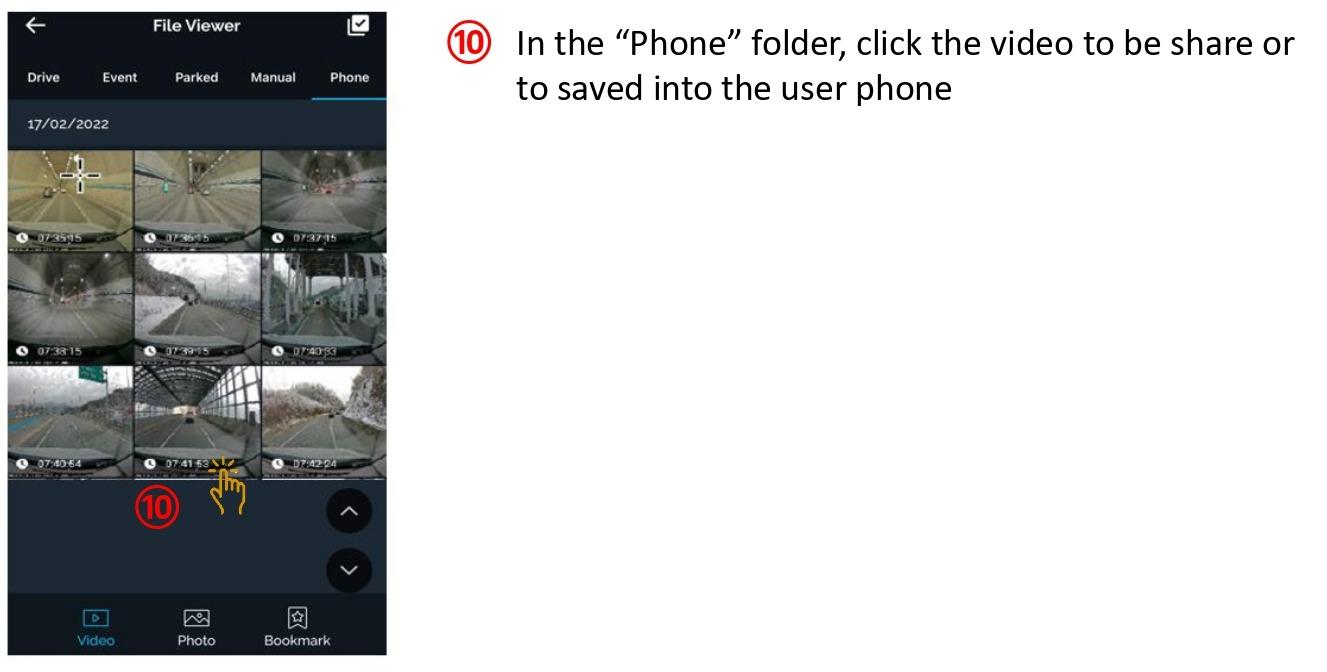
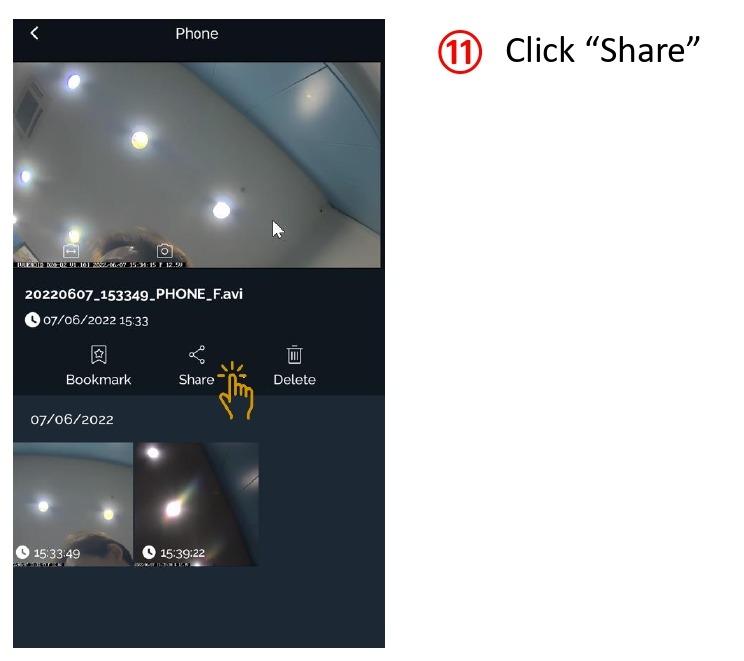
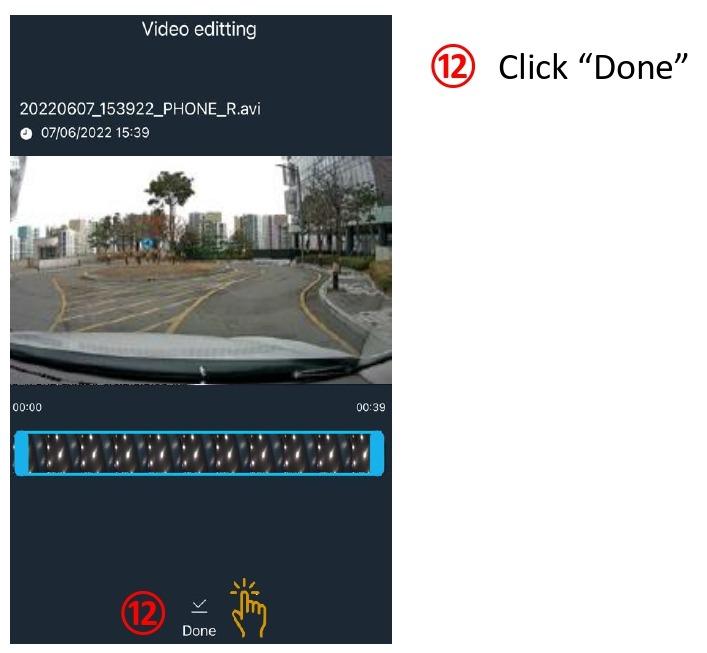
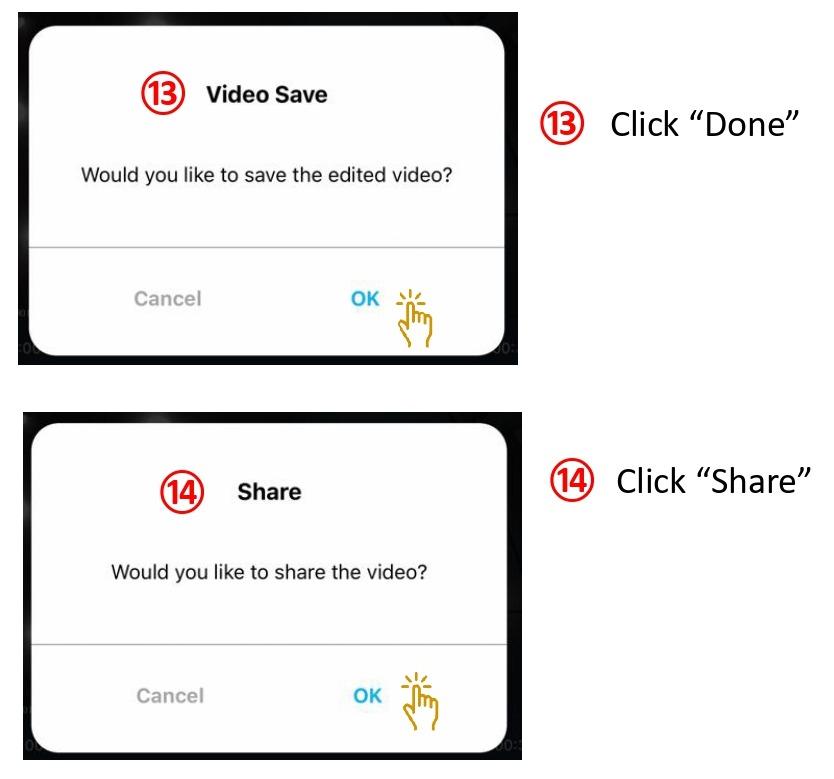
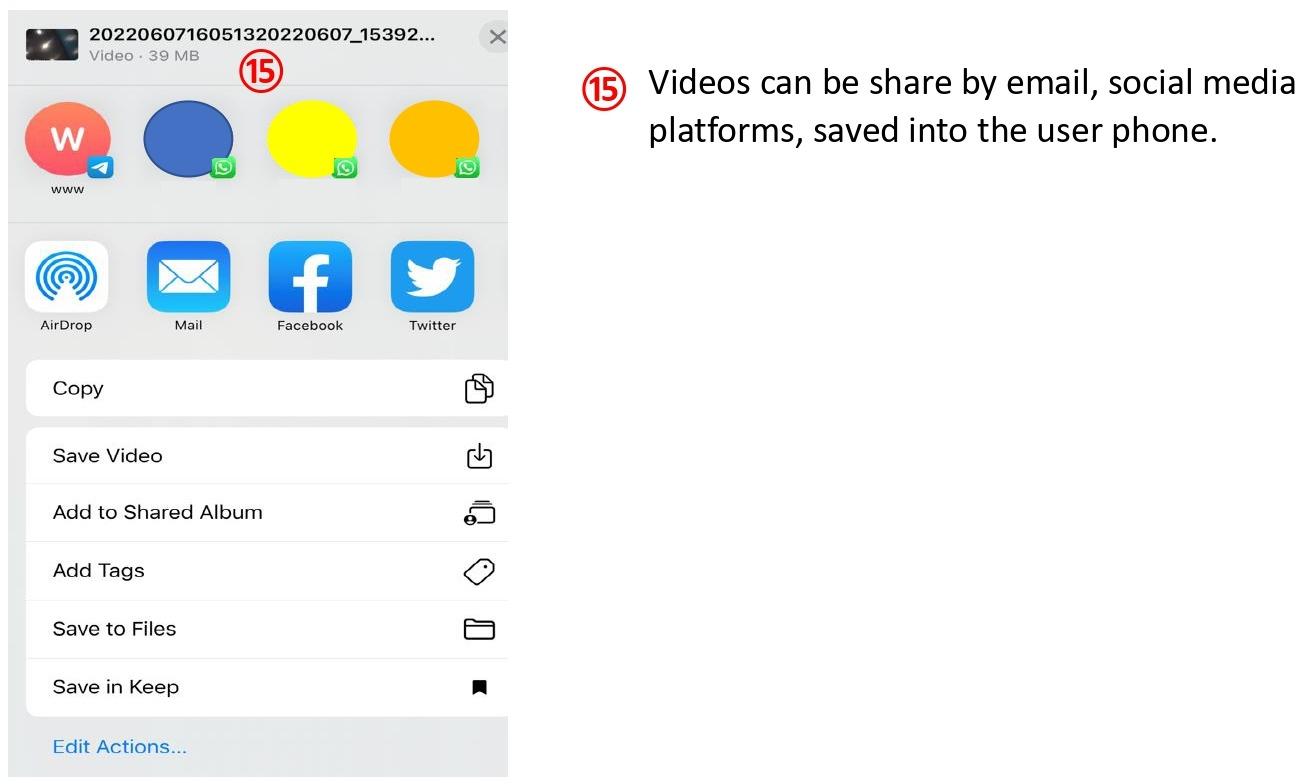
To save the downloaded videos to the user own phone library or to share, please continue to STEP 10