FAQs
Table of Contents
- BLACKVUE - FREQUENT ASK QUESTIONS (FAQs)
- 1. GENERAL
- 1.1 I am confused with so many models of dashcam. Where to get help?
- 1.2 Where can I purchase the original BlackVue products?
- 1.3 Is the price quoted here include installation fees?
- 1.4 How much time is needed for installation?
- 1.5 Do you provide the repair service for the product is out of warranty?
- 1.6 Do I need to make an appointment before coming for repair service?
- 1.7 I need further assistance. Where to get help?
- 2. PRODUCT
- 2.1 Where is your product made?
- 2.2 Is your product compatible with Mac OS?
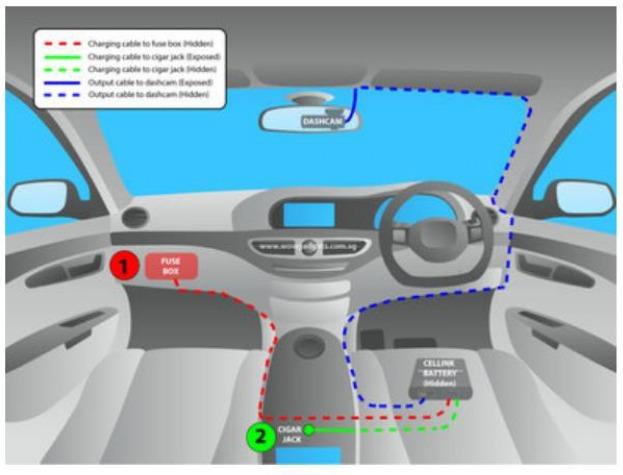
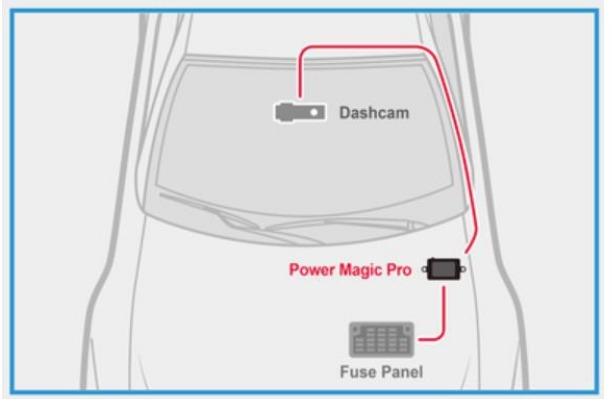
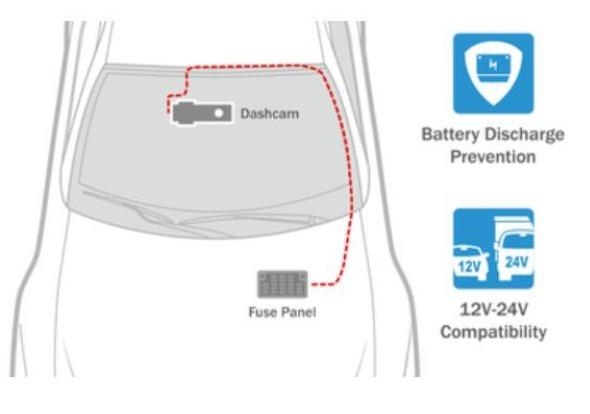
- 2.3 How you connect the power to BlackVue?
- 2.4 Can you install BlackVue in trucks, lorries and others?
- 2.5 What is parking mode?
- 2.6 Where is the typical location for the installation of BlackVue, Power Magic Pro and Cellink battery?
- 2.7 How much time is needed for the installation?
- 2.8 Does it perform loop recording or auto deletion when the memory is full?
- 2.9 How much time the memory card records before it starts to overwrite?
- 2.10 What kind of recording format used?
- 2.11 How many type of files recorded?
- 2.12 Can I used other third party memory card?
- 2.13 Do I need to perform maintenance to the memory card?
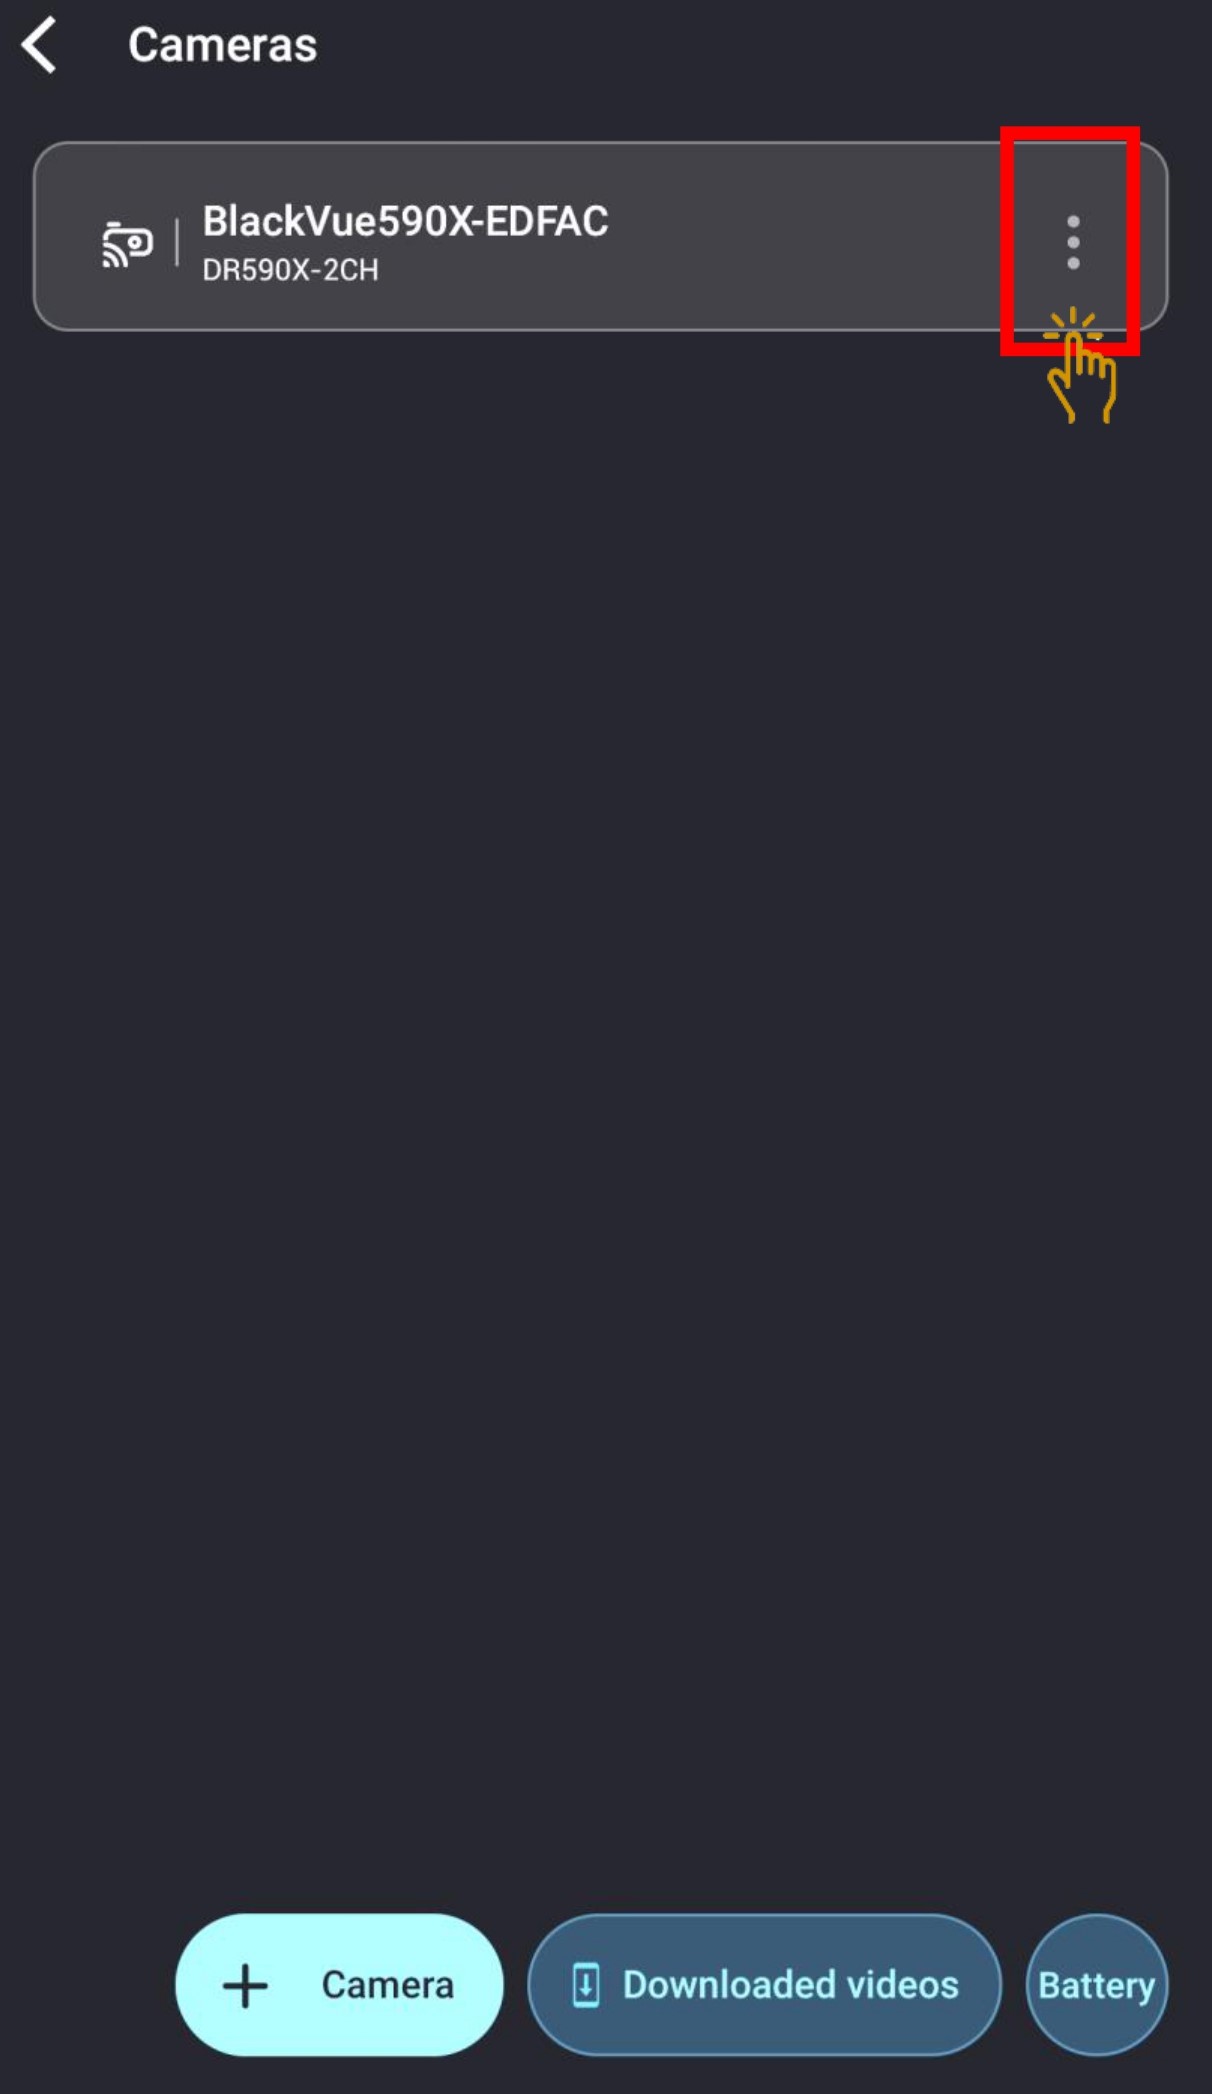
- 2.14 How do I connect the BlackVue to the smartphone?
- 2.15 Do you have 4 channels dashcam for front, rear, left and right coverage?
- 2.16 Will tinted films affect the performance of BlackVue?
- 2.17 What is the BlackVue Over the Cloud?
- 2.18 How do I check if my BlackVue is compatible with BlackVue Over the Cloud?
- 2.19 What smartphone is compatible with BlackVue dashcams?
- 2.20 How to remove and insert micro SD card to BlackVue dashcams?
- 2.21 How to remove BlackVue dashcams from mount holder?
- 3. SD CARD
- 4. TECHNICAL
- 4.1 How to upgrade the firmware?
- 4.2 How to change or reset the Wi-Fi password?
- 4.3 How to connect the BlackVue Wi-Fi?
- 4.4 Unable to connect BlackVue Wi-Fi / error "BlackVue Wi-Fi signal is too weak"
- 4.5 Unable to switch the Wi-Fi to default OFF
- 4.6 Unit keeps restarting
- 4.7 Incorrect date and time
- 4.8 Unit prompts "Error 1 GPS"
- 4.9 What is the correct camera lens adjustment?
- 4.10 How to share the video files using BlackVue App?
- 5. CLOUD
- 5.1 Do I need a Wi-Fi hotspot for Blackvue cloud dashcam?
- 5.2 Do I need a SIM Card in the car?
- 5.3 What type of mobile router is compatible to the cloud service?
- 5.4 How can I hardwired the mobile router to ensure hassle free operation?
- 5.5 How to get the SIM card?
- 5.6 How does the push notification works?
- 5.7 How to upgrade the Cloud Plan?
- 5.8 How to determine if my BlackVue is compatible?
- 5.9 Where to find Cloud QR code?
- 5.10 How to connect BlackVue Cloud dashcam to a hotspot?
- 5.11 Does all the files recorded with the dashcam to be uploaded to Cloud?
- 5.12 Will the files copied to the Cloud storage be deleted?
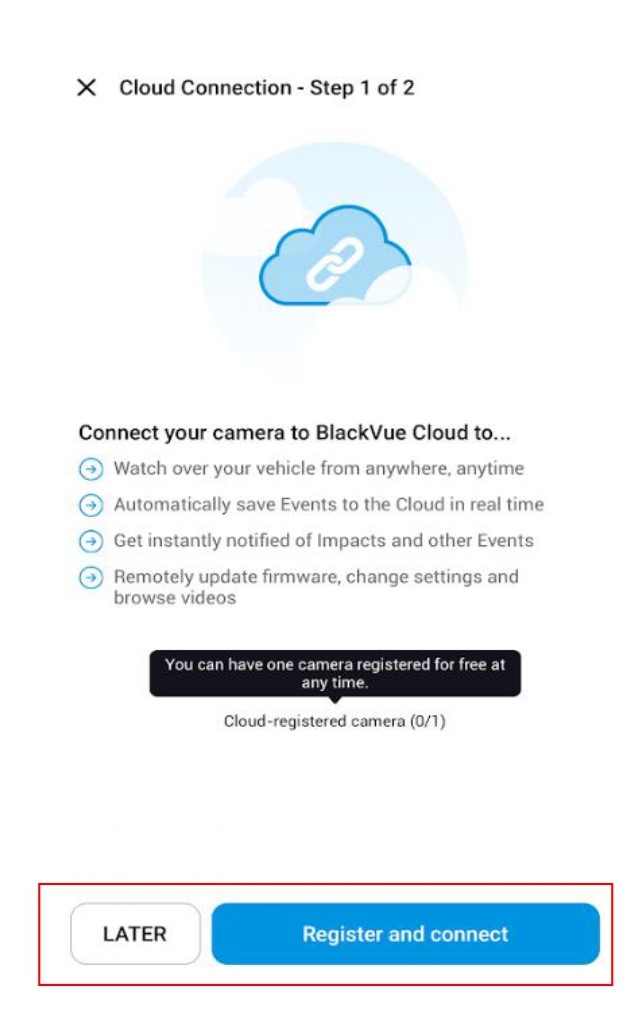
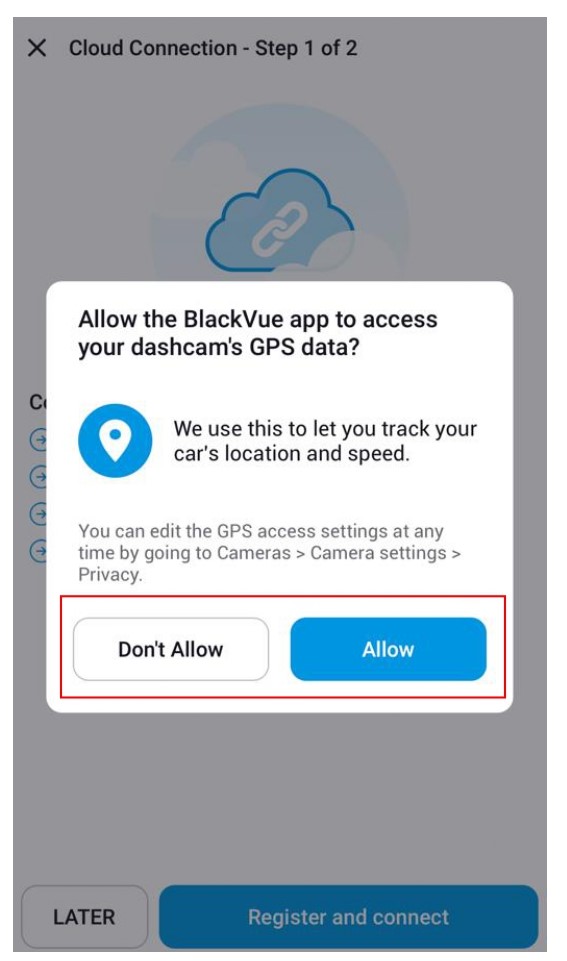
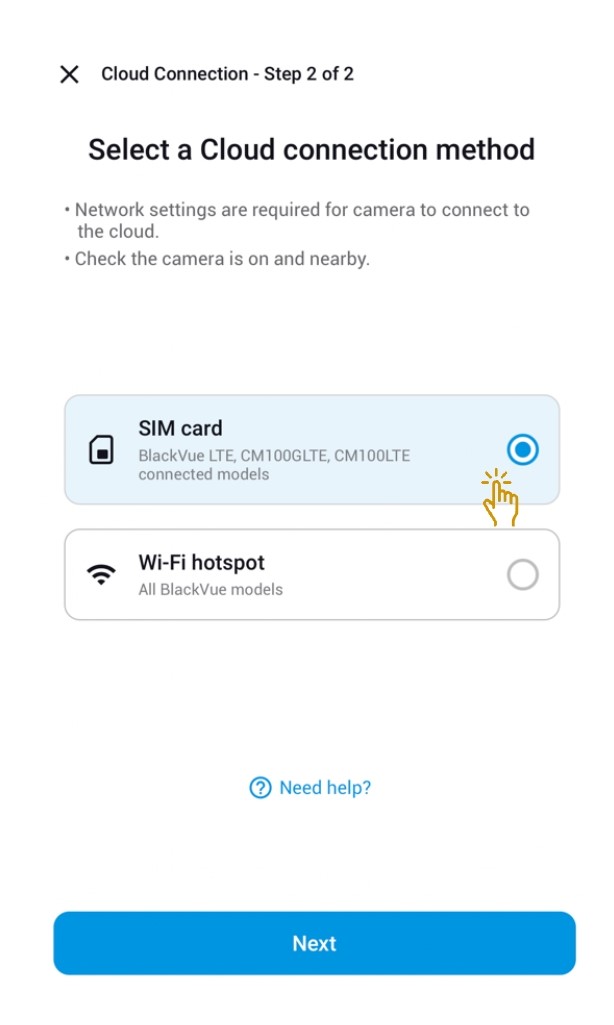
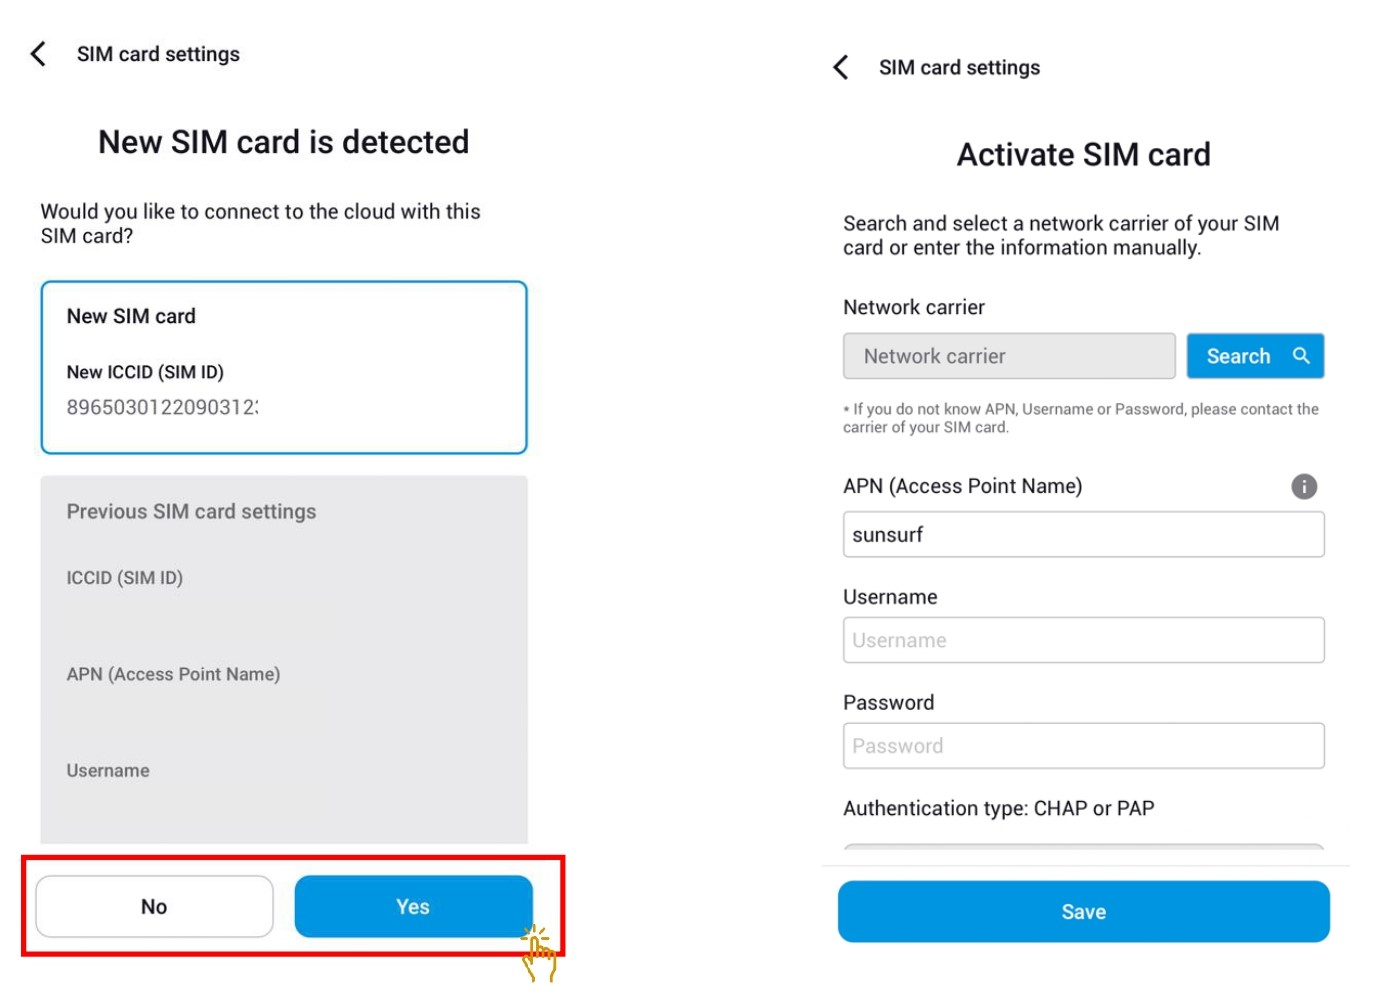
- 5.13 To Setup Cloud Connection
- 6. PRODUCT WARRANTY REGISTRATION
- 6.1 How to register the warranty for the product?
- 6.2 What is the warranty period for the products?
- 6.3 Can I register the product that I purchased outside Singapore?
- 6.4 Where can I locate the information for the model and serial number of the product?
- 6.5 Is it critical to submit the required information correctly?
- 6.6 Do I still need to keep the purchase receipt (invoice) for the warranty service?
- 6.7 When I need to submit the product registration?
- 6.8 How do I know if my form of submission is successful?
- 6.9 If the unit that I purchased earlier was replaced with a new unit during the warranty, do I need to register again?
- 7. PARKING MODE
- 7.1 When does the dashcam switch Parking Mode?
- 7.2 How does the dashcam records in Parking Mode?
- 7.3 What are the advantages of Parking Mode over Normal Mode?
- 7.4 I have dual-channel dashcam. Does Parking Mode works for both cameras?
- 7.5 Can i deactivate Parking Mode?
- 7.6 What do i need to enable Parking Mode?
- 7.7 Which mode should you choose? Motion-Impact Detection or Time Lapse?
- 7.8 What capacity of memory card is most suitable if i have Parking Mode?
- 7.9 How to reduce power consumption while in Parking Mode?
- 1. GENERAL
BLACKVUE - FREQUENT ASK QUESTIONS (FAQs)
1. GENERAL
1.1 I am confused with so many models of dashcam. Where to get help? |
|
Check out the overview of our dashcams here > |
1.2 Where can I purchase the original BlackVue products? |
|
Please refer to the list of our BlackVue Authorized Dealers, most of the dealers are able to provide the professional installation with concealed wirings. Alternatively, online store is available from the link at BlackVue Online Store. |
1.3 Is the price quoted here include installation fees? |
|
No. For exact package price with installation included, please contact the authorized dealers BlackVue Authorized Dealers. |
1.4 How much time is needed for installation? |
|
Typically within an hour for single-channel dashcam (front only) and one and half hours for dual-channel dashcam (front and back). |
1.5 Do you provide the repair service for the product is out of warranty? |
|
Yes, we provide repair service for the product which was purchased from our authorized dealers or from us earlier. Contact us with the model information to confirm the repair service availability. |
1.6 Do I need to make an appointment before coming for repair service? |
|
It is good to do so to avoid unnecessary waiting time. Normally, we will try to repair the unit within an hour but if it requires longer repair time, we can loan you a dashcam for free during the repair period. Terms and conditions apply. |
1.7 I need further assistance. Where to get help? |
|
Call our hotline at 61009691 (Weekdays 9am to 6pm | Saturdays 9am to 1pm) |
2. PRODUCT
2.1 Where is your product made? |
|
BlackVue is manufactured by Pittasoft in Seoul, Republic of Korea using the highest quality and reliable components. |
2.2 Is your product compatible with Mac OS? |
|
Yes, all BlackVue cameras are indeed Mac compatible! Learn more about our intuitive BlackVue App and Viewer for Mac here >. |
2.3 How you connect the power to BlackVue? |
|
We have a few options available:
For more details on Parking mode, please refer Item 7 - Parking Mode |
2.4 Can you install BlackVue in trucks, lorries and others? |
|
BlackVue products is 12 and 24V DC compatible. We also can supply AC adaptor for use in other places out of your vehicles. |
2.5 What is parking mode? |
|
If you have set up your BlackVue with Power Solutions (parking mode add-on), BlackVue is able to switch to parking mode automatically after your car is parked for 5 minutes. In parking mode, BlackVue only records when it detects any motion or impact, this will saves a lot of memory space for the memory card. |
2.6 Where is the typical location for the installation of BlackVue, Power Magic Pro and Cellink battery? |
|
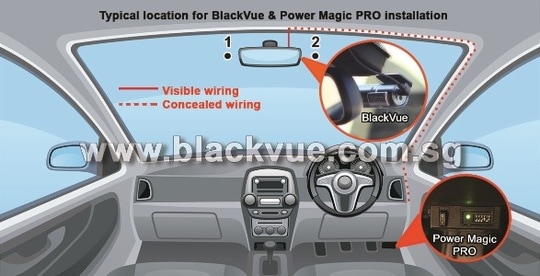
For BlackVue, it will be located behind the rear view mirror. Some cars with rain sensor located at the lower part of the rear view mirror, hence BlackVue may needs to be positioned at 1 or 2 as illustration above.
All wires will be concealed neatly if the product is installed professionally by our trained authorized dealers. |
2.7 How much time is needed for the installation? |
|
Typical installation by our authorized dealers is around 45 minutes for our single channel dashcam (front only) and about 1.5 hours for Dual-channels (front and rear) dashcam. |
2.8 Does it perform loop recording or auto deletion when the memory is full? |
|
Yes, BlackVue will start recording automatically upon power ON. When memory is full, it will automatically delete the oldest file one by one. |
2.9 How much time the memory card records before it starts to overwrite? |
|
This is very much depending on the model of BlackVue dashcam, memory size and quality setting. |
2.10 What kind of recording format used? |
|
BlackVue records in MP4 (H264) format, it is easy to access and share. It does not requires any specialised software for conversion. |
2.11 How many type of files recorded? |
|
There’s 3 types of files recorded which is Normal (N), Event (E) and Parking (P). DR650 series, DR750 and DR900 series supports additional Manual (M) file which can be manually activated by touching the sensor. Function for the sensor is default for Voice On/ Off control but can be switched to Manual Recording On/ Off by accessing the settings. |
2.12 Can I used other third party memory card? |
|
We recommend using BlackVue microSD cards for guaranteed compatibility and optimal performance. Learn more from the SD card section above. |
2.13 Do I need to perform maintenance to the memory card? |
|
2.14 How do I connect the BlackVue to the smartphone? |
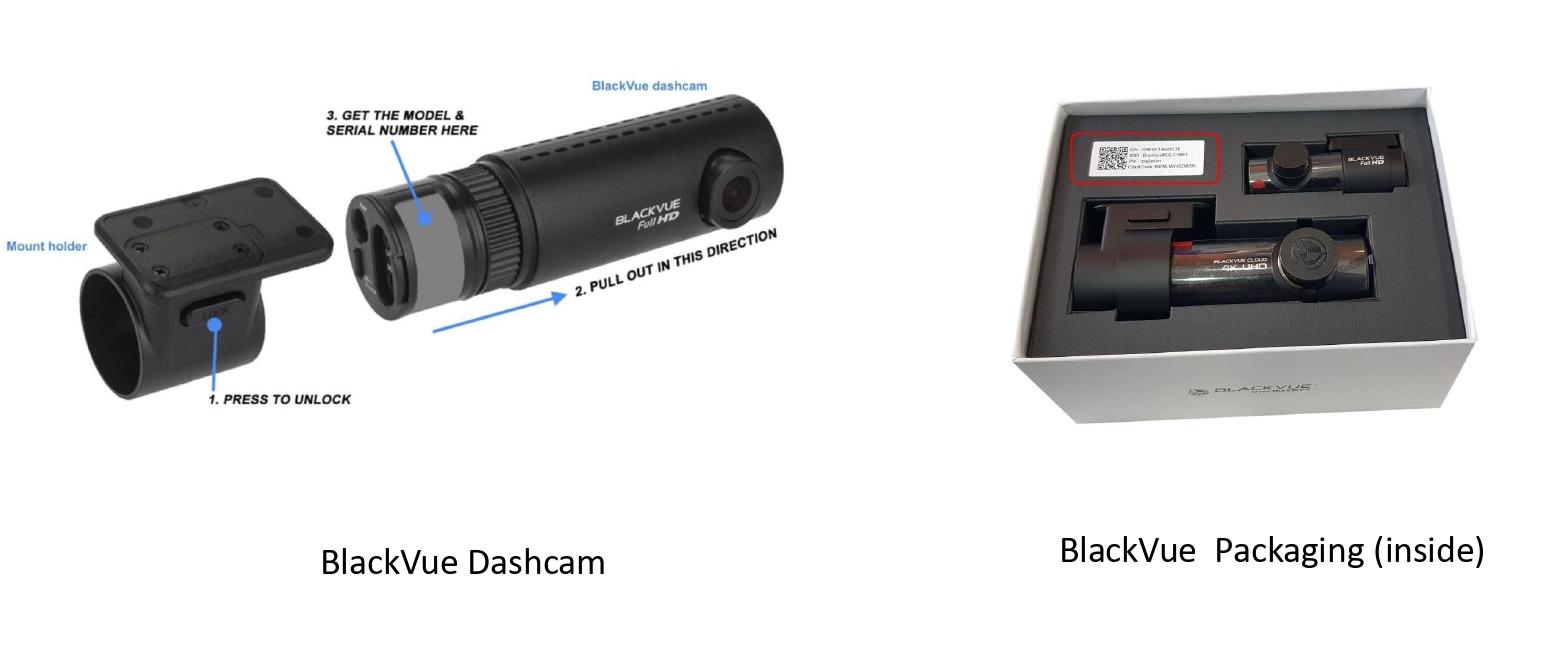
DR590, DR590W, DR590X, DR750S, DR750X, DR770X, DR900S, DR900X and DR970X series dashcams come with unique password. You can find the information for the Wi-Fi SSID and password on the dashcam or the inside of the packaging.
Learn more on TECHNICAL Section. |
2.15 Do you have 4 channels dashcam for front, rear, left and right coverage? |
|
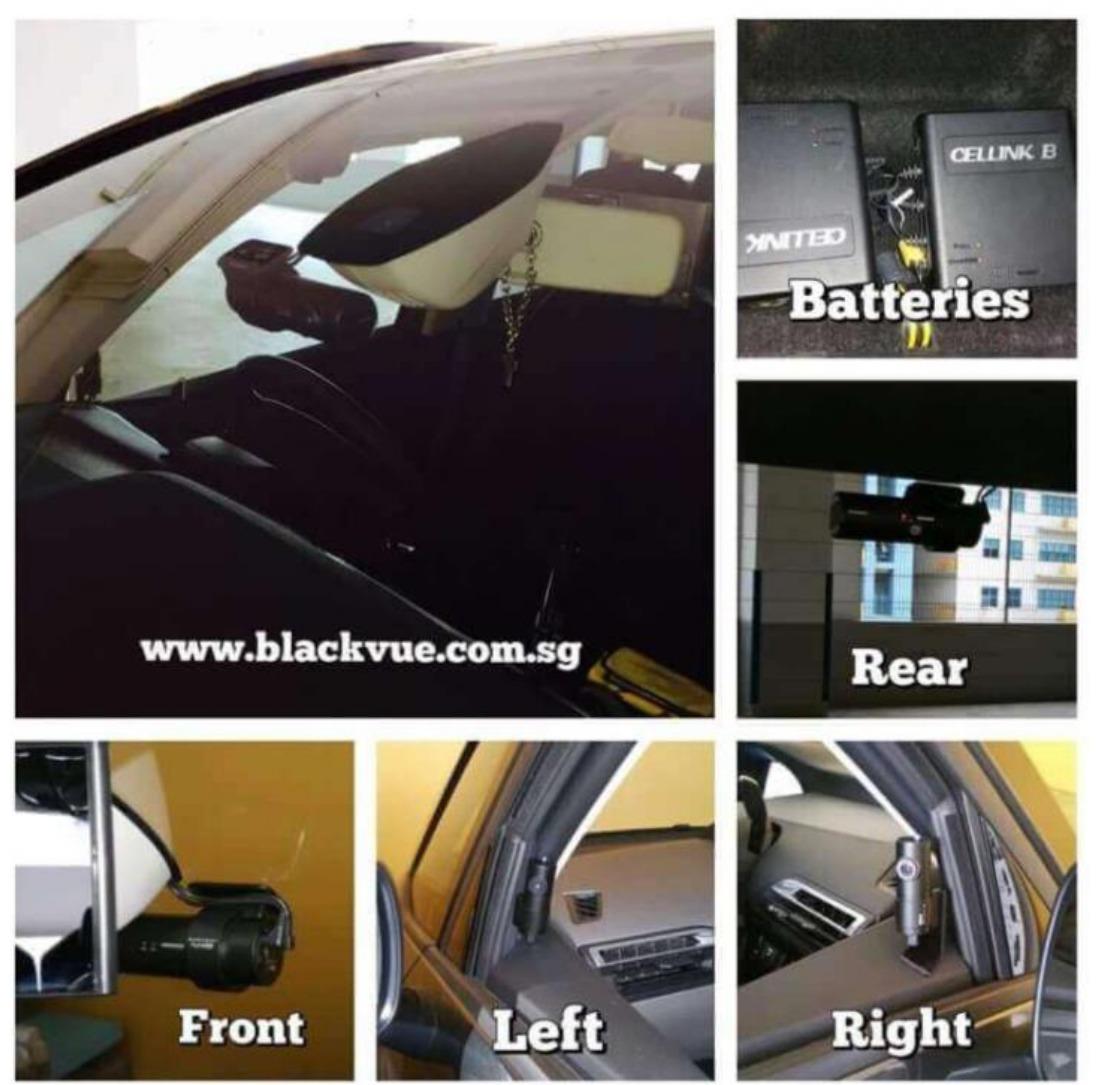
We could use 2 sets of 2 channels dashcam product to achieve close to 360 degree coverage.
|
2.16 Will tinted films affect the performance of BlackVue? |
|
Tinted film which is too dark may cause poorer recording quality. Anyway, you can adjust the brightness setting by using BlackVue app or Viewer software as to improve the recording quality. Please take note that some metallic contents for tinted film may affect the GPS reception of the BlackVue hence it may takes longer time to log on to the GPS. |
2.17 What is the BlackVue Over the Cloud? |
|
BlackVue Over the Cloud is the solution for our Cloud service. Find out more here. |
2.18 How do I check if my BlackVue is compatible with BlackVue Over the Cloud? |
|
If you are using DR650GW series, please visit here to check compatibility. |
2.19 What smartphone is compatible with BlackVue dashcams? |
|
Generally, smartphones from Apple and Samsung have the (*) best compatibility comparing with other brands like Xiaomi, Huawei, Oppo and etc. Many of these phones claimed to run on Android OS, but most of them were tweaked by the manufacturers. Some smartphones with limited capabilities to playback the recorded files smoothly, distorted sound etc. |
2.20 How to remove and insert micro SD card to BlackVue dashcams? |
|
|
2.21 How to remove BlackVue dashcams from mount holder? |
|
|
3. SD CARD
3.1 Which SD card is compatible with BlackVue?
|
||||||||||||||||
|
a) We recommend using our microSD cards for guaranteed compatibility and optimal performance. b) The reason is that dashcams put microSD cards under higher stress than most electronic products such as action cameras or DSLRs due to their constant loop recording. We test our cards extensively before selecting them for inclusion in our products, to make sure that their performance is good and degrades as little as possible over time. Anyway, memory card is a consumable item when it is used in dashcam hence it will fail eventually and requires a new replacement. c) Using other third party microSD cards can affect dashcams’ performance and in some cases, force the dashcam to reboot or restart randomly during recording. Although the basic requirement of the microSD cards for BlackVue dashcams is Class 10 or U1 and that the SD card should be formatted as FAT32 [Windows] or MS-DOS (FAT) [Mac OS], we cannot guarantee the perfect performance of cards from other manufacturers, as even cards with same specifications may vary from batch to batch. |
||||||||||||||||
3.2 What is the maximum capacity of SD card supported? |
||||||||||||||||
To check on the recording hours, please refer to the link here >. |
||||||||||||||||
3.3 Camera says "Please check SD card" |
||||||||||||||||
|
||||||||||||||||
3.4 Camera says "No SD card, please insert SD card" |
||||||||||||||||
|
||||||||||||||||
3.5 How to format the SD card? |
||||||||||||||||
|
Important:
Methods on Formatting SD Card
3.5.1 Format Using BLACKVUE Mobile Apps In the event, if user unable to connect the dashcam, below is the optional methods of formatting SD Card 3.5.2 Format Using BLACKVUE Viewer (Windows) 3.5.3 Format Using BLACKVUE MAC Viewer 3.5.4 Format Using BLACKVUE Dashcam
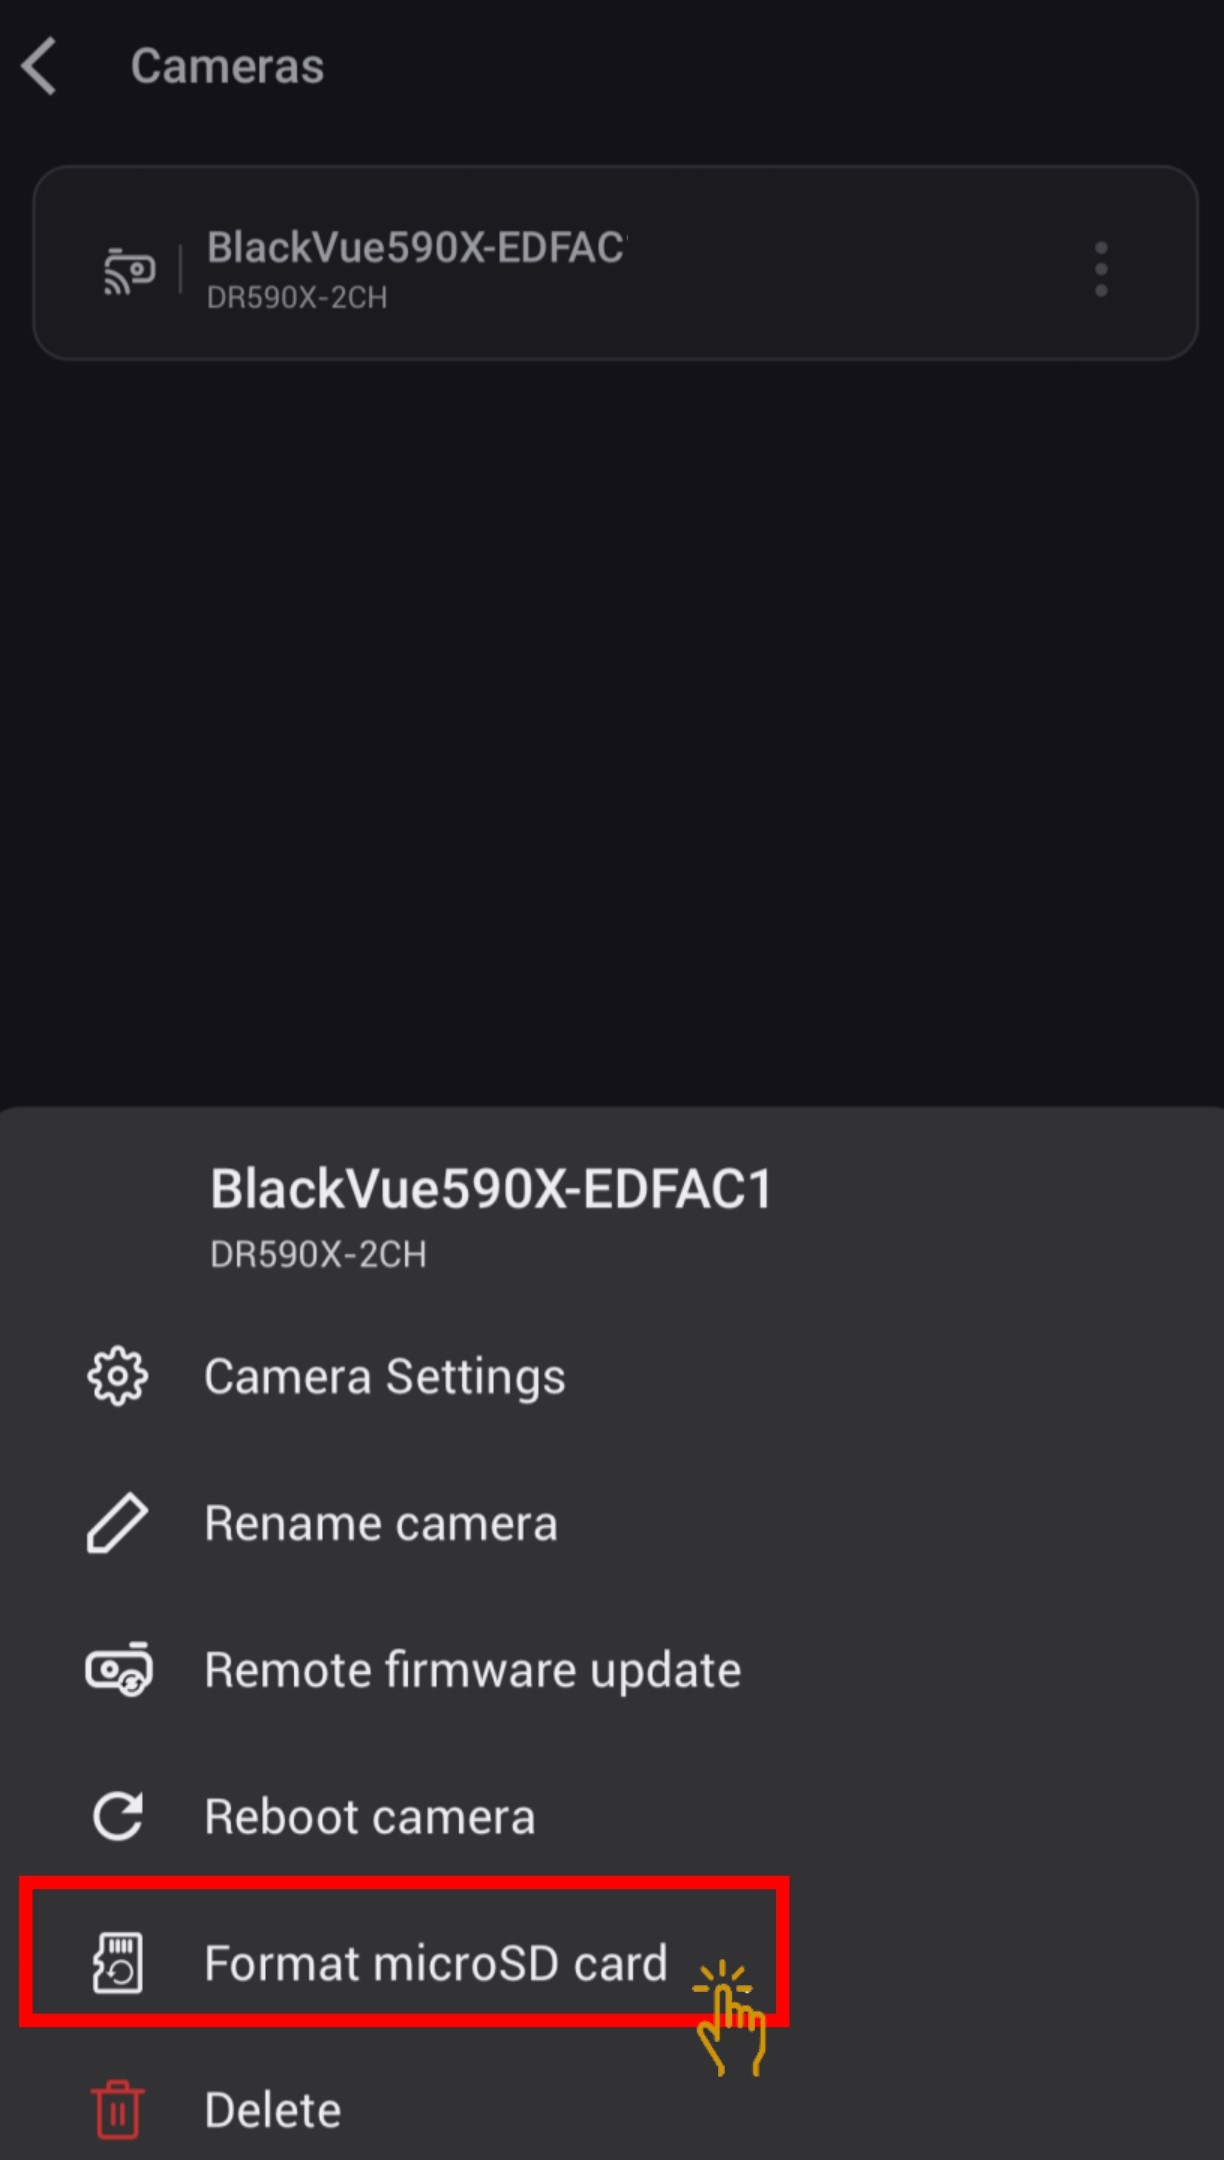
3.5.1 Format Using BLACKVUE Mobile Apps
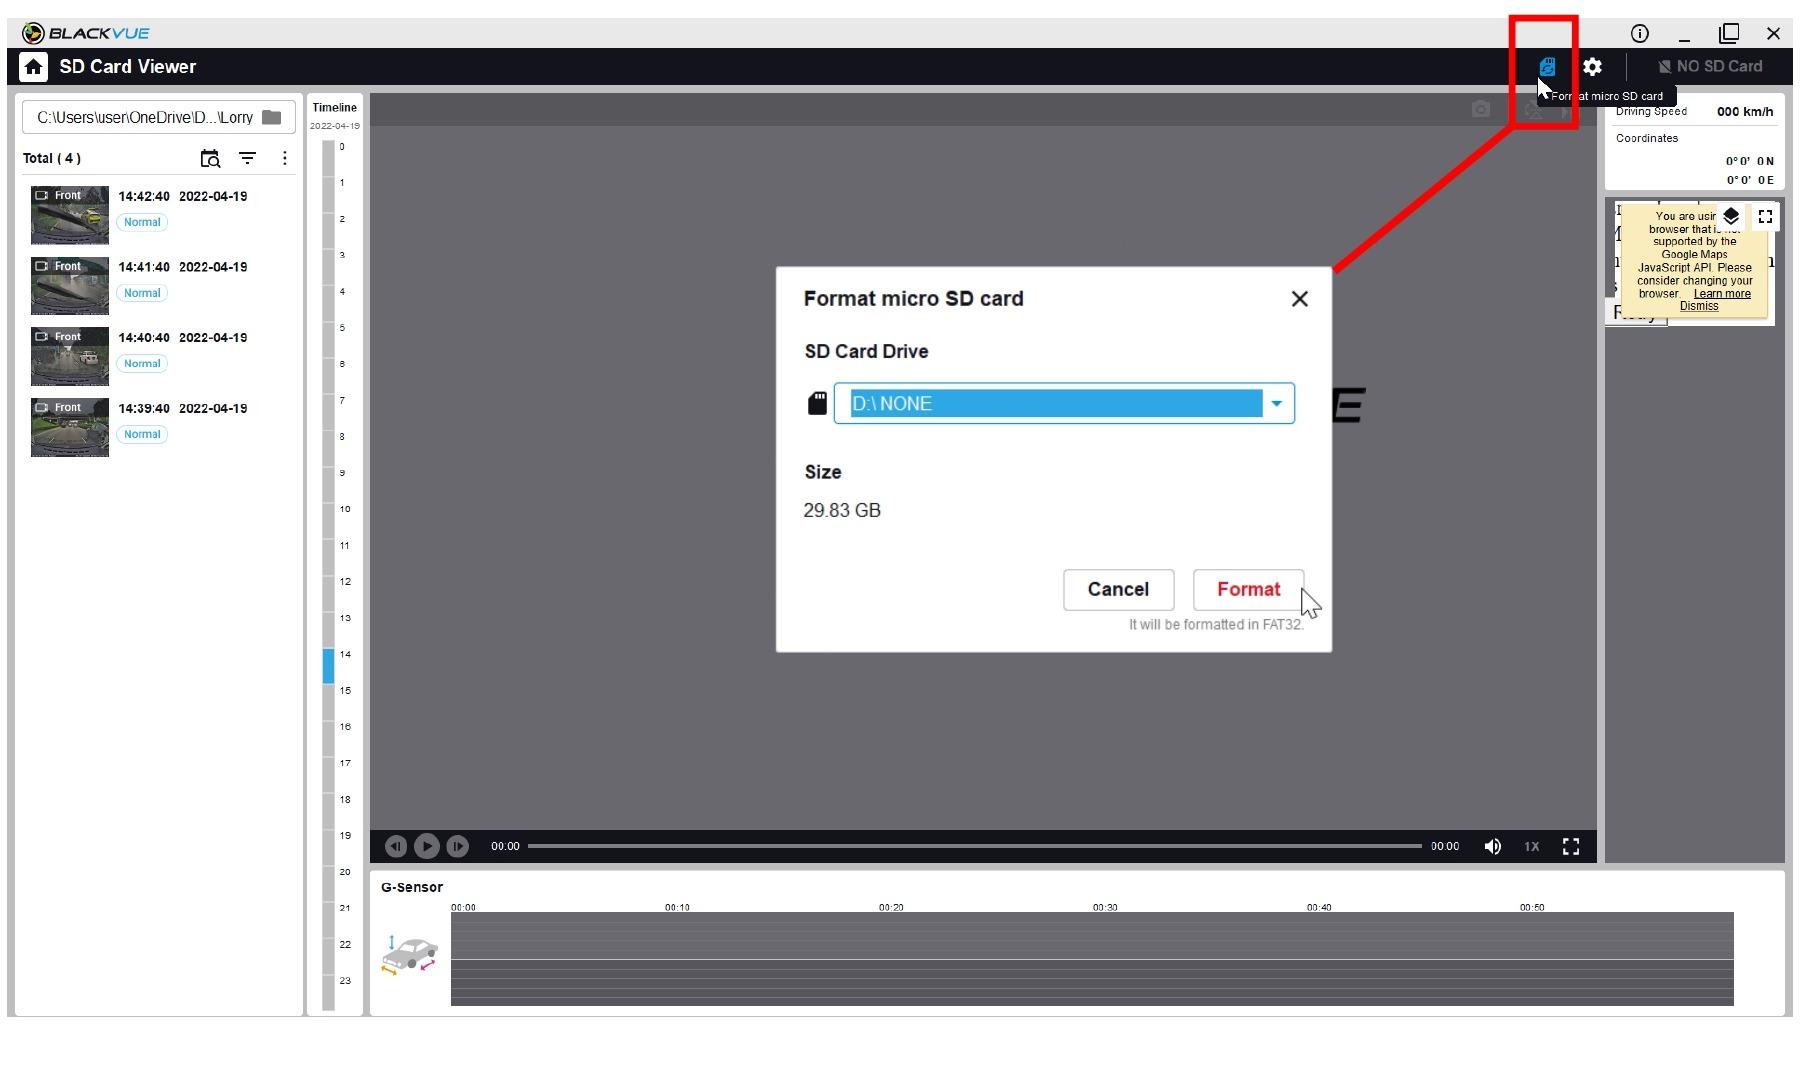
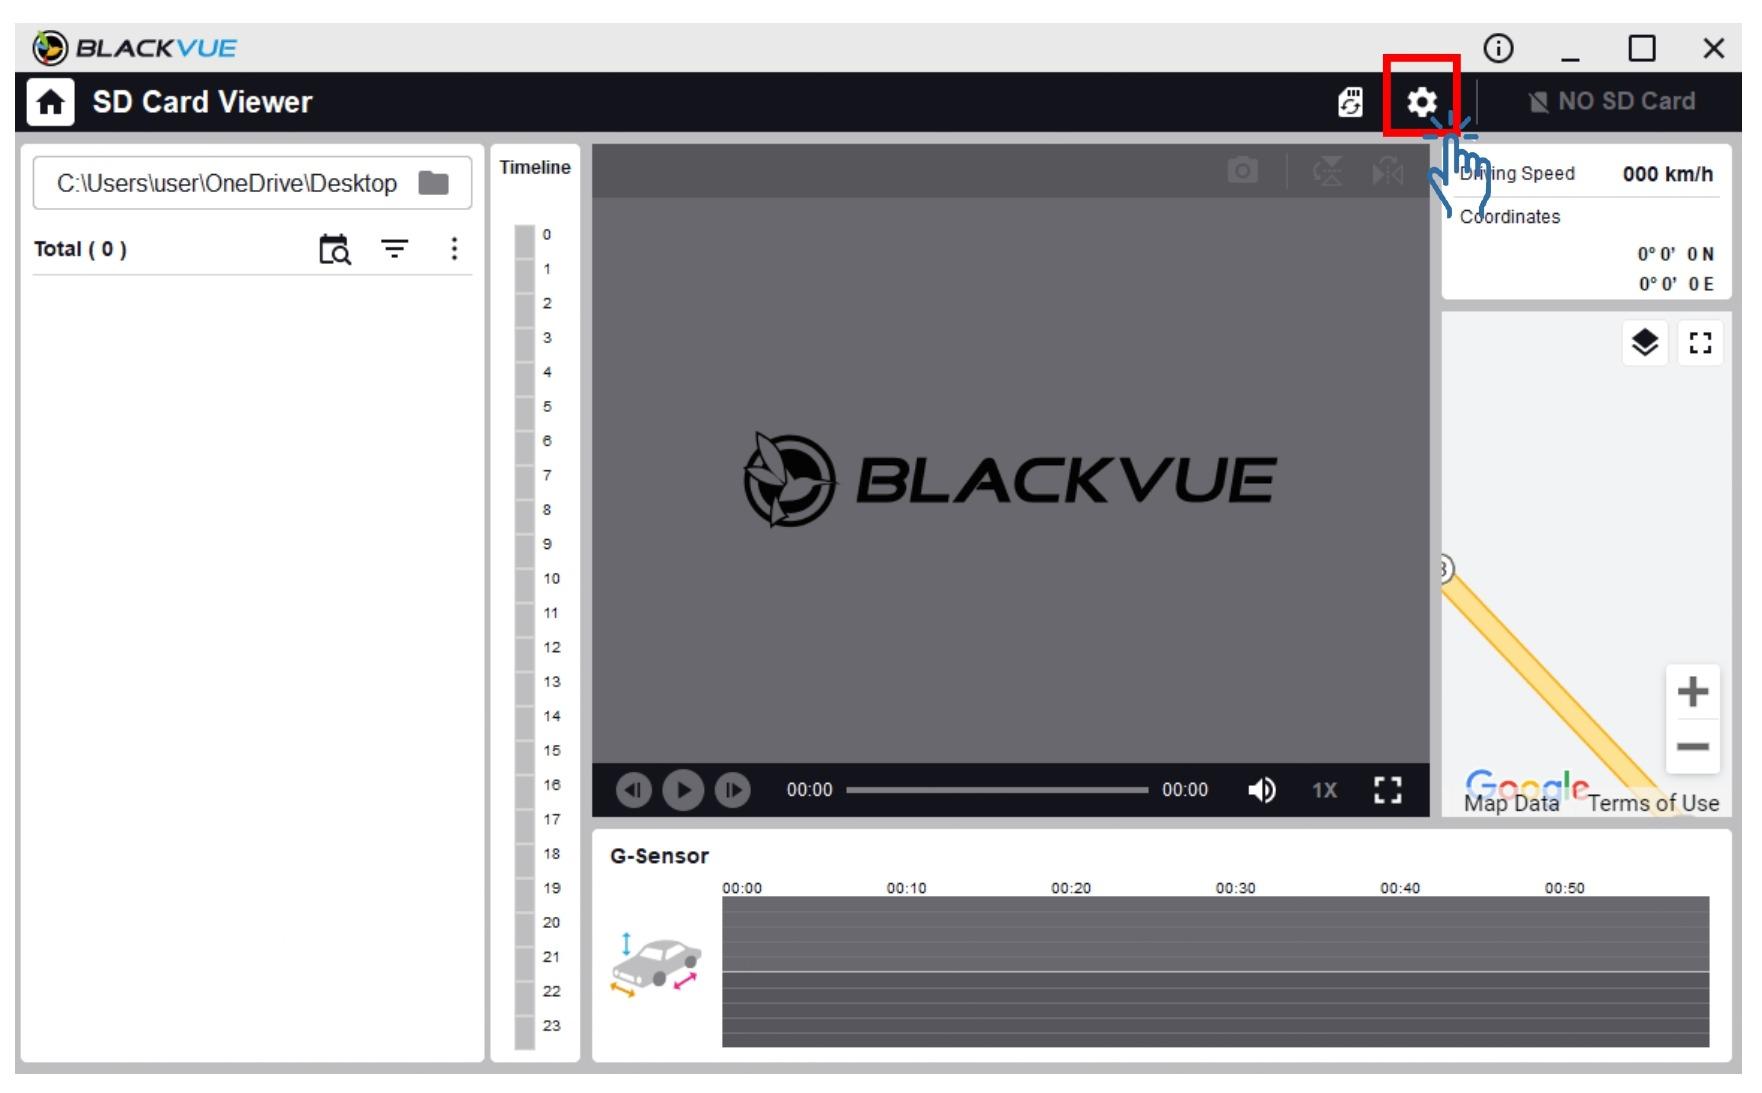
3.5.2 Format Using BLACKVUE VIEWER
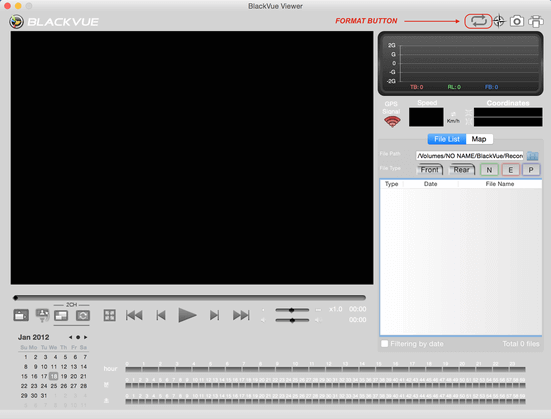
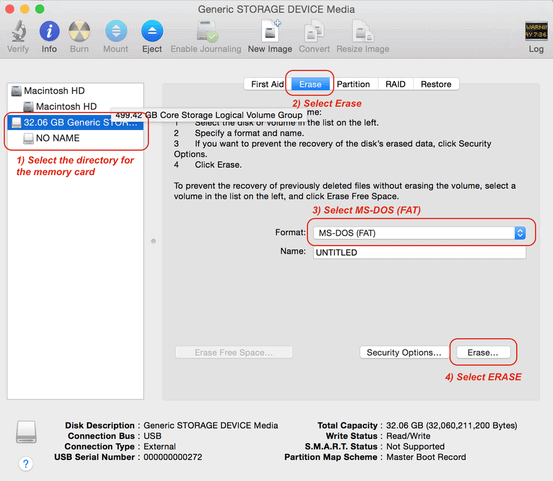
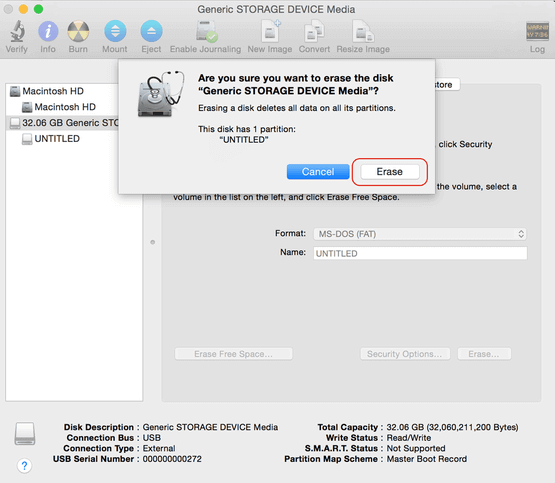
3.5.3 Format using MAC VIEWER
|
||||||||||||||||
3.5.4 Format Using BLACKVUE DashcamThe easiest way to format the SD card for periodic maintenance is by pressing the Wi-Fi/ Format or Mic/ Format button.
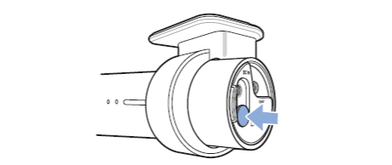 • This method only applicable for dashcam models (DR900S, DR750S, DR590W, DR590):
a) Press the button for 5 seconds till beeps b) Press again the button for another 5 seconds till beeps
|
||||||||||||||||
4. TECHNICAL
4.1 How to upgrade the firmware? |
||||||||||||||||||||||||||||||||||||||||||||||||||||||||||||||
|
Please follow the procedure here. |
||||||||||||||||||||||||||||||||||||||||||||||||||||||||||||||
4.2 How to change or reset the Wi-Fi password? |
||||||||||||||||||||||||||||||||||||||||||||||||||||||||||||||
|
4.2.1 Identify Dashcam Model
4.2.2 Default Password
2. For older dashcam models such as DR650 series, the default password is 'blackvue' . In any case that you would like to reset or change the password, please refer to the following options: - Item 4.2.3 - Reset using dashcam's Wi-Fi button - Item 4.2.4 - Reset using BlackVue Viewer
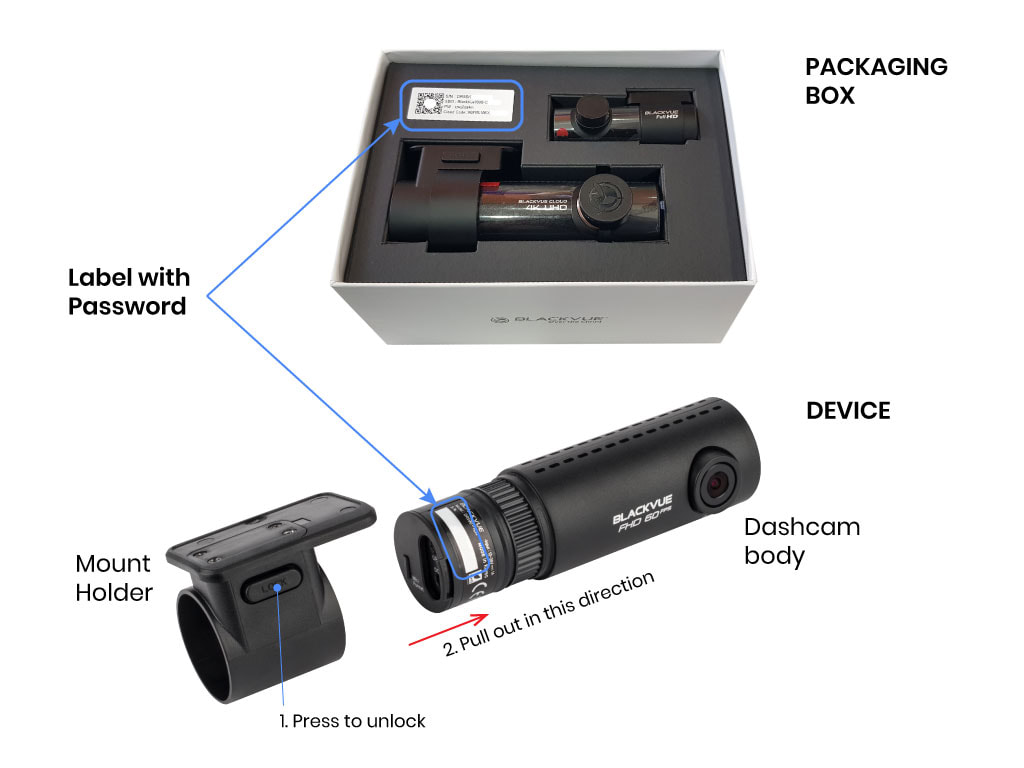
4.2.3 Reset Using Dashcam's WI-FI ButtonApplicable for DR590W, DR750S and DR900S series The DR590W, DR590X, DR750S, DR900S, DR750X, DR900X, DR770X, DR970X Series introduces unique Wi-Fi passwords instead of the default “blackvue” password. The default unique password is printed on the label , which can be found on the internal packaging or by removing the dashcam from its mount. Photo as shown in item 4.3.
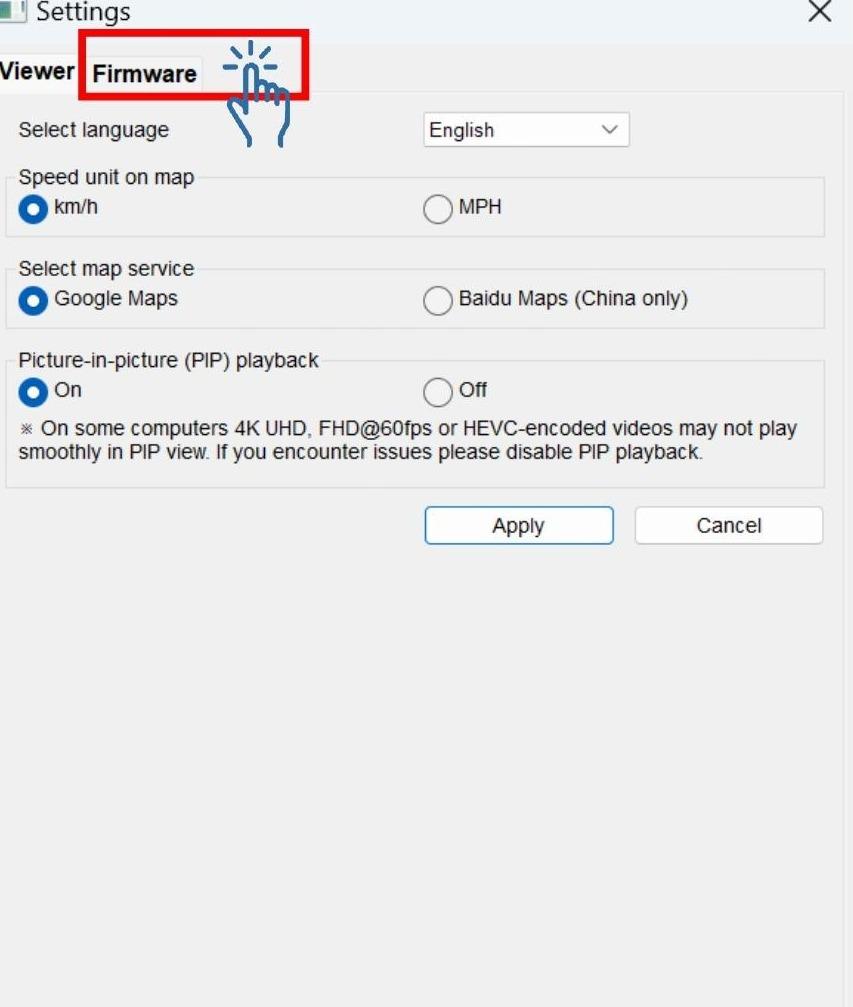
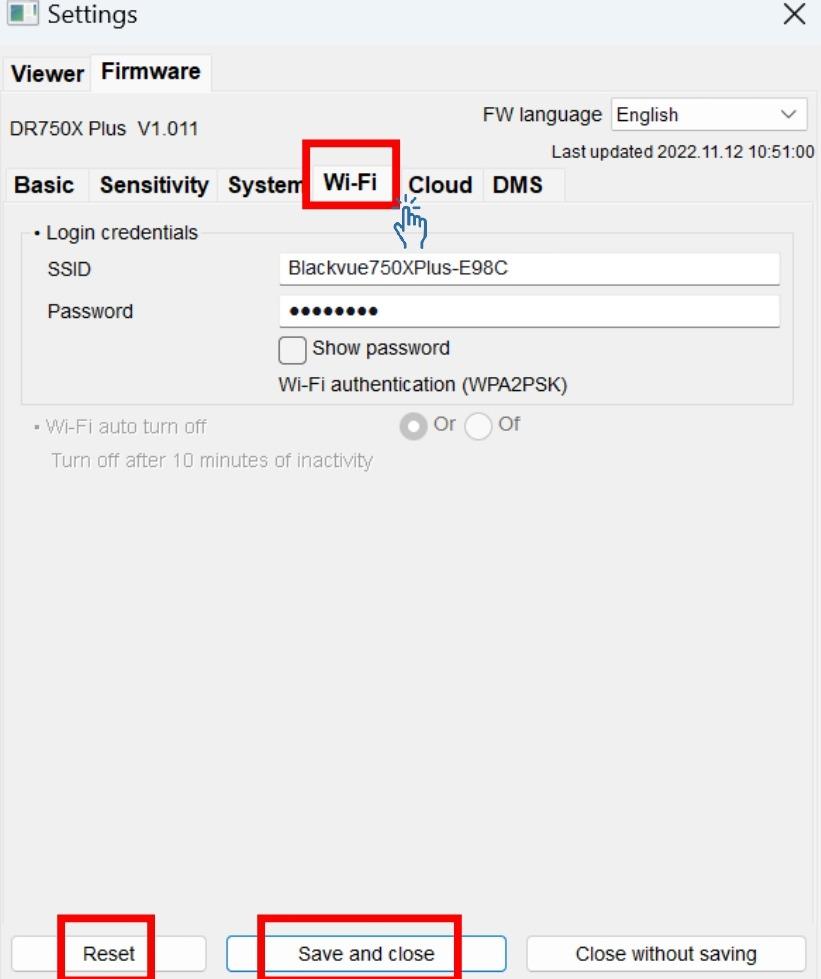
4.2.4 Reset / Change Using BlackVue Viewer
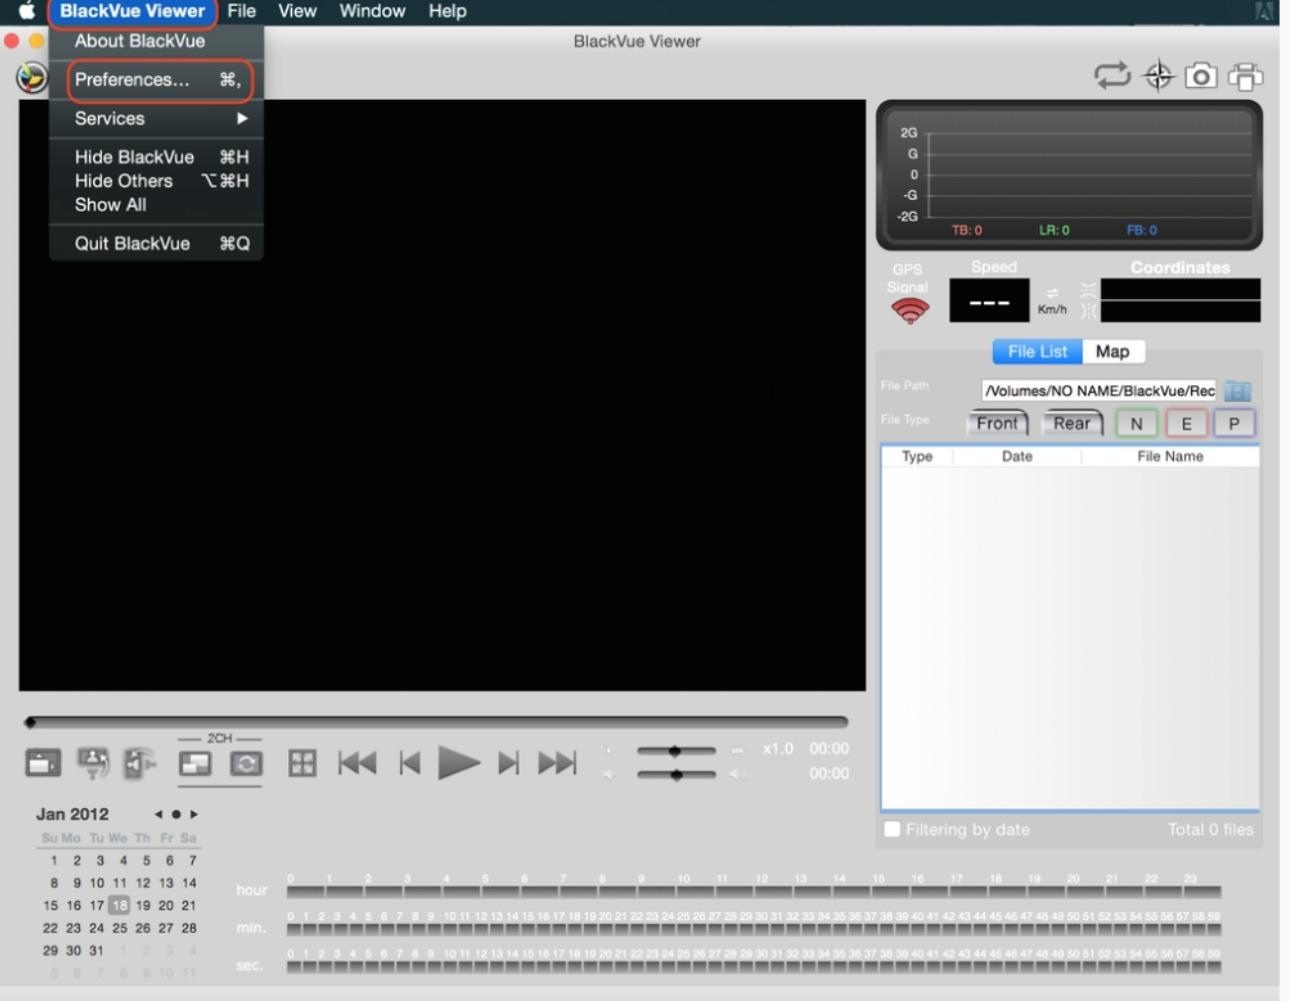
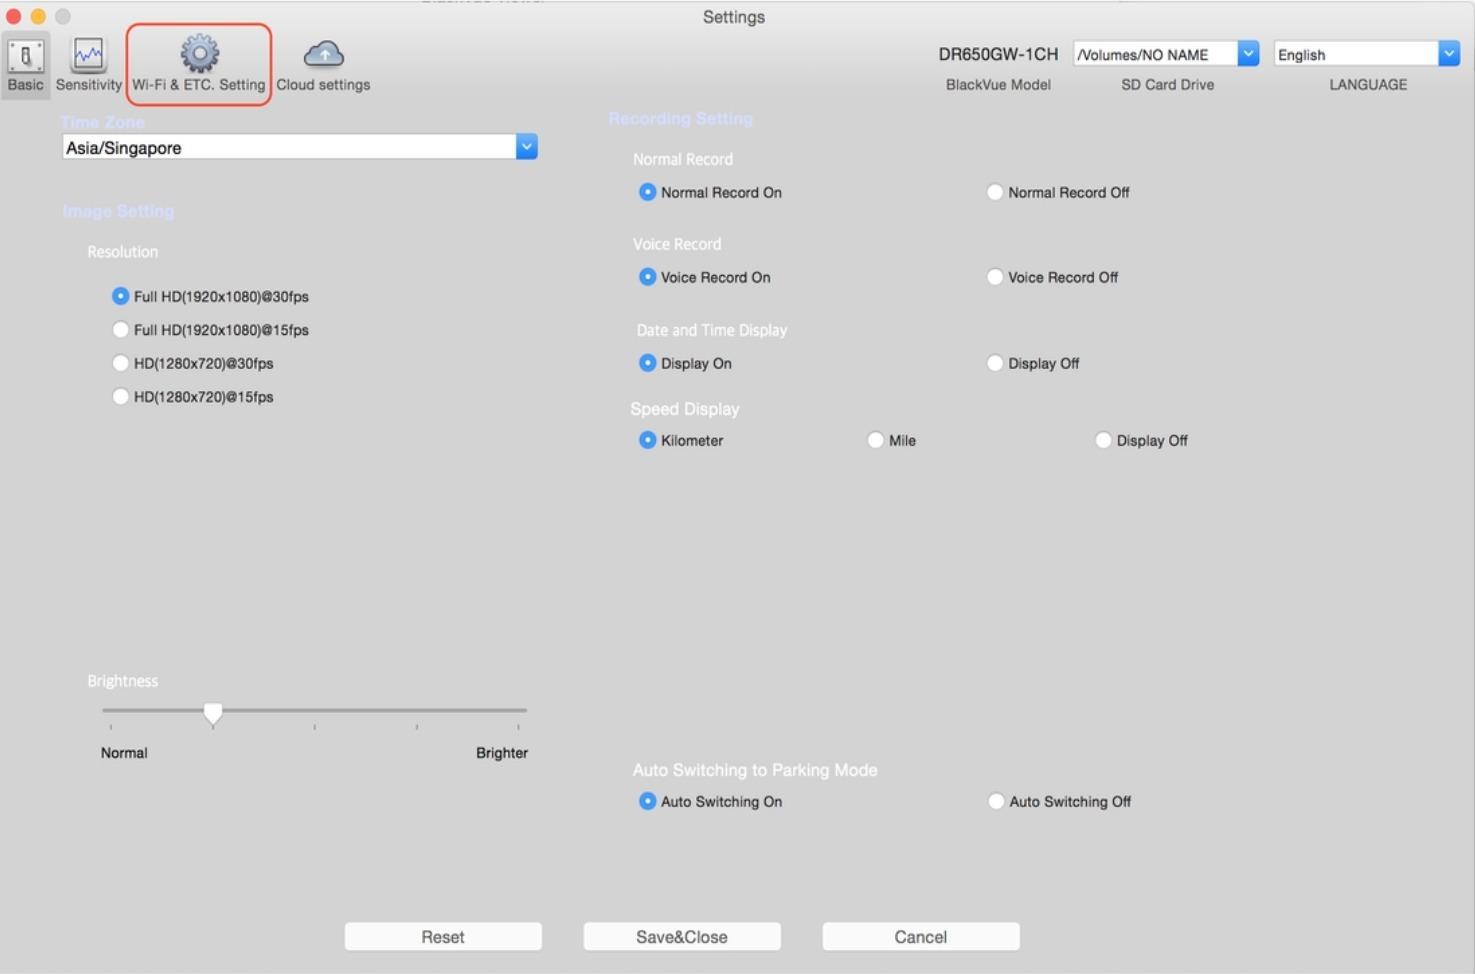
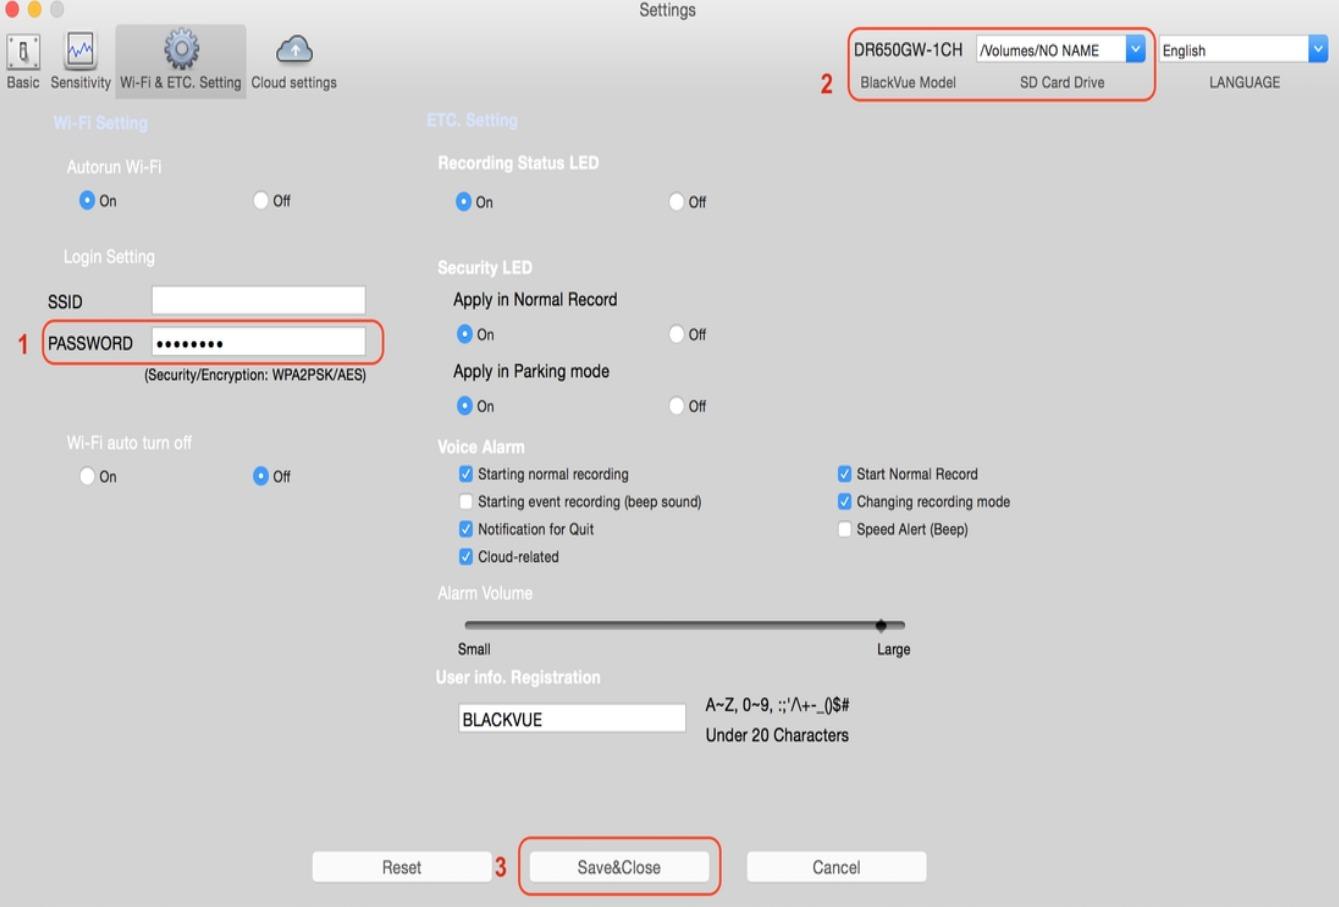
Applicable for any dashcam models 1. With the BlackVue Viewer, you can reset or change the Wi-Fi password. 2. For older dashcam models, BlackVue Viewer for Mac or Windows OS is located inside the memory card of BlackVue. 4. Power off the dashcam and remove the memory card from it. 5. Insert the card into the microSD card reader and connect it to the computer. 6. Continue the following steps for Windows or Mac user accordingly.
4.2.4.1 Reset / Change Using BlackVue Viewer Windows Version
4.2.4.2 Reset / Change Using BlackVue Viewer MAC Version
|
||||||||||||||||||||||||||||||||||||||||||||||||||||||||||||||
4.3 How to connect the BlackVue Wi-Fi? |
||||||||||||||||||||||||||||||||||||||||||||||||||||||||||||||
|
If you are still unable to connect, please refer to other possible reasons on item 4.4 below. |
||||||||||||||||||||||||||||||||||||||||||||||||||||||||||||||
4.4 Unable to connect BlackVue Wi-Fi / error "BlackVue Wi-Fi signal is too weak" |
||||||||||||||||||||||||||||||||||||||||||||||||||||||||||||||
|
Possible reasons:
|
||||||||||||||||||||||||||||||||||||||||||||||||||||||||||||||
4.5 Unable to switch the Wi-Fi to default OFF |
||||||||||||||||||||||||||||||||||||||||||||||||||||||||||||||
|
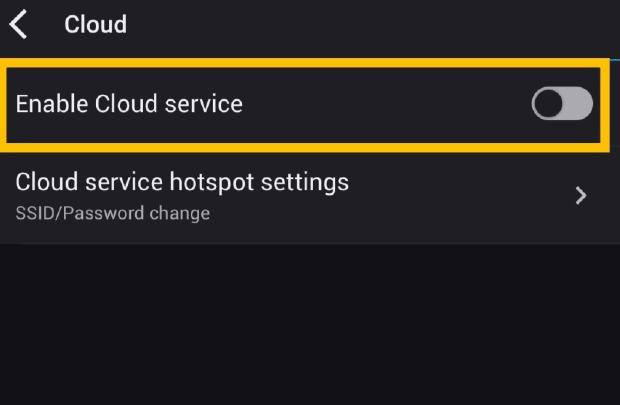
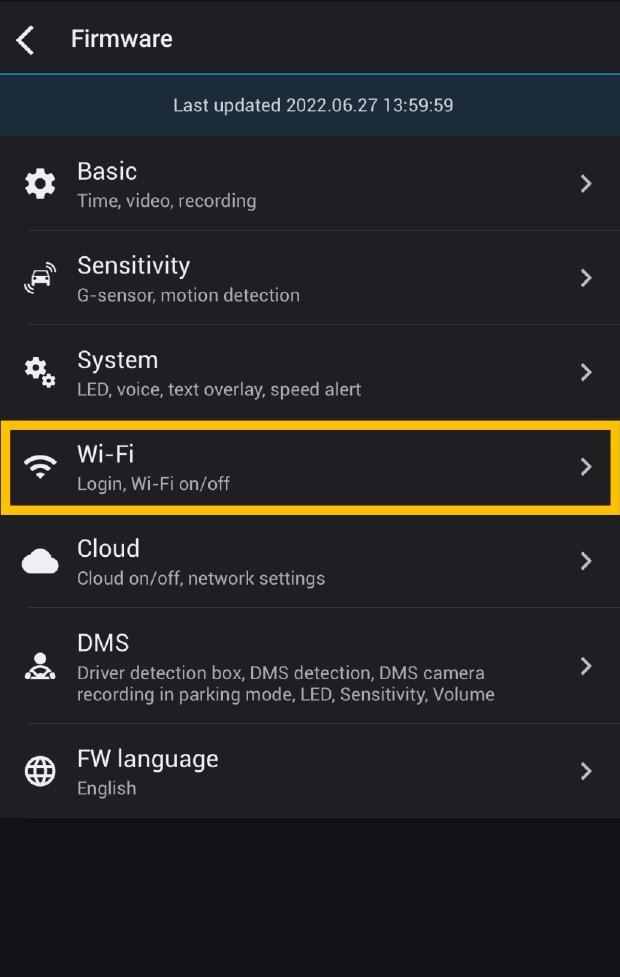
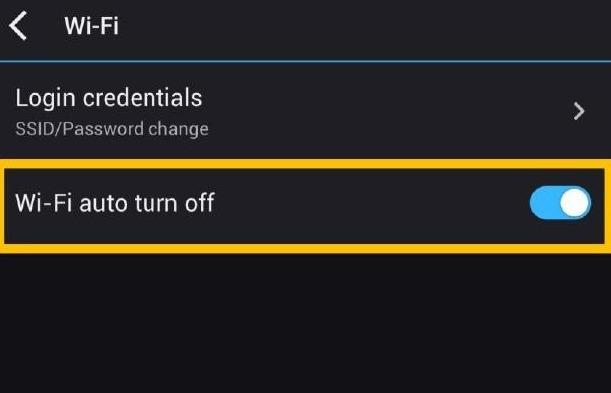
When the Cloud service is enabled the Wi-Fi auto settings cannot be adjusted. Wi-Fi will automatically switch on when you turn on the dashcam and remain on. You can change the settings as follows:
|
| SETTING | ON | OFF |
| WI-FI - AUTO TURN ON | Wi-Fi turns on when dashcam turn on | Wi-Fi does not turn on when dashcam turn on |
| WI-FI - AUTO TURN OFF | Wi-Fi turns off when if it is inactive for 10 minutes | Wi-Fi does not turn off automatically |
You can press physically Wi-Fi / Format button on the dashcam to manually switch Wi-Fi On/Off
For DR750S series dashcam, even you had switched the WIFI AUTO TURN ON to OFF, the WIFI will still ON for about 5 minutes upon power ON
4.5.2 Using BlackVue Viewer
-
Remove the microSD card from the dashcam.
-
Insert the card into the microSD card reader and connect it to a computer.
-
Run the BlackVue Viewer program.
-
In BlackVue Viewer Go to Settings (Windows) / BlackVue Viewer-> Preferences (Mac) to access the settings panel.
-
Click on Cloud Settings tab and under Enable Cloud Service, choose Off.
-
Click the Wi-Fi and Other tab and and adjust the desired Wi-Fi auto settings.
-
Click Save & Close.
4.6 Unit keeps restarting
-
This problem is most likely due to a faulty, corrupted or incompatible SD card. Please format the card or replace with a new card from us. Learn more from the SD card section above.
-
If before the system restarts, there’s message "Resetting the Time", this problem is due to the system is trying to re-adjust the date and time which is out of sync with the GPS.
-
If this error occurs frequently, please send your unit back for warranty claim or repair. If before the system restarts, there’s message "Powering down", this problem could be due to intermittent power source for example poor connection of the installation. Please contact the installer for a check.
4.7 Incorrect date and time
-
Upgrade the dashcam’s firmware to the latest version available on the download page here>.
-
For the dashcams without built-in or externally connected GPS module, run the Time setting program available on the download page [Download Viewer, App, Manual and Others] from here >
Time Setting Software is not compatible for DR590W, DR590 and DR490 series
-
For the dashcams with built-in or externally connected GPS module, it is not necessary to run the Time setting program if the dashcam’s GPS is working properly.
- Make sure that you set the time zone correctly using the BlackVue App or BlackVue Viewer for example, Asia > Singapore or 8 GMT.
- BlackVue systems use a RTC (Real Time Clock) internal battery to maintain an accurate time and date If there is an issue with system or the RTC battery has come to the end of its life, the time and date may go out of sync. Please contact us for warranty claim or repair service.
4.8 Unit prompts "Error 1 GPS"
This error is normally due to wrong connection of rear camera jack to the GPS socket of the front camera. Power off and reinsert the rear camera jack to the correct socket.
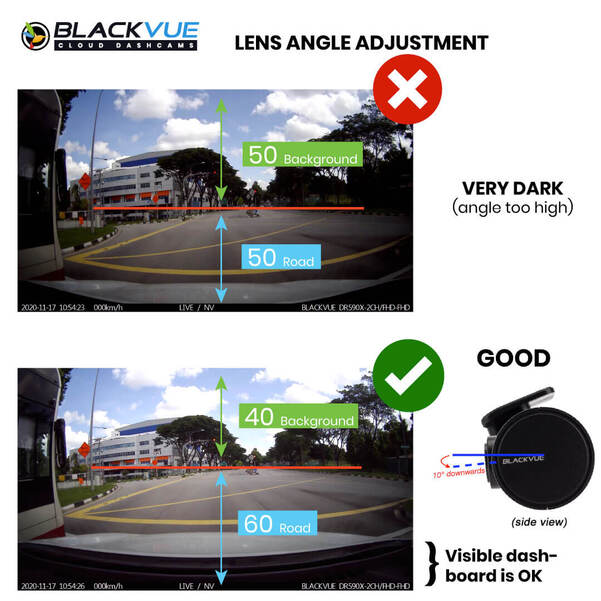
4.9 What is the correct camera lens adjustment?
Adjust the angle of the lens by rotating the body of the front camera. We recommend pointing the lens slightly downwards (≈10° below horizontal), so as to record video with a 6:4 road to background ratio.
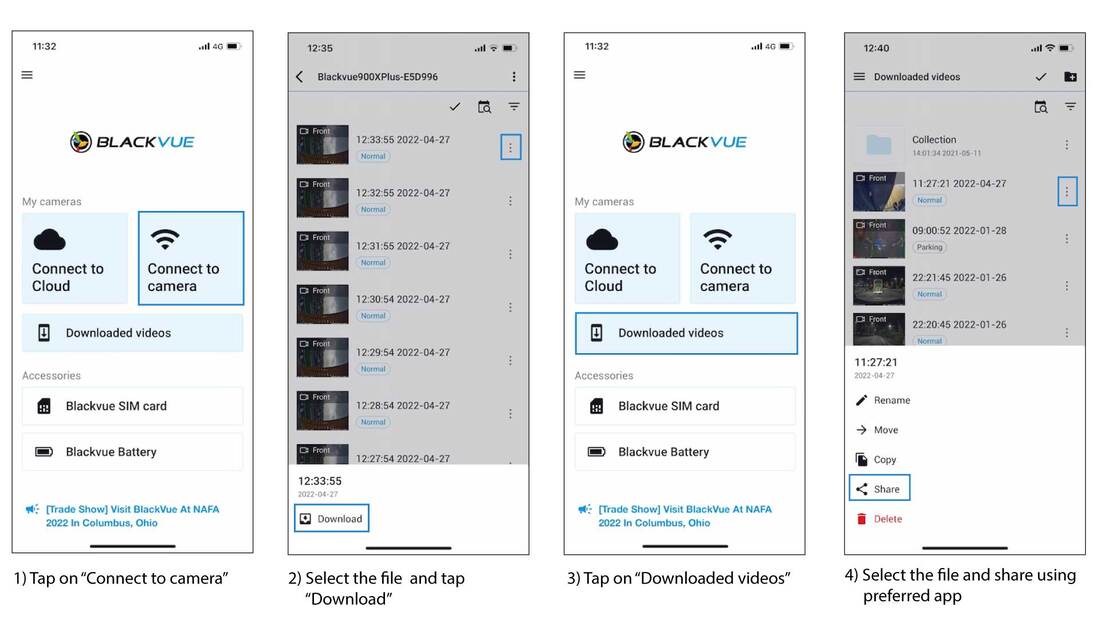
4.10 How to share the video files using BlackVue App?
Please take note that WhatsApp on Android OS is unable to compress the BlackVue video files before sending out but no problem for iOS. If you are using Android smartphones, please consider sharing the files while maintaining the original video quality (no compression) by using apps such as WeChat, Telegram or upload the files to Google Drive or One Drive and share the download link with others instead.
5. CLOUD
5.1 Do I need a Wi-Fi hotspot for Blackvue cloud dashcam? |
|
The BlackVue cloud series dashcams (DR970X/ DR770X/ DR900X/ DR750X/ DR900S/ DR750S / DR650S) can support connection to any Wi-Fi hotspot which include your smartphone, mobile router or in-car imbedded internet. If your car is parked nearby your home or office, you can make use of the accessible Wi-Fi hotspot. When your car leaves these premises, Wi-Fi connection will be unavailable. To take the best advantage of BlackVue Cloud - including the Parking Mode Push Notifications, the use of dedicated mobile router is recommended. |
5.2 Do I need a SIM Card in the car? |
|
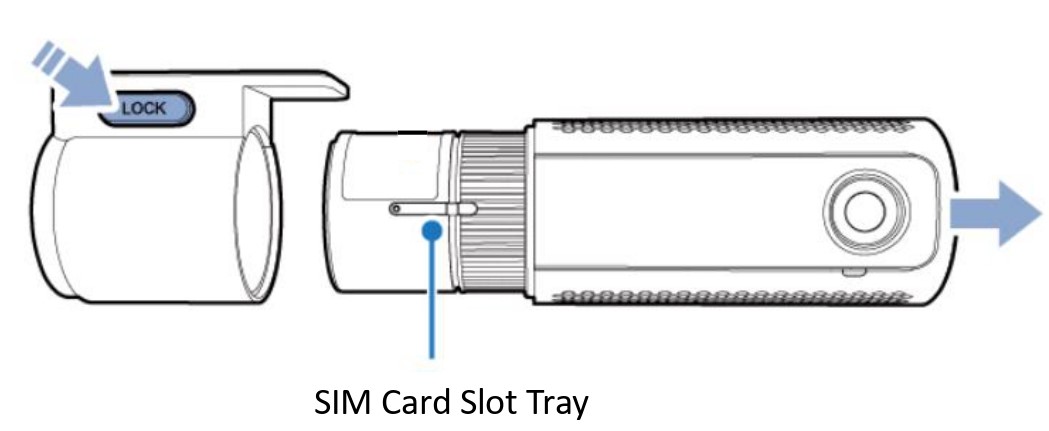
If you want to constantly monitoring your car, setting up a mobile router in the car is one of the best options and with SIM card to be inserted inside the mobile router. Exception for LTE model series which comes with built-in nano-SIM card tray enable 4G SIM card to be inserted directly to the dashcam.
|
5.3 What type of mobile router is compatible to the cloud service? |
|
We had tested many mobile routers before the launch. To have faster and stable connectivity, we recommend using 4G/ LTE mobile router and we have the Car WiFi Kit which is fully compatible. For new X series, it support easier setup by just plugging in the optional LTE connectivity module. |
5.4 How can I hardwired the mobile router to ensure hassle free operation? |
|
We are offering the Car WiFi Kit which is compatible for BlackVue over the Cloud. This kit includes the 4G/ LTE Car WiFi Dongle, Power Supply Kit and installation service. |
5.5 How to get the SIM card? |
|
Please check with your telco for the availability of the additional SIM card and subscription. You can always apply additional SIM card to share the data from your current handphone line subscription. |
5.6 How does the push notification works? |
|
User can set the type of push notifications using the BlackVue app. Options are event notification for driving or parking, overspeed notification, entering or escaping the parking mode, motion detection notifications and etc. If you set the notification for event while in parking mode, BlackVue will send the push notification immediately to your smartphone upon detecting an impact. |
5.7 How to upgrade the Cloud Plan? |
|
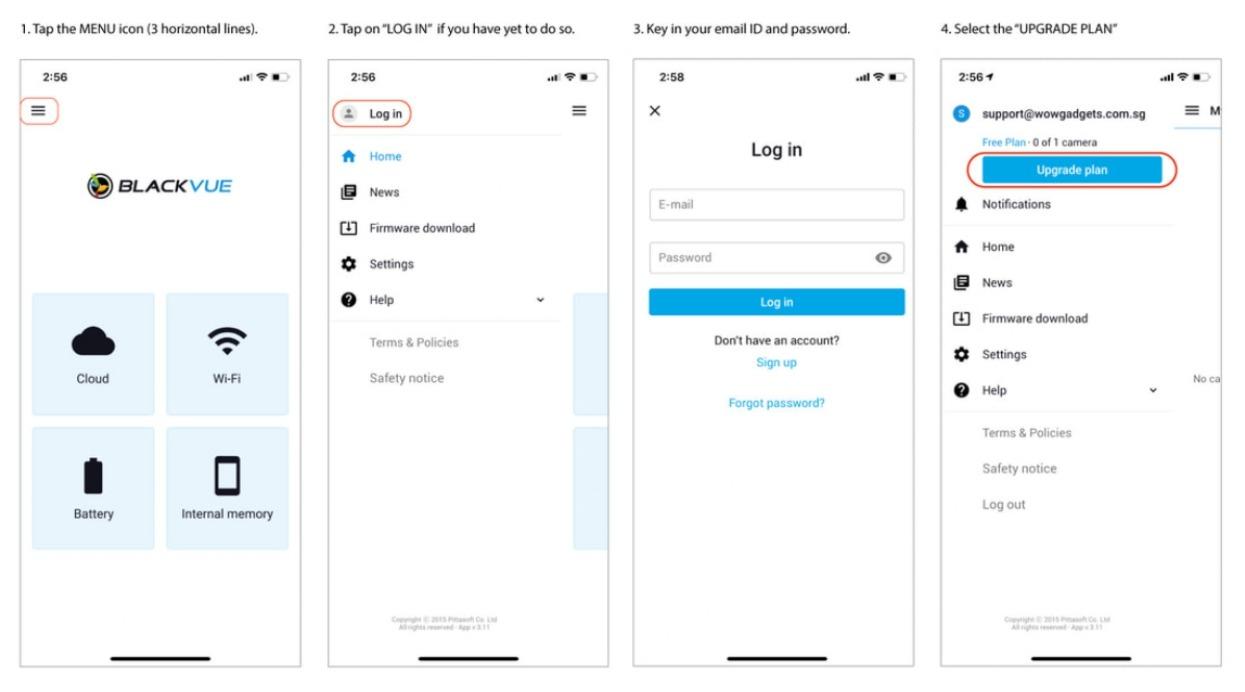
In the BlackVue app, tap the hamburger icon (3 horizontal lines) in the top-left corner, then select Upgrade Plan.
Discover the available plans here >.
|
5.8 How to determine if my BlackVue is compatible? |
|
Basically, all our cloud dashcam models which include DR750-2CH LTE, DR900Xand DR900S, DR750X Plus, DR750X and DR750S and DR650S series. Updated on 6 May 2021 |
5.9 Where to find Cloud QR code? |
|
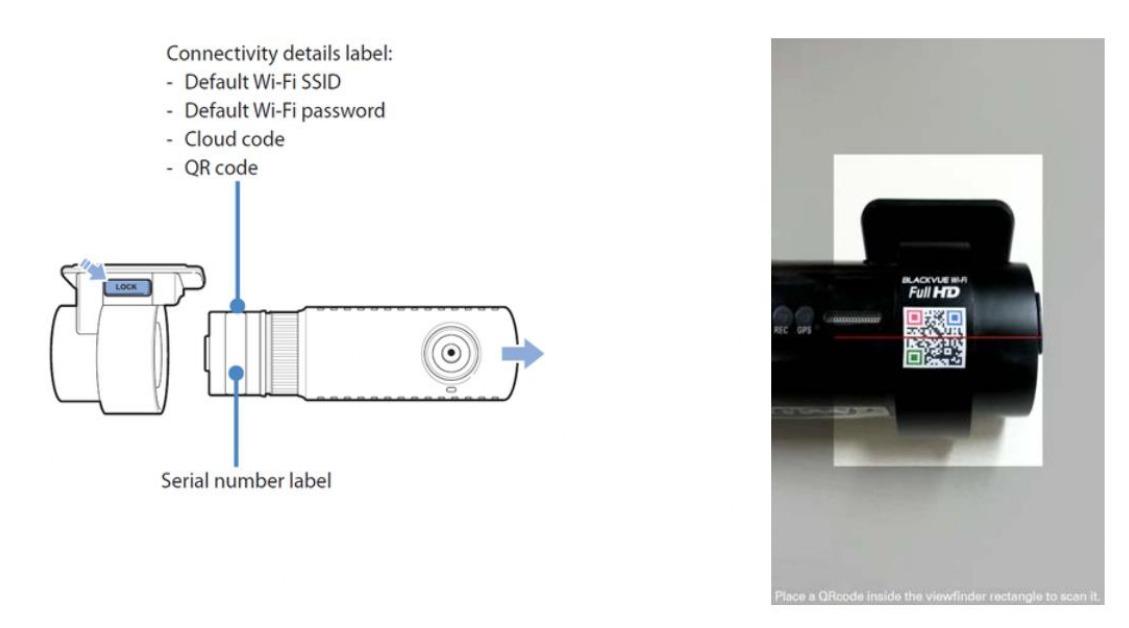
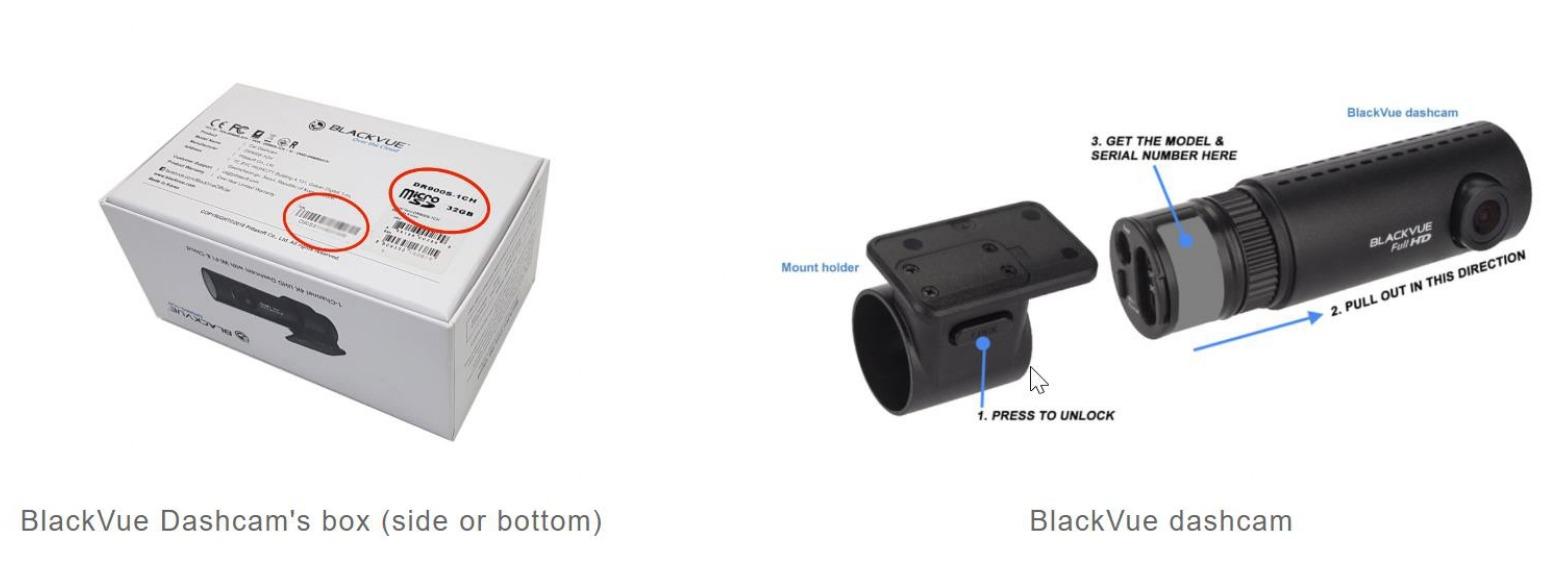
On DR900X/750X/900S/750S/DR750-2CH LTE models, the QR code to register your BlackVue to the Cloud is located on a label under the mount. To unmount your dashcam, press the "LOCK" button on the mount and pull on the dashcam while holding the mount.
If your device does not have a QR code on it, or you lost or removed your QR code sticker, you will need a Cloud security code. |
5.10 How to connect BlackVue Cloud dashcam to a hotspot? |
|
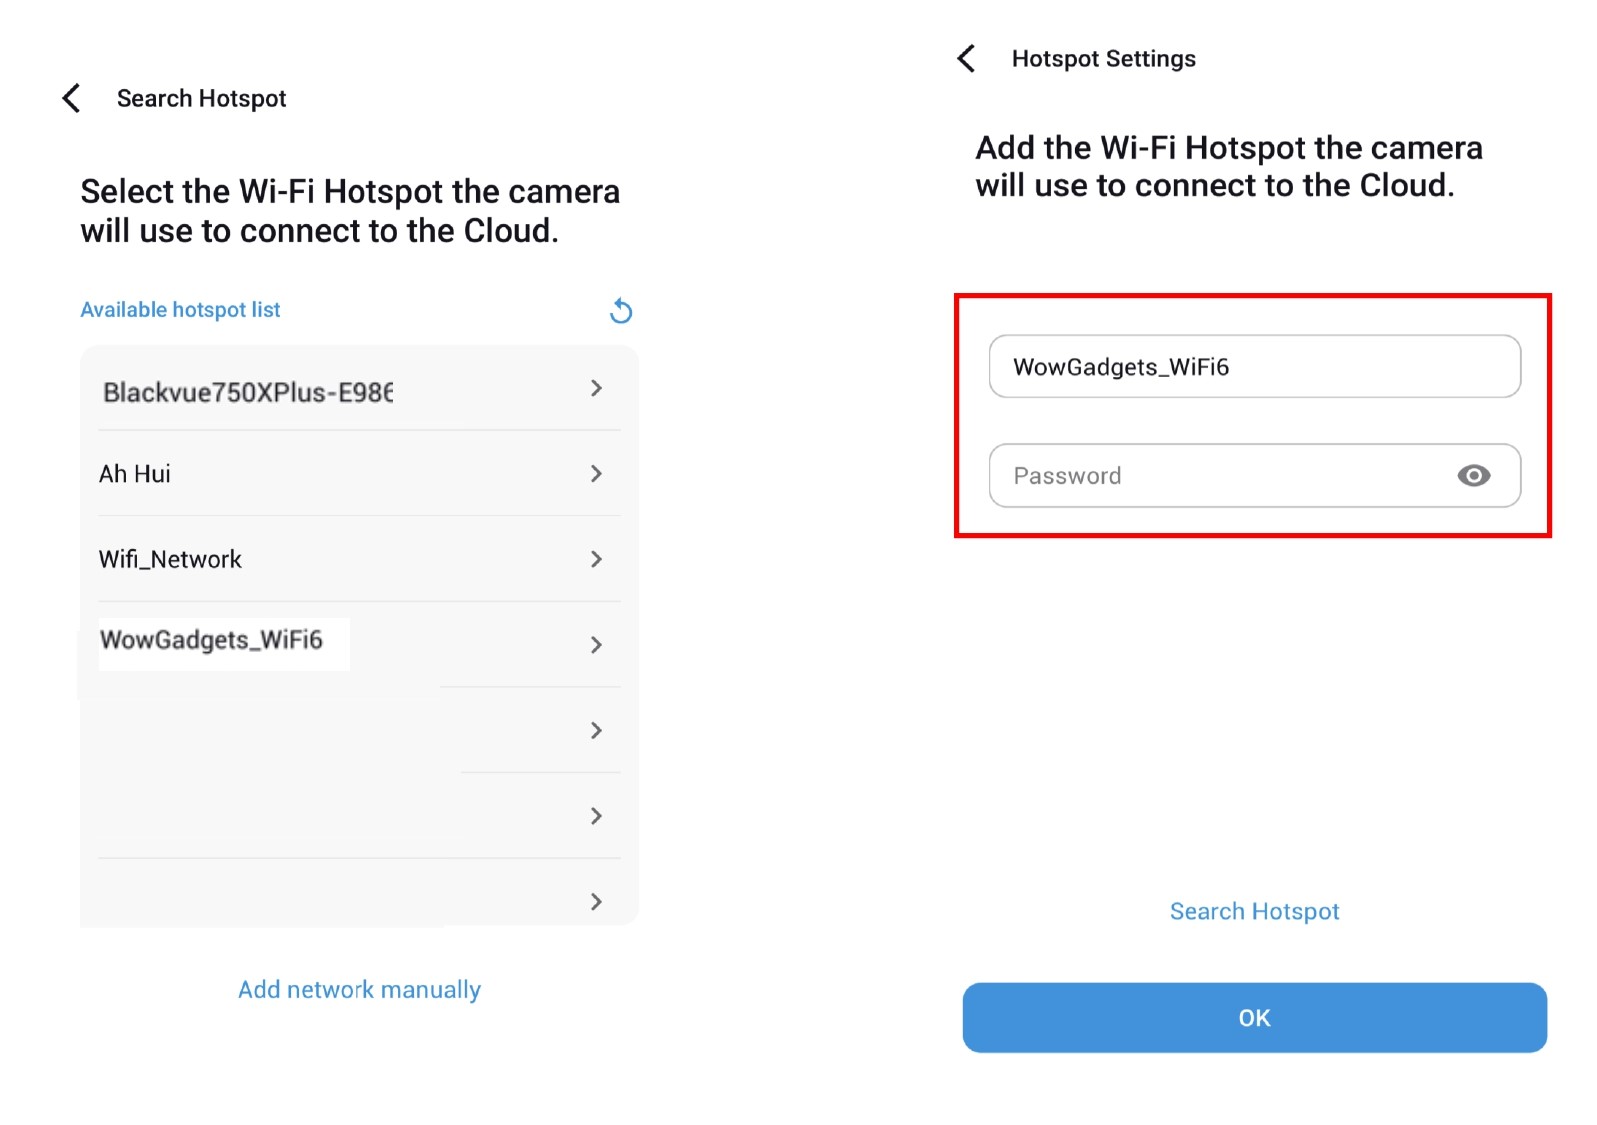
In order to enjoy BlackVue Cloud, you must set up your BlackVue to connect to a Wi-Fi hotspot/router. This hotspot can be your home Wi-Fi, a mobile Wi-Fi hotspot or your car’s embedded connection. Once you are done, you will be able to use your BlackVue Cloud account to connect to your BlackVue from anywhere, anytime. With the BlackVue App:
With the BlackVue Viewer:
|
5.11 Does all the files recorded with the dashcam to be uploaded to Cloud? |
|
The primary storage of the dashcam is the microSD card. Only selected files such as event or manually selected files is to be uploaded to the Cloud storage (settings dependant) as a secondary storage. |
5.12 Will the files copied to the Cloud storage be deleted? |
|
Files manually copied to the Cloud will be stored on the servers for up to 90 days. As for the files automatically uploaded via Event File Auto Upload, they will be kept up to 7 days. After the period stated, they will automatically be deleted from the servers. Please backup any videos you want to keep to your smartphone or computer. |
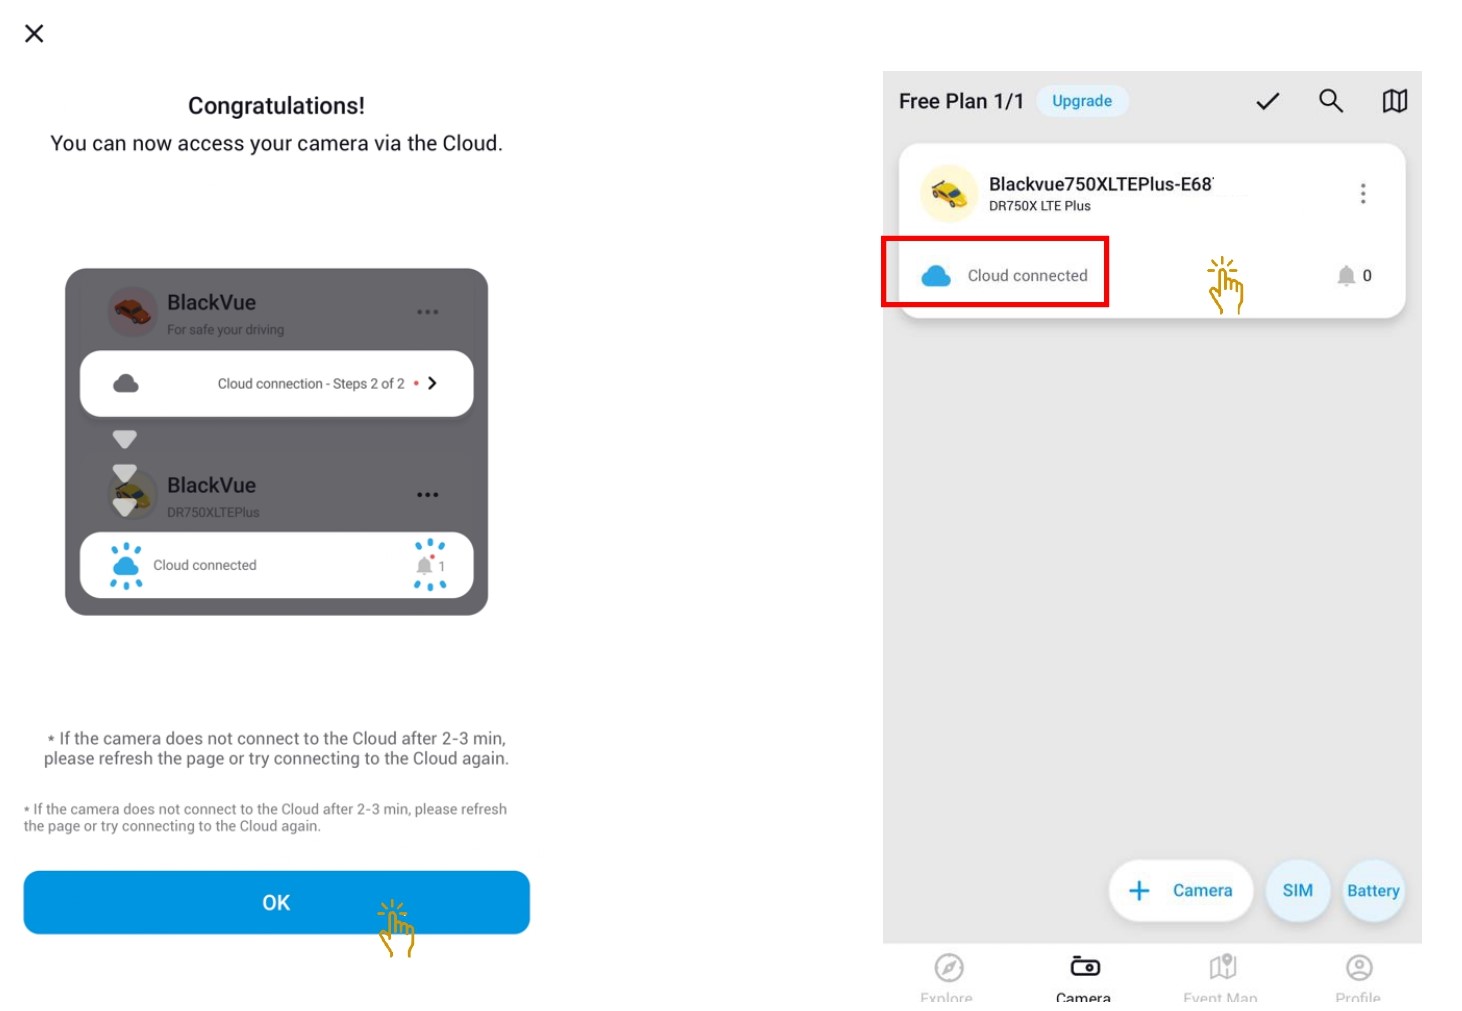
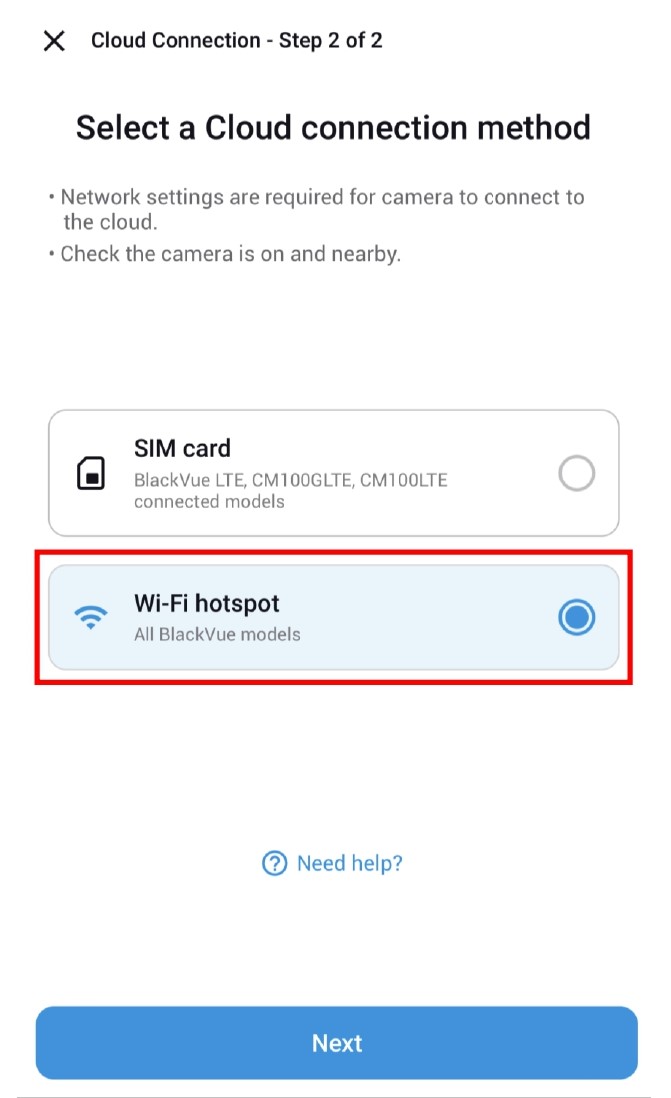
5.13 To Setup Cloud Connection |
|
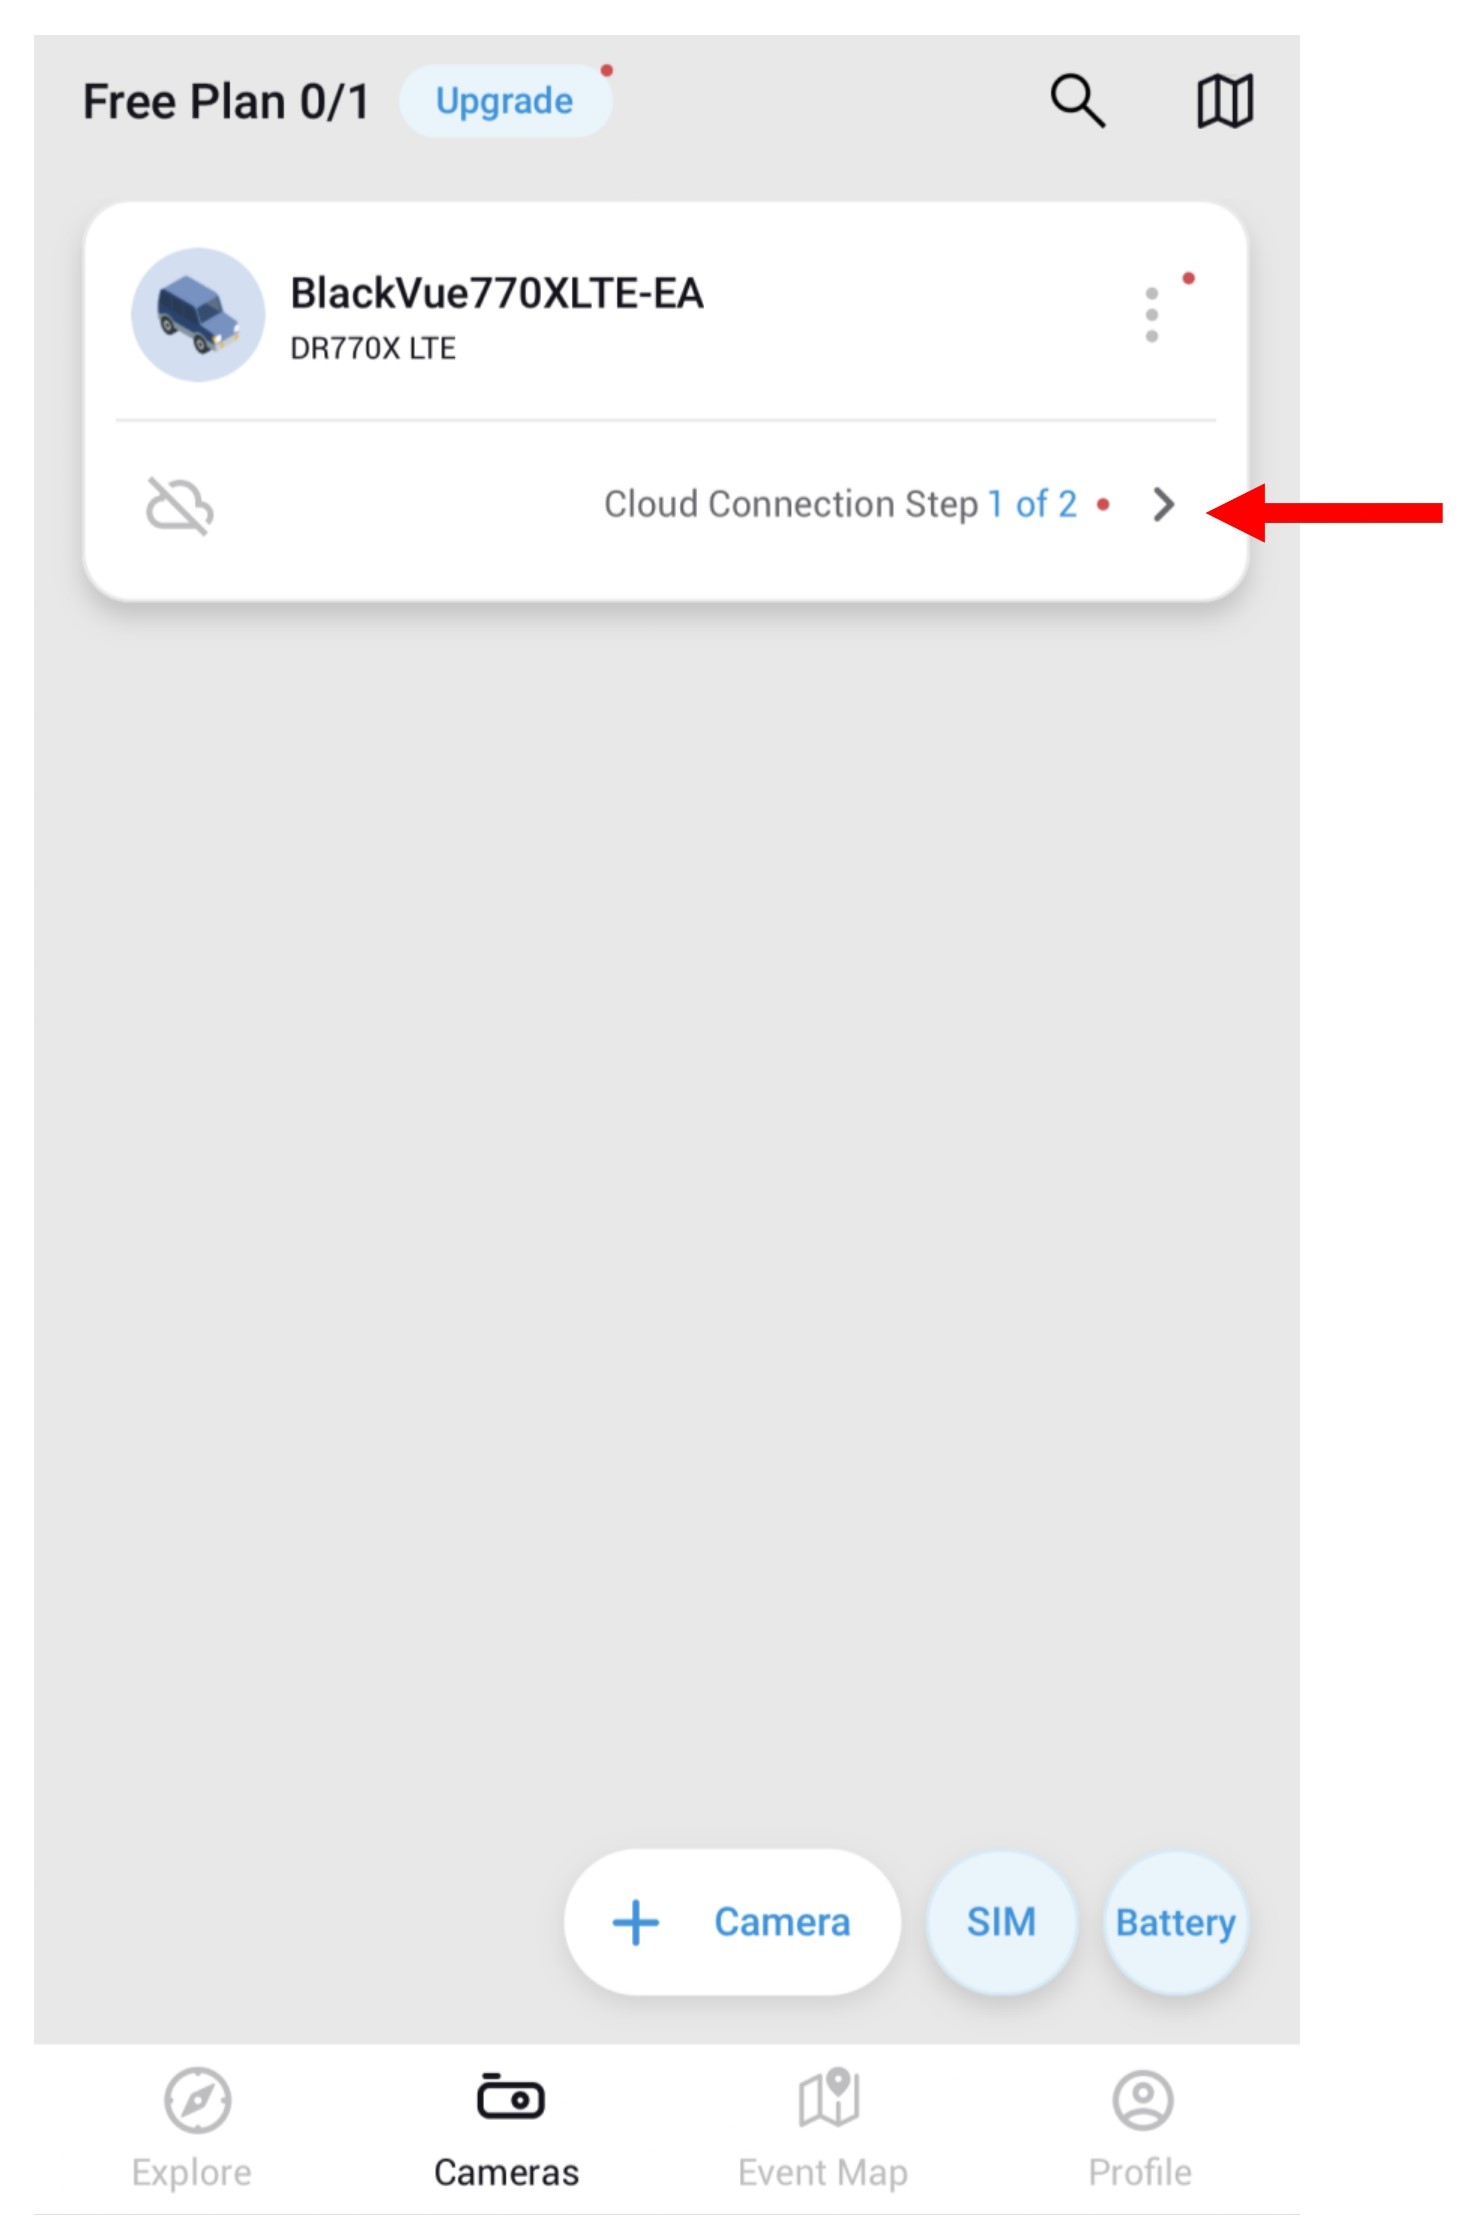
Select "Allow" or "Don't Allow" for GPS speed and location tracking. 5.13.1 SIM Card Configuration
|
6. PRODUCT WARRANTY REGISTRATION
6.1 How to register the warranty for the product? |
|
Effective from 29 July 2019, customers are encouraged to submit the online product registration within two weeks upon purchase at BlackVue Warranty Registration. |
6.2 What is the warranty period for the products? |
|
All our products comes with 1 year manufacturers warranty, exception for the default memory card which comes with 6 months period since it is a consumable item. Effective from 25th July 2019, all customers are encouraged to submit the product registration through online form here BlackVue Warranty Registration instead of warranty card submission by mail. |
6.3 Can I register the product that I purchased outside Singapore? |
|
This product registration is valid only for purchase made in Singapore. If you had purchased the product overseas, please contact your local seller or distributor instead. |
6.4 Where can I locate the information for the model and serial number of the product? |
|
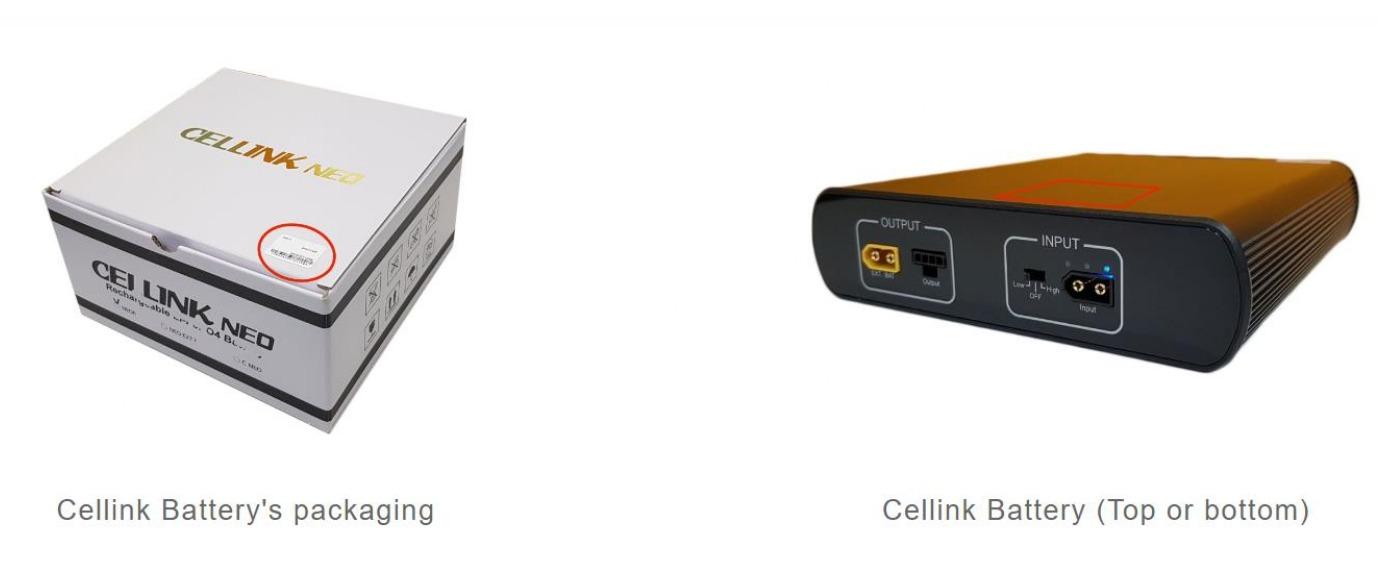
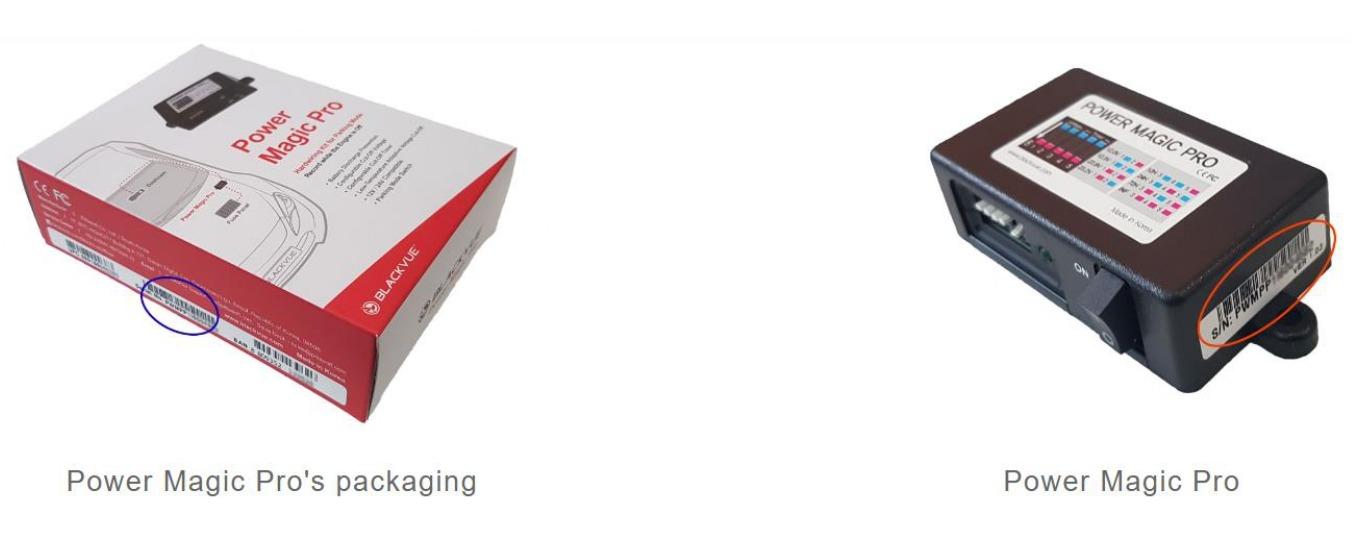
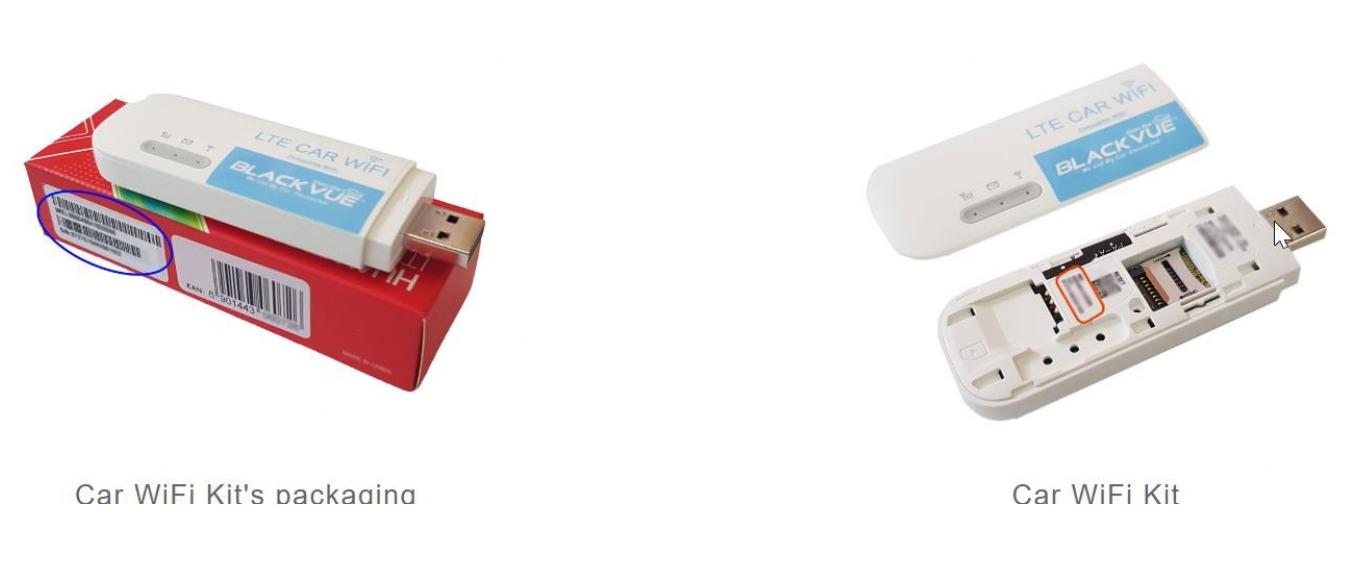
You can find these information on the labels located on the body and packaging for BlackVue dashcam, Cellink battery , Power Magic and other accessories. If you would like to retrieve just the model name for the dashcam, you can playback any recorded video and model name is watermarked on the bottom right of the video.
|
6.5 Is it critical to submit the required information correctly? |
|
Accurate information will help us to identify the product ownership. This also ensure we can contact you in the unlikely event of a safety repair or recall. |
6.6 Do I still need to keep the purchase receipt (invoice) for the warranty service? |
|
Yes, you have to show us the receipt (invoice) when you require the warranty service. |
6.7 When I need to submit the product registration? |
|
You are required to submit the product registration within two weeks of purchase. |
6.8 How do I know if my form of submission is successful? |
|
Upon submission, you will receive an email (from sales@wowgadgets.com.sg) within a few minutes with a ticket number to acknowledge your registration. |
6.9 If the unit that I purchased earlier was replaced with a new unit during the warranty, do I need to register again? |
|
No, you just need to reply us with the email that we sent you earlier about the first successful warranty registration with the updated serial number. |
7. PARKING MODE
7.1 When does the dashcam switch Parking Mode? |
|
BlackVue Parking Mode activates after the dashcam’s accelerometer (G-sensors) detects that the vehicle is stationary for five minutes. With the X Series models, you can hardwire the dashcam directly to the fuse box of your vehicle. In this case, the dashcam will switch to Parking Mode as soon as ignition is turned off and monitor the voltage to shut down at the set cutoff value. X Series models also activate Parking Mode based on the accelerometer’s status, in case you cannot hardwire the dashcam but still want to use Parking Mode. |
7.2 How does the dashcam records in Parking Mode? |
|
In Parking Mode, your BlackVue is active all the time but does not write to the memory card, unless:
*The BlackVue constantly keeps the last few seconds of video in its buffer memory so as to catch the actions that led to the trigger.
We concluded that both motion and impact detection is equally important during parking mode as not all incidents in car park will be triggered only by impact, imagine vandals who come scratching your car may mostly triggers only the motion detection. With about 5 seconds of pre-buffered recording before the impact and motion detection is a crucial evident of how the whole incident happens. Don't you think it's really too late just to wake up the dashcam to only start recording when there's an impact detected??
ADDITIONAL FEATURES FOR DR750S / DR750X AND DR900S / DR900X / DR770X / DR970X SERIES PARKING MODES: Since August 2018, BlackVue DR970X / DR770X / DR900S / DR900X Series and DR750S / DR750X Series dashcams support two different Parking Modes:
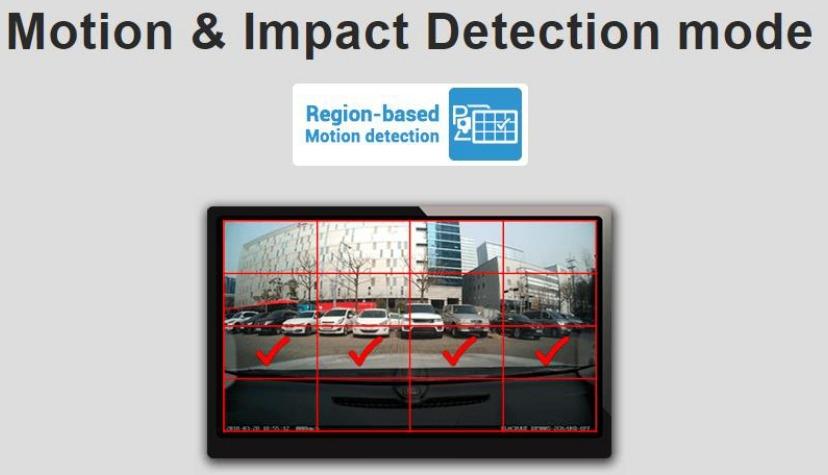
Motion & Impact Detection Parking Mode detects both: Motions recorded by the image sensor (Parking Mode files marked “P” in the file list). Impacts detected by the accelerometer/G-sensor (Event files marked “E” in the file list). With the DR970X / DR770X/ DR900S / DR900X / DR750S / DR750X Series dashcams, users have the added possibility to choose detection regions to reduce the risk of triggered too many motion recordings due to trees swaying in the wind, etc.
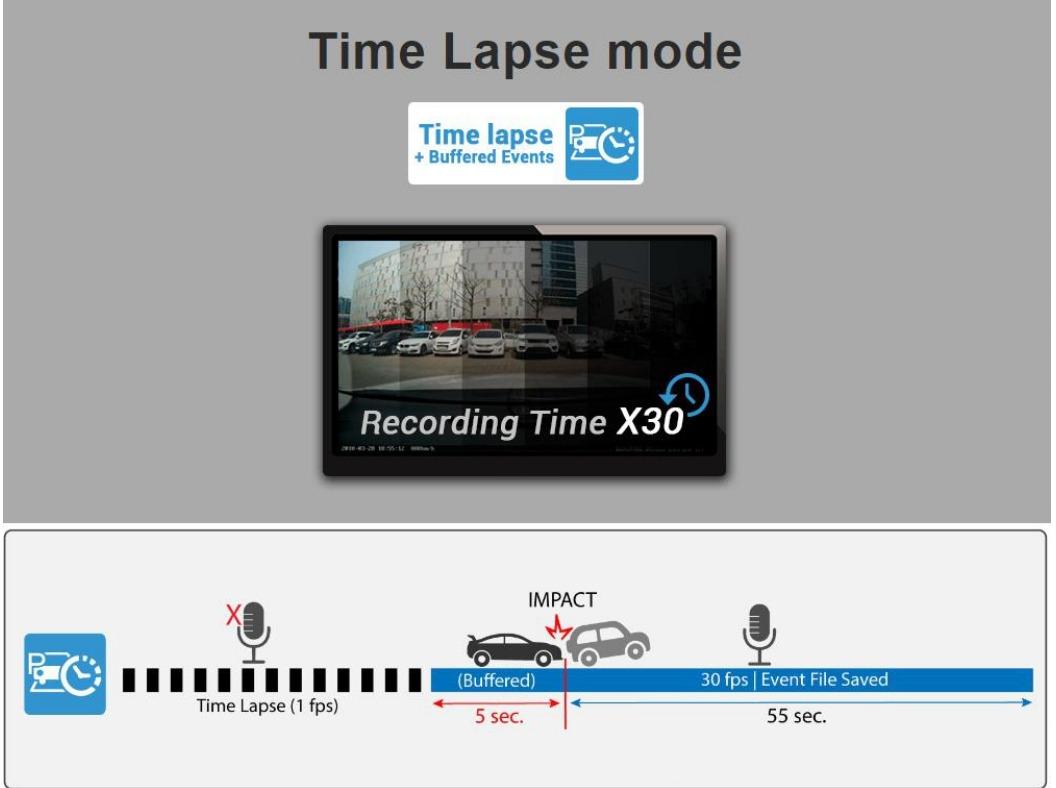
Time Lapse Parking Mode allows your dashcam to continuously record at 1FPS (one frame per second). Videos are played back at 30FPS. Each 1-minute Time lapse Parking Mode video covers a real-time period of 30 minutes (Time lapse Parking Mode files are marked “P” in the file list). This mode allows to cover a period of more than 27 hours on a 16GB microSD card for a dual-channel model at the highest (Extreme) quality setting. Additionally, when impacts are detected, the dashcam creates a buffered Event video. Information
Learn more about Region-based Motion Detection and Time Lapse mode from here >. |
7.3 What are the advantages of Parking Mode over Normal Mode? |
|
In Parking Mode, because it only records when something happens, your BlackVue minimizes the risks of overwriting important footage during long Parking Mode sessions. (With bigger file size due to higher resolution quality and video file from rear camera (if any) sharing into the same memory card, memory storage is always a concern especially for parking mode) It also reduces the stress on the microSD card, which helps extend the memory card’s lifespan. Additionally, the GPS module is turned off during Parking Mode, which reduces power consumption. |
7.4 I have dual-channel dashcam. Does Parking Mode works for both cameras? |
|
The Parking videos can be triggered by motion detected by either the front or the rear (or interior) camera. The Event videos are triggered by vibrations detected by the accelerometer located in the front camera. In either case, the dashcam will save videos recorded by both the front and rear camera |
7.5 Can i deactivate Parking Mode? |
|
Yes, Parking Mode can be deactivated in your camera’s settings. In this case, the dashcam will continue recording in Normal Mode as long as it is powered, even if the vehicle is stationary for more than five minutes. |
7.6 What do i need to enable Parking Mode? |
|
By default, BlackVue dashcams come with a male cigar lighter power adapter to plug in your vehicle’s cigar socket.
|
7.7 Which mode should you choose? Motion-Impact Detection or Time Lapse? |
|
It is up to you of course, but here are a few things to consider:
|
7.8 What capacity of memory card is most suitable if i have Parking Mode? |
|
Since August 2019, all our dashcam comes with default 32GB microSD card and support up to maximum of 256GB capacity. |
7.9 How to reduce power consumption while in Parking Mode? |
|
If you normally park your car reversed-in, you may want to consider switching off the rear camera automatically when in parking mode. You just need change the settings once, go to Settings > Firmware Settings > Basic > Recording > Rear camera recording in parking mode > OFF With the setting to OFF, the dashcam will automatically switch off the rear camera about 5 minutes after it had switched to parking mode. The rear dashcam will be automatically switch back to on when you drive off. This will save about 30% of power consumption , which means if you are using a Cellink power pack, it could power the dashcam for a longer duration before it depletes. If your dashcam uses Power Magic Pro or hardwiring kit which taps car battery power for parking mode, this setting will also help to prolong the period of recording before it reaches the voltage threshold due to lower power consumption. Since the rear camera is off and not recording, this also save about 30% of memory space of the microSD card too. This feature is available in DR970X series, DR770X series, DR900S series, DR900X series, DR750S series, DR750X series, DR750X PLUS series, DR750-2CH LTE and DR590X-2CH. |
